

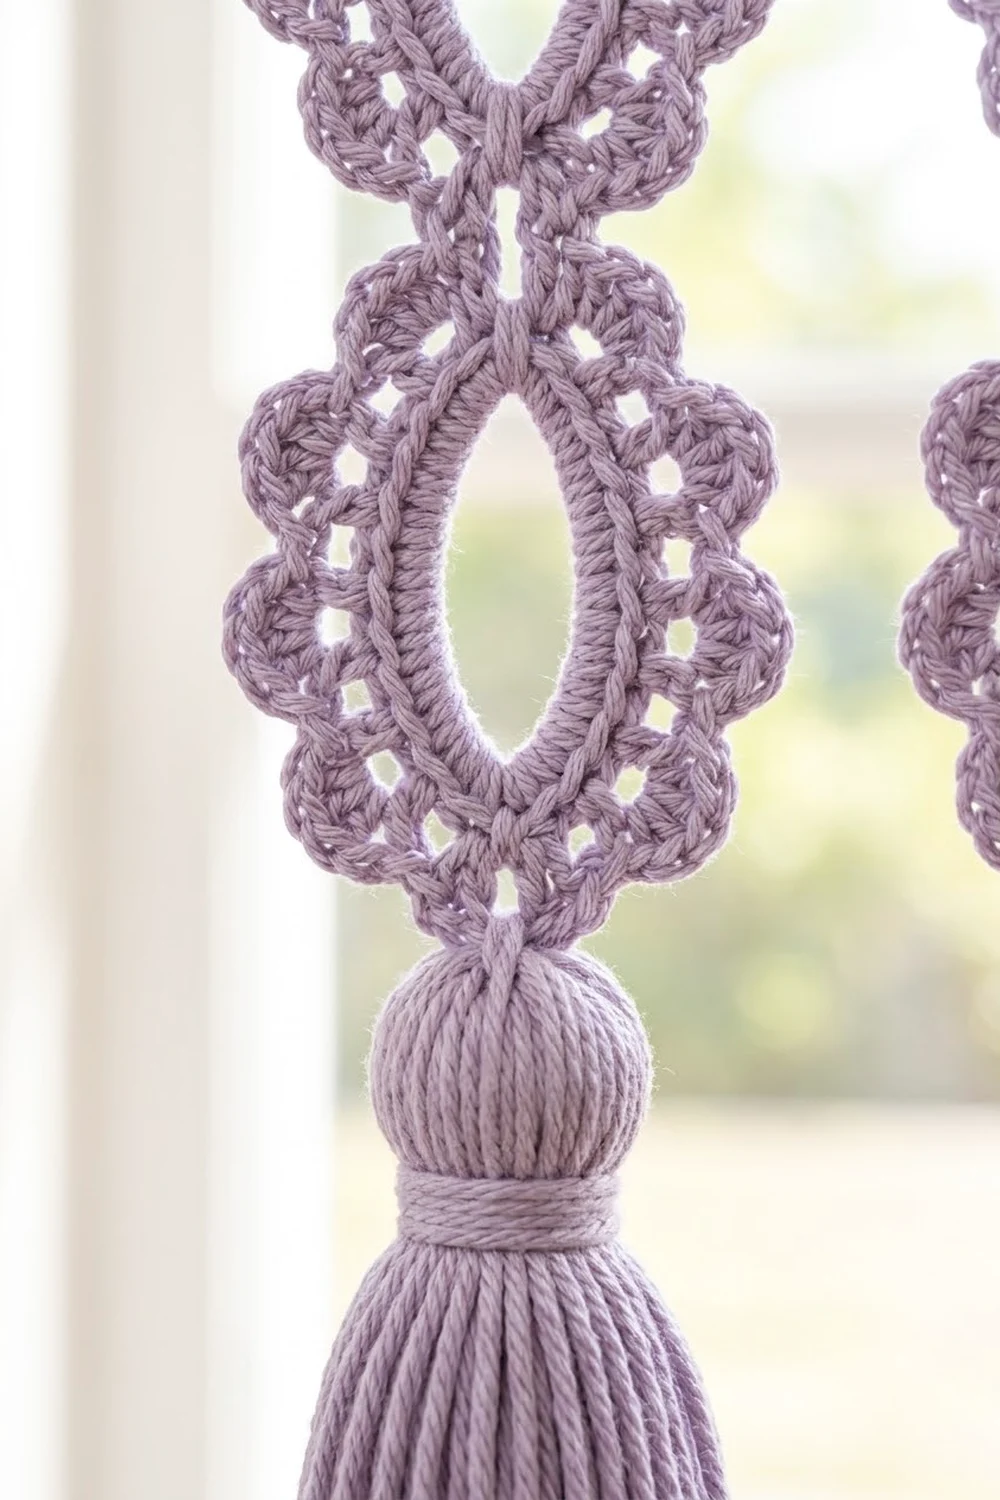
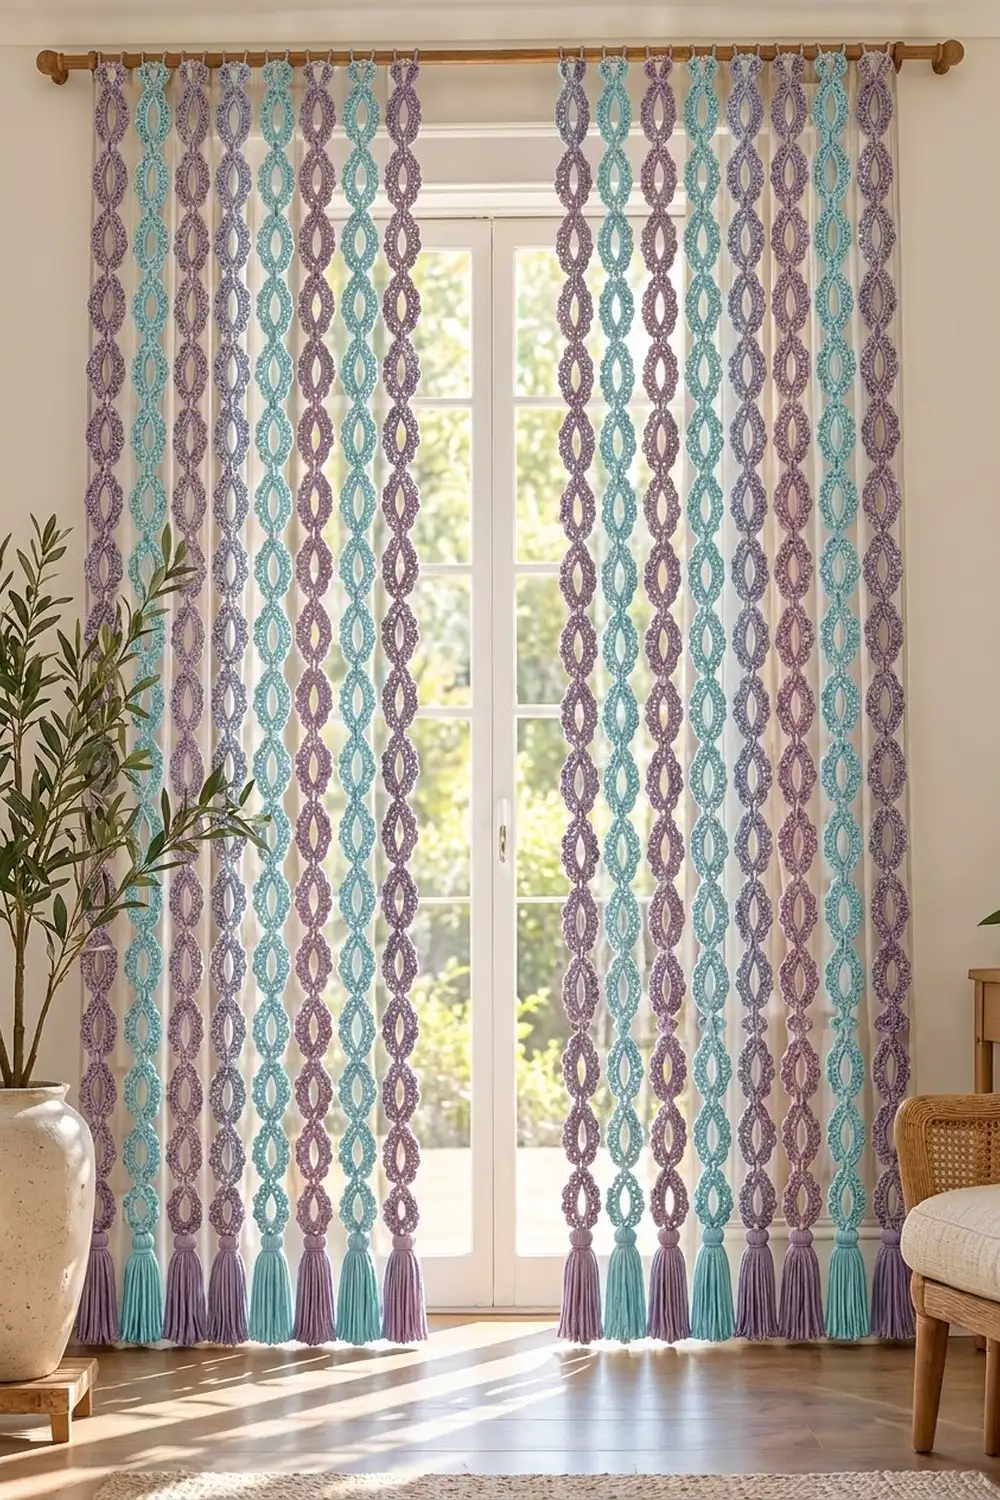
The Lilac Lagoon curtain is a light, airy doorway or window curtain made from long lace strands. Each strand is a column of pointed, eye-shaped motifs edged with picot shells and finished with a full tassel. The strands alternate lavender and aqua, so you get soft vertical stripes that let light through without blocking the view.
The pattern uses US crochet terms throughout. Each finished strand is 3.25 in (8.3 cm) wide and 68 in (172.7 cm) long before the tassel. With the hanging loop and tassel added, the total drop is about 75.5 in (191.8 cm). The curtain has two panels of 8 strands each. Each panel is about 29.5 in (74.9 cm) wide when the strands hang with small gaps between them.
Construction is simple and repetitive. First, crochet each motif core in two rounds on a chain ring. Next, sew 18 cores tip to tip into a column. Then work one continuous scallop border down one side of the column, around the bottom tip, and back up the other side. That one border round also forms the hanging loop and the tassel loop. Finally, add the tassels, block the strands, and hang them.
Because the border is worked over the whole strand at once, every motif ends up with matching scallops. The waists between motifs come out as neat, even pinch points.
Finished Size and Construction
- Finished size (one strand): 3.25 in (8.3 cm) wide × 68 in (172.7 cm) long, plus a 6 in (15.2 cm) tassel
- Total drop: about 75.5 in (191.8 cm) from the rod to the end of the tassel
- Skill level: Intermediate
- Terminology: US crochet terms
- Yarn weight: DK / light worsted (#3) cotton
- Hook: 4.0 mm (US G-6)
- Number of pieces: 288 motif cores (16 strands × 18 cores) and 16 tassels
- Layout: 2 panels × 8 strands, alternating lavender and aqua
- Piece size (core after Round 2): 3.75 in (9.5 cm) long × 2.25 in (5.7 cm) wide
- Strand size before border: 67.5 in (171.5 cm) × 2.25 in (5.7 cm)
- Border depth: 0.5 in (1.3 cm) on each long side
Materials
Use a smooth, mercerized or combed cotton in DK weight. Cotton holds the picots crisply and hangs straight without stretching much. Avoid acrylic: over a 68 in (172.7 cm) strand it tends to stretch and twist.
- Lavender: 400 g / about 960 m (8 balls of 50 g / 120 m)
- Aqua: 400 g / about 960 m (8 balls of 50 g / 120 m)
Each strand uses about 106 m: about 90 m for the motifs and border, and about 14 m for the tassel. Each color makes 8 strands. The quantities above include a margin of about 13% for swatching, tails, and tension differences.
Tools:
– 4.0 mm (US G-6) crochet hook
– Tapestry needle
– 2 locking stitch markers
– Stiff card 6.5 in (16.5 cm) tall, for winding tassels
– Sharp scissors
– Blocking mats, rustproof pins, and a spray bottle
– Measuring tape
– Curtain rod no thicker than 1 in (2.5 cm)
Abbreviations (US Terms)
- ch – chain
- sl st – slip stitch
- sc – single crochet
- hdc – half double crochet
- dc – double crochet
- sk – skip
- sc2tog – single crochet 2 together
- st(s) – stitch(es)
- rnd – round
Special stitch: Shell. Work (2 dc, ch 3, sl st in the 3rd ch from the hook, 2 dc) all in the same stitch. Each shell has 4 dc and 1 picot.
Junction sc2tog: Insert the hook in the last side stitch of one motif, yarn over, and pull up a loop. Skip the two joined tips, insert the hook in the first side stitch of the next motif, yarn over, and pull up a loop. Yarn over and draw through all 3 loops.
Gauge and Checkpoints
Gauge: 22 sc and 24 rows = 4 in (10.2 cm) in sc. In dc, 10 rows = 4 in (10.2 cm).
Make one complete motif core first and measure it against these checkpoints:
- After Rnd 1: 3.25 in (8.3 cm) long × 1.5 in (3.8 cm) wide, laid flat as an eye shape
- After Rnd 2: 3.75 in (9.5 cm) long × 2.25 in (5.7 cm) wide
Length is the measurement that matters most, because every motif adds to the strand. An error of 0.25 in (0.6 cm) per core adds up to 4.5 in (11.4 cm) over 18 cores.
- Core too big: go down 0.5 mm in hook size.
- Core too small: go up 0.5 mm.
- Correct size but cupping: loosen your dc slightly rather than changing hooks.
Motif Core (make 288)
Make 144 cores in lavender and 144 in aqua.
Foundation: Ch 36. Sl st into the first ch to form a ring, taking care not to twist the chain. Lay the ring flat as a long oval with 18 ch on each side.
Rnd 1: Ch 1 (does not count as a stitch). Sc in the same ch as the join and in each ch around. Join with a sl st to the first sc. (36 sc: 36 worked 1 per chain + 0 added)
Mark the stitches before you start Rnd 2:
– St 1 is the top tip.
– St 19 is the bottom tip.
– Sts 2–18 form Side A (17 sts).
– Sts 20–36 form Side B (17 sts).
Place a marker in st 19.
Rnd 2 (growth round): Ch 1. Sc in st 1 (top tip).
Side A: hdc in next st, dc in next 4 sts, (2 dc in next st, dc in next st) 3 times, 2 dc in next st, dc in next 4 sts, hdc in next st. This uses 17 sts and makes 21.
Sc in the marked st 19 (bottom tip).
Side B: repeat the Side A sequence.
Join with a sl st to the first sc. Rnd 2 total: 44 sts (1 tip sc + 21 side sts + 1 tip sc + 21 side sts).
The 4 increases on each side sit at the center positions, so each side bulges evenly and the single-sc tips stay pointed. That is what gives the eye shape.
Fasten off and leave a 10 in (25.4 cm) tail. The tail comes out at the top tip and will be used for joining. Lay the core flat and check it against the Rnd 2 checkpoint.
Make All Pieces
Totals:
– Lavender: 144 cores (8 strands × 18) and 8 tassels
– Aqua: 144 cores (8 strands × 18) and 8 tassels
Store the cores in bundles of 18 so that each bundle is one strand.
Layout (L = lavender strand, A = aqua strand; each letter is a column of 18 motifs):
ROD ===================================================
Panel 1:  L  A  L  A  L  A  L  A      (gap for door)
Panel 2:  L  A  L  A  L  A  L  A
          |  |  |  |  |  |  |  |
       18 motifs per strand, tassel at each base
Joining
Each strand is joined tip to tip, with nothing added between motifs.
- Lay 18 cores of one color in a vertical column on a flat surface. Each core’s tail should be at its top tip.
- Take the top tip sc of core 2 and butt it against the bottom tip sc of core 1.
- Thread core 2’s tail onto the needle. Whipstitch the two tip stitches together through both loops, making 3 passes.
- Wrap the tail horizontally around the joined tips 4 times to form a small bound knot. This creates the neat waist connector between motifs.
- Pass the needle under the wraps, then weave the tail into Rnd 1 of core 2.
- Repeat down the column until all 18 cores are joined. Weave in the top tail of core 1.
Stitch-to-stitch logic: Only one tip stitch is joined to one tip stitch. None of the 21 side stitches on either side of a core are touched. Because of that, each long side of the strand still has exactly 18 × 21 = 378 side stitches for the border.
Tension: Pull the whipstitches snug, but not so tight that the tips curl. If the tips gather, the strand will twist when it hangs.
Checkpoint: The joined strand should lie flat at 67.5 in (171.5 cm) × 2.25 in (5.7 cm). That is 18 × 3.75 in (9.5 cm).
Border
Border gauge: One repeat of (sk 1, shell, sk 1, sc) uses 4 stitches and is about 0.75 in (1.9 cm) long along the edge. Each shell stands 0.5 in (1.3 cm) tall.
Work the border in the same color as the strand, as one continuous round.
Top tip and hanging loop: Join yarn with a sc in the top tip st of core 1. Ch 20, then sc in the same tip st. The ch-20 loop is about 3.5 in (8.9 cm) around.
Side 1, working down the strand:
Core 1: Sc in the first side st. [Sk 1, shell in next st, sk 1, sc in next st] 4 times. Sk 1, shell in next st, sk 1. Junction sc2tog over the last side st of core 1 and the first side st of core 2.
Cores 2 to 17: [Sk 1, shell in next st, sk 1, sc in next st] 4 times. Sk 1, shell in next st, sk 1. Junction sc2tog into the next core.
Core 18: [Sk 1, shell in next st, sk 1, sc in next st] 5 times. The last sc lands in side st 21.
Bottom tip and tassel loop: Work (sc, ch 3, sc) in the bottom tip st of core 18.
Side 2, working up the strand: Work Side 1 again, from core 18 back up to core 1.
Join with a sl st to the first sc. Fasten off and weave in the ends.
Counts for each long side:
– 90 shells (18 × 5)
– 91 sc-type stitches: 74 sc plus 17 junction sc2tog
Counts at the tips:
– Top: 2 sc plus the ch-20 loop
– Bottom: 2 sc plus the ch-3 loop
Why the math works: Each core side has 21 stitches, which is 1 + (4 × 5). That is exactly one starting sc plus five 4-stitch shell repeats.
Along one long side:
– The shells use 90 × 3 = 270 stitches (skip, shell, skip).
– The 74 sc use 74 stitches.
– The 17 sc2tog use 34 stitches.
– 270 + 74 + 34 = 378, which is exactly 18 × 21.
No stitches are added or lost at the seams. The sc2tog at each junction pulls the two cores toward each other, so the scallops stay continuous and each waist stays narrow.
Checkpoint: The bordered strand measures 68 in (172.7 cm) × 3.25 in (8.3 cm). That is 2.25 in (5.7 cm) for the core plus 0.5 in (1.3 cm) of border on each side.
Tassels (make 16)
- Wind yarn 40 times around the 6.5 in (16.5 cm) card.
- Thread a 12 in (30.5 cm) strand under the wraps at one edge. Pass it through the ch-3 tassel loop at the bottom of the strand and tie it tightly.
- Cut the wraps at the opposite edge.
- Wrap a separate 20 in (50.8 cm) strand 8 times around the tassel, 1 in (2.5 cm) below the top, to form the rounded head. Knot it and bury the ends inside the tassel.
- Trim the skirt to an even 6 in (15.2 cm).
Final Blocking
- Mist each strand with water until it is damp but not dripping.
- Pin the strand in sections of 6 motifs on the blocking mats.
- Pin the width to 3.25 in (8.3 cm) at the widest point of each motif.
- Pin each picot outward so it opens.
- Check that each motif measures 3.75 in (9.5 cm) from waist to waist.
- Let it dry completely, then move the pins on to the next section.
- Steam the tassels lightly and smooth the skirts with your fingers.
- Slide the hanging loops onto the rod, alternating colors as shown in the layout. Leave 0.5 in (1.3 cm) between strands.
Final Quality-Control Checklist
- Every core has 44 stitches in Rnd 2, with 21 on each side.
- Each strand has 18 cores, all joined at the tips with bound waists.
- Each long side has 90 shells, and every picot is open.
- Each strand is 3.25 in (8.3 cm) wide and 68 in (172.7 cm) long.
- The tassels are 6 in (15.2 cm) long, with heads 1 in (2.5 cm) deep.
- All the hanging loops fit over the rod, and the colors alternate correctly.
- All ends are woven in securely.
Troubleshooting
- Motif tips are rounded, not pointed: You worked extra stitches at the tip. Use exactly 1 sc in each tip in Rnd 2.
- Core cups or waves: Your dc tension is too tight or too loose compared with the sc. Keep the dc relaxed, or check that each side has exactly 4 increases.
- Strand twists when hung: The whipstitches or waist wraps are uneven. Rewrap the waists evenly and re-block.
- Scallops are crowded at the waists: You skipped the junction sc2tog or used the wrong stitches for it. Recount: each side should have 378 stitches.
- Strand is too long: Remove a core. Each core changes the length by 3.75 in (9.5 cm).
- Picots disappear: Pin each picot open during blocking.
Care
Hand wash in cool water with mild soap. Press out the water in a towel and dry flat, re-pinning if needed. Do not hang the strands to dry while wet, because the weight will stretch them.
Final Notes
The measurements build on each other in a single chain:
– 22 sc = 4 in (10.2 cm) gives a 3.75 in × 2.25 in (9.5 cm × 5.7 cm) core.
– 18 cores make a 67.5 in (171.5 cm) strand.
– The border brings each strand to 68 in × 3.25 in (172.7 cm × 8.3 cm).
– The hanging loop and the 6 in (15.2 cm) tassel give a total drop of about 75.5 in (191.8 cm).
If you match the first checkpoint, everything after it will fall into place.
Happy crocheting!