

This bow ornament looks like glossy holiday ribbon. Two open-mesh loops sit on either side of a striped center band, and two flared tails hang below. Each tail ends in a sharp dovetail notch. Every loop and tail has a twisted gold edge that catches the tree lights.
The colors are simple: bright Christmas red for the body and metallic gold for the edging, the outlines around the openings, the band stripes and the hanging loop. The style is classic and a little formal, and it suits a traditional red-and-gold tree.
This pattern uses US crochet terms. The finished bow measures about 5.5 in (14.0 cm) wide and 5.5 in (14.0 cm) tall, plus a gold hanging loop on top.
The bow is one ornament made from five small parts:
– two identical loops, worked in the round around a chain ring
– two identical tails, worked in rows from the top down
– one striped center band
You edge the loops and tails in gold, gather each loop at its inner side, stack the parts and wrap the band around the middle.
Finished Size and Construction
- Finished size: about 5.5 in x 5.5 in (14.0 cm x 14.0 cm)
- Skill level: Intermediate
- Terminology: US terms
- Yarn weight: Sport (2), red plus metallic gold
- Hook: 3.0 mm (C/2–D/3)
- Number of pieces: 1 bow made from 5 parts (2 loops, 2 tails, 1 band)
- Layout: loops on the left and right, tails angled down and out below, band at the center
- Loop size: 3.0 in (7.6 cm) across with the border; 2.6 in (6.6 cm) before the border
- Tail size: 2.7 in x 3.7 in (6.9 cm x 9.4 cm) with the border; 2.3 in x 3.3 in (5.8 cm x 8.4 cm) before the border
- Band size: 2.5 in x 0.8 in (6.4 cm x 2.0 cm)
- Border depth: 0.2 in (0.5 cm), 2 rounds in gold
Materials
For the red, choose a smooth, tightly plied sport weight yarn. Mercerized cotton or a cotton blend with a slight sheen gives crisp, ribbon-like stitches. For the gold, use a sport weight metallic yarn. You can also hold a fine metallic thread together with a thin gold yarn to reach sport weight.
- Red (main color): 15 g, about 45 m
- Gold (metallic): 8 g, about 24 m
- 3.0 mm (C/2–D/3) crochet hook
- Tapestry needle
- Scissors
- Stitch markers
- Rustproof pins and a foam blocking board
- Spray bottle with water
- Optional: fabric stiffener
The quantities include a margin of about 20% for gauge differences and swatching.
Abbreviations (US Terms)
- ch – chain
- sl st – slip stitch
- sc – single crochet
- dc – double crochet
- sc2tog – single crochet 2 together
- sc3tog – single crochet 3 together
- sp – space
- st(s) – stitch(es)
- rev sc – reverse single crochet
- RS – right side
Special stitch: reverse single crochet (rev sc, also called crab stitch). Work from left to right if you are right-handed. Insert the hook into the next stitch to the right, yarn over and pull up a loop. Yarn over again and pull through both loops. This stitch makes the twisted, corded gold edge.
Gauge and Checkpoints
Gauge: 24 sc and 24 sc rows = 4 in (10.2 cm) in red with a 3.0 mm hook. One dc row measures about 0.33 in (0.8 cm).
Make one loop and one tail first. They are small and tell you more than a flat swatch.
Loop checkpoints (measured flat, across):
– After Round 1: 1.5 in (3.8 cm)
– After Round 2: 2.25 in (5.7 cm)
– After Round 3: 2.6 in (6.6 cm)
– After the border: 3.0 in (7.6 cm)
Tail checkpoints:
– After Row 1: about 1.7 in (4.3 cm) wide
– After Row 11: about 2.3 in (5.8 cm) wide and 2.7 in (6.9 cm) long
– After Row 15: about 3.3 in (8.4 cm) long to the tips of the points
– After the border: 2.7 in x 3.7 in (6.9 cm x 9.4 cm)
If your pieces are too big, go down to a 2.75 mm hook. If they are too small, go up to a 3.25 mm hook.
If the loop ruffles, your dc are tall compared to your sc. Try a smaller hook for Round 2 only. If the loop cups, loosen your tension on Round 3.
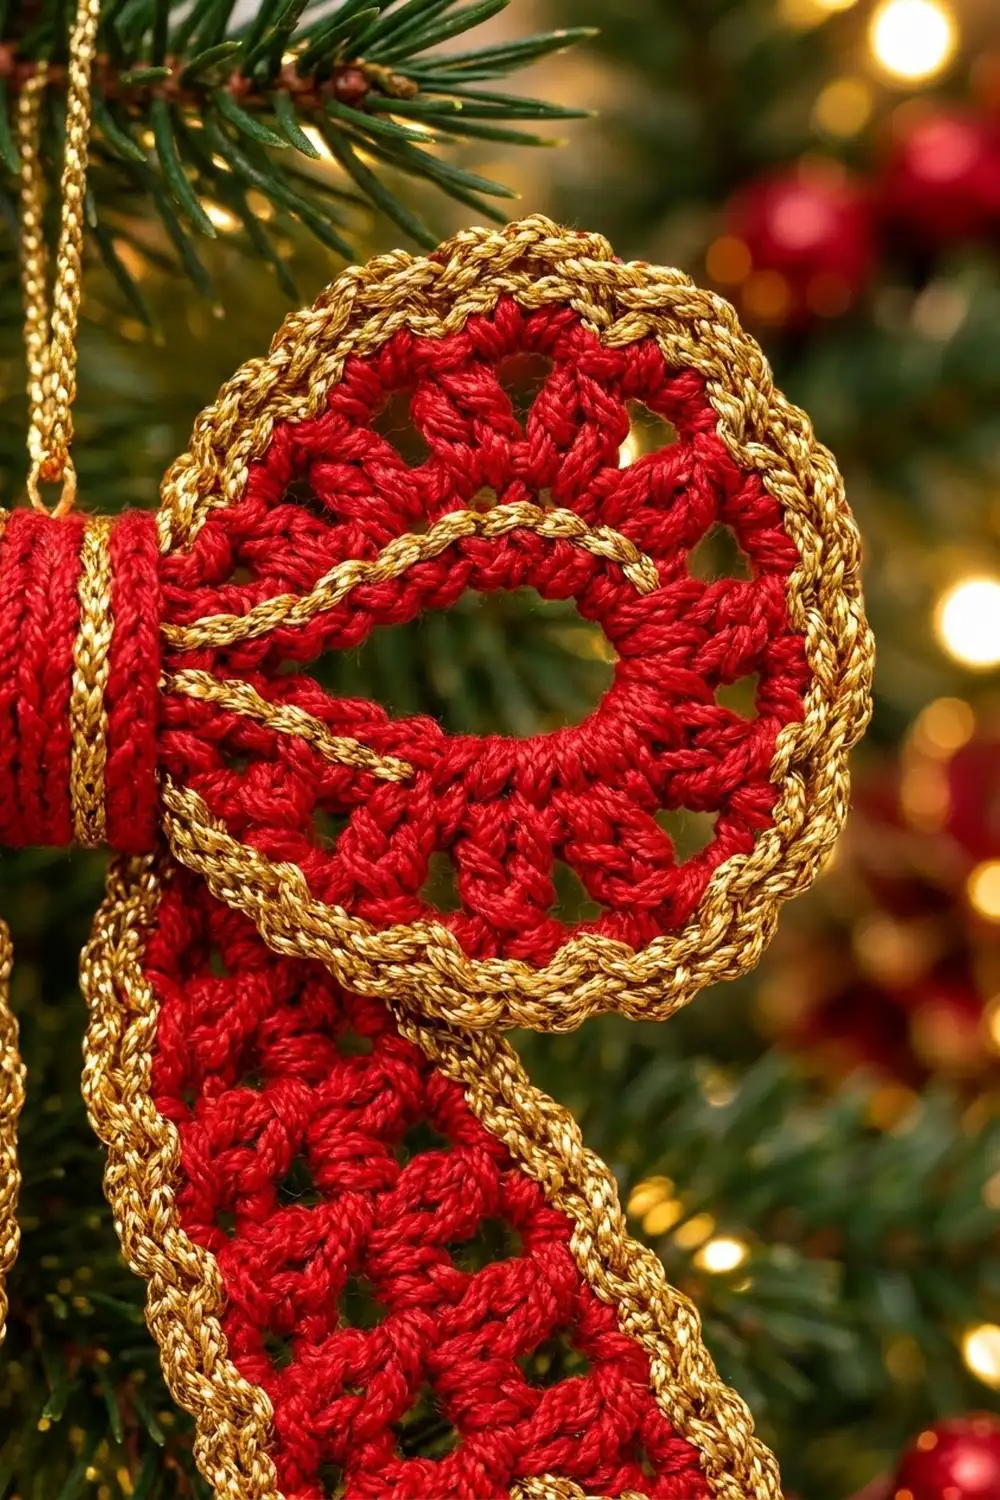
Loops (make 2)
With red, ch 16 and sl st to the first ch to form a ring. This ring becomes the oval opening.
Round 1: Ch 3 (counts as dc), work 29 dc into the ring, sl st to the top of the beginning ch-3. (30 dc)
Spread the stitches evenly around the ring so the center stays open.
Round 2 (mesh): Ch 5 (counts as dc + ch-2), skip the next dc, dc in the next dc, ch 2, skip the next dc. Repeat from * 14 more times, then sl st to the 3rd ch of the beginning ch-5. (15 dc and 15 ch-2 sps = 45 sts)
These 15 spaces form the ring of small windows around the opening.
Round 3 (conversion): Sl st into the first ch-2 sp, ch 1. [2 sc in the ch-2 sp, sc in the next dc] twice, 3 sc in the next ch-2 sp, sc in the next dc. Repeat from * 4 more times, then sl st to the first sc. (50 sc: 45 worked one per existing st + 5 extra)
Each repeat covers 3 spaces and 3 dc: 2 + 1 + 2 + 1 + 3 + 1 = 10 sc. Five repeats give 50 sc. Fasten off.
Opening outline: Join gold with a sl st around the foundation ring, between any 2 dc of Round 1. Sl st around the ring between the next 2 dc. Repeat around, keeping the stitches loose enough to lie flat. (30 sl st) Join to the first sl st and fasten off. This makes the gold line around the opening.
Tails (make 2)
You work the tails from the top edge down. Rows 2, 4, 6, 8 and 10 are mesh rows.
With red, ch 11.
Row 1 (RS): Sc in the 2nd ch from the hook and in each ch across, turn. (10 sc)
Row 2 (mesh): Ch 3 (counts as dc), dc in the next sc, [ch 2, skip 2 sc, dc in the next 2 sc] twice, turn. (6 dc and 2 ch-2 sps = 10 sts)
Row 3 (growth): Ch 1, 2 sc in the first dc, sc in the next dc, 2 sc in the ch-2 sp, sc in the next 2 dc, 2 sc in the ch-2 sp, sc in the next dc, 2 sc in the top of the turning ch, turn. (12 sc)
Row 4 (mesh): Ch 3 (counts as dc), dc in the next 2 sc, ch 2, skip 2, dc in the next 2, ch 2, skip 2, dc in the last 3 sc, turn. (8 dc and 2 ch-2 sps = 12 sts)
Row 5 (growth): Ch 1, 2 sc in the first dc. Across to the last st, work 1 sc in each dc and 2 sc in each ch-2 sp. Work 2 sc in the top of the turning ch, turn. (14 sc)
Row 6 (mesh): Ch 3 (counts as dc), dc in the next sc, [ch 2, skip 2 sc, dc in the next 2 sc] 3 times, turn. (8 dc and 3 ch-2 sps = 14 sts)
Row 7: Ch 1. Across, work sc in each dc and 2 sc in each ch-2 sp, ending with sc in the top of the turning ch, turn. (14 sc)
Rows 8–11: Repeat Rows 6 and 7 twice. (Row 11: 14 sc)
The 3 windows in each mesh row stack into the column of openings down the tail.
First point:
Row 12: Ch 1, sc in the first 7 sc, turn. (7 sc) Leave the other 7 sts unworked.
Row 13: Ch 1, sc2tog, sc in the next 3, sc2tog, turn. (5 sc)
Row 14: Ch 1, sc2tog, sc in the next st, sc2tog, turn. (3 sc)
Row 15: Ch 1, sc3tog. (1 st) Fasten off.
Second point: With the RS facing, join red in the 8th sc of Row 11. Repeat Rows 12–15 over the remaining 7 sts. Fasten off.
Each point decreases on both edges, so its tip sits in the middle of its half. The gap between the two tips forms the V notch.
Center Band (make 1)
You work the band lengthwise, so the gold rows become stripes that run around the middle of the bow.
With red, ch 16.
Row 1: Sc in the 2nd ch from the hook and in each ch across, turn. (15 sc)
Row 2: Change to gold. Ch 1, sc in each sc across, turn. (15 sc)
Row 3: Change to red. Ch 1, sc across, turn. (15 sc)
Row 4: Change to gold. Ch 1, sc across, turn. (15 sc)
Row 5: Change to red. Ch 1, sc across. (15 sc) Fasten off, leaving a 10 in (25.4 cm) red tail for sewing.
Carry the unused color up the side. The band should measure 2.5 in x 0.8 in (6.4 cm x 2.0 cm).
Gold Border (Loops and Tails)
Border gauge: The 2 rounds (1 round of sc + 1 round of rev sc) add 0.2 in (0.5 cm) to each edge.
Work the border on all 4 pieces before you assemble the bow.
Loop Border
Round 1: Join gold in any sc of Round 3. Ch 1, sc in the next 9 sc, 2 sc in the next sc. Repeat from * 4 more times, then sl st to the first sc. (55 sc: 50 worked one per st + 5 extra)
Round 2: Ch 1, rev sc in each sc around, sl st to the first rev sc. (55 rev sc) Fasten off.
Why the math works: The outer edge is longer than Round 3, so Round 1 adds 1 stitch for every 10. Rev sc adds height but no stitches, so the count stays at 55 and the edge lies flat.
Tail Border
Round 1: With the RS facing, join gold in the first foundation ch at the top right corner. Ch 1, then work:
- Top edge: 3 sc in the first ch, sc in the next 8 ch, 3 sc in the last ch. (14 sc, including both corners)
- Left side: Down Rows 1–11, work 1 sc in each sc row end and 2 sc in each dc row end. (6 sc rows x 1 + 5 dc rows x 2 = 16 sc)
- First point: 1 sc in each row end of Rows 12–14 on the outer edge (3 sc), 3 sc in the sc3tog tip, then 1 sc in each row end of Rows 14 and 13 on the inner edge (2 sc). (8 sc)
- Notch: Sc2tog over the Row 12 row end of the first point and the Row 12 row end of the second point. (1 st)
- Second point: 1 sc in each row end of Rows 13 and 14 (2 sc), 3 sc in the tip, then 1 sc in each row end of Rows 14–12 on the outer edge (3 sc). (8 sc)
- Right side: Up Rows 11–1, work the same as the left side. (16 sc)
Sl st to the first sc. (14 + 16 + 8 + 1 + 8 + 16 = 63 sc)
Round 2: Ch 1, rev sc in each st around, sl st to the first rev sc. (63 rev sc) Fasten off.
Why the math works:
– A dc row is about twice as tall as an sc row, so each dc row end takes 2 sc.
– The 3-sc groups turn the corners and tips cleanly.
– The sc2tog pulls the notch into a sharp V.
– Rev sc keeps the same 63 sts.
Assembly
- Gather the loops. Lay one loop flat with the opening horizontal. Decide which side will face the center of the bow. On that side, sew a running stitch in red straight across the loop from top to bottom, about 0.25 in (0.6 cm) in from the gold edge. Pull until that side is 1.25 in (3.2 cm) tall and knot. Gather the second loop the same way as a mirror image.
- Place the tails. Lay the tails side by side with their top edges overlapping by 0.5 in (1.3 cm). Angle them so the points sit about 3.5 in (8.9 cm) apart.
- Stack. Place the gathered ends of both loops on top of the tail tops, with the gathered edges touching. Tack all four layers together with a few stitches through the center.
- Wrap the band. Wrap the band around the center with the gold stripes facing out. Sew the short ends together at the back.
- Hanging loop. With gold, ch 30 (about 4.5 in / 11.4 cm). Fold the chain in half and sew both ends under the band at the back.
Final Blocking
- Lightly mist the bow with water.
- Pin each loop flat into a rounded oval, keeping the opening and the mesh windows open.
- Pin the tails straight, then pin each dovetail tip to a sharp point.
- Check the overall size: 5.5 in x 5.5 in (14.0 cm x 14.0 cm).
- Let the bow dry completely, about 6–8 hours.
- For a firmer ornament, brush on diluted fabric stiffener before it dries.
Final Quality-Control Checklist
- Each loop has 30 dc, 15 mesh windows, 50 sc and 55 border sts.
- Each tail has 3 windows per mesh row and 63 border sts.
- The gold outline around each opening lies flat.
- Both dovetail notches are sharp and centered.
- The band stripes run around the middle, and the seam is hidden at the back.
- The finished bow measures about 5.5 in (14.0 cm) in each direction.
- All ends are woven in securely.
Troubleshooting
The loop ruffles: Check that Round 3 has exactly 50 sc, or use a smaller hook for Round 2.
The loop cups: Loosen Round 1 of the border, or add 1 extra sc in each 3-sc group and recount.
The opening closes up: The foundation ring is too tight. Chain more loosely, or use a larger hook for the ring.
The tail curls toward the back: Block it firmly, or work the side edges with slightly looser tension.
The notch is rounded: Make sure you worked sc2tog at the notch, not 2 separate sc.
The gold border looks stiff: Metallic yarns stretch less, so keep the rev sc loose.
Care
Store the bow flat in tissue paper. To clean it, dab with cool water, then reshape it and let it dry flat.

Final Notes
Here is the full measurement chain:
– Loops: 1.5 in (3.8 cm) after Round 1, 2.6 in (6.6 cm) after Round 3, and 3.0 in (7.6 cm) with the border.
– Tails: 2.3 in x 3.3 in (5.8 cm x 8.4 cm) before the border and 2.7 in x 3.7 in (6.9 cm x 9.4 cm) with it.
– Finished bow: gathered and stacked, the parts make a 5.5 in (14.0 cm) bow.
If your first loop and tail hit their checkpoints, the rest of the bow will too.
Happy crocheting!