

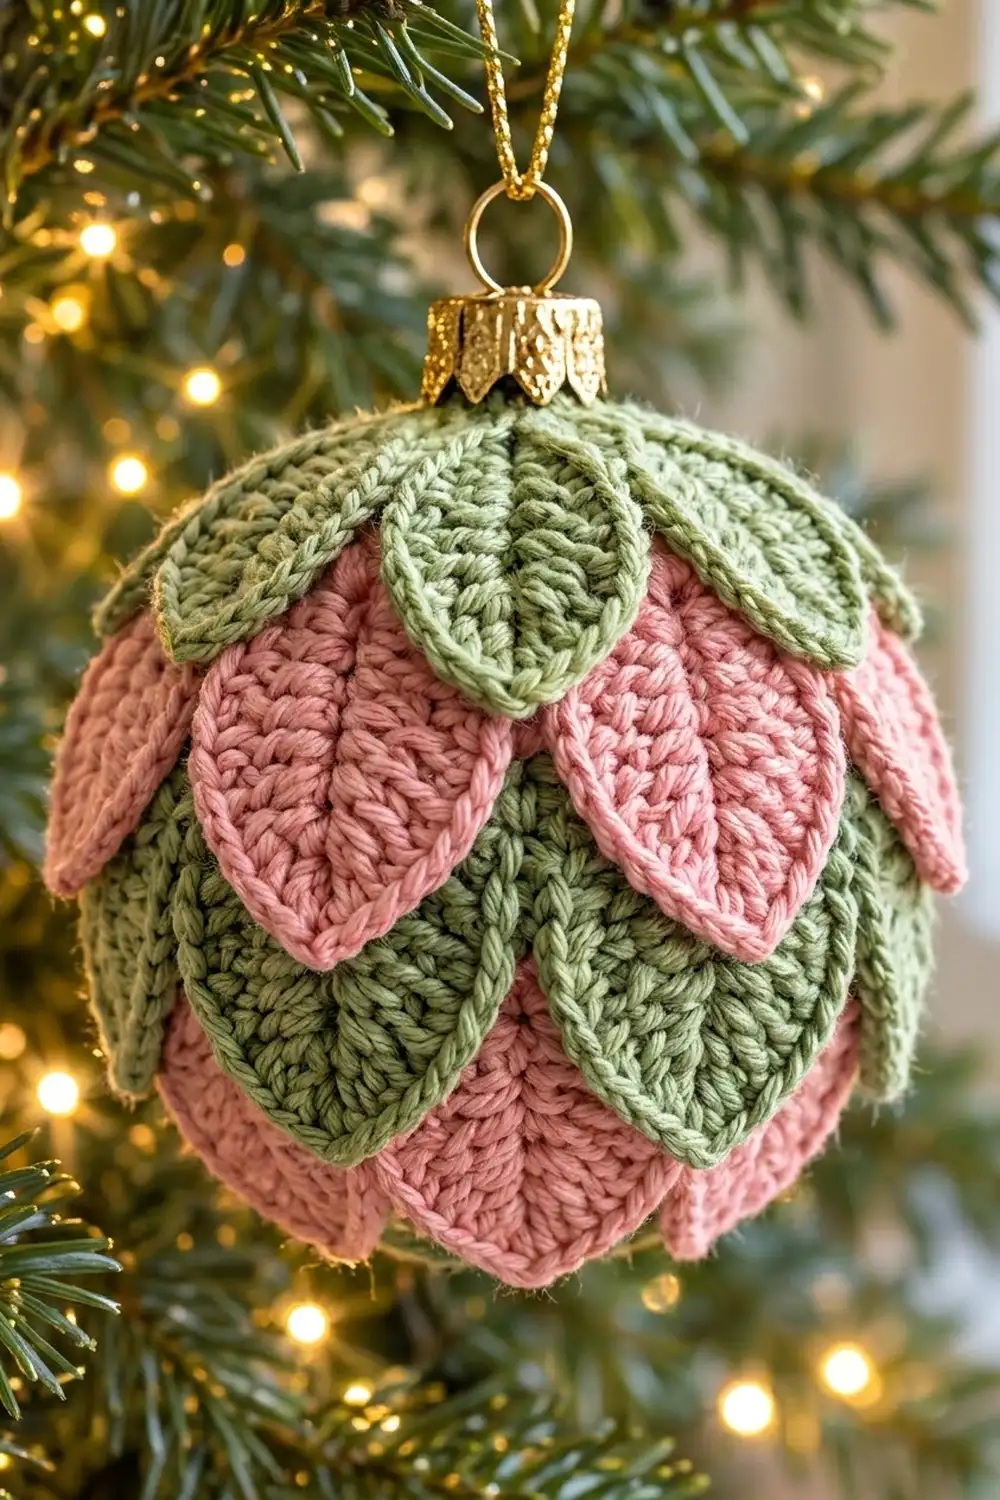
This ornament is a round Christmas bauble covered in overlapping crochet leaves. The leaves go on in four tiers that alternate sage green and dusty pink, and each tier is offset so the leaves sit like petals on a flower bud. A gold cap and cord finish the vintage look.
The colors are soft and a little old-fashioned. Sage green and dusty pink alternate down the ball, and a hidden cream base cover stands in for the white glass. Every leaf has a raised center vein and a neat outline of single crochet around the edge.
This pattern uses US crochet terms. The finished ornament measures about 3.5 in (8.9 cm) across including the leaves, and about 4 in (10.2 cm) tall including the cap but not the hanging cord.
Here is how it goes together. You crochet a cream single-crochet cover that fits snugly around a 3 in (7.6 cm) ball. Then you make 32 leaves, finish the top of the cover with a short collar, and sew the leaves on in four tiers from the bottom up.
Finished Size and Construction
- Finished size: 3.5 in (8.9 cm) diameter, 4 in (10.2 cm) tall with cap
- Skill level: Intermediate (simple stitches, careful placement)
- Terminology: US crochet terms
- Yarn weight: DK (#3) cotton or cotton blend
- Hook: 3.5 mm (E-4)
- Number of pieces: 33 (1 base cover + 32 leaves)
- Layout: 4 tiers of 8 leaves, staggered by half a leaf
- Piece size: large leaf 2.25 in (5.7 cm) long x 1.25 in (3.2 cm) wide; small leaf 1.75 in (4.4 cm) x 1 in (2.5 cm)
- Size before border: cover top opening of 16 sts, 3.2 in (8.1 cm) around
- Border depth: 3 collar rounds, 0.6 in (1.5 cm)
Materials
Pick a smooth, firm cotton or cotton blend so the leaf edges and veins stand out. Fuzzy or very splitty yarn will hide the texture.
- Sage green: 25 g, about 58 m (63 yd)
- Dusty pink: 30 g, about 69 m (75 yd)
- Cream: 10 g, about 23 m (25 yd), for the base cover
Tools:
- 3.5 mm (E-4) crochet hook
- One 3 in (7.6 cm) ball ornament with a removable cap (shatterproof plastic or foam is best)
- Tapestry needle with a blunt tip
- 8 stitch markers
- Scissors
- Gold cord, 6 in (15.2 cm)
- Steam iron or garment steamer
All yarn amounts include about a 20% margin for gauge swatches and sewing tails.
Abbreviations (US Terms)
- ch: chain
- sc: single crochet
- hdc: half double crochet
- dc: double crochet
- sl st: slip stitch
- inc: 2 sc in the same stitch
- sc2tog: single crochet 2 together
- MR: magic ring
- st(s): stitch(es)
- sp: space
- rnd: round
Special stitch: invisible sc2tog. Insert the hook into the front loop only of the next stitch, then into the front loop only of the stitch after it. Yarn over, pull through both front loops, yarn over, and pull through both loops on the hook. On a stretched cover this leaves almost no gap.
Gauge and Checkpoints
Gauge: 5 sc and 5 rnds = 1 in (2.5 cm) in sc worked in the round.
Make one large leaf before anything else. It should measure 2.25 in (5.7 cm) long without the stem tab and 1.25 in (3.2 cm) wide. If it does, your tension is right for the cover too.
Checkpoints:
- Large leaf: 2.25 in (5.7 cm) x 1.25 in (3.2 cm).
- Small leaf: 1.75 in (4.4 cm) x 1 in (2.5 cm).
- Cover after Rnd 8: a flat disc about 3.2 in (8.1 cm) across. It may cup slightly.
- Cover Rnds 9–16: 48 sts, 9.6 in (24.4 cm) around. The ball’s equator is about 9.42 in (23.9 cm), so the fit is nearly exact.
- Collar Rnd 23: 12 sts, 2.4 in (6.1 cm) around.
If your pieces are too big: go down 0.5 mm in hook size. Oversized leaves hide the stagger, and a loose cover slides on the ball.
If your pieces are too small: go up 0.5 mm in hook size. Leaves that are too short leave cream gaps between tiers.
Base Cover (Cream)
Work in continuous spiral rounds and move a marker up at the start of each round. You start at the bottom pole of the ball.
Rnd 1: Make a MR, 6 sc in the ring. (6)
Rnd 2: Inc in each st around. (12)
Rnd 3: (Sc in next st, inc) 6 times. (18)
Rnd 4: (Sc in next 2 sts, inc) 6 times. (24)
Rnd 5: (Sc in next 3 sts, inc) 6 times. (30)
Rnd 6: (Sc in next 4 sts, inc) 6 times. (36)
Rnd 7: (Sc in next 5 sts, inc) 6 times. (42)
Rnd 8: (Sc in next 6 sts, inc) 6 times. (48)
Rnds 9–16: Sc in each st around. (48 per round, 8 rounds)
The widest part of the ball sits at about Rnd 12. Take the cap off the ornament and push the ball into the cover with the neck facing up.
Rnd 17: (Sc in next 4 sts, sc2tog) 8 times. (40)
Rnd 18: (Sc in next 3 sts, sc2tog) 8 times. (32)
Rnd 19: (Sc in next 2 sts, sc2tog) 8 times. (24)
Rnd 20: (Sc in next st, sc2tog) 8 times. (16)
Do not fasten off. The collar comes next, in the Border section.
Leaves
Large Leaf (make 24: 16 pink, 8 green)
Foundation: Ch 11.
Rnd 1: Sc in the 2nd ch from the hook, hdc in next ch, dc in next 6 ch, hdc in next ch, then (sc, ch 2, sc) in the last ch for the tip. Rotate the piece and work along the free loops on the other side of the chain: hdc in next ch, dc in next 6 ch, hdc in next ch, sc in the last ch (the same ch as the first sc). Join with a sl st to the first sc.
Count: 9 sts on side A + 2 tip sc + 9 sts on side B = 20 sts, plus 1 ch-2 tip sp.
Rnd 2: Ch 1, sc in the same st as the join and in the next 8 sts (9 sc for side A). Sc in the first tip sc, (sc, ch 2, sc) in the ch-2 sp, sc in the second tip sc, then sc in each of the 9 side B sts. Join with a sl st to the first sc.
Count: 9 + 1 + 2 + 1 + 9 = 22 sc, plus 1 ch-2 tip sp.
Stem tab: Ch 3, sl st in the 2nd ch from the hook and in the next ch, then sl st into the joining st. Fasten off and leave a 12 in (30.5 cm) tail for sewing.
The foundation chain runs up the middle and forms the raised vein. The short-to-tall stitches on each side make the almond shape.
Small Leaf (make 8, green)
Foundation: Ch 8.
Rnd 1: Sc in the 2nd ch from the hook, hdc in next ch, dc in next 3 ch, hdc in next ch, (sc, ch 2, sc) in the last ch. Working along the other side of the chain: hdc in next ch, dc in next 3 ch, hdc in next ch, sc in the last ch. Join with a sl st to the first sc.
Count: 6 + 2 + 6 = 14 sts, plus 1 ch-2 sp.
Rnd 2: Ch 1, sc in the first 6 sts, sc in the tip sc, (sc, ch 2, sc) in the ch-2 sp, sc in the next tip sc, sc in the last 6 sts. Join with a sl st.
Count: 6 + 1 + 2 + 1 + 6 = 16 sc, plus 1 ch-2 sp.
Stem tab: Work it the same way as on the large leaf. Leave a 12 in (30.5 cm) tail.
Make All Pieces
- Cream: 1 base cover
- Sage green: 8 small leaves (Tier 1) and 8 large leaves (Tier 3)
- Dusty pink: 16 large leaves (Tiers 2 and 4)
Before sewing, lightly steam all the leaves flat (see Final Blocking).
Layout grid (view from the side; A = column lines, B = halfway between them):
Rnd 21  Tier 1  green small   A . A . A . A . A . A . A . A .
Rnd 18  Tier 2  pink large    . B . B . B . B . B . B . B . B
Rnd 15  Tier 3  green large   A . A . A . A . A . A . A . A .
Rnd 11  Tier 4  pink large    . B . B . B . B . B . B . B . B
Each tier has 8 leaves, 32 in total. Green leaves sit on the A lines and pink leaves sit on the B lines.
Border: Crown Collar
The collar is worked in cream and continues straight on from Rnd 20. Its gauge is the same as the cover: 5 sc = 1 in (2.5 cm). Think of the round as 4 equal quarters, which play the role of the sides of a flat piece.
Rnd 21: Sc in each st around. (16 total, 4 per quarter)
Rnd 22: (Sc in next 2 sts, sc2tog) 4 times. (12 total, 3 per quarter)
Rnd 23: Sl st in each st around. (12 total, 3 per quarter)
Fasten off and weave in the end.
Why the math works: Rnd 21 has 16 sts and Tier 1 has 8 leaves, so there is exactly one small leaf every 2 sts. Rnd 22 removes 1 st from each quarter: 4 sts become 3, giving 12 sts. That is 2.4 in (6.1 cm) around, which hugs the ornament neck (about 2.2 in / 5.6 cm around) without bunching. The sl st round firms the edge so the cap clicks down over it.
Mark the column lines now. Place 8 markers in Rnd 21, one in every 2nd st. These are the A lines. Run each one straight down the ball with a pin or a strand of scrap yarn so you can line up Tier 3. The B lines fall halfway between neighboring A lines.
Joining: Sewing the Leaves On
Method: Backstitch through the leaf’s stem tab and the top 0.25 in (0.6 cm) of its edge. Stitch only into the front loops of the cover round, and slide the blunt needle under the surface so it never scrapes the ball.
Stitch-to-stitch logic:
- Tier 4 (Rnd 11, 48 sts): One pink leaf every 6 sts, centered on the B lines. The tips point down and meet at the bottom pole.
- Tier 3 (Rnd 15, 48 sts): One green leaf every 6 sts on the A lines, 3 sts away from the Tier 4 leaves.
- Tier 2 (Rnd 18, 32 sts): One pink leaf every 4 sts on the B lines.
- Tier 1 (Rnd 21, 16 sts): One small green leaf every 2 sts on the A lines.
Always work from the bottom up. Each new tier covers the stems of the tier below it, and every leaf hides the gap between two leaves underneath.
Tension advice: Sew only the stem tab and the top edge. Let the lower two-thirds of each leaf hang free, because that is what gives the layered look. Pull each stitch just snug. If you pull hard, the cover puckers and the leaf tilts out of line.
Size checkpoint: After Tier 3, measure around the widest part of the ball. You should get about 11 in (27.9 cm), which is 3.5 in (8.9 cm) across. When all four tiers are on, no cream should show anywhere when you look at the ball side-on.
Final Blocking
- Before sewing, pin each leaf flat to the stated size and hover steam over it for 3–5 seconds. Let it dry completely.
- Once the leaves are attached, put the cap back on and hang the ornament up.
- Steam lightly from 2 in (5.1 cm) away, one tier at a time.
- While each tier is still warm, curve the leaf tips gently inward with your fingers so they follow the ball.
- At the bottom, press the Tier 4 tips together lightly so they meet neatly.
- Leave it to hang until dry, about 1 hour.
- Thread the 6 in (15.2 cm) gold cord through the cap ring and knot it.
Final Quality-Control Checklist
- [ ] Large leaves are 2.25 in (5.7 cm) x 1.25 in (3.2 cm); small leaves are 1.75 in (4.4 cm) x 1 in (2.5 cm).
- [ ] Every large leaf has 22 sc in Rnd 2; every small leaf has 16.
- [ ] The cover sits snugly with no slipping.
- [ ] The collar has 12 sts and sits under the cap.
- [ ] Each tier has 8 leaves, and each tier is staggered half a leaf from the next.
- [ ] Colors go green, pink, green, pink from top to bottom.
- [ ] No cream shows when you view the ball from the side.
- [ ] All tails are woven into the cover, not left hanging behind the leaves.
- [ ] The ornament is about 3.5 in (8.9 cm) across.
Troubleshooting
- Leaves curl along their length: The foundation chain is too tight. Chain with a hook one size larger, then switch back.
- Leaf tips are rounded instead of pointed: Make sure the tip of each round is (sc, ch 2, sc), not 3 sc.
- Cover is baggy: Take out back to Rnd 16 and redo the decreases with a smaller hook.
- Cream shows between tiers: Move the gappy tier 1 round lower, or block the leaves to full length.
- Leaves twist sideways: Sew both sides of the stem tab, not just the center.
- Collar won’t fit under the cap: Leave out Rnd 23, or make it sc instead of sl st.
Care
Spot clean only, using a damp cloth and mild soap. Store the ornament wrapped in tissue in a box so the leaf tips don’t get crushed.

Final Notes
Here is the chain of measurements that holds the design together. Your gauge of 5 sc per 1 in (2.5 cm) sets the 48-stitch cover at 9.6 in (24.4 cm) around, which matches a 3 in (7.6 cm) ball. The collar narrows to 12 sts, or 2.4 in (6.1 cm), to fit under the cap. Then 32 leaves at 2.25 in (5.7 cm) and 1.75 in (4.4 cm) long, placed every 6, 4 or 2 stitches, bring the ornament to 3.5 in (8.9 cm) across. If your swatch leaf measures right, every later step will fit.
Happy crocheting!