

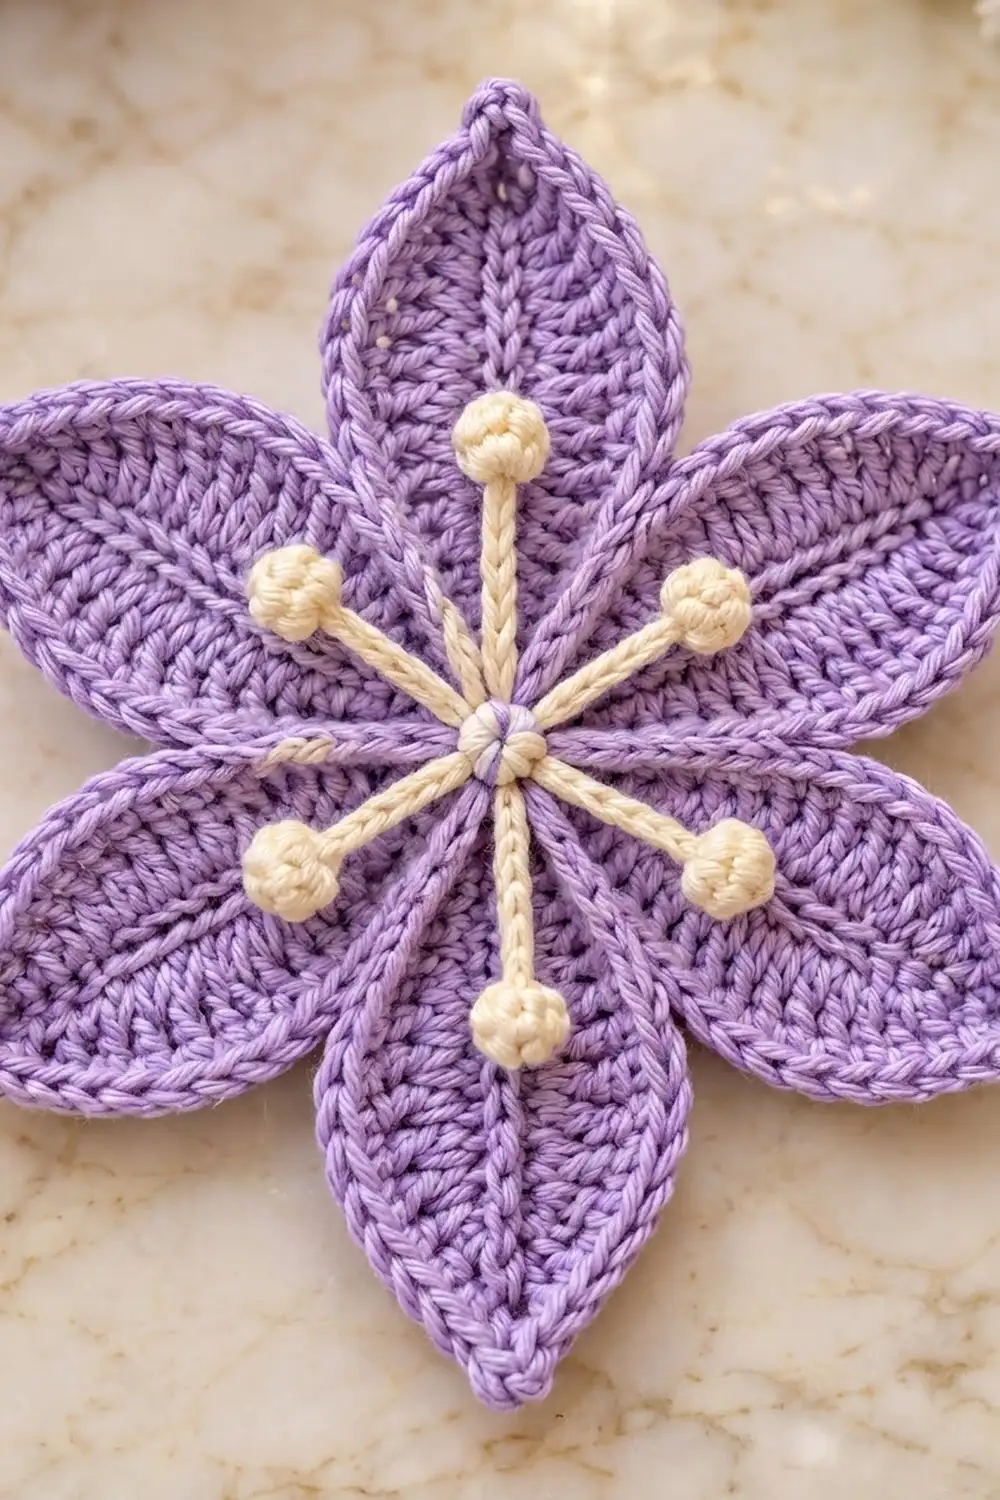
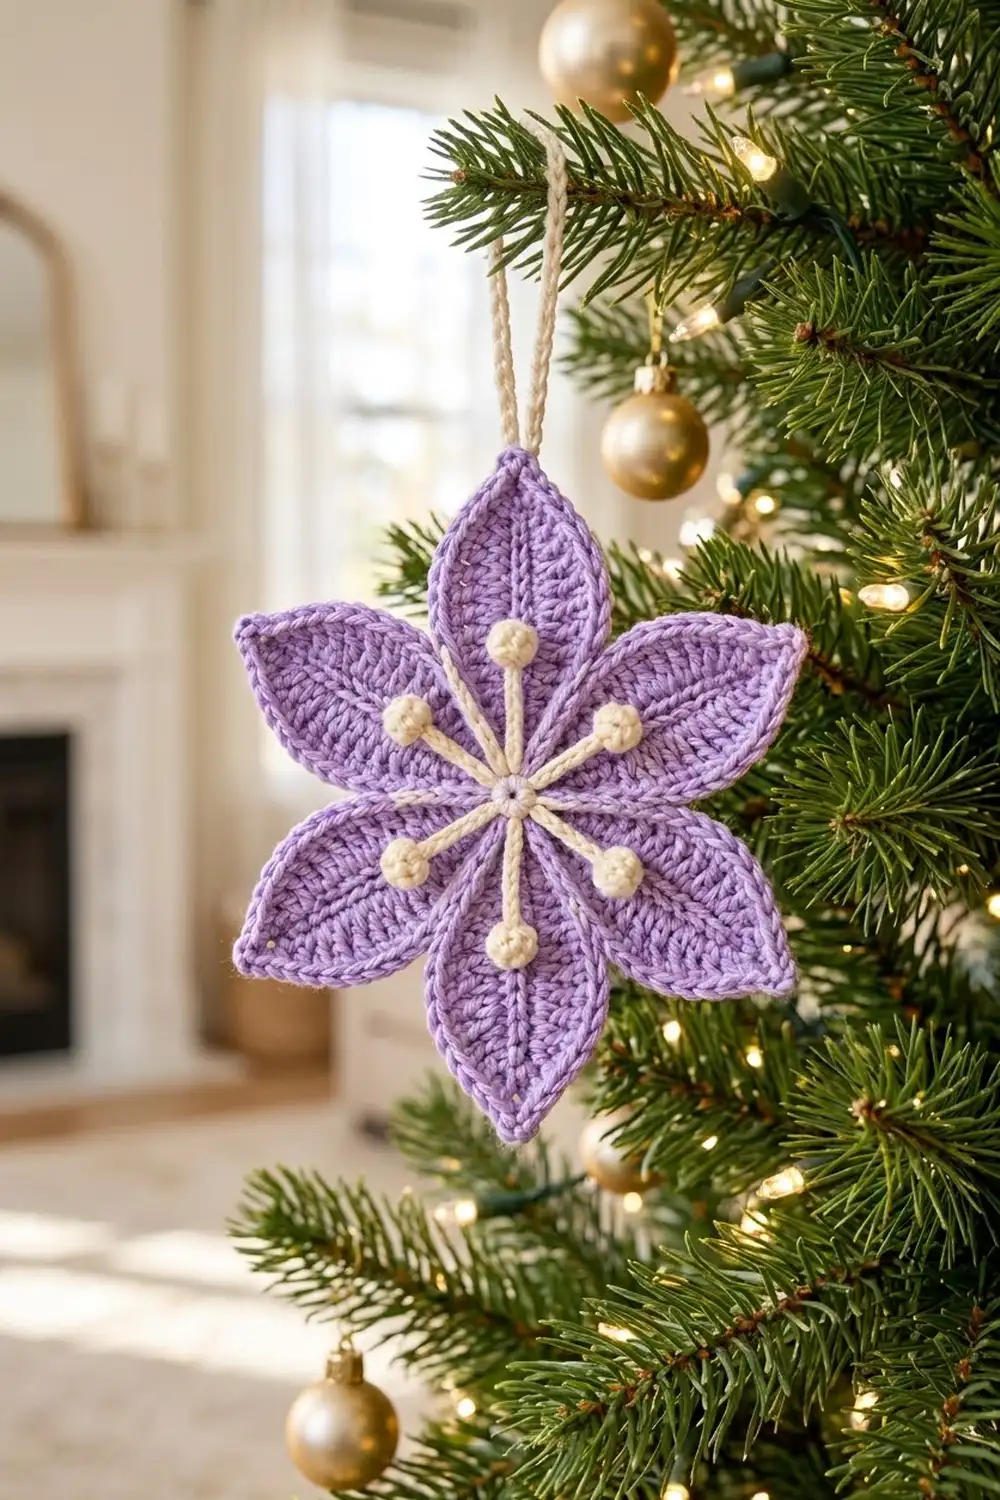
The Lilac Starburst Flower is a six-petal motif with pointed leaf-shaped petals and a cream stamen star on top. Each petal has a raised center spine and a crisp rope-like edge, so the flower looks sculpted even though it lies flat. It works as an ornament, a gift topper, a bag charm, or one unit for a hanging strand.
The colors are soft lavender for the petals, center disk, and border, and cream for the stamens. The style is light and botanical, and the pale palette suits spring, weddings, or a gentle winter tree.
This pattern uses US crochet terms. The finished flower measures 6 in (15.2 cm) from tip to tip across opposite petals.
Here is how it is built. You crochet six petals in rounds around a short foundation chain, add a slip-stitch spine to each, and then join them to a small center disk with a single crochet joining round. Next, a two-round border runs around the whole outline. Finally, a one-piece cream stamen star is sewn on top and a French knot covers the center.
Finished Size and Construction
- Finished size: 6 in (15.2 cm) tip to tip
- Skill level: Intermediate (working around a chain, bobbles, joining round)
- Terminology: US crochet terms
- Yarn weight: DK / light worsted (weight 3) cotton or cotton blend
- Hook: 3.5 mm (E-4)
- Number of pieces: 8 (6 petals, 1 center disk, 1 stamen star), joined into one motif
- Layout: 6 petals spaced evenly around the disk, one at each even clock position
- Single petal size: 2.5 in × 1.4 in (6.4 cm × 3.6 cm)
- Center disk: 1 in (2.5 cm) diameter
- Flower size before border: 5.5 in (14.0 cm) tip to tip
- Border depth: 0.25 in (0.6 cm) at each tip
Materials
Yarn advice: A smooth mercerized or matte cotton in DK weight gives the clearest stitch definition and a sharp petal spine. Look for roughly 50 g / 125 m per ball. Fuzzy or very splitty yarns will blur the spine and the rope edge.
- Color A, Lavender: 20 g (50 m) for petals, spines, disk, and border
- Color B, Cream: 5 g (13 m) for the stamen star and center knot
Both quantities include a comfortable margin for a gauge petal, tails, and an optional hanging loop.
Tools:
– 3.5 mm (E-4) crochet hook
– Tapestry needle
– Stitch markers (at least 2)
– Scissors
– Ruler or tape measure
– Blocking mat and rust-proof pins
– Spray bottle with water
Abbreviations (US Terms)
- ch: chain
- sl st: slip stitch
- sc: single crochet
- hdc: half double crochet
- dc: double crochet
- st(s): stitch(es)
- sp: space
- RS: right side
- MR: magic ring
Special stitch: 4-dc bobble. Yarn over, insert hook in the indicated stitch, yarn over and pull up a loop, yarn over and pull through 2 loops. Repeat in the same stitch 3 more times (5 loops on hook). Yarn over and pull through all 5 loops.
Special technique: surface slip stitch. Hold the yarn behind the work. Insert the hook from front to back, pull up a loop, and pull it through the loop on the hook. Keep each stitch the length of one chain.
Gauge and Checkpoints
Gauge: 20 sc and 22 rows = 4 in (10.2 cm) in Color A with a 3.5 mm hook. Exact gauge matters less than matching the petal checkpoints below.
Test one piece first. Make one complete petal before anything else, because it is your real gauge swatch.
- After Petal Round 1: 2.25 in × 1 in (5.7 cm × 2.5 cm)
- After Petal Round 2: 2.5 in × 1.4 in (6.4 cm × 3.6 cm)
- Center disk after Round 3: 1 in (2.5 cm) across
- After joining: 5.5 in (14.0 cm) tip to tip
- After border: 6 in (15.2 cm) tip to tip
If your petal is too big (longer than 2.75 in / 7.0 cm), go down to a 3.25 mm hook. If it is too small (shorter than 2.25 in / 5.7 cm after Round 2), go up to a 3.75 mm hook. Don’t change stitch counts, because the joining and border math depends on them.
Petal (Make 6)
With Color A, ch 11.
Round 1: Sc in 2nd ch from hook, hdc in next ch, dc in next 6 ch, hdc in next ch, 3 sc in last ch (tip). Rotate to work along the opposite side of the foundation chain. Hdc in next ch, dc in next 6 ch, hdc in next ch, 2 sc in the same ch as the first sc (base). Join with sl st to first sc. (22 sts)
How the 22 stitches are grouped:
– Base group: 3 sc (the first sc plus the 2 final sc)
– Side A: 8 sts (hdc, 6 dc, hdc)
– Tip group: 3 sc
– Side B: 8 sts (hdc, 6 dc, hdc)
Check: 3 + 8 + 3 + 8 = 22.
The tall dc in the middle and short sc at both ends give the leaf its pointed oval shape.
Round 2: Ch 1. Sc in the same st as the join, then sc in each of the 8 Side A sts. In the tip group, sc in the first sc, 3 sc in the center sc, and sc in the last sc. Sc in each of the 8 Side B sts, then sc in each of the remaining 2 base sts. Join with sl st to first sc. (24 sts)
How the 24 stitches are grouped:
– Base: 3 sts
– Side A: 8 sts
– Tip: 5 sts
– Side B: 8 sts
Check: 3 + 8 + 5 + 8 = 24. Only the tip gets extra stitches (2), so the tip stays sharp and the base stays narrow for joining.
Fasten off, leaving a 6 in (15.2 cm) tail. Weave it in on the wrong side.
Raised spine: Cut a 12 in (30.5 cm) strand of Color A. With the RS facing and the yarn held behind, start at the base. Work 10 surface sl sts along the original foundation chain, between the two sides of Round 1, ending at the base of the tip group. Fasten off and weave in both ends on the wrong side. This makes the raised center line seen on every petal.
Petal checkpoint: 24 sts, 2.5 in × 1.4 in (6.4 cm × 3.6 cm), and a straight spine from base to tip.
Center Disk (Make 1)
With Color A:
Round 1: MR, 6 sc in ring. Join with sl st to first sc. (6 sts)
Round 2: Ch 1, 2 sc in each st around. Join. (12 sts)
Round 3: Ch 1, sc in next st, 2 sc in next st; repeat from * 5 more times. Join. (18 sts)
Don’t fasten off. Place a marker in the loop on your hook. Checkpoint: 1 in (2.5 cm) across and flat.
Stamen Star (Make 1)
With Color B:
Make the arms: MR. Ch 9, work a 4-dc bobble in the 4th ch from hook, sl st in each of the next 5 ch, sl st into the ring. Repeat from * 5 more times, for 6 arms in total.
Each arm is 5 sl sts plus 1 bobble, about 1.5 in (3.8 cm) from the ring to the tip of the bobble. Each bobble is about 0.3 in (0.8 cm) across.
Pull the ring tight. Fasten off, leaving an 18 in (45.7 cm) tail for sewing and for the center knot.
Make All Pieces
Before joining, check that you have everything:
- Color A, Lavender: 6 petals (24 sts each, spines done) and 1 center disk (18 sts, loop live)
- Color B, Cream: 1 stamen star (6 arms)
Layout grid (petal tips by clock position, RS facing):
              [P1] 12:00
   [P6] 10:00          [P2] 2:00
              ( DISK )
   [P5] 8:00           [P3] 4:00
              [P4] 6:00
Each petal’s base covers 3 disk stitches, so 6 petals × 3 sts = 18 disk sts.
Joining
Method: You join the petals with a single crochet joining round worked from the disk’s live loop. This joins each petal to the disk stitch for stitch.
Joining Round: Hold Petal 1 RS facing, with its base overlapping the edge of the disk by about 0.25 in (0.6 cm). Insert the hook through the first base st of the petal and the next disk st together, and sc. Do the same with the 2nd base st and the next disk st, then with the 3rd base st and the next disk st. That is 3 sc for Petal 1.
Repeat with Petals 2 through 6, working clockwise, so the Side B of each petal sits next to the Side A of the petal before it. Join with sl st to the first joining sc. (18 sc: 3 per petal)
Stitch-to-stitch logic: Each petal has exactly 3 base sts and the disk has exactly 18 sts, so every petal gets one third of a sixth of the circle. Nothing is skipped and nothing is doubled.
Tension advice: Work the joining sc firmly, but don’t pull so tight that the disk cups. If the petals overlap each other, your joining stitches are too tight. If gaps open at the base, they are too loose.
Fasten off and weave in the end.
Size checkpoint: 5.5 in (14.0 cm) from one tip to the opposite tip. Each petal should have 21 free sts (8 + 5 + 8).
Border
Border gauge: Same as the main gauge, 5 sc per 1 in (2.5 cm). The border adds about 0.25 in (0.6 cm) at each tip.
Border Round 1: With RS facing, join Color A in the first Side A st of Petal 1 (next to the disk). Ch 1. Then for each petal:
- Side A: Sc in each of the 8 sts.
- Tip: Sc in the next 2 sts, (sc, ch 2, sc) in the center tip st, sc in the next 2 sts. That is 6 sc and 1 ch-2 sp.
- Side B: Sc in each of the 8 sts.
Move straight into Side A of the next petal without adding stitches in the valley. Repeat for all 6 petals. Join with sl st to the first sc.
Count: 22 sc + 1 ch-2 sp per petal. That is 21 sts worked 1 per existing st plus 1 extra sc at the tip, for 132 sc + 6 ch-2 sps in total.
Border Round 2 (rope edge): Ch 1. Working loosely, sl st in each sc around and 3 sl sts in each ch-2 tip sp. Join to the first sl st.
Count: 25 sl sts per petal. That is 22 sl sts worked 1 per existing st plus 3 in the tip sp, for 150 sl sts in total.
Fasten off and weave in.
Why the math works: Each petal had 24 sts. The 3 base sts were used in the join, which leaves 21 free sts per petal and 126 in total. Round 1 adds 1 sc at each tip, so 126 + 6 = 132. The ch-2 sp lets the point grow outward. The valleys get no increases because they are inward corners held in place by the disk. Round 2 adds 3 sl sts at each tip, so 132 + 18 = 150, which keeps the tip sharp under the stiff slip-stitch rope. The sides stay at 1:1 so the edge doesn’t ruffle.
Final size checkpoint: 6 in (15.2 cm) tip to tip.
Optional hanging loop: At any tip, join Color A in the center tip sl st. Ch 15, which makes a chain about 3 in (7.6 cm) long. Sl st into the same st, forming a loop about 1.5 in (3.8 cm) tall. Fasten off.
Attaching the Stamens
- Center the stamen star over the disk, with the RS facing up.
- Turn the star so each arm lies over a petal’s spine. Each bobble should land about 1 in (2.5 cm) out from the disk edge, in the lower half of the petal.
- With the long tail, tack the ring to the center of the disk with 4 small stitches.
- Run the tail under the back of the work to each bobble and tack it down with 2 stitches, so the arms stay straight.
- Return to the center and make a French knot, wrapping 3 times, over the ring.
- Fasten off on the back and weave in the end.
Final Blocking
- Spritz the flower lightly until it is damp but not soaked.
- Lay it RS up on the blocking mat.
- Pin each tip at 3 in (7.6 cm) from the center, which gives 6 in (15.2 cm) tip to tip.
- Check that the tips sit about 2.75 in (7.0 cm) apart all the way around.
- Pin each valley lightly, pointing in toward the disk.
- Use your fingertip to straighten each spine and each stamen arm.
- Let it dry completely, at least 4 hours, before removing the pins.
Final Quality-Control Checklist
- Each petal has 24 sts before joining and a 10-st spine.
- The disk has 18 sts and 18 joining sc.
- Border Round 1 has 132 sc and 6 ch-2 sps.
- Border Round 2 has 150 sl sts.
- The flower measures 6 in (15.2 cm) tip to tip.
- All 6 tips are sharp and evenly spaced.
- The flower lies flat, with no cupping at the center.
- Each stamen bobble is tacked over its petal’s spine.
- The center French knot is secure.
- All ends are woven in on the wrong side.
Troubleshooting
Petal curls or cups. Your Round 1 tension is too tight. Go up 0.25 mm and remake the petal.
Tip is rounded, not pointed. Make sure the 3 sc in Round 2 go into the center tip st. In Border Round 1, the ch-2 must sit in that same center line.
Spine wanders. Insert the hook only between the two sides of Round 1. Count exactly 10 sl sts.
Petals overlap after joining. Your joining sc were too tight. Undo the joining round and rework it more loosely.
Border ruffles at the sides. Check that you worked only 8 sc per side, with no extra stitches in the valleys.
Stamen arms droop. Add one more tack stitch halfway along each arm.
Flower is under 5.75 in (14.6 cm) after blocking. Your gauge is tight. Make the next flower with a 3.75 mm hook.
Care
Hand wash in cool water with a mild soap, press out the water in a towel, and lay flat to dry. If needed, pin it back to 6 in (15.2 cm) while it is damp.
Final Notes
Here is the full measurement chain in one place:
- One petal is 2.5 in × 1.4 in (6.4 cm × 3.6 cm) with 24 sts.
- The disk is 1 in (2.5 cm) across with 18 sts.
- Six petals joined with 3 sc each make a 5.5 in (14.0 cm) flower.
- Border Round 1 has 132 sc and Border Round 2 has 150 sl sts.
- The finished, blocked flower is 6 in (15.2 cm) tip to tip.
If your first petal hits its checkpoint, everything after it will fall into place. Take your time on the spines and the stamen tacking, because those details give the Lilac Starburst its crisp, sculpted look.
Happy crocheting!