

The Evergreen Scallop Tree is a flat Christmas ornament with a classic triangle outline and a lot of texture. Its body is made of rows of fan-shaped shells. Each row is one shell shorter than the row below, so the tree narrows to a single shell at the top. A small single crochet trunk anchors the base, and a sturdy covered loop at the top lets it hang.
The design looks best in smooth, crisp yarn. Deep burgundy gives a rich, traditional look. Natural cream reads as soft and Scandinavian. Make one tree in each color and hang them in alternating order for a simple, elegant display.
This pattern uses US crochet terms. The finished ornament measures about 6 in (15.2 cm) wide and 4.5 in (11.4 cm) tall from the trunk to the tip, or 5.5 in (14.0 cm) tall including the hanging loop.
Construction is simple and all in one piece. You chain a foundation, work 5 rows of decreasing shells back and forth, and finish the tip with the hanging loop. Then you work the trunk into the free loops of the foundation chain and finish it with a single round of edging.
Finished Size and Construction
- Finished size: 6 in (15.2 cm) wide × 4.5 in (11.4 cm) tall; 5.5 in (14.0 cm) tall with loop
- Skill level: Easy
- Terminology: US crochet terms
- Yarn weight: DK (#3), cotton or cotton blend
- Hook: 3.5 mm (E-4)
- Number of pieces: 1 (the trunk and loop are worked onto the tree, so there is no sewing)
- Layout: Single tree: 5 shell rows (5, 4, 3, 2, 1 shells), centered trunk, top loop
- Piece size (tree body): 6 in (15.2 cm) wide × 3.5 in (8.9 cm) tall
- Trunk size before border: 1.0 in (2.5 cm) wide × 0.8 in (2.0 cm) tall
- Border depth: 0.2 in (0.5 cm) on each trunk side and along the trunk bottom
Materials
Choose a smooth DK cotton or cotton blend with good stitch definition. Mercerized cotton gives the gentle sheen seen on the finished trees and helps the shells hold their fan shape. Avoid fuzzy or very soft acrylics, because the scallops will blur and droop.
Yarn (per ornament):
– Burgundy version: 8 g (about 20 m) of burgundy DK
– Cream version: 8 g (about 20 m) of cream DK
Each tree uses only one color. These quantities include a margin of about 30% for your gauge swatch, weaving in ends and small tension differences.
Tools:
– 3.5 mm (E-4) crochet hook
– Tapestry needle
– Scissors
– Stitch marker (1)
– Ruler or tape measure
– Blocking mat and rust-proof pins
– Spray bottle with water
Abbreviations (US Terms)
- ch – chain
- sc – single crochet
- dc – double crochet
- sl st – slip stitch
- st(s) – stitch(es)
- sk – skip
- RS – right side
- * * – repeat the instructions between asterisks as stated
Special stitch: Shell – Work 7 dc in the same stitch. The 4th dc of a shell is its center dc.
Gauge and Checkpoints
Your gauge piece is one finished ornament. Make one tree completely, measure it, and only then decide whether to make more.
Base gauge: 5 sc and 5 sc rows = 1 in (2.5 cm) with a 3.5 mm hook.
Shell gauge: One shell repeat (sc, sk 3, shell, sk 3) = 1.2 in (3.0 cm) wide. One shell row = 0.7 in (1.8 cm) tall.
Checkpoints while you work:
– After Row 1: 6 in (15.2 cm) wide, 0.7 in (1.8 cm) tall
– After Row 2: the shell part of the row is 4.8 in (12.2 cm) wide; total height is 1.4 in (3.6 cm)
– After Row 3: 3.6 in (9.1 cm) wide; 2.1 in (5.3 cm) tall
– After Row 4: 2.4 in (6.1 cm) wide; 2.8 in (7.1 cm) tall
– After Row 5: 1.2 in (3.0 cm) wide; 3.5 in (8.9 cm) tall
– Trunk before border: 1.0 in (2.5 cm) × 0.8 in (2.0 cm)
– Trunk after border: 1.4 in (3.6 cm) × 1.0 in (2.5 cm)
Measure Rows 2–5 straight across the shells in that row. A tolerance of 0.25 in (0.6 cm) is fine.
If your tree is too big: go down a half size to a 3.25 mm hook, or tighten your foundation chain. A loose chain is the most common cause of an overly wide Row 1.
If your tree is too small: go up to a 3.75 mm hook. If the shells cup or ruffle, the foundation chain is too tight. Chain with a hook one size larger and switch back for Row 1.
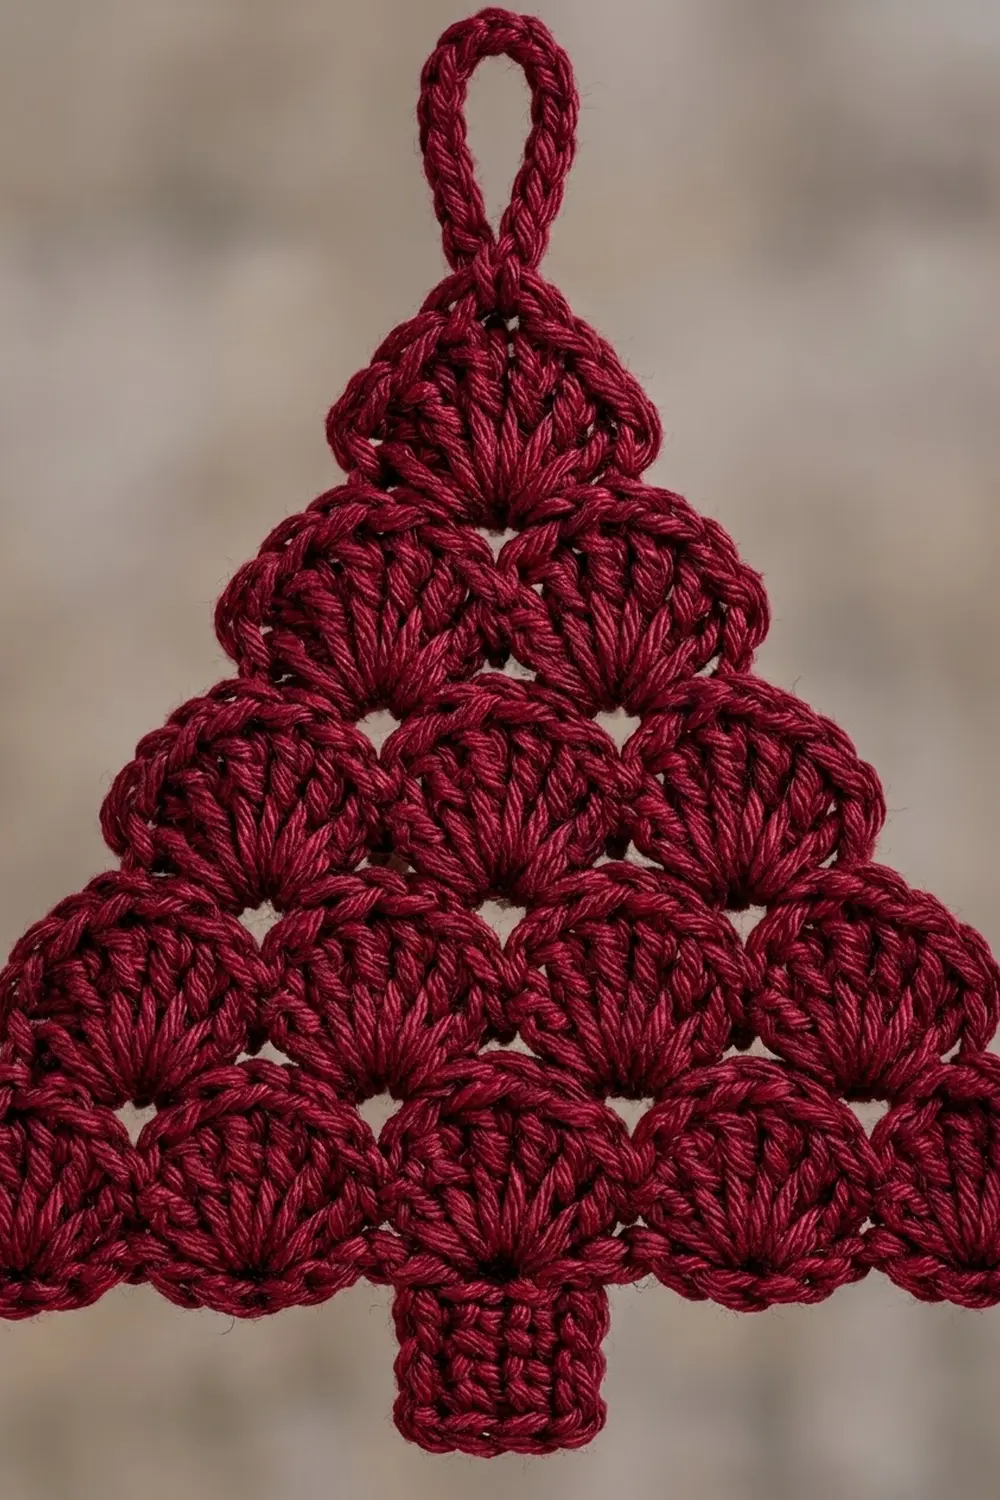
Pattern: Tree Body
Foundation: Ch 42.
Row 1 (RS): Sc in 2nd ch from hook (this is foundation st 1). *Sk 3 ch, shell in next ch, sk 3 ch, sc in next ch* 5 times. Turn.
Count: 5 shells, 6 sc (35 dc + 6 sc = 41 sts).
You worked into 41 chains. The shells sit in foundation chains 5, 13, 21, 29 and 37. The sc’s sit in chains 1, 9, 17, 25, 33 and 41. Place a marker in the free loop at the base of the center shell (chain 21). You will need it for the trunk.
Row 2: Sl st in first sc and in next 3 dc (4 sl sts, not counted). Ch 1, sc in center dc of the same shell. *Shell in next sc, sc in center dc of next shell* 4 times. Turn.
Count: 4 shells, 5 sc (28 dc + 5 sc = 33 sts).
Each new shell sits in an sc between two Row 1 shells. Each new sc sits on top of a Row 1 shell, which creates the offset scallop pattern.
Row 3: Sl st in first sc and in next 3 dc. Ch 1, sc in center dc of the same shell. *Shell in next sc, sc in center dc of next shell* 3 times. Turn.
Count: 3 shells, 4 sc (21 dc + 4 sc = 25 sts).
Row 4: Sl st in first sc and in next 3 dc. Ch 1, sc in center dc of the same shell. *Shell in next sc, sc in center dc of next shell* 2 times. Turn.
Count: 2 shells, 3 sc (14 dc + 3 sc = 17 sts).
Row 5: Sl st in first sc and in next 3 dc. Ch 1, sc in center dc of the same shell. Shell in next sc, sc in center dc of next shell. Turn.
Count: 1 shell, 2 sc (7 dc + 2 sc = 9 sts).
Every row drops exactly one shell and one sc, which is 8 stitches: 41, 33, 25, 17, 9. Each side steps in by half a shell repeat, 0.6 in (1.5 cm), so the triangle stays symmetrical.
Pattern: Tip and Hanging Loop
Row 6 (tip): Sl st in first sc and in next 3 dc. Ch 1, sc in center dc of the shell. (1 sc)
Loop: Ch 12, sl st in the same sc to form a ring. Work 18 sc into the ch-12 ring, then sl st in the tip sc.
Count: 18 sc around the loop.
Fasten off, leaving a 6 in (15.2 cm) tail. Weave the tail down through the center shell so the loop stands upright.
The covered loop hangs about 1 in (2.5 cm) above the tip and holds up better than a bare chain.
Pattern: Trunk
Turn the tree upside down so the foundation chain is on top, with the RS facing you.
Row 1: Count 2 free loops to the right of the marked loop and join yarn with a sl st in that loop (chain 19). Ch 1, sc in the same loop and in the next 4 free loops (chains 19–23). Turn.
Count: 5 sc.
The trunk sits exactly under the center shell, with 2 stitches on each side of chain 21.
Rows 2–4: Ch 1, sc in each st across. Turn.
Count: 5 sc per row.
At the end of Row 4, fasten off. Your trunk now measures 1.0 in (2.5 cm) wide × 0.8 in (2.0 cm) tall.
Border: Trunk Edging
The scallops of the tree body are their own decorative edge, so they need no border. The trunk gets one round of single crochet. It neatens the row ends and gives the trunk the firm, squared-off look seen on the finished ornament.
Border gauge: Same as the base gauge, 5 sc and 5 rows = 1 in (2.5 cm).
Edging: With the RS facing and the tree upside down, join yarn with a sl st in the free foundation loop just left of the trunk (chain 18). Then:
– Left side: Work 4 sc evenly down the trunk side, 1 sc in each row end. (4 sc)
– Bottom: 2 sc in the first st of Row 4, sc in each of the next 3 sts, 2 sc in the last st. (7 sc, including the 2 corner increases)
– Right side: Work 4 sc evenly up the other trunk side, 1 sc in each row end. (4 sc)
Sl st in the next free foundation loop (chain 24). Fasten off.
Total: 15 sc (4 + 7 + 4).
Why the math works: At this gauge, one sc row is exactly as tall as one sc is wide. That means one sc per row end lies flat, with no ruffling and no puckering. The bottom edge starts with 5 stitches. The two 2-sc corners add 1 stitch at each end, making 7. Those 2 extra stitches match the new edge stitches on the left and right sides. The trunk grows from 5 to 7 stitches wide, which is 1.0 in + 0.2 in + 0.2 in = 1.4 in (3.6 cm). It grows from 0.8 in to 1.0 in (2.5 cm) tall. The total ornament height becomes 3.5 in + 1.0 in = 4.5 in (11.4 cm).
Final Blocking
- Weave in all ends through stitches of the same color, staying inside the shells so they don’t show along the scalloped edge.
- Spritz the ornament with water until it is evenly damp but not dripping.
- Lay it flat on a blocking mat, RS up.
- Pin the bottom corners first so the base measures 6 in (15.2 cm).
- Pin the tip so the body measures 3.5 in (8.9 cm) from the foundation to the top of the tip shell.
- Pin the outer edge of each side scallop so the left and right edges form straight, matching diagonal lines.
- Pin the trunk square at 1.4 in (3.6 cm) wide × 1.0 in (2.5 cm) tall.
- Use your fingertips to open each shell into an even fan, then pin the loop straight up.
- Let it dry completely before you unpin, usually 6 to 12 hours.
Final Quality-Control Checklist
- [ ] Shell rows count 5, 4, 3, 2, 1 from the bottom up
- [ ] Every shell has 7 dc
- [ ] Each upper shell sits centered in the dip between two lower shells
- [ ] Both side edges step in evenly and mirror each other
- [ ] Trunk is centered under the middle bottom shell
- [ ] Trunk edging has 15 sc with no gaps at the corners
- [ ] Hanging loop is fully covered with 18 sc and stands upright
- [ ] Ornament measures 6 in (15.2 cm) × 4.5 in (11.4 cm), within 0.25 in (0.6 cm)
- [ ] All ends are woven in invisibly
Troubleshooting
The base is wider than the upper rows suggest, or Row 1 flares. The foundation chain is too loose. Chain with a smaller hook, or re-chain more firmly.
Row 1 cups and won’t lie flat. The foundation chain is too tight. Chain with a hook one size larger.
The tree leans to one side. You probably slipped across too many or too few stitches at the start of a row. There are always exactly 4 sl sts: the sc plus 3 dc.
Holes appear between shells. Your dc are loose. Pull up shorter loops, or go down a half hook size.
The trunk is off-center. Recount the free loops. The trunk must cover chains 19–23, centered on chain 21.
The trunk edges ripple. You worked more than 1 sc per row end. Undo the edging and work exactly 4 sc per side.
The loop flops over. Pack the 18 sc firmly, and weave the tail down through the tip shell to brace it.
Care
Hand wash in cool water with mild soap, press out the water in a towel, and dry flat, reshaping the shells. Store flat, or hang the ornament by its loop, away from direct sunlight.
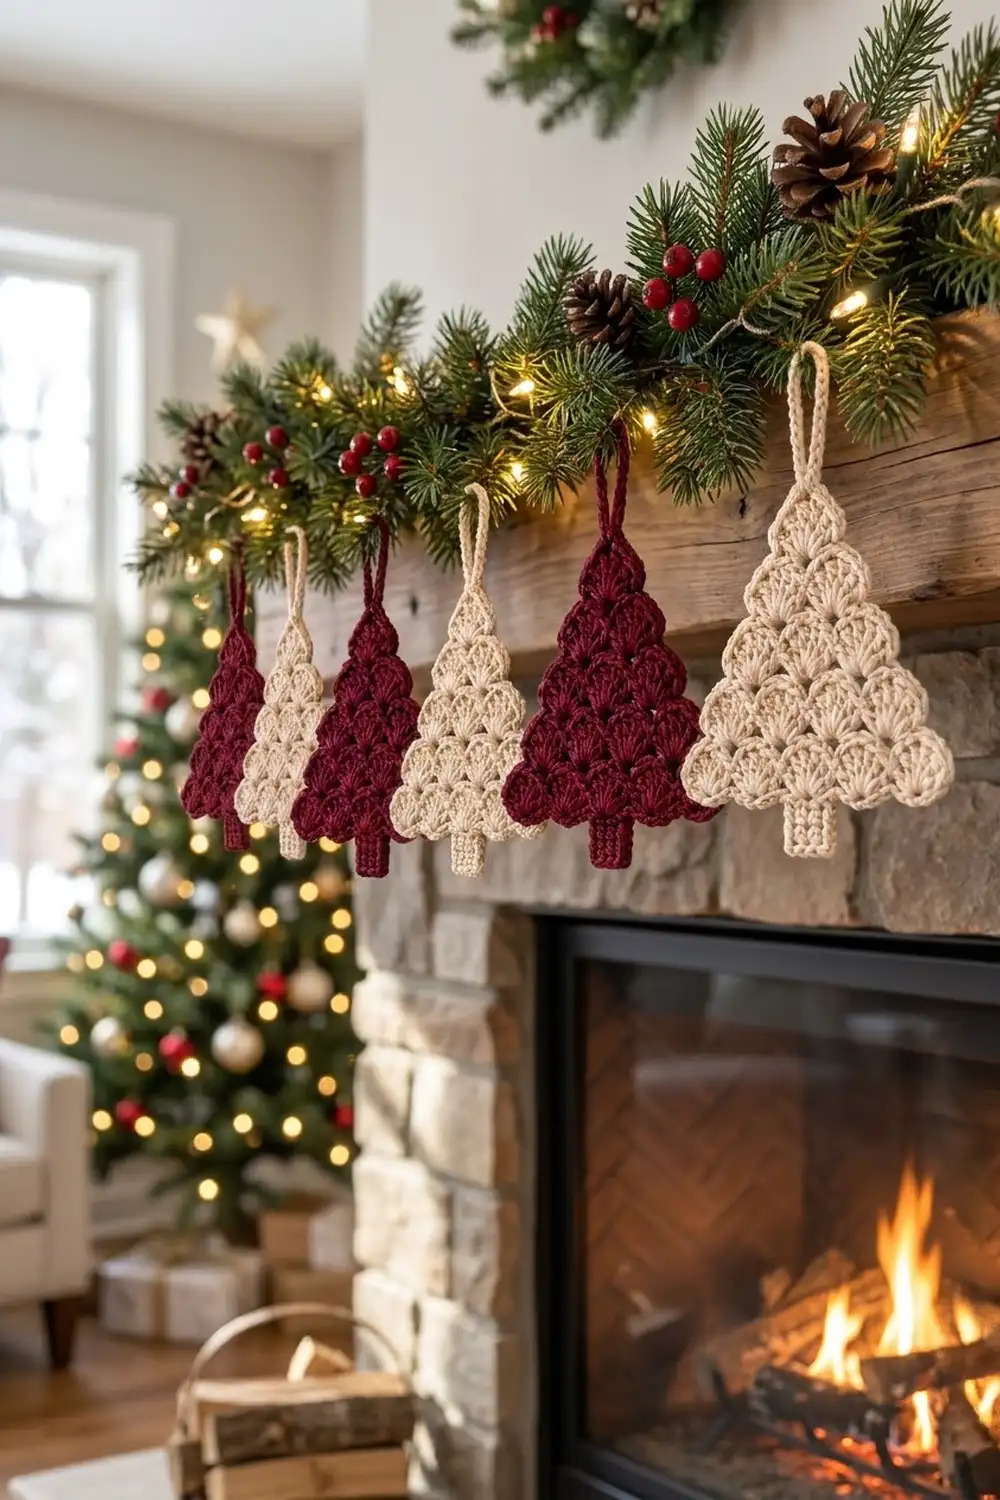
Final Notes
The size of the Evergreen Scallop Tree follows one simple chain of measurements. Start with a gauge of 5 sc = 1 in (2.5 cm). That gives a shell repeat of 1.2 in (3.0 cm) and a Row 1 of 41 stitches, 6 in (15.2 cm) wide. Each row drops 8 stitches (41, 33, 25, 17, 9), so the width steps down by 1.2 in (3.0 cm) per row. Five rows at 0.7 in (1.8 cm) each make a body 3.5 in (8.9 cm) tall. The 5-stitch trunk measures 1.0 in × 0.8 in (2.5 cm × 2.0 cm), and its 15-stitch edging brings it to 1.4 in × 1.0 in (3.6 cm × 2.5 cm). The finished ornament is 4.5 in (11.4 cm) tall, plus a 1 in (2.5 cm) loop.
Check your first tree against these numbers, then make as many as you like in burgundy, cream, or both.
Happy crocheting!