

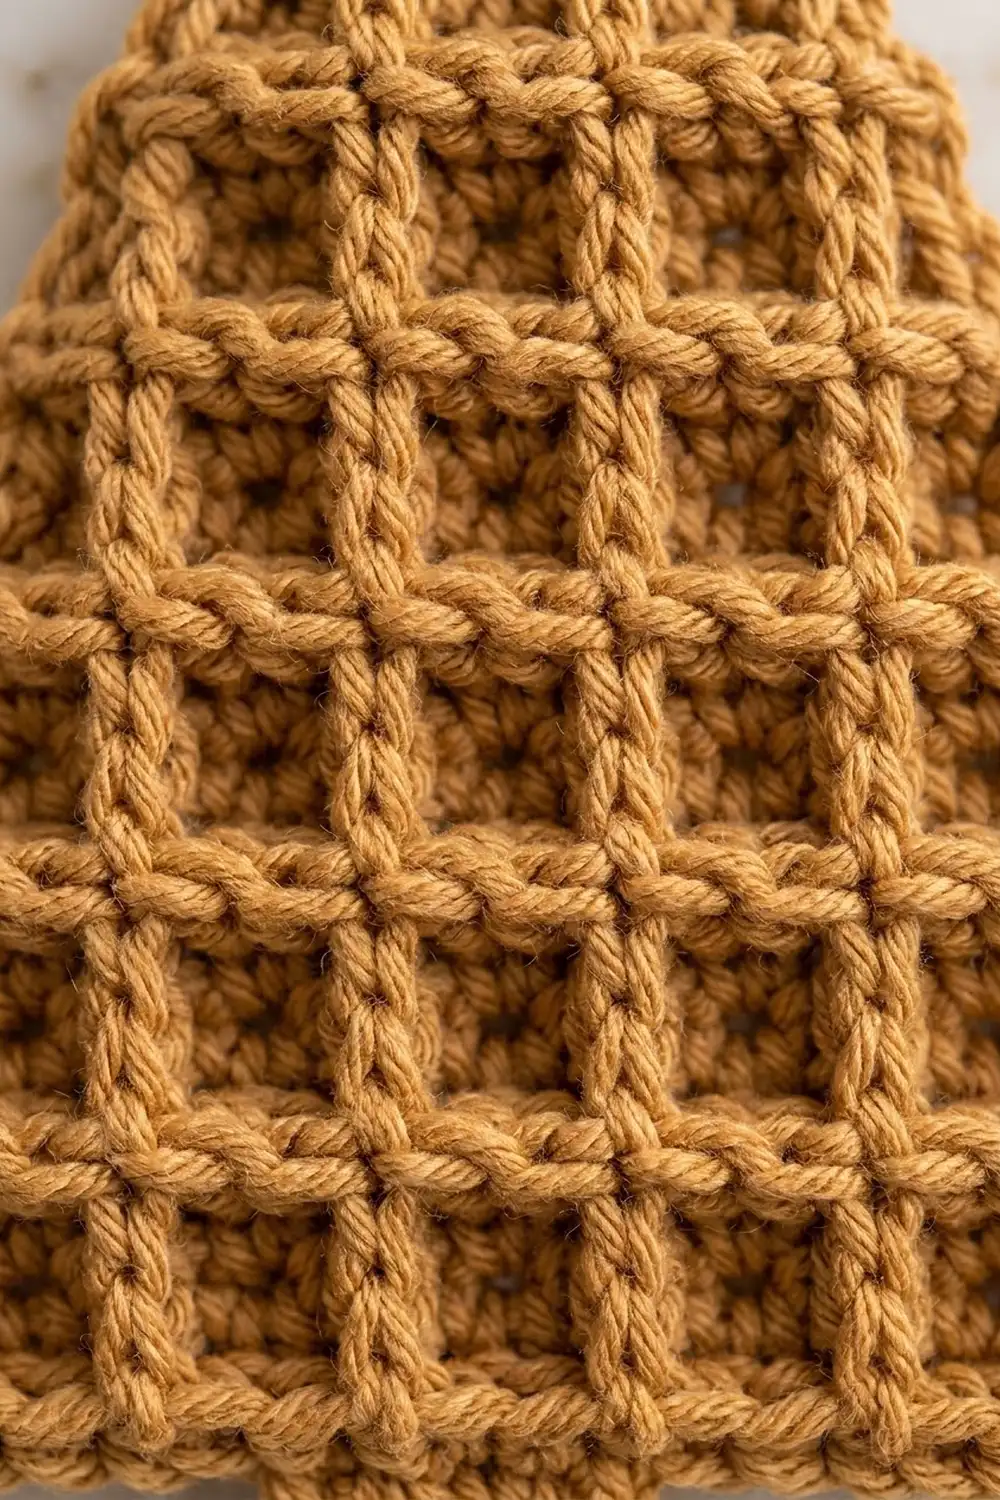
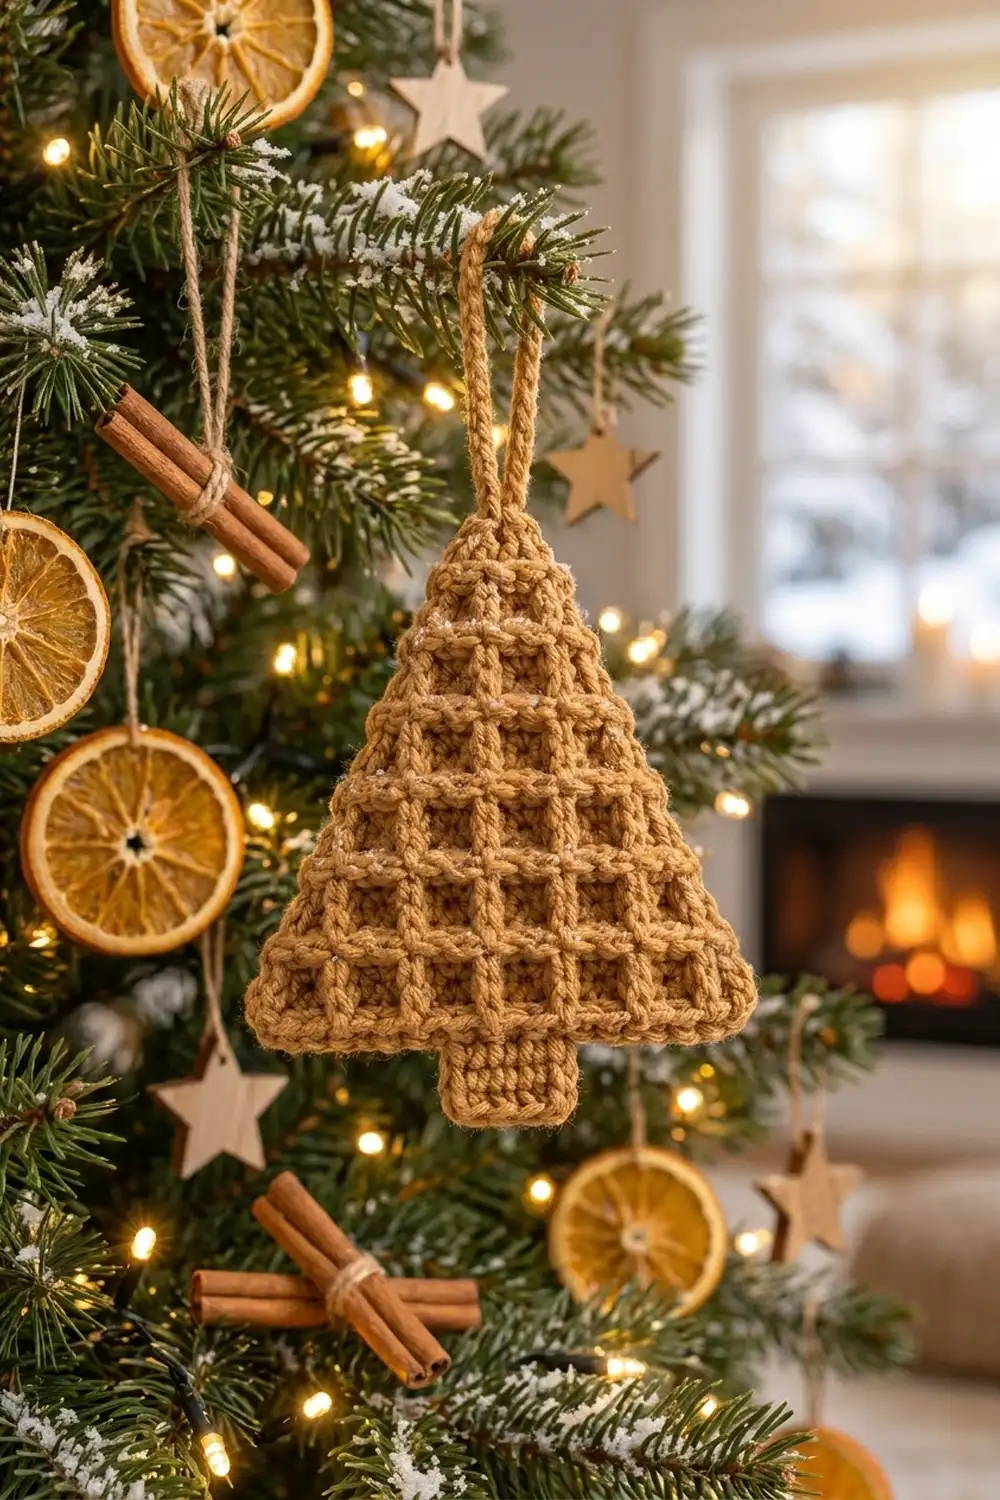
This little tree is a single flat ornament worked in a raised waffle grid. Post ribs run up the tree in neat columns, and the row tops form crisp horizontal ridges between them. Together they make a grid of square cells that narrows to a point. A short solid trunk sits under the tree, a single-crochet rim frames the whole shape, and a thick corded loop at the tip lets it hang.
The sample is shown in two warm neutrals: a golden caramel and a soft cream. Each ornament uses one color only, so you can make a matching pair or a whole set from leftover worsted yarn. The look is calm and Scandinavian, a bit like a waffle cookie. It suits natural greenery, gold baubles and warm fairy lights.
The pattern uses US crochet terms throughout. The finished ornament measures 4.75 in (12.1 cm) wide and 6 in (15.2 cm) tall, not counting the hanging loop. The loop adds about 1.5 in (3.8 cm).
Construction is simple. You work the tree triangle from the bottom up in rows. You start with a row of double crochet, then decrease 1 stitch at each end of every row while the post stitches stack into columns. Next you work the trunk down from the center of the foundation chain. One round of single crochet goes around everything, and you finish with the corded loop at the tip.
Finished Size and Construction
- Finished size: 4.75 in (12.1 cm) wide x 6 in (15.2 cm) tall, plus a 1.5 in (3.8 cm) loop
- Skill level: Easy-intermediate (front and back post stitches, decreases)
- Terminology: US crochet terms
- Yarn weight: Worsted (#4)
- Hook: 4.5 mm (US 7)
- Number of pieces: 1 (one flat tree ornament)
- Layout: Single piece, no joining
- Tree triangle: 4.25 in (10.8 cm) wide at the base x 4.5 in (11.4 cm) tall
- Trunk: 1.25 in (3.2 cm) wide x 1 in (2.5 cm) long
- Size before border: 4.25 in (10.8 cm) wide x 5.5 in (14.0 cm) tall
- Border depth: 0.25 in (0.6 cm) on every edge
Materials
Yarn: Use a smooth worsted yarn with good stitch definition. Cotton or a cotton blend gives the crispest grid. Soft acrylic also works but looks a little rounder. The quantities below assume a yarn of about 200 m per 100 g (219 yd per 100 g).
- Color A, golden caramel: 15 g, about 30 m (33 yd) for one ornament
- Color B, cream (optional second colorway): 15 g, about 30 m (33 yd) for one ornament
Each ornament uses about 9-10 g. These quantities include a margin for checking your gauge and weaving in ends.
Tools:
- 4.5 mm (US 7) crochet hook
- Tapestry needle
- Scissors
- 2 stitch markers
- Ruler or tape measure
- Blocking mat, rust-proof pins and a spray bottle
- Optional: fabric stiffener or diluted craft glue
Abbreviations (US Terms)
- ch – chain
- sl st – slip stitch
- sc – single crochet
- dc – double crochet
- dc2tog – double crochet 2 together (decrease of 1)
- dc3tog – double crochet 3 together (decrease of 2)
- FPdc – front post double crochet
- BPdc – back post double crochet
- st(s) – stitch(es)
- RS / WS – right side / wrong side
Special stitch – Waffle grid: On RS rows, work FPdc around each post stitch from the row below and dc in each dc. On WS rows, work BPdc around each post stitch and dc in each dc. A BPdc worked from the WS stands out on the RS, so every post column stays raised on the front. The ch 2 at the start of each row does not count as a stitch.
Gauge and Checkpoints
Gauge: 16 sts and 8 rows = 4 in (10.2 cm) in waffle grid. That is 4 sts and 2 rows per 1 in (2.5 cm). For the border, 4 sc = 1 in (2.5 cm).
Test one piece first. The ornament is small, so the tree itself is your swatch. Work Rows 1-4 and measure before you go on.
- After Row 1: 4.25 in (10.8 cm) wide.
- After Row 4: 2 in (5.1 cm) tall from the foundation edge.
- After Row 9: 4.5 in (11.4 cm) tall.
- After the trunk: the trunk is 1.25 in (3.2 cm) wide and 1 in (2.5 cm) long.
- After the border: 4.75 in (12.1 cm) x 6 in (15.2 cm).
If your piece is too big: go down to a 4 mm (US G-6) hook. If it is too small: go up to a 5 mm (US H-8) hook. Width matters most. If Row 1 is off by more than 0.25 in (0.6 cm), change hooks and restart, because every later count depends on it.
Tree Triangle
Work in rows. Each row decreases 1 st at each end, so the count drops by 2 every row. The outermost post column disappears into a decrease every other row, which is what makes the grid narrow toward the tip.
Row 1 (RS): Ch 19. Dc in 3rd ch from hook and in each ch across. (17 dc)
Row 2 (WS): Ch 2, turn. Dc2tog over first 2 sts, [BPdc around next st, dc in next st] 6 times, BPdc around next st, dc2tog over last 2 sts. (15 sts: 7 BPdc, 6 dc, 2 dc2tog)
Row 3 (RS): Ch 2, turn. Dc2tog over first 2 sts, dc in next st, [FPdc around next st, dc in next st] 5 times, dc2tog over last 2 sts. (13 sts: 5 FPdc, 6 dc, 2 dc2tog)
The first and last BPdc of Row 2 are absorbed into the decreases. The other 5 post columns carry on.
Row 4 (WS): Ch 2, turn. Dc2tog over first 2 sts, [BPdc around next st, dc in next st] 4 times, BPdc around next st, dc2tog over last 2 sts. (11 sts: 5 BPdc, 4 dc, 2 dc2tog)
Checkpoint: the piece should be 2 in (5.1 cm) tall.
Row 5 (RS): Ch 2, turn. Dc2tog over first 2 sts, dc in next st, [FPdc around next st, dc in next st] 3 times, dc2tog over last 2 sts. (9 sts: 3 FPdc, 4 dc, 2 dc2tog)
Row 6 (WS): Ch 2, turn. Dc2tog over first 2 sts, [BPdc around next st, dc in next st] 2 times, BPdc around next st, dc2tog over last 2 sts. (7 sts: 3 BPdc, 2 dc, 2 dc2tog)
Row 7 (RS): Ch 2, turn. Dc2tog over first 2 sts, dc in next st, FPdc around next st, dc in next st, dc2tog over last 2 sts. (5 sts: 1 FPdc, 2 dc, 2 dc2tog)
Row 8 (WS): Ch 2, turn. Dc2tog over first 2 sts, BPdc around next st, dc2tog over last 2 sts. (3 sts)
Row 9 (RS): Ch 2, turn. Dc3tog over all 3 sts. (1 st) Fasten off.
Post columns per row: 0, 7, 5, 5, 3, 3, 1, 1, 0. The center column runs from Row 2 up to Row 8 and gives the tree a clear center line.
Checkpoint: the triangle should be 4.25 in (10.8 cm) wide at the base and 4.5 in (11.4 cm) tall.
Trunk
You work the trunk straight down from the free loops on the underside of the foundation chain. Number the 17 foundation sts from the right edge of Row 1 (st 1) to the left edge (st 17), with the RS facing and the tree upright. The trunk uses the center 5 sts, sts 7-11, which leaves 6 sts free on each side.
Place markers in sts 7 and 11 so you can find them easily.
Trunk Row 1: Turn the tree upside down with the RS facing. Join yarn in the free loop of st 11. Ch 1, sc in the same loop and in the next 4 free loops, ending in st 7. (5 sc)
Trunk Rows 2-4: Ch 1, turn. Sc in each st across. (5 sc)
Fasten off.
Checkpoint: the trunk should be 1.25 in (3.2 cm) wide and 1 in (2.5 cm) long. The whole piece should now measure 4.25 in (10.8 cm) x 5.5 in (14.0 cm).
Border
Border gauge: 4 sc = 1 in (2.5 cm). One round of sc adds 0.25 in (0.6 cm) on every edge.
Each corner group below is counted once and is not repeated in the side counts.
Round 1 (RS): Hold the tree upright with the RS facing. Join yarn in the top of the Row 9 dc3tog and work clockwise:
- Tip: Ch 1, 3 sc in the dc3tog. (3 sc)
- Right slanted side: Work down the row ends of Rows 8 to 1, alternating 3 sc and 2 sc. Start with 3 sc in the Row 8 end. (20 sc)
- Right base corner: 3 sc in the free loop of foundation st 1. (3 sc)
- Right base: Sc in the free loops of sts 2-6. (5 sc)
- Trunk right side: Sc in each row end of Trunk Rows 1-4. (4 sc)
- Trunk bottom: 3 sc in first st of Trunk Row 4, sc in next 3 sts, 3 sc in last st. (9 sc: 3 + 3 + 3)
- Trunk left side: Sc in each row end of Trunk Rows 4-1. (4 sc)
- Left base: Sc in the free loops of sts 12-16. (5 sc)
- Left base corner: 3 sc in the free loop of foundation st 17. (3 sc)
- Left slanted side: Work up the row ends of Rows 1 to 8, alternating 2 sc and 3 sc. Start with 2 sc in the Row 1 end. (20 sc)
Sl st to first sc to join. (76 sc)
Total check: 3 + 20 + 3 + 5 + 4 + 9 + 4 + 5 + 3 + 20 = 76.
Hanging loop: Sl st into the center sc of the tip group. Ch 16, then sl st into the same center sc to form a loop. Work 24 sc over the chain loop so it is fully covered. Sl st into the center tip sc. Fasten off and weave in all ends.
Why the math works: Each slanted side is about 5 in (12.7 cm) long. At 4 sc per inch, 20 sc covers exactly 5 in (12.7 cm), so the edge lies flat. Along the slant, each dc row end is a little more than 0.5 in (1.3 cm). Alternating 3 sc and 2 sc averages 2.5 sc per row end, which fits better than 2 sc (would pull) or 3 sc (would ruffle). The base and trunk edges take 1 sc per st or row end, and the 3 sc groups turn each corner. The base has 17 sts: 5 are used by the trunk and 6 are free on each side. Each set of 6 becomes 1 corner group plus 5 sc. The finished outline is 4.25 in + 0.5 in = 4.75 in (12.1 cm) wide and 5.5 in + 0.5 in = 6 in (15.2 cm) tall.
Final Blocking
- Weave in all ends along the WS and trim them close.
- Spritz the ornament with water until just damp. Do not soak cotton.
- Lay it RS up on the blocking mat.
- Pin the tip, the two base corners and the four trunk corners first.
- Ease each slanted side into a straight line 5 in (12.7 cm) long. Pin every 1 in (2.5 cm).
- Check that the base is 4.75 in (12.1 cm) wide and the total height is 6 in (15.2 cm).
- Gently pinch each post column so it stands up. Do not press it flat.
- Let it dry fully. For a stiffer ornament, brush a thin coat of stiffener on the WS and let it dry again.
Final Quality-Control Checklist
- Row 1 has 17 dc, and each later row has 2 fewer sts.
- All post columns are raised on the RS and run straight up.
- The center post column runs from Row 2 to Row 8.
- The trunk is centered, with 6 free base sts on each side.
- Border Round 1 has 76 sc.
- Both slanted sides have 20 sc and mirror each other.
- The hanging loop is fully covered and attached exactly at the tip.
- The finished piece measures 4.75 in (12.1 cm) x 6 in (15.2 cm).
Troubleshooting
The post columns zigzag instead of stacking. You probably worked a post stitch around a dc. Count from the decrease at the start of each row and follow the bracket repeats exactly.
The grid looks flat on the RS. On WS rows you need BPdc, not FPdc. Back post stitches worked from the WS stand out on the front.
The tree leans to one side. Make sure each row starts and ends with a dc2tog. Missing one decrease shifts the whole tip.
The slanted edges ripple. Your border is too loose. Use 2 sc in every row end, or go down a hook size for the border only.
The slanted edges pull inward. Your border is too tight. Keep the 3 sc / 2 sc pattern and loosen your tension.
The trunk is off-center. Recount the foundation loops and check that you started in st 11 and ended in st 7.
The loop twists. Hold the chain flat while you sc over it, and do not pull it tight.
Care
Hand wash in cool water, press the water out in a towel and dry flat. Re-block if needed, and spot clean only if you used stiffener.
Final Notes
The measurements build in a short, simple chain. Row 1 sets the width at 4.25 in (10.8 cm), and nine rows bring the triangle to 4.5 in (11.4 cm) tall. The trunk adds 1 in (2.5 cm), so the piece is 4.25 in (10.8 cm) x 5.5 in (14.0 cm) before the border. One round of 76 sc adds 0.25 in (0.6 cm) on every edge. That gives a finished tree of 4.75 in (12.1 cm) x 6 in (15.2 cm) with a 1.5 in (3.8 cm) loop.
Get Row 1 right and everything else follows. Make one in caramel and one in cream, then hang them together on a branch or tie one to a gift.
Happy crocheting!