

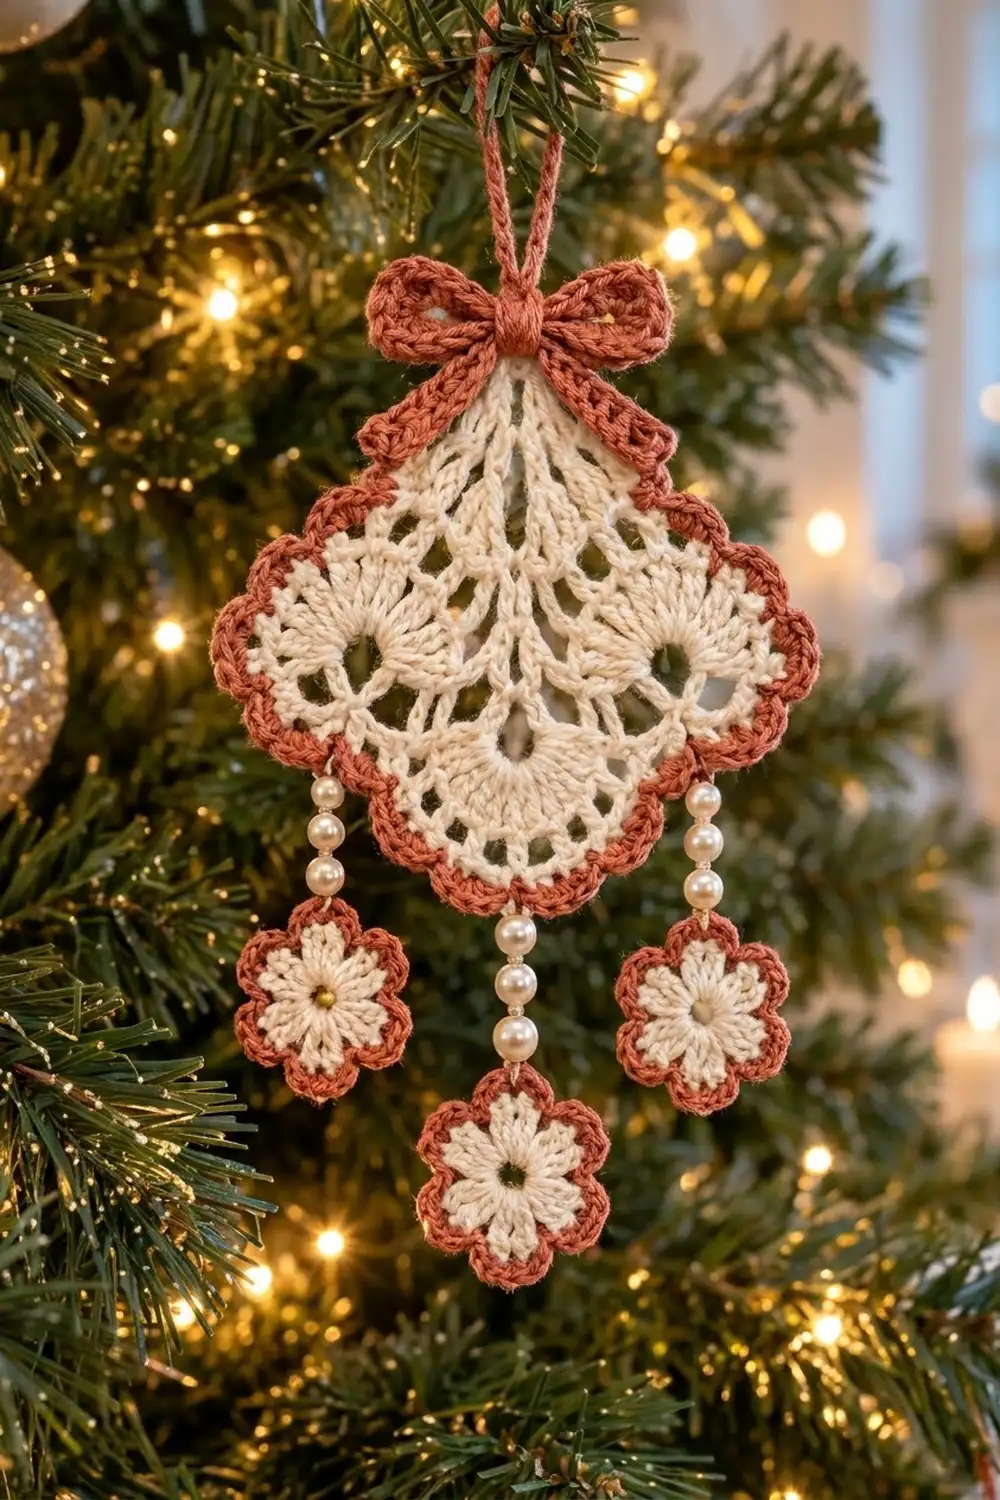
The Rosewood Lace Ornament is a small, old-fashioned tree decoration. A cream lace motif hangs on point from a rust bow, and three pearl-strung flowers dangle below it. It works well as a gift-tag topper, a keepsake, or a set of matching ornaments for one tree.
The palette is just two colors, warm cream and rust, plus ivory pearl beads. The lace has rays from the center, V-stitches along the sides, and three round fans that form the rounded lower lobes. A rope-like reverse single crochet border keeps the edge crisp.
This pattern uses US crochet terms. The finished lace body measures 4.5 in (11.4 cm) wide and 4.5 in (11.4 cm) tall. The full ornament, from the top of the hanging loop to the bottom of the center flower, is about 8.5 in (21.6 cm) long.
The body is worked in the round as a square. Three corners become fan lobes and the fourth corner stays a sharp point. You add a two-round rust border, then make a bow and three small flowers and attach the flowers on pearl strands.
Finished Size and Construction
- Finished body size: 4.5 in x 4.5 in (11.4 cm x 11.4 cm), measured point to lobe
- Full ornament length: about 8.5 in (21.6 cm)
- Skill level: Intermediate
- Terminology: US
- Yarn weight: #1 super fine (fingering) mercerized cotton
- Hook: 2.25 mm (US B-1)
- Number of pieces: 1 main lace body, plus small trims (1 bow strip, 1 bow tail strip, 3 flowers)
- Layout: One single motif hung on point, with the bow at the top and three drops below
- Body size before border: 4 in x 4 in (10.2 cm x 10.2 cm)
- Border depth: 0.25 in (0.6 cm) per edge, 2 rounds
- Flower size: 1.25 in (3.2 cm) across
Materials
Use a smooth mercerized cotton in fingering weight. It shows the stitch definition clearly, blocks crisply and won’t fuzz on the tree. Avoid fluffy or splitty yarns, because the small holes in the lace will fill in.
- Cream (Color A): 10 g / 34 m, for the lace body and flower centers
- Rust (Color B): 6 g / 20 m, for the border, bow, hanging loop and flower edges
- Pearl beads: 13 ivory pearls, 6 mm, with holes large enough for a needle threaded with cotton
These quantities include a margin of about 20% for swatching and tails.
Tools:
– 2.25 mm (US B-1) crochet hook
– Tapestry needle, plus a fine beading needle if your pearls have small holes
– Scissors
– 4 locking stitch markers
– Blocking mat, rust-proof pins, and a spray bottle
– Optional: light spray starch
Abbreviations (US Terms)
- ch – chain
- sl st – slip stitch
- sc – single crochet
- hdc – half double crochet
- dc – double crochet
- tr – treble crochet
- sp(s) – space(s)
- st(s) – stitch(es)
- sk – skip
- rev sc – reverse single crochet (crab stitch)
- beg – beginning
Special stitches:
– V-st: (dc, ch 3, dc) in the same stitch or space.
– Rev sc: Work single crochet from left to right (right-handers). Insert the hook into the next stitch to the right, yarn over, pull up a loop, yarn over, and draw through both loops. This makes a twisted, rope-like edge.
Gauge and Checkpoints
Gauge isn’t critical for an ornament, but the size of the lace holes depends on it. Make the body first and measure at every checkpoint before going on.
- After Rnd 1: circle measures 0.75 in (1.9 cm) across.
- After Rnd 2: square measures 2 in (5.1 cm) from flat side to flat side, and 2.75 in (7.0 cm) from corner loop to corner loop.
- After Rnd 3: 3.5 in (8.9 cm) from the top point to the bottom fan.
- After Rnd 4: 4 in (10.2 cm) point to lobe, in both directions.
- After the border: 4.5 in (11.4 cm) point to lobe.
- Border gauge: 9 sc = 1 in (2.5 cm) along a straight side.
If your piece is too big: go down to a 2.0 mm hook, or pull the chain loops a little snugger.
If your piece is too small: go up to a 2.5 mm hook. Tight lace closes its holes, so a slightly loose fit is better than a tight one.
Main Lace Body
Use Color A (cream).
Foundation: Ch 6, then sl st to the first ch to form a ring.
Rnd 1 (rays): Ch 4 (counts as dc + ch 1). Work [dc in ring, ch 1] 11 times, then sl st to the 3rd ch of the beg ch-4.
(12 dc, 12 ch-1 sps)
These evenly spaced dc are the rays that spread from the center.
Rnd 2 (square setup): Sl st into the first ch-1 sp. Ch 3 (counts as dc), then work 2 dc in the same sp. [Ch 2, 3 dc in next sp] twice, then ch 5 (corner loop).
[3 dc in next sp, (ch 2, 3 dc in next sp) twice, ch 5] twice.
3 dc in next sp, (ch 2, 3 dc in next sp) twice, ch 1, then tr in the top of the beg ch-3. The ch 1 and tr together make the fourth corner loop.
(36 dc in 12 groups of 3; 8 ch-2 sps; 4 corner loops)*
Each side now has 3 dc groups with 2 ch-2 sps between them. Your hook sits in the middle of the last corner loop. This corner is the top point, so place a marker in it.
Rnd 3 (V-stitches and fans): Ch 3 (counts as dc), then work 2 dc around the tr post in the top corner sp.
Side: Ch 2, sk the next 3-dc group, V-st in the next ch-2 sp. Ch 2, sc in the center dc of the next 3-dc group, ch 2, V-st in the next ch-2 sp. Ch 2, sk the next 3-dc group.
Fan corner: 9 dc in the ch-5 corner loop.
Repeat Side and Fan corner twice more, so you have 3 fan corners in total.
Work the Side once more. Then work 3 dc in the top corner sp, ch 2, and sl st to the top of the beg ch-3.
(Per side: 2 V-sts, 1 sc, 4 ch-2 sps. Top point: 6 dc and 1 ch-2 sp. Each fan: 9 dc. Total: 49 dc, 4 sc, 8 V-sts.)
The ch-5 loops from Rnd 2 stay open inside each 9-dc fan. These are the round holes in the left, right and bottom lobes. The top corner has only (3 dc, ch 2, 3 dc), so it stays a sharp point.
Rnd 4 (sc edge): Ch 1, then sc in the same st as the join and in the next 2 dc (3 sc).
Side (19 sc): 2 sc in the ch-2 sp. In the V-st: sc in dc, 3 sc in ch-3 sp, sc in dc. 2 sc in the ch-2 sp, sc in the sc, 2 sc in the ch-2 sp. In the next V-st: sc in dc, 3 sc in ch-3 sp, sc in dc. 2 sc in the ch-2 sp.
Check: 2 + 5 + 2 + 1 + 2 + 5 + 2 = 19.
Fan corner (18 sc): 2 sc in each of the 9 dc.
Repeat Side and Fan corner twice more. Work the Side once more.
Top point: sc in the next 3 dc, then 3 sc in the ch-2 sp, then sl st to the first sc. Mark the center sc of those 3 as the point stitch. Fasten off.
Stitch count for Rnd 4:
– 4 sides x 19 sc = 76
– 3 fans x 18 sc = 54
– Top point: 3 + 3 + 3 = 9
– Total: 139 sc
In this pattern, “side” means the 19 sc between the corner sections. The corner sections are counted separately.
Checkpoint: The body measures 4 in (10.2 cm) point to lobe, and the lobes curve without cupping.
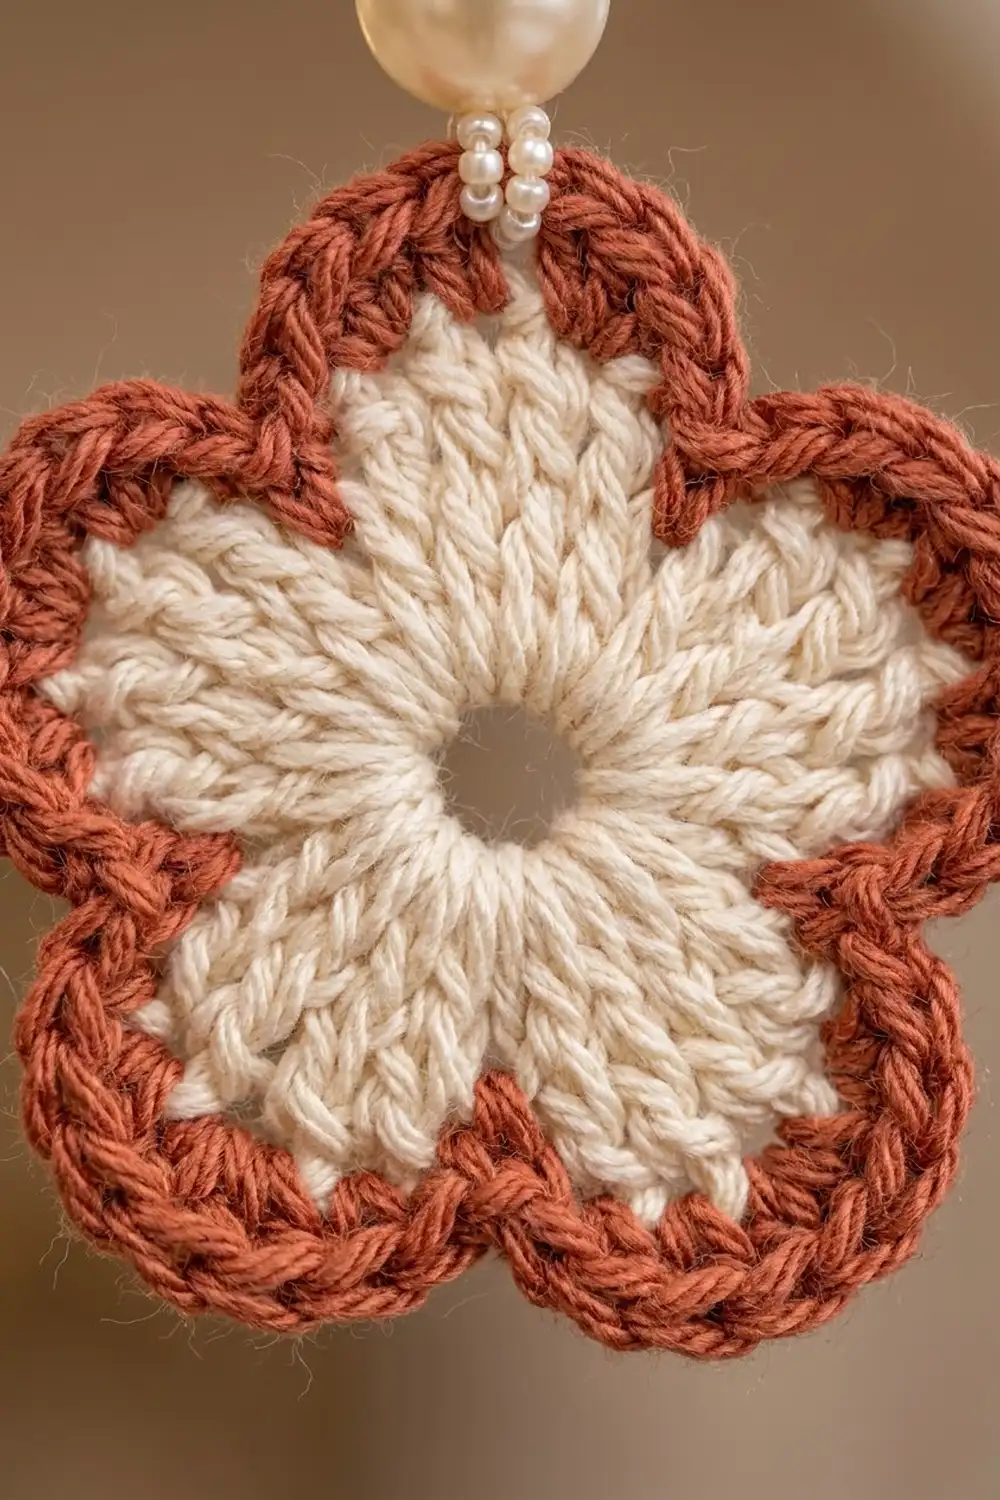
Flowers (Make 3)
Rnd 1: With Color A, ch 4, then sl st to the first ch to form a ring. Ch 1, work 10 sc in the ring, and sl st to the first sc.
(10 sc)
Rnd 2: Ch 1, sc in the same st. [Ch 3, sk 1 st, sc in next st] 4 times. Ch 3, sk the last st, then sl st to the first sc.
(5 sc, 5 ch-3 loops)
Rnd 3 (petals): In each ch-3 loop work (sc, hdc, 3 dc, hdc, sc). Sl st to the first sc. Fasten off Color A.
(5 petals, 7 sts each = 35 sts)
Rnd 4 (edge): Join Color B in any st. Work 1 sc in each st around, but work 2 sc in the center dc of each petal. Sl st to the first sc and fasten off.
(35 worked 1-per-st + 5 added = 40 sc)
Checkpoint: Each flower measures 1.25 in (3.2 cm) across, with a small open hole in the center.
Bow and Hanging Loop
Bow loop strip: With Color B, ch 29. Sc in the 2nd ch from the hook and in each ch across (28 sc). Ch 1 and turn, then sc in each st across (28 sc). Fasten off with an 8 in (20.3 cm) tail.
Overlap the two short ends by 0.25 in (0.6 cm) and whipstitch them closed to make a ring. Flatten the ring so the seam sits at the center back.
Bow tail strip: With Color B, ch 16. Sl st in the 2nd ch from the hook and in each ch across (15 sl st). Fasten off. Fold it into a V.
Assemble the bow: Lay the V-fold behind the flattened ring. Wrap the long tail tightly around the center 6 times, then secure it at the back. The finished bow is about 1.5 in (3.8 cm) wide.
Rust Border
Rnd 5 (sc trim): With the right side facing, join Color B in the marked point st. Ch 1 and work 3 sc in the point st.
Sc in each st along the side (19 sc).
Fan: [sc in next 5 sts, 2 sc in next st] 3 times (21 sc).
Continue this way around: sides get 1 sc per st and each fan gets the 21-sc pattern. Sc in the remaining top-point sts, then sl st to the first sc.
Count for Rnd 5:
– Top point: 9 sts worked 1 each, plus 2 added at the point = 11
– Sides: 4 x 19 = 76, nothing added
– Fans: 3 x (18 + 3 added) = 63
– Total: 139 worked 1-per-st + 11 added = 150 sc
Rnd 6 (rope edge): Ch 1. Rev sc in each st around, then sl st to the first st.
(150 rev sc)
Don’t fasten off yet.
Hanging loop: Sl st into the center st of the top point. Ch 40 and sl st back into the same st. The loop is about 2 in (5.1 cm) when doubled. Fasten off.
Why the math works: Each side keeps its 19 sts from Rnd 4 one-for-one. At 9 sc per 1 in (2.5 cm), that matches the length of the straight edge, so the sides lie flat with no ruffling. The fans are curved, and Rnd 5 sits on their outer edge, so each fan needs 3 extra sts to avoid cupping. The point gets 3 sc in one st, which turns the corner sharply instead of rounding it. Rev sc is worked one-for-one and adds no width beyond its rope texture.
Attaching the Trims
- Sew the bow over the base of the hanging loop on the top point, catching both layers of the border.
- Cut three 10 in (25.4 cm) lengths of Color A. Anchor one at the lowest border st of the left lobe, one at the lowest st of the right lobe, and one at the lowest st of the bottom lobe.
- Side strands: String 5 pearls each, about 1.25 in (3.2 cm).
- Center strand: String 3 pearls, about 0.75 in (1.9 cm).
- Sew each strand into the tip of one rust petal edge on a flower. Pass back up through all the pearls and knot the thread at the lobe. Weave in the ends.
The center flower hangs below the bottom lobe, and the side flowers hang next to it, a little higher.
Final Blocking
- Weave in all ends except the bow wrap.
- Spray the body and flowers lightly until they’re damp, not soaked.
- Pin the body on point, making it 4.5 in (11.4 cm) tall and 4.5 in (11.4 cm) wide.
- Put a pin in the tip of the top point and one in the center of each lobe. Pin the sides straight.
- Open each lobe hole with a pin tip.
- Pin the flowers flat, with a pin in each petal.
- Mist with starch if you want a stiffer finish.
- Let everything dry completely before removing the pins.
Final Quality-Control Checklist
- Rnd 4 totals 139 sc, with 19 per side.
- Rnd 5 totals 150 sc, and Rnd 6 totals 150 rev sc.
- The top point is sharp, and all three lobes are round and evenly sized.
- All three lobe holes are open.
- The body measures 4.5 in (11.4 cm) point to lobe.
- Each flower has 40 sc on the edge and measures 1.25 in (3.2 cm).
- Pearl counts are 5, 3, 5, and the strands are tied firmly.
- The bow is centered and the hanging loop is secure.
Troubleshooting
- Lobes cup: Add 1 more increase per fan in Rnd 5, and remember to add it to your total.
- Sides ruffle: Your border is looser than your body. Go down a hook size for the rust rounds.
- Top point looks rounded: You may have skipped the 3 sc in the point st in Rnd 5. Rip back and redo it.
- Lobe holes closed up: The ch-5 loops are too tight. Chain more loosely in Rnd 2.
- Flowers curl: Block them wet and pin each petal.
- Pearls slide down: Knot the thread under the top pearl as well as at the lobe.
Care
Hand wash in cool water, press out the water in a towel, and pin it flat to dry. Store flat in tissue so the point and lobes keep their shape.
Final Notes
Here’s the measurement chain: Rnd 1 is 0.75 in (1.9 cm) across, Rnd 2 is 2 in (5.1 cm) side to side, Rnd 3 is 3.5 in (8.9 cm) point to fan, Rnd 4 is 4 in (10.2 cm), and the bordered body is 4.5 in (11.4 cm). The stitch counts run 139 to 150 to 150, and the full ornament is about 8.5 in (21.6 cm) long. If you match each checkpoint, the finished ornament will match too. Happy crocheting!