

The Golden Pinwheel Table Runner is a lace runner built from swirling flower motifs. Each flower has an open center ring and eight curved petals that all lean in one direction, so the whole runner seems to spin gently along the table. Tassels at both ends add a relaxed boho finish.
The sample is worked in one color, a natural sand-beige cotton. A single neutral shade lets the petal ridges and the lacy gaps between the flowers do the work, and it suits wood, linen, and stoneware.
This pattern uses US crochet terms. The finished runner measures 16.5 x 61.5 in (41.9 x 156.2 cm) before tassels, or 16.5 x 69.5 in (41.9 x 176.5 cm) with the 4 in (10.2 cm) tassels at each end.
Construction is simple to follow. You make 36 identical motifs, joining each one to its neighbors on the last round (join-as-you-go) in a grid of 3 x 12. Two rounds of chain-loop edging straighten the outer edges, and six tassels hang from each short end.
Finished Size and Construction
- Finished size: 16.5 x 61.5 in (41.9 x 156.2 cm), plus 4 in (10.2 cm) tassels at each end
- Skill level: Intermediate
- Terminology: US crochet terms
- Yarn weight: Worsted (#4) cotton
- Hook: 4.5 mm (US 7)
- Number of pieces: 36 motifs, plus 12 tassels
- Layout: 3 motifs wide x 12 motifs long
- Piece size: 5 in (12.7 cm) side to side across the petal pairs; 5.5 in (14.0 cm) tip to tip
- Size before border: 15 x 60 in (38.1 x 152.4 cm)
- Border depth: 0.75 in (1.9 cm) on each side
Materials
Yarn: Use a smooth, tightly plied worsted-weight cotton or cotton blend. Mercerized or twisted cotton gives the crispest petal ridges. Avoid fuzzy or very soft yarns, which blur the swirl.
- Sand / natural beige: 350 g, about 595 m (7 balls of 50 g / 85 m)
Quantities include a margin of about 10% for swatching, joining, and tassels.
Tools:
– 4.5 mm (US 7) crochet hook
– Tapestry needle
– Scissors
– Stitch markers
– Stiff card 4 in (10.2 cm) tall, or a tassel maker
– Blocking mats and rustproof pins
– Spray bottle
– Measuring tape
Abbreviations (US Terms)
- ch – chain
- sl st – slip stitch
- sc – single crochet
- hdc – half double crochet
- dc – double crochet
- tr – treble crochet (yarn over twice)
- sp – space
- st(s) – stitch(es)
- RS – right side
Special stitch – Joining Tip: In place of (sc, ch 3, sc) at a petal tip, work sc, ch 1, sl st into the ch-3 sp of the matching tip on the finished neighbor motif, ch 1, sc. The ch 1, sl st, ch 1 replaces the ch 3, so the round’s stitch count does not change.
Gauge and Checkpoints
Make one complete motif first and block it lightly before you start joining. The motif is your gauge.
- After Round 1: the ring measures 1.25 in (3.2 cm) across, with a 0.5 in (1.3 cm) open center.
- After Round 2: 4.5 in (11.4 cm) side to side.
- After Round 3: 5 in (12.7 cm) side to side across the petal pairs, and 5.5 in (14.0 cm) tip to tip.
A tolerance of ±0.25 in (±0.6 cm) per motif is fine. Over 12 motifs, though, that becomes ±3 in (±7.6 cm) in runner length, so get as close as you can.
If your motif is too big: go down to a 4 mm hook, or tighten the petal chains. If it is too small: go up to a 5 mm hook. Remeasure after Round 2 before working the outline.
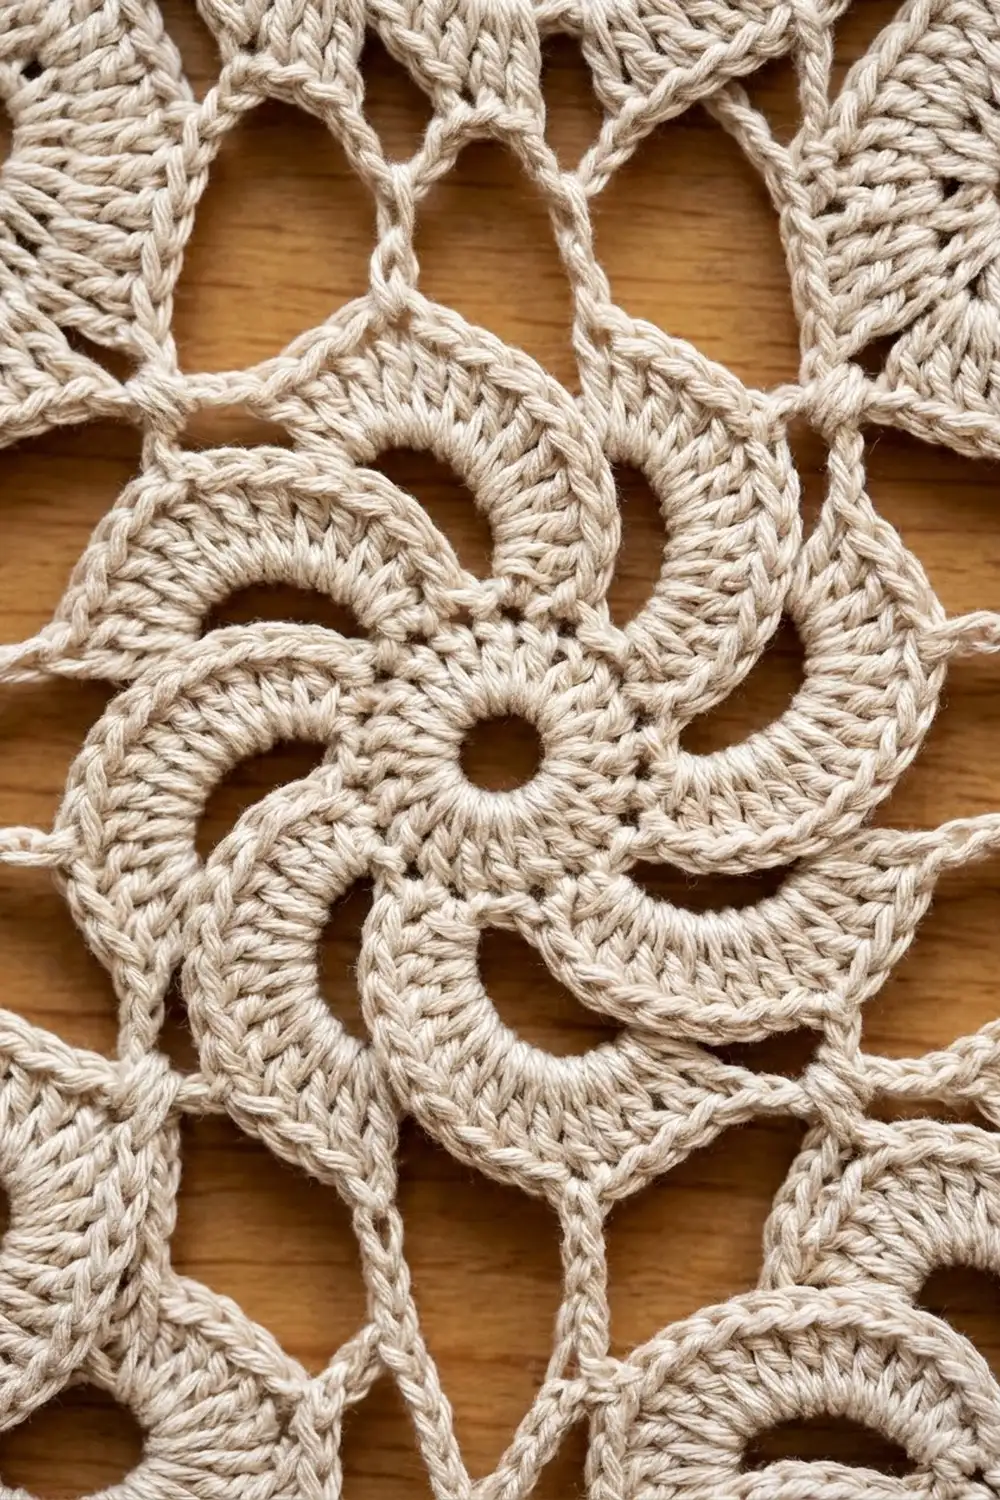
Motif (Make 36)
Round 1 – Center Ring
Ch 8, sl st in first ch to form a ring.
Round 1: Ch 1 (does not count as a st), work 24 sc into the ring, sl st in first sc. (24 sts)
Keep the sc packed evenly around the ring so the center stays a round open hole.
Round 2 – Swirl Petals
Each petal is a chain worked back toward the ring. Tall stitches near the base and a short stitch at the tip make a curved comma shape.
Round 2: Ch 10. Working back along the chain: sc in 2nd ch from hook, hdc in next ch, dc in each of next 2 ch, tr in each of next 3 ch, dc in next ch, hdc in last ch (9 sts on the petal). Skip next 2 sc of Round 1, sl st in next sc. Repeat from * to * 7 more times. The last sl st lands in the first sl st of the round.
Count: 8 petals of 9 sts each = 72 petal sts, plus 8 sl sts on the ring. 8 petals x 3 ring sc used = 24, which matches Round 1.
All the petals lean the same way because each one is worked in the same direction. Do not turn your work.
Round 3 – Petal Outline (and Joining Round)
This round outlines every petal, puts a point at each tip, and makes the outer edge curve to finish the pinwheel.
Round 3: Working up the free loops on the other side of the petal’s foundation chain: sc in each of the 9 free loops. In the tip ch (the skipped ch at the end): (sc, ch 3, sc). Working back down the tops of the petal sts: sc in sc, sc in hdc, sc in each of next 2 dc, 2 sc in each of next 3 tr, sc in dc, sc in hdc (12 sc). Sl st in the Round 2 sl st between petals. Repeat from * to * 7 more times. Fasten off and weave in ends.
Count per petal: 9 + 5 (sc, ch 3, sc) + 12 + 1 sl st = 27 sts.
Round total: 8 x 27 = 216 sts, including 8 ch-3 tips.
The 3 increases over the tr section make the outer edge curve more, which pushes each tip sideways and sharpens the swirl.
Orientation for joining: Lay a motif RS up so that the gap between two petals points straight up at 12 o’clock. Two tips then point toward each side: 2 on top, 2 on the right, 2 on the bottom, and 2 on the left. Every tip belongs to exactly one side.
Make All Pieces
All 36 motifs are worked in Sand. Work the first motif completely (Rounds 1–3). On every other motif, Round 3 uses Joining Tips wherever a tip faces a finished neighbor.
Layout grid (3 wide x 12 long, numbered in working order):
[ 1] [ 2] [ 3]
[ 4] [ 5] [ 6]
[ 7] [ 8] [ 9]
[10] [11] [12]
[13] [14] [15]
[16] [17] [18]
[19] [20] [21]
[22] [23] [24]
[25] [26] [27]
[28] [29] [30]
[31] [32] [33]
[34] [35] [36]
Joining
Method: Join-as-you-go on Round 3, using the Joining Tip.
Stitch-to-stitch logic: Each shared side has 2 tips that join to the 2 facing tips on the neighbor. The upper-left tip of the new motif joins the upper-right tip of the motif to its left, and the lower-left joins the lower-right. Joining to the motif above works the same way: top-left to bottom-left, and top-right to bottom-right.
- Motifs 2–3: join 2 tips to the left neighbor.
- Motifs 4, 7, 10, and so on (left column): join 2 tips to the motif above.
- All other motifs: join 2 tips to the left and 2 tips to the motif above, for 4 Joining Tips.
Because the motifs are round, an open diamond-shaped gap forms where four motifs meet. This is part of the lace design.
Tension: Keep the joining sl st snug but not tight. A tight sl st pulls the tips together and makes the gaps pucker. A loose one lets the motifs drift apart. Always check that the motif’s RS faces up before you join.
Size checkpoint: After the first row of 3 motifs, the strip should measure 15 in (38.1 cm) wide. After 4 rows, it should measure 20 in (50.8 cm) long. After all 12 rows, the runner should be 15 x 60 in (38.1 x 152.4 cm), give or take 1 in (2.5 cm) in length.
Border
Border gauge: The edging adds 0.75 in (1.9 cm) to each side. Chain lengths are matched to the distance between free tips. Two tips on the same motif sit about 2.1 in (5.3 cm) apart, and ch 7 fits that gap. Tips on neighboring motifs, and the corner tips, sit farther apart, so ch 9 fills those gaps and gives the corners a little ease.
Free tips: Each motif on the edge has 2 free tips per outer side. The long sides have 12 x 2 = 24 tips each, and the short ends have 3 x 2 = 6 tips each, for a total of 60 tips.
Per-motif side unit: sc in tip, ch 7, sc in tip, ch 9 = 18 sts. Each side’s count includes the one ch-9 loop after its last tip, which is the corner loop. No corner stitches are added twice.
Border Round 1 – Chain Loops
With RS facing, join yarn with sc in the ch-3 sp of the first free tip on one short end (the left tip of the corner motif). Ch 7, sc in the ch-3 sp of the next tip on the same motif, ch 9, sc in the ch-3 sp of the first free tip on the next motif or around the corner. Repeat around. End with ch 9 and sl st in the first sc.
- Each long side: 12 x 18 = 216 sts (24 sc, 12 ch-7 loops, 12 ch-9 loops)
- Each short end: 3 x 18 = 54 sts (6 sc, 3 ch-7 loops, 3 ch-9 loops)
- Total: 2 x (216 + 54) = 540 sts, made up of 60 sc + 30 ch-7 + 30 ch-9
Border Round 2 – Covered Loops
Sl st into the first ch-7 sp. Work 8 sc in the ch-7 sp, skip the sc, then work 10 sc in the ch-9 sp, skip the sc. Repeat around. Sl st in the first sc and fasten off.
- Each long side: 12 x 18 = 216 sc
- Each short end: 3 x 18 = 54 sc
- Total: 540 sc
Why the math works: Each loop gets one more sc than it has chains (7 + 1 = 8 and 9 + 1 = 10). That adds 2 sc per motif side, which exactly replaces the 2 Round 1 sc you skip. Each unit stays at 18 sts, so the border lies flat without ruffling. The Round 1 sc stay visible as small points at each petal tip.
Tassels (Make 12)
Wrap yarn 25 times around the 4 in (10.2 cm) card. Slide a 10 in (25.4 cm) tie strand under the wraps at the top and knot it tightly. Cut the bottom loops. Wrap a separate strand 6 times around the bundle 0.75 in (1.9 cm) below the top to form the head, then knot it and bury the ends inside. Trim the ends to an even 4 in (10.2 cm).
Using the tie strand, attach one tassel to each Round 1 sc that sits at a petal tip on the short ends. That gives 6 tassels per end. Knot securely on the wrong side and weave the ends in.
Final Blocking
- Weave in all remaining ends, following the petal outlines.
- Soak the runner in cool water for 10 minutes, then press out the water in a towel. Do not wring it.
- Lay it flat RS up on blocking mats and pin it to 16.5 x 61.5 in (41.9 x 156.2 cm).
- Pin straight along both long edges first, then square the corners.
- Pin out each interior petal tip so every motif shows a clear pinwheel and the diamond gaps open evenly.
- Shape each petal curve with your fingers and mist any areas that are drying stiff.
- Let it dry completely. Comb the tassels straight and trim them to 4 in (10.2 cm).
Final Quality-Control Checklist
- All 36 motifs swirl in the same direction with the RS facing up.
- Every motif has 8 petals and 8 pointed tips.
- Every shared side is joined at 2 tips, with no missed joins.
- The runner measures 15 x 60 in (38.1 x 152.4 cm) before the border.
- Border Round 1 has 60 sc, with ch 7 and ch 9 alternating.
- Border Round 2 has 216 sc per long side and 54 sc per short end.
- The finished size is 16.5 x 61.5 in (41.9 x 156.2 cm).
- There are 6 even tassels on each end, all 4 in (10.2 cm) long.
- No ends are visible on the RS.
Troubleshooting
- Petals cup or curl over: Your tr sts are too tight, or you missed the increases. Check that you work 12 sc down the stitch side of each petal.
- Petals look straight, not swirled: Make sure each tr gets 2 sc in Round 3, and work every petal in the same direction.
- Center hole closes up: Use a looser ch 8 ring, or go up a hook size for Round 1 only.
- Diamond gaps pucker: Your joining sl sts are too tight. Rework them with a relaxed loop.
- Border edge waves: Your chains are too long. Re-chain at your normal tension, or work ch 8 in place of ch 9.
- Border edge pulls in: Your chains are too tight. Loosen them, and check that you used 10 sc in every ch-9 sp.
Care
Hand wash in cool water with mild detergent, then press out the water in a towel. Dry flat, reshaping the petals, and steam lightly if needed.
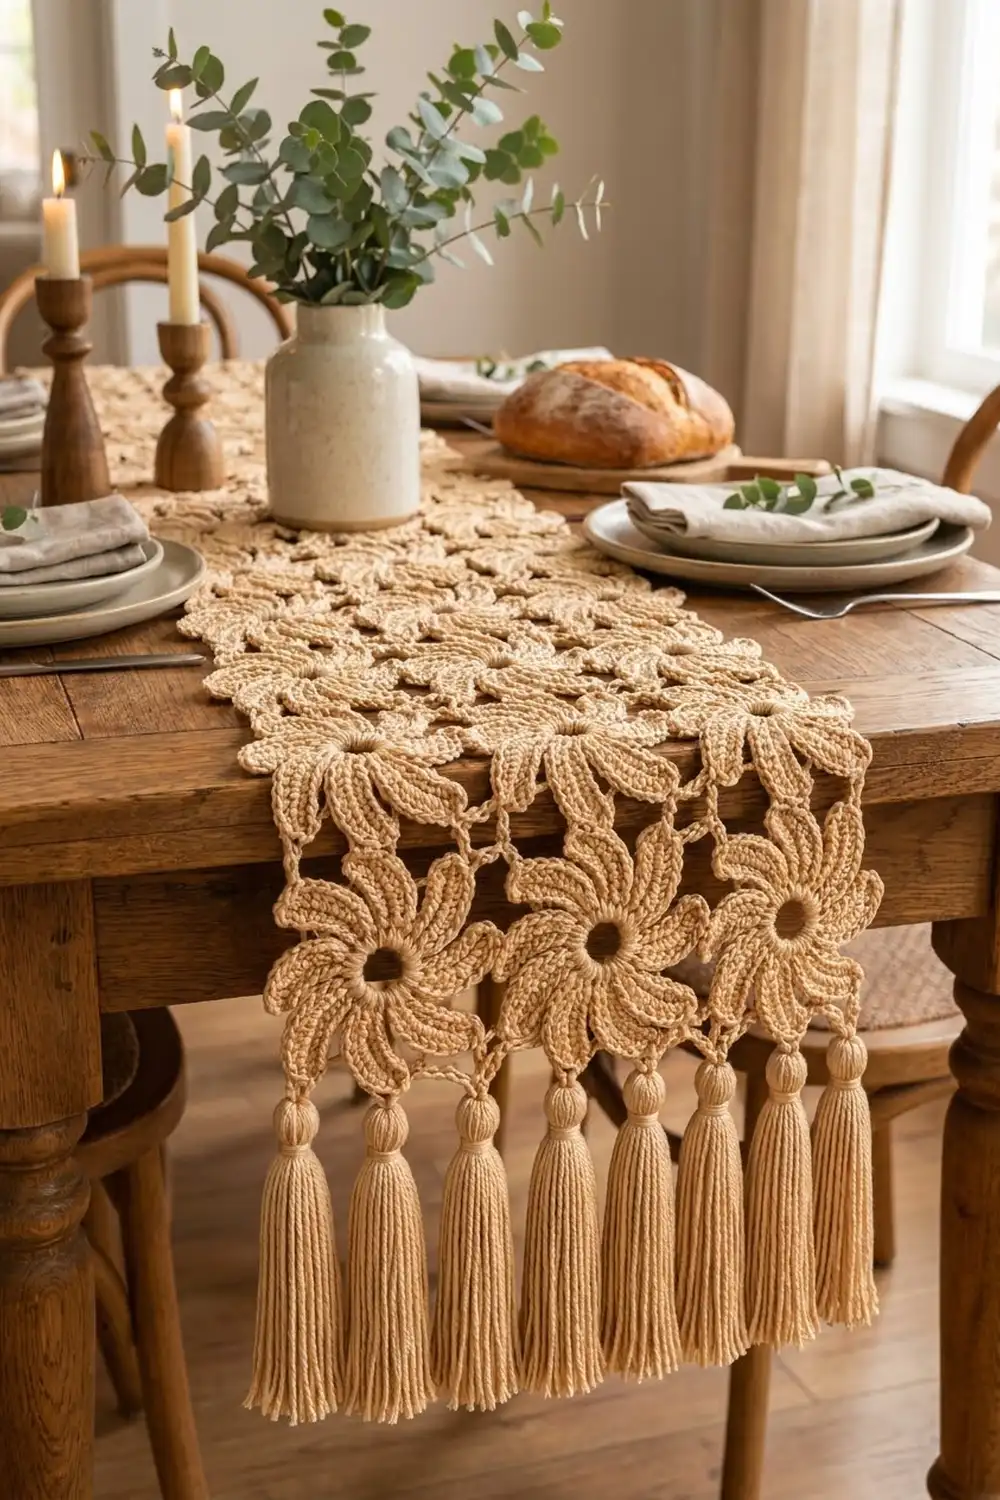
Final Notes
The measurement chain is straightforward. One motif measures 5 in (12.7 cm). Three motifs across give 15 in (38.1 cm), and twelve motifs down give 60 in (152.4 cm). The border adds 0.75 in (1.9 cm) per side for 16.5 x 61.5 in (41.9 x 156.2 cm), and the tassels bring the total length to 69.5 in (176.5 cm). Check your first motif carefully, and the rest of the runner will follow.
Happy crocheting!