

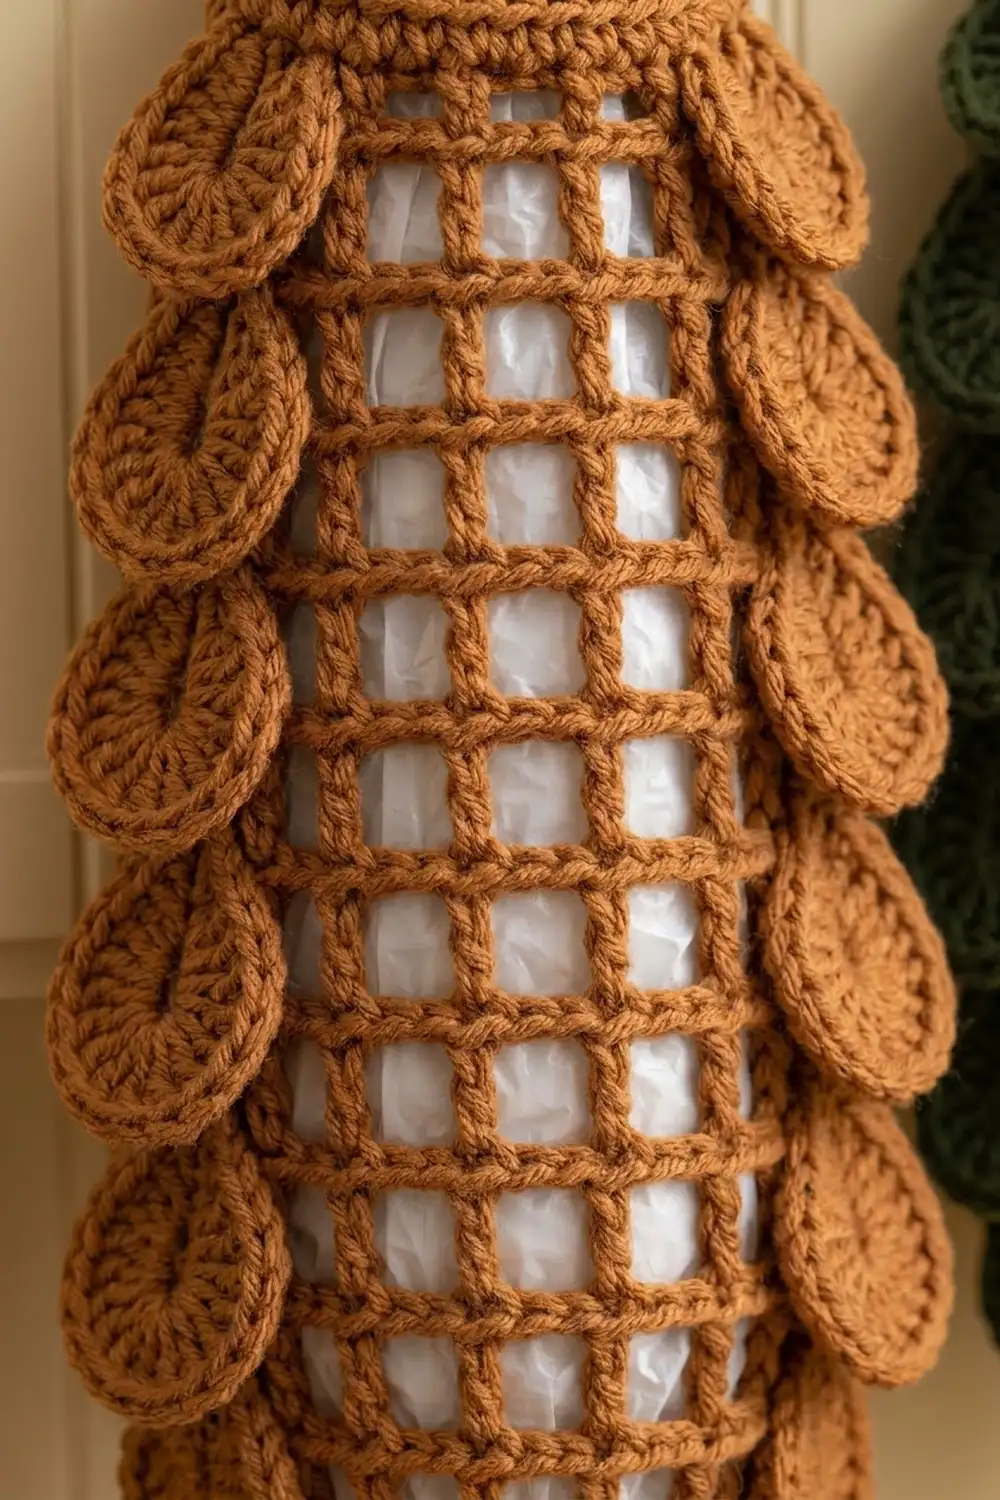
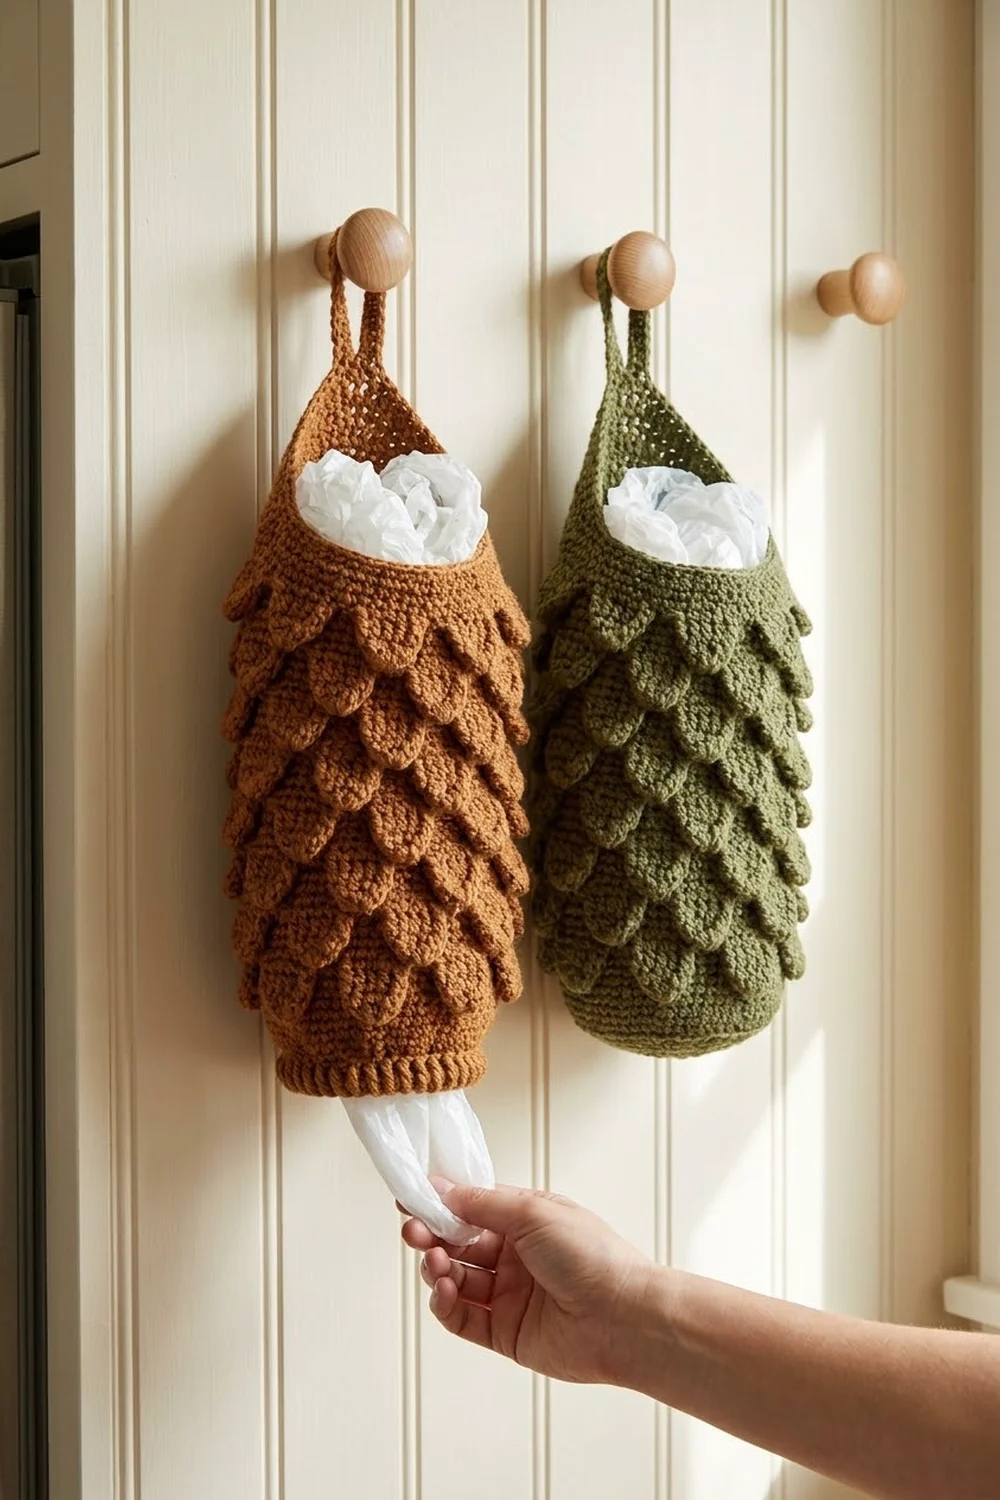
This holder turns a messy pile of grocery bags into something you can leave on display. It has an open mesh body so you can see the bags inside, a pointed solid cone at the top with a sturdy hanging loop, and a narrow bottom opening for pulling bags out one at a time. Rows of rounded scales overlap down both sides, which gives it the outline of a pinecone or a little fir tree.
Shown here in warm caramel and soft olive green, it looks right in a farmhouse, rustic, or cottage kitchen. The pattern makes one holder in a single color. Make a second one in another shade if you want a matching pair like the photo.
All terms are US crochet terms. The finished holder is 6.4 in (16.3 cm) wide laid flat across the body (about 8.4 in / 21.3 cm including the scales) and 17.75 in (45.1 cm) long, or 20.75 in (52.7 cm) with the hanging loop.
The body is made in one piece from the top down. You start with a magic ring at the cone tip, work the solid cone and neck band, switch to filet mesh for the tube, and then decrease into a solid taper. The bottom cuff border comes next, and then the hanging loop is added at the tip. Finally, you make 18 scales separately and sew them on in 9 tiers.
Finished Size and Construction
- Finished size: 6.4 in (16.3 cm) wide flat; 17.75 in (45.1 cm) long without loop; 20.75 in (52.7 cm) with loop
- Skill level: Easy-intermediate
- Terminology: US
- Yarn weight: Worsted (#4)
- Hook: 5.0 mm (H-8)
- Number of pieces: 1 main body plus 18 scale appliqués
- Layout: One tube with 2 vertical columns of scales (one on each side), 9 scales per column
- Piece size (one scale): 2 in (5.1 cm) long × 1.5 in (3.8 cm) wide
- Size before border: 16.75 in (42.5 cm) long, measured from the cone tip to the end of the taper
- Border depth: 1 in (2.5 cm) bottom cuff
Materials
Yarn: Use a worsted-weight cotton or cotton blend, about 180 m per 100 g. Cotton keeps its shape well and doesn’t stretch out under the weight of the bags. If you use acrylic, the holder will be softer and slightly stretchier. A smooth, tightly plied yarn shows off the mesh squares and the ridged scale outlines best. Fuzzy or loosely plied yarns blur the stitch detail.
- Main color (one holder): 130 g / 235 m. Use caramel brown for the rust holder or olive green for the green holder.
- About 75 g / 135 m of that goes into the body and loop, and about 55 g / 100 m into the 18 scales.
These quantities include a margin of about 15 percent. If you’re making the pair, buy 130 g / 235 m of each color.
Tools:
– 5.0 mm (H-8) crochet hook
– Tapestry needle
– 2 locking stitch markers, plus 18 more for scale placement
– Measuring tape
– Blocking pins and a spray bottle
– A rolled towel or a 4 in (10.2 cm) wide cardboard tube for blocking
Abbreviations (US Terms)
- ch – chain
- sl st – slip stitch
- sc – single crochet
- hdc – half double crochet
- dc – double crochet
- inc – 2 sc in the same stitch
- sc2tog – single crochet 2 together (decrease)
- BLO – back loop only
- sp – space
- rev sc – reverse single crochet (crab stitch)
- st(s) – stitch(es)
Special stitch – Reverse single crochet: Work from left to right (right to left if you crochet left-handed). Insert the hook into the next stitch to the right, yarn over, pull up a loop, then yarn over and pull through both loops. It makes a firm, twisted, corded edge.
Gauge and Checkpoints
Solid gauge: 15 sc and 16 rounds = 4 in (10.2 cm).
Mesh gauge: 5 mesh squares (15 sts) and 6 mesh rounds = 4 in (10.2 cm). Each square is 0.8 in (2.0 cm) wide and about 0.67 in (1.7 cm) tall.
Test one scale first. It’s quick to make and checks your tension. A finished scale should measure 2 in (5.1 cm) long and 1.5 in (3.8 cm) wide.
Checkpoints:
– After Cone Round 13: the band measures 12.8 in (32.5 cm) around, or 6.4 in (16.3 cm) laid flat.
– After Mesh Round 6: the mesh section is 4 in (10.2 cm) tall.
– After Mesh Round 18: the mesh section is 12 in (30.5 cm) tall.
– After Taper Round 6: the opening is 6.4 in (16.3 cm) around.
If your work is too big, go down a hook size, to 4.5 mm (7). If it’s too small, go up to 5.5 mm (I-9). Check the mesh carefully. If it stretches tall, shorten your chains slightly instead of changing hooks.
Body
Cone (Top Down)
Work in continuous spirals. Mark the first stitch of each round.
- Round 1: Magic ring, 6 sc into the ring. (6)
- Round 2: Inc in each st around. (12)
- Round 3: Sc 1, inc 6 times. (18)
- Round 4: Sc 2, inc 6 times. (24)
- Round 5: Sc in each st around. (24)
- Round 6: Sc 3, inc 6 times. (30)
- Round 7: Sc around. (30)
- Round 8: Sc 4, inc 6 times. (36)
- Round 9: Sc around. (36)
- Round 10: Sc 5, inc 6 times. (42)
- Round 11: Sc around. (42)
- Round 12: Sc 6, inc 6 times. (48)
- Round 13 (band): Sc in BLO around, then sl st into the first st. (48)
Working Round 13 in the back loops leaves a ridge, so you can see where the solid band meets the cone. The cone is now about 3.25 in (8.3 cm) long. Place a marker in st 1 and another in st 25. These two marks show the side edges.
Mesh Tube
- Mesh Round 1 (conversion): Ch 5 (counts as dc + ch 2), skip 2 sts, dc in next st, ch 2, skip 2 sts 15 times, then sl st into the 3rd ch of the beginning ch-5. Count: 16 dc worked into existing sts + 32 chains over skipped sts = 48 sts, with 0 extra added. That makes 16 mesh squares.
- Mesh Rounds 2–18: Ch 5 (counts as dc + ch 2; it sits on the previous round’s beginning ch), skip the next ch-2 sp, dc in next dc, ch 2 15 times, then sl st into the 3rd ch of the beginning ch-5. (16 dc and 16 ch-2 sps per round = 48 sts)
Your joins should stack in a straight line. Make sure dc 1 and dc 9 sit directly below your side markers. Move the markers up to those dc posts every few rounds. They will be your scale columns.
The mesh measures 12 in (30.5 cm) tall after Round 18.
Bottom Taper
Work in continuous spirals again.
- Taper Round 1 (conversion): Ch 1, sc in each dc and 2 sc in each ch-2 sp around. Count: 16 sc in dc + 32 sc in the spaces = 48 sc, with 0 extra added. (48)
- Taper Round 2: Sc 6, sc2tog 6 times. (42)
- Taper Round 3: Sc 5, sc2tog 6 times. (36)
- Taper Round 4: Sc 4, sc2tog 6 times. (30)
- Taper Round 5: Sc 3, sc2tog 6 times. (24)
- Taper Round 6: Sc around. (24)
The taper is 1.5 in (3.8 cm) long, and the body now measures 16.75 in (42.5 cm). Don’t fasten off. Go straight on to the border.
Scales (Make 18)
- Foundation: Ch 6.
- Round 1: Sc in the 2nd ch from the hook, hdc in the next ch, dc in each of the next 2 chs, and 6 dc in the last ch. Rotate and work along the opposite side of the foundation: dc in each of the next 2 chs, hdc in the next ch, sc in the next ch. Sl st into the first sc. Count: 4 + 6 + 4 = 14 sts.
- Round 2: Ch 1, then sc BLO in each of the next 4 sts, 2 sc BLO in each of the 6 tip dc, and sc BLO in each of the last 4 sts. Sl st into the first sc. Count: 4 + 12 + 4 = 20 sts.
Fasten off and leave a 10 in (25.4 cm) tail. The sc end is the narrow tip. The 6-dc end is the rounded edge, and the BLO round gives it a raised outline that shows up as a ridge on the front.
The scale measures 2 in (5.1 cm) × 1.5 in (3.8 cm).
Attaching the Scales
The scales are sewn in 2 columns, one along dc 1 and one along dc 9 (directly opposite). Work tiers on Mesh Rounds 1, 3, 5, 7, 9, 11, 13, 15, and 17. That gives 9 tiers × 2 scales = 18 scales. Mark all 18 positions before you sew.
To attach a scale, place its narrow tip on the dc post with the ridged side facing out and the rounded end pointing down and slightly away from the tube. Sew only the top 0.5 in (1.3 cm) of the scale, so that the lower part flares out. Whipstitch through both the dc post and the round below so the scale can’t spin.
The tiers are 1.33 in (3.4 cm) apart and each scale is 2 in (5.1 cm) long, so each one overlaps the scale below it by about 0.67 in (1.7 cm). That overlap gives the stacked pinecone look.
Sew the tier on the left and the tier on the right before you move down to the next round. That way both columns stay level with each other.
Border
The border is the bottom dispensing cuff. It is worked in the round directly on Taper Round 6.
Border gauge: Same as the solid gauge, 15 sc = 4 in (10.2 cm). 4 rounds = 1 in (2.5 cm).
Laid flat, the 24 sts split into 12 on the front and 12 on the back.
- Border Round 1: Sc BLO around. (24: 12 front, 12 back) The BLO ridge marks where the cuff starts.
- Border Round 2: Sc around. (24: 12 front, 12 back)
- Border Round 3: Sc around. (24: 12 front, 12 back)
- Border Round 4: Ch 1, rev sc in each st around, then sl st into the first st. (24: 12 front, 12 back)
Fasten off and weave in the end.
Why the math works: Taper Round 6 ends with exactly 24 sts. The cuff works 1 stitch into each of them, with no increases or decreases, so it stays a straight tube. 24 sts at 15 sts per 4 in gives 6.4 in (16.3 cm) around and an opening about 2 in (5.1 cm) across. That’s narrow enough to hold the bags in but wide enough to pull one out. The rev sc round firms up the rim so it doesn’t flare.
Hanging Loop
Join yarn to any st of Cone Round 1. Ch 24, skip 2 sts, and sl st into the 4th st, so the chain lands directly opposite the join. Work 30 sc over the chain loop, then sl st into the joining st. The extra stitches over the chain make a firm, solid teardrop loop that hangs about 3 in (7.6 cm) above the tip. Fasten off and weave in the end.
Final Blocking
- Weave in all ends, including the scale tails left over from sewing.
- Lightly spray the whole holder with water until it is damp but not wet.
- Slide a rolled towel or cardboard tube into the mesh section so it holds its round shape.
- Ease the mesh windows into squares and pull the columns straight.
- Lay the holder on its side. Shape each scale flat, smooth the rounded ends, and angle them down and out.
- Pin the hanging loop straight and open.
- Let it dry completely, at least 24 hours.
Final Quality-Control Checklist
- Cone Round 13 has 48 sts and a visible BLO ridge.
- All 18 mesh rounds have 16 squares each.
- Joins are aligned and the columns run straight.
- The taper ends at 24 sts.
- The cuff is 1 in (2.5 cm) deep with a corded rev sc rim.
- 18 scales, each 2 in × 1.5 in (5.1 × 3.8 cm).
- Scales sit in 9 even tiers on both sides, with matching heights.
- The loop is secure and centered on the tip.
- The body is 17.75 in (45.1 cm) long, or 20.75 in (52.7 cm) with the loop.
Troubleshooting
- The mesh is twisting: Check that you join into the 3rd ch every time and that each beginning ch-5 sits directly on top of the previous one.
- The squares are too tall: Pull your dc tighter, or use shorter ch-2 loops.
- The cone is ruffling: Your tension is too loose. Go down one hook size for the cone only.
- The scales curl: Block them flat. Also check that Round 2 has exactly 20 sts.
- The bottom opening is too loose: Add one more sc round before the rev sc round, or switch to a smaller hook for the cuff.
- The scales droop flat against the tube: Sew a slightly shorter section, about 0.4 in (1.0 cm), so they flare more.
- Bags fall out on their own: Stuff the bags in loosely rather than packing them down tight.
Care
Hand wash in cool water, then reshape and lay flat to dry. Don’t tumble dry, because the mesh can stretch out of shape.
Final Notes
Here is the measurement chain from top to bottom:
- The cone grows to 48 sts, 12.8 in (32.5 cm) around.
- The mesh keeps those 48 sts as 16 squares through 18 rounds, for 12 in (30.5 cm) of length.
- The taper reduces to 24 sts in 1.5 in (3.8 cm).
- The cuff adds 1 in (2.5 cm) at a steady 24 sts.
- 18 scales at 2 in (5.1 cm) each overlap in 9 tiers.
If your gauge matches at each checkpoint, the finished holder will be 17.75 in (45.1 cm) long and 20.75 in (52.7 cm) with the loop.
Happy crocheting!