

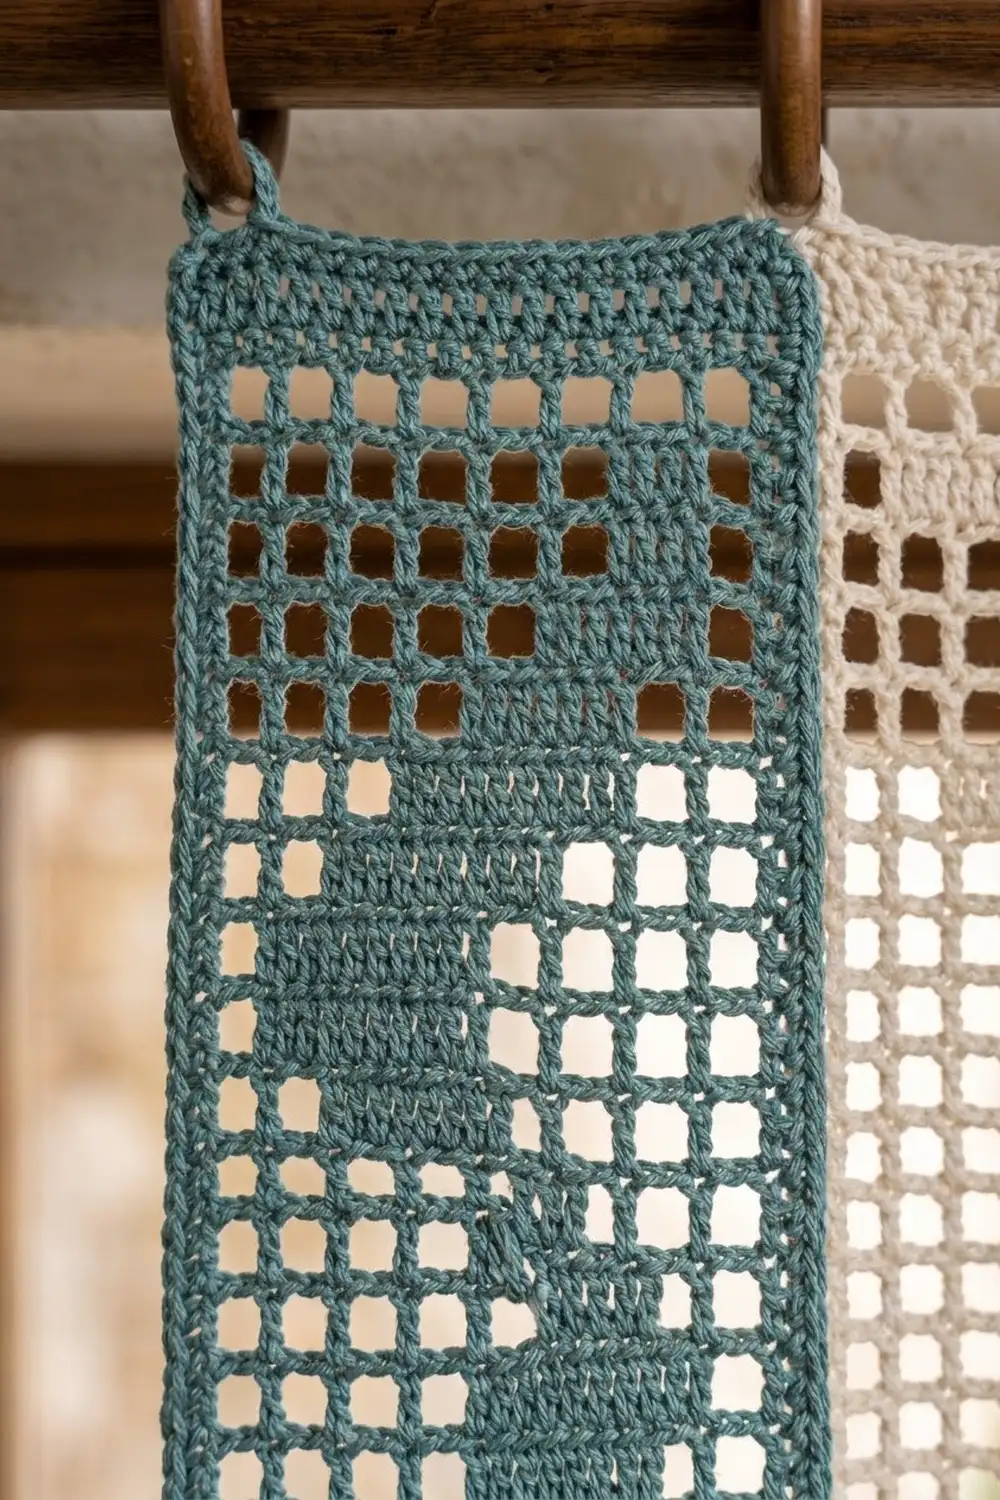
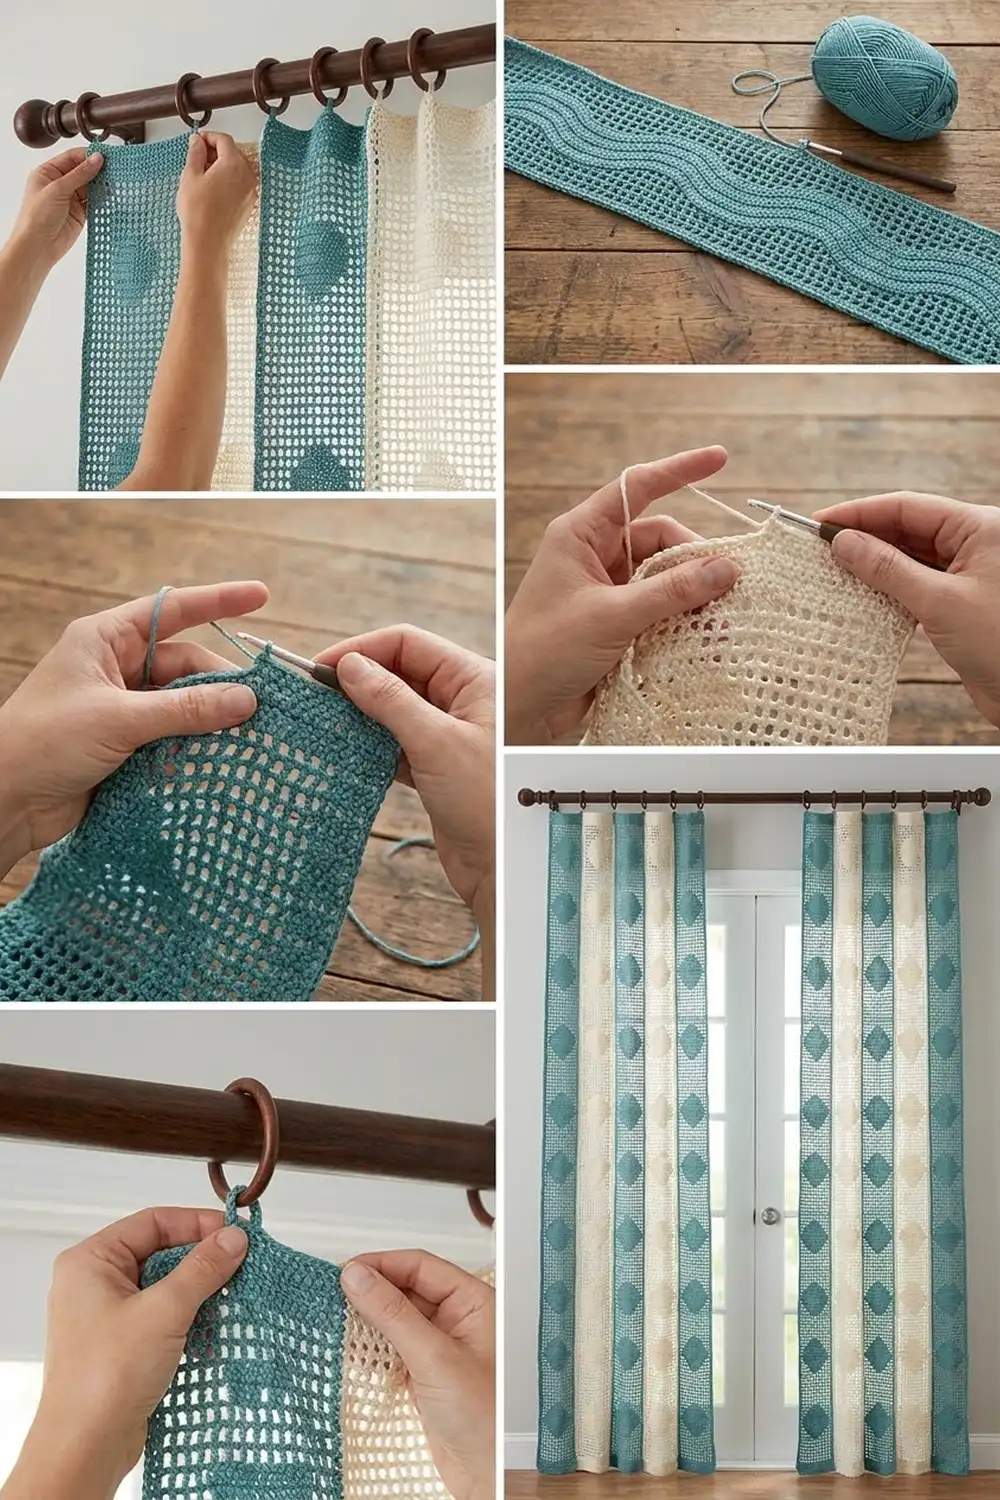
The Coastal Ribbon curtain is made from long, narrow strips of filet mesh. Each strip has open squares all over and a solid band three blocks wide that swings from one edge to the other in a slow wave. Teal and cream strips alternate across the window. Every strip hangs from its own wooden ring, so light comes through the mesh and the wave bands seem to move as the strips sway.
The palette is a dusty sea teal and a warm natural cream. Together they suit boho, coastal, and Mediterranean rooms. Worked in worsted cotton, the curtain has enough weight to hang straight and is still airy enough to filter light rather than block it.
This pattern uses US crochet terms. One finished strip measures 6.5 in (16.5 cm) wide by 81 in (205.7 cm) long, not counting the hanging tab. One panel is five strips laid side by side for a total width of 32.5 in (82.6 cm). The photo shows two panels, one on each side of a door, and the instructions below are written for one panel. Make the whole pattern twice for a pair.
Construction is simple. You work each strip flat in rows of filet mesh, put a two-round single crochet border around it, and then add a small tab at the top center that folds over a curtain ring. The strips are never seamed together. They hang next to each other on the rod.
Finished Size and Construction
- Finished strip size: 6.5 in x 81 in (16.5 cm x 205.7 cm), plus tab
- Finished panel width: 32.5 in (82.6 cm), 5 strips
- Skill level: Intermediate (filet blocks, reading a row table)
- Terminology: US
- Yarn weight: Worsted (#4) cotton
- Hook: 4.5 mm (US 7)
- Number of pieces: 5 strips per panel (3 teal, 2 cream); 10 strips for a pair
- Layout: one row of 5 strips hung side by side, teal / cream / teal / cream / teal
- Strip size before border: 5.5 in x 80 in (14.0 cm x 203.2 cm)
- Border depth: 0.5 in (1.3 cm) on every side, two rounds of sc
Materials
Yarn: Use a smooth, mercerized or combed worsted-weight cotton, about 170 m per 100 g. Cotton keeps the blocks square and does not stretch much under the curtain’s own weight. Avoid acrylic and loosely spun yarns, because long strips of those will grow in length after hanging.
Per panel (5 strips):
- Teal: 600 g / 1,020 m (6 balls), for 3 strips
- Cream: 400 g / 680 m (4 balls), for 2 strips
For a pair of panels, double both amounts: 1,200 g / 2,040 m teal and 800 g / 1,360 m cream.
One bordered strip with its tab uses about 300 m. The amounts above include a margin of roughly 10-15% for gauge differences and the swatch.
Tools:
- 4.5 mm (US 7) crochet hook
- Tapestry needle
- Stitch markers
- Measuring tape, ideally one longer than 80 in (203.2 cm)
- 5 wooden curtain rings per panel, 2 in (5.1 cm) inner diameter
- Blocking mats or a clean floor area with towels, plus rust-proof pins
- Spray bottle
Abbreviations (US Terms)
- ch – chain
- sc – single crochet
- dc – double crochet
- sl st – slip stitch
- sk – skip
- st(s) – stitch(es)
- sp – space
- RS / WS – right side / wrong side
Special stitches – filet blocks:
- Open block (OB): ch 2, sk 2 sts (or the ch-2 sp), dc in next dc. That is 3 sts.
- Solid block (SB): dc in each of the next 2 sts (or 2 dc in the ch-2 sp), dc in next dc. That is 3 sts.
Every row begins with ch 3, which counts as the first dc. A row of 11 blocks is 1 + (11 x 3) = 34 sts, with each ch counted as a stitch.
Gauge and Checkpoints
Gauge: 4 blocks wide x 4 rows tall = 2 in x 2 in (5.1 cm x 5.1 cm) in filet mesh. That works out to 2 blocks (6 sts) per inch and 2 rows per inch, so each block is a square 0.5 in (1.3 cm) on each side.
Make a swatch first: ch 15 and work Row 1 below (13 sts, 4 blocks), then work 5 rows of open blocks. Block the swatch and measure the middle 4 x 4 blocks.
- Swatch too big: go down to a 4 mm hook.
- Swatch too small: go up to a 5 mm hook.
- Width right but rows too short: pull up a slightly taller loop on each dc. Do not change the hook for this.
After the swatch, test one full strip before making the others. Check it at each stage:
- After Row 3: 5.5 in (14.0 cm) wide, 1.5 in (3.8 cm) tall
- After Row 17 (first wave repeat): 8.5 in (21.6 cm) tall
- After Row 101 (7 repeats): 50.5 in (128.3 cm) tall
- After Row 160: 80 in (203.2 cm) tall
- After the border: 6.5 in x 81 in (16.5 cm x 205.7 cm)
Measure lying flat with no tension on the piece. If the strip is more than 1 in (2.5 cm) longer than it should be at Row 101, your rows are running tall. Rip back and go down a hook size. Don’t just stop early, because the wave has to end on a complete repeat.
Strip Pattern
Make 3 strips in teal and 2 in cream. Teal strips use the row table exactly as written. On cream strips, swap the “open before” and “open after” numbers in every wave row. That mirrors the wave so the cream bands swing the opposite way from the teal bands beside them.
Foundation: Ch 36.
Row 1 (RS): Dc in 4th ch from hook (the skipped ch count as the first dc) and in each ch across. Turn. (34 sts: 11 SB)
Row 2 (WS): Ch 3 (counts as dc), work 11 OB, placing the final dc in the top of the turning ch. Turn. (34 sts: 11 OB)
Row 3 (RS): Repeat Row 2. (34 sts: 11 OB)
Rows 1-3 give a solid hem row at the bottom followed by two rows of plain mesh.
Wave Rows (Rows 4-157)
Each wave row has three parts: some open blocks, then 3 solid blocks, then more open blocks. The numbers are given in the order you work them. Every row starts with ch 3 and always totals 11 blocks (34 sts).
| Repeat row | Side | Open before | Solid | Open after |
|---|---|---|---|---|
| 1 | WS | 7 | 3 | 1 |
| 2 | RS | 1 | 3 | 7 |
| 3 | WS | 6 | 3 | 2 |
| 4 | RS | 3 | 3 | 5 |
| 5 | WS | 4 | 3 | 4 |
| 6 | RS | 5 | 3 | 3 |
| 7 | WS | 2 | 3 | 6 |
| 8 | RS | 7 | 3 | 1 |
| 9 | WS | 1 | 3 | 7 |
| 10 | RS | 6 | 3 | 2 |
| 11 | WS | 3 | 3 | 5 |
| 12 | RS | 4 | 3 | 4 |
| 13 | WS | 5 | 3 | 3 |
| 14 | RS | 2 | 3 | 6 |
Strip Row 4 is Repeat Row 1. Work Repeat Rows 1-14 a total of 11 times, which takes you through Row 157 (11 x 14 = 154 rows).
How the wave works: Number the blocks 1 to 11 from right to left with the RS facing. The solid band starts at block 2 (one open block next to the edge). It then moves one block per row until it starts at block 8 (one open block at the other edge). It holds there for two rows and travels back. Holding for two rows at each turn rounds off the zigzag into a wave. Each row’s band overlaps the band below it by 2 blocks, so the ribbon looks continuous. Blocks 1 and 11 stay open in every row and frame the wave.
Tip: Put a stitch marker in the first row of every repeat. Then you can count finished repeats without counting individual rows.
Row 158 (WS): Ch 3, 11 OB. Turn. (34 sts)
Row 159 (RS): Ch 3, 11 OB. Turn. (34 sts)
Row 160 (WS): Ch 3, 11 SB (dc in each st and 2 dc in each ch-2 sp). Do not fasten off. (34 sts: 11 SB)
Before the border, the strip should measure 5.5 in x 80 in (14.0 cm x 203.2 cm).
Make All Pieces
For one panel:
- Teal: 3 strips, wave as written
- Cream: 2 strips, wave mirrored (swap open before and open after)
For a pair, make 6 teal and 4 cream strips.
Layout for one panel, seen from the room side:
| T | C | T | C | T |
  1   2   3   4   5
If you’re making a pair, hang the second panel in the same order so that teal strips sit at both outer edges and both inner edges of the window.
Joining
The strips are not sewn to each other. They meet only at the rod. Each strip gets a hanging tab that wraps around one ring. This lets the curtain open like a normal panel and lets light come through the gaps between strips.
You’ll add the tab after the border (see below). It’s centered on the top edge. After Border Round 2 the top side has 38 sts including its two corner sts. Count 16 sts in from each corner. That leaves 6 center sts, which are sts 17-22.
Tab:
- Row 1: With RS facing, join yarn in st 17. Ch 1, sc in same st and in next 5 sts. Turn. (6 sc)
- Rows 2-16: Ch 1, sc in each st. Turn. (6 sc)
The tab measures about 1 in (2.5 cm) wide and 3.5 in (8.9 cm) long. Slide it through a ring and fold it to the back of the strip. Whipstitch the last row of the tab across the WS of Border Round 1, directly under the tab base. Match the stitches one to one: tab st 1 goes to the st under st 17, and so on through 6.
Tension: Sew firmly but don’t pull. If you pull too hard, the top edge puckers into a gather. When you’re done, the ring should slide freely inside the loop.
Size checkpoint: Hang all 5 rings with their ring centers 6.5 in (16.5 cm) apart. The strip edges should just touch, and the panel should measure 32.5 in (82.6 cm) across.
Border
Border gauge: Along the short edges, 1 sc goes into each st, about 6 sc per inch. Along the long edges, 2 sc go around each row-end dc, about 4 sc per inch. Sc worked around a dc post sits wider than sc worked into top loops, so these two rates give flat edges at the same real length.
Round 1 (RS): Rotate to work across the top of Row 160. Ch 1. Work 3 sc in the first st, sc in each of the next 32 sts, and 3 sc in the last st. Rotate. Work 2 sc in each row end down the long side (160 row ends, 320 sc). Rotate. Across the foundation chain, work 3 sc in the first ch, sc in each of the next 32 ch, and 3 sc in the last ch. Rotate. Work 2 sc in each row end up the second long side (320 sc). Join with sl st to the first sc.
Count the corner sc (the middle sc of each 3-sc group) as part of both sides it touches:
- Short sides: 1 corner + 1 + 32 + 1 + 1 corner = 36 sts each
- Long sides: 1 corner + 1 + 320 + 1 + 1 corner = 324 sts each
- Total: (2 x 36) + (2 x 324) − 4 shared corners = 716 sts
Round 2 (RS): Ch 1. Sc in each sc around, with 3 sc in each corner sc. Join with sl st.
- Short sides: 36 + 2 = 38 sts each
- Long sides: 324 + 2 = 326 sts each
- Total: (2 x 38) + (2 x 326) − 4 = 724 sts
Fasten off. Now work the tab on sts 17-22 of the top short side.
Why the math works: Each round of sc adds about 0.25 in (0.6 cm) on every side. Two rounds add 0.5 in (1.3 cm) per side, or 1 in (2.5 cm) to each dimension. So 5.5 in + 1 in = 6.5 in (16.5 cm) wide, and 80 in + 1 in = 81 in (205.7 cm) long. Each round adds exactly 2 sts per side, one from each corner increase. Because of that, the 3-sc corners stay square and don’t flare.
Final Blocking
- Weave in all ends along the solid hem rows or inside the border. Never weave them across open mesh.
- Soak each strip in cool water with a little wool wash for 15 minutes.
- Press the water out gently. Roll the strip in towels. Do not wring it.
- Lay the strip flat. Pin the long sides straight at 6.5 in (16.5 cm) wide, placing a pin every 10 in (25.4 cm).
- Pin the length to 81 in (205.7 cm). Do not stretch it any longer, because hanging will lengthen it slightly.
- Spot-straighten the blocks. Each open square should be about 0.5 in (1.3 cm) on a side.
- Let it dry completely before unpinning. With cotton, that can take 24 hours.
- Hang the panel for a day, then measure again. A growth of up to 1 in (2.5 cm) is normal.
Final Quality-Control Checklist
- [ ] Every row has 34 sts (11 blocks)
- [ ] Blocks 1 and 11 are open in every wave row
- [ ] 11 complete wave repeats per strip
- [ ] Cream strips are mirrored relative to teal strips
- [ ] Border Round 2: 38 sts per short side, 326 per long side, 724 total
- [ ] Strip measures 6.5 in x 81 in (16.5 cm x 205.7 cm) after blocking
- [ ] All strips in the panel are within 0.5 in (1.3 cm) of each other in length
- [ ] Tab centered on sts 17-22 and sewn securely
- [ ] Rings spaced 6.5 in (16.5 cm) apart on the rod
Troubleshooting
The band looks jagged instead of wavy. You’ve probably skipped one of the two hold rows at a turn (Repeat Rows 1-2 or 8-9). Count the band’s starting block on the two rows at each turn. They should match.
The strip is getting narrower. You may be missing the last dc in the top of the turning ch. Count to 34 sts at the end of every row for a few rows to catch it.
The open squares are tall rectangles. Your dc are too tall for your chains. Make the ch-2 a little looser, or go down a hook size.
The long edges ripple after the border. Use 2 sc per row end, not 3. If they still ripple, redo Round 1 with a hook one size smaller.
The strips hang at different lengths. Block all of them together with the same pins and the same measurement. If they’re still off, add or remove one open-block row in Rows 158-159 of the shorter or longer strips.
The top edge gathers at the tab. Unpick the tab and sew it again more loosely, stitch to stitch.
Care
Hand wash cold or machine wash on a gentle cycle inside a mesh laundry bag. Dry flat, then re-hang while still slightly damp so the strips straighten under their own weight.
Final Notes
The whole pattern depends on a short chain of measurements. Each block is 0.5 in (1.3 cm), so 11 blocks make a 5.5 in (14.0 cm) strip and 160 rows make 80 in (203.2 cm). Two sc border rounds bring the strip to 6.5 in x 81 in (16.5 cm x 205.7 cm). Five strips hung edge to edge make a 32.5 in (82.6 cm) panel. If your swatch is on gauge and your first strip hits its checkpoints, the rest of the curtain will come out at the same size. Work the wave one repeat at a time, mirror it on the cream strips, and let the strips hang free.
Happy crocheting!