

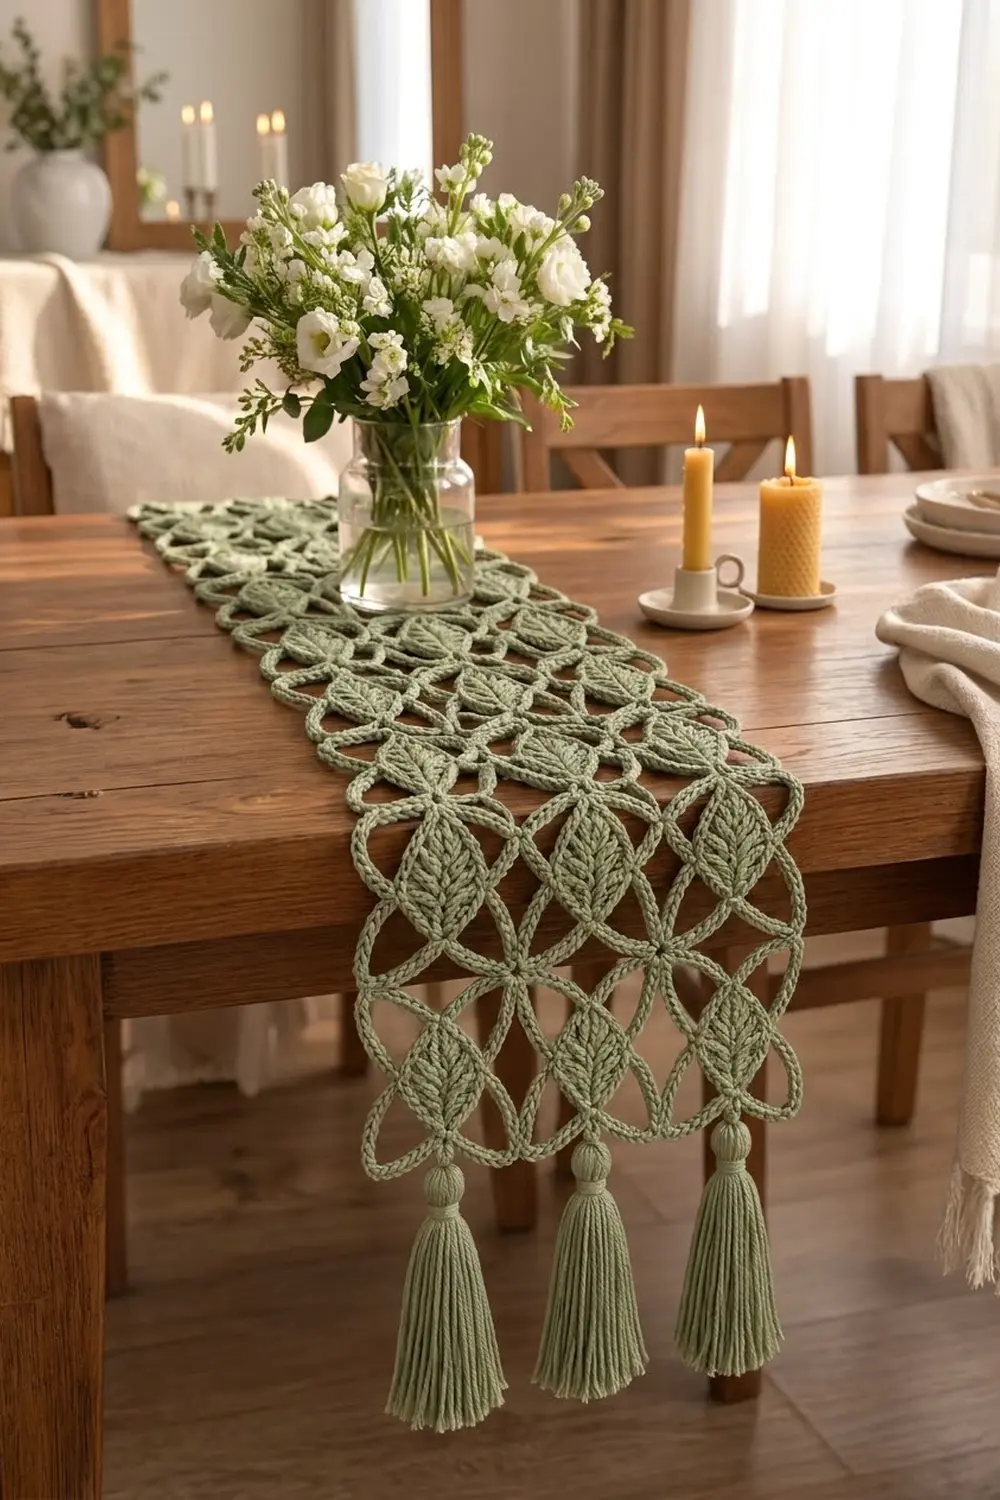
The Sage Leaf Lattice Table Runner is an airy, botanical runner built from 21 identical motifs. Each motif has a textured leaf at its center, a frame of four pointed chain petals, and a squared outer round. Once joined, the runner reads as a lattice of leaves and open rings.
The whole runner is worked in one soft sage green cotton. The leaves get their ridged, braid-like texture from back-loop rounds and a slip-stitch center vein. The petals and corner loops stay open and lacy, and three wrapped tassels hang from each short end.
This pattern uses US crochet terms. After the border, the finished runner measures 16 in x 36 in (40.6 cm x 91.4 cm). The 4 in (10.2 cm) tassels at each end bring the total length to about 44 in (111.8 cm).
Construction is simple. Crochet the leaf around a foundation chain, add the petal frame, and square the motif in two rounds. Then join the motifs into a grid of 3 x 7, work a two-round border, and add six tassels.
Finished Size and Construction
- Finished size: 16 in x 36 in (40.6 cm x 91.4 cm), excluding tassels
- Length including tassels: about 44 in (111.8 cm)
- Skill level: Intermediate
- Terminology: US crochet terms
- Yarn weight: Worsted (#4), cotton or cotton blend
- Hook: 4.5 mm (US 7)
- Number of pieces: 21 motifs, plus 6 tassels
- Layout: 3 motifs wide x 7 motifs long
- Motif size: 5 in x 5 in (12.7 cm x 12.7 cm)
- Size before border: 15 in x 35 in (38.1 cm x 88.9 cm)
- Border depth: 0.5 in (1.3 cm) on each side
Materials
Choose a smooth, tightly plied worsted cotton. It shows the leaf ridges clearly and holds the pointed petals in shape after blocking. Avoid fuzzy or loosely spun yarn: the open chain work will look blurry and the leaf texture will disappear.
- Sage green: 500 g, about 900 m (984 yd), based on a yarn with about 180 m per 100 g
This amount includes a margin of about 20 percent to cover your gauge swatch, small differences in tension, and fuller tassels. Buy all skeins from the same dye lot. The runner is a single color, so any change in shade will show.
Tools:
- 4.5 mm (US 7) crochet hook
- 4 mm and 5 mm hooks, in case you need to adjust gauge
- Tapestry needle
- 4 stitch markers
- Stiff card 4.5 in (11.4 cm) wide, for the tassels
- Sharp scissors
- Tape measure
- Blocking mats and rust-proof pins
- Spray bottle
Abbreviations (US Terms)
- ch – chain
- sl st – slip stitch
- sc – single crochet
- hdc – half double crochet
- dc – double crochet
- dtr – double treble crochet
- BLO – back loop only
- sk – skip
- sp – space
- st(s) – stitch(es)
- rep – repeat
- RS / WS – right side / wrong side
Special stitch – Surface slip stitch: Hold the yarn under the work. Insert the hook from the front between two stitches, pull up a loop, and draw it through the loop on the hook. Repeat to make a chain-like line on the surface.
Gauge and Checkpoints
Make one complete motif before you start the rest. Gauge matters here because any small error is repeated across 21 motifs. Block the test motif lightly and measure it flat, without stretching.
Checkpoints:
- After Round 1: the leaf is 3 in (7.6 cm) long and 1 in (2.5 cm) wide
- After Round 3: the leaf is 3.5 in (8.9 cm) long and 2 in (5.1 cm) wide
- After Round 5: petal tip to opposite petal tip is 4.5 in (11.4 cm)
- After Round 7: the square is 5 in x 5 in (12.7 cm x 12.7 cm), lightly blocked
- Edge gauge: 23 sts per 5 in (12.7 cm), or about 4.6 sts per 1 in (2.5 cm)
If your motif is more than 0.25 in (0.6 cm) too big, switch to a 4 mm hook. If it is too small, switch to a 5 mm hook. Check the leaf first. If the leaf is the right size but the square is off, the chain arcs are usually the cause, so adjust your chain tension rather than changing hooks.
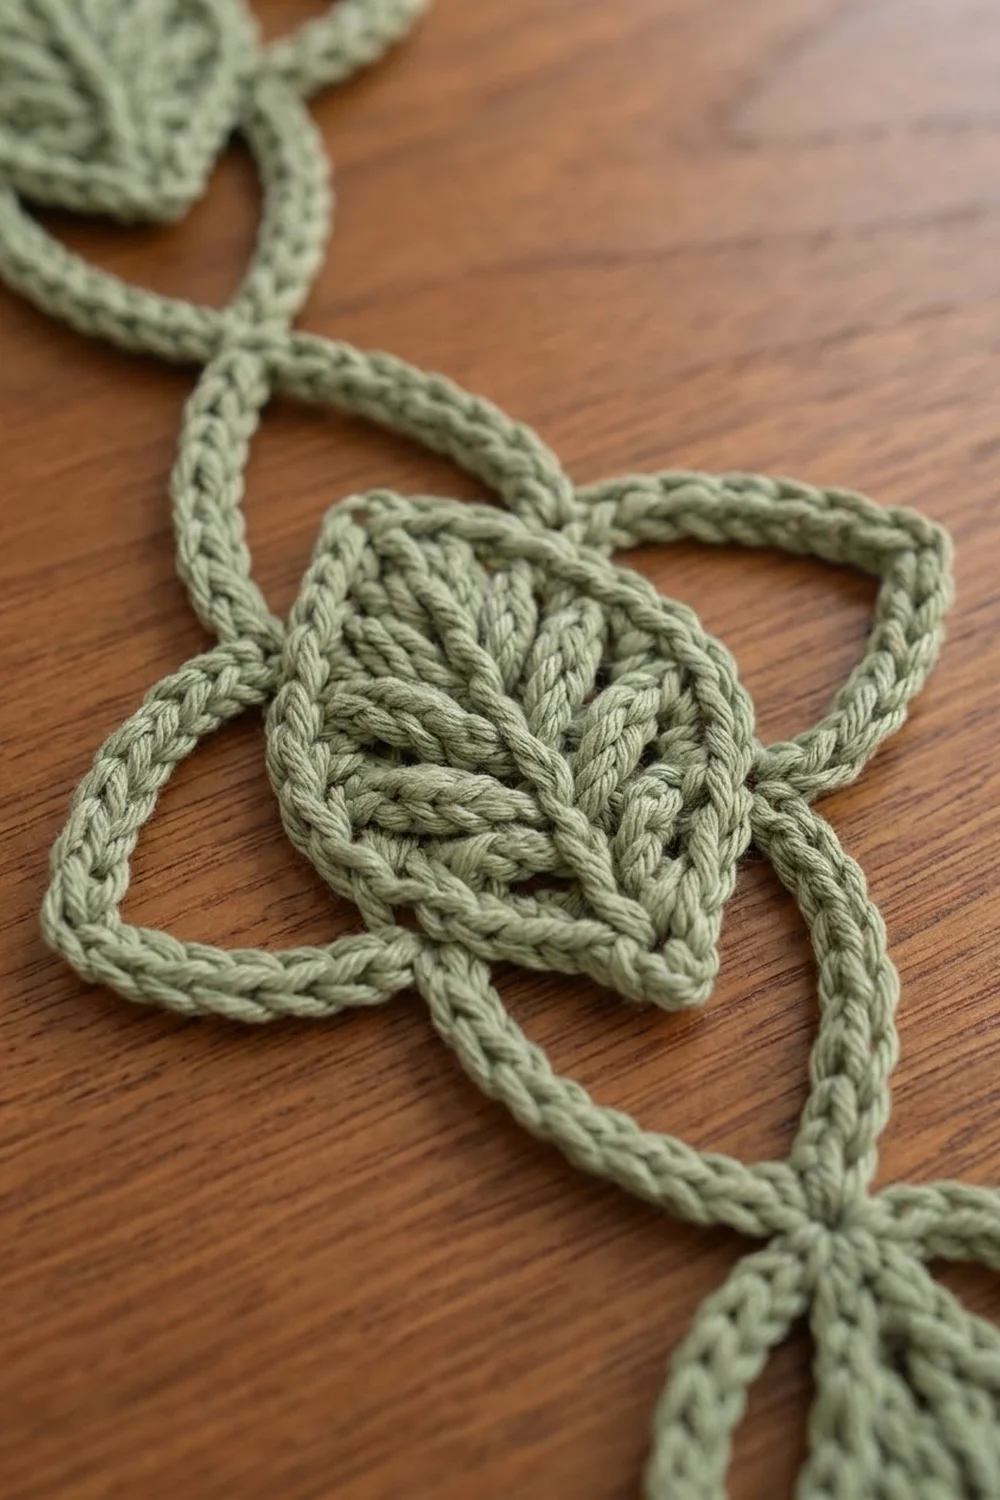
Motif (Make 21)
Leaf
Round 1: Ch 15. Sc in 2nd ch from hook, hdc in next ch, dc in next 10 ch, hdc in next ch, (sc, ch 2, sc) in last ch for the leaf tip. Rotate the piece and work along the free loops on the other side of the chain: hdc in next ch, dc in next 10 ch, hdc in next ch, sc in next ch. Ch 2 for the base point, sl st to first sc. (28 sts: 13 on each side plus 2 tip sc, and 2 ch-2 sps)
Round 2 (BLO): Ch 1 (does not count here or in later rounds). Working in BLO: sc in first 2 sts, hdc in next 2 sts, [dc in next st, 2 dc in next st] 4 times, hdc in next st, sc in next tip sc, (sc, ch 2, sc) in tip ch-2 sp, sc in next tip sc, hdc in next st, [2 dc in next st, dc in next st] 4 times, hdc in next 2 sts, sc in next 2 sts, (sc, ch 2, sc) in base ch-2 sp. Sl st to first sc. (40 sts: 28 sts worked once + 8 increases + 4 sc in the points, and 2 ch-2 sps)
The free front loops of Round 1 now form raised ridges that run out from the center. These ridges give the leaf its braided look.
Round 3 (BLO): Ch 1. Working in BLO: sc in next 19 sts, (sc, ch 2, sc) in tip ch-2 sp, sc in next 20 sts, (sc, ch 2, sc) in base ch-2 sp, sc in last st. Sl st to first sc. (44 sts: 40 sts worked once + 4 sc in the points, and 2 ch-2 sps)
Each side of the leaf now has 22 sts between the tip sp and the base sp.
Center vein: With RS facing, work a line of surface sl sts along the center of the foundation chain, from the base to the tip. Fasten off and weave in the ends.
Place markers: Count down each side from the tip ch-2 sp. Mark the 7th st and the 16th st on both sides (4 markers).
Petal Frame
Round 4: With RS facing, join yarn with sc in the marked 7th st on the right side. Ch 19, sk next 12 sts and the tip sp, sc in the marked 7th st on the left side (top petal). Ch 19, sk next 8 sts, sc in the marked 16th st (side petal). Ch 19, sk next 12 sts and the base sp, sc in the marked 16th st on the right side (bottom petal). Ch 19, sk next 8 sts, sl st to first sc (side petal). (4 sc and 4 ch-19 arcs)
Round 5: Working into the chains of the next ch-19 arc: sc in next 9 ch, (sc, ch 2, sc) in next ch, sc in next 9 ch, sl st in next anchor sc. Rep from * 3 more times. (80 sc: 20 per petal, and 4 ch-2 tip sps; the anchor sl sts are not counted)*
Pinch each ch-2 tip into a point. The petals should lie flat around the leaf like a four-pointed star, with the leaf tip and base inside the top and bottom petals.
Squaring Rounds
Round 6: Join yarn with sc in any petal tip ch-2 sp. Ch 5, sk next 6 sc, sc in next sc, ch 3, sk next 3 sc, (dtr, ch 3, dtr) in the anchor sl st, ch 3, sk next 3 sc, sc in next sc, ch 5, sk next 6 sc, sc in next tip ch-2 sp. Rep from * 2 more times, then rep from * to ** once. Sl st to first sc. (12 sc and 8 dtr, plus 8 ch-5 sps, 8 side ch-3 sps, and 4 corner ch-3 sps)*
The dtr pairs push the gaps between the petals outward to form corners. Each corner ch-3 forms part of the small ring where four motifs meet.
Round 7: Ch 1. Sc in first sc, 5 sc in next ch-5 sp, sc in next sc, 3 sc in next ch-3 sp, sc in next dtr, (sc, ch 2, sc) in corner ch-3 sp, sc in next dtr, 3 sc in next ch-3 sp, sc in next sc, 5 sc in next ch-5 sp, sc in next sc, 5 sc in next ch-5 sp, sc in next sc, 3 sc in next ch-3 sp, sc in next dtr, (sc, ch 2, sc) in corner ch-3 sp; rep from * 2 more times, sc in next dtr, 3 sc in next ch-3 sp, sc in next sc, 5 sc in last ch-5 sp. Sl st to first sc. Fasten off. (92 sc: 20 sts worked once + 40 sc in ch-5 sps + 24 sc in side ch-3 sps + 8 corner sc, and 4 ch-2 corner sps)*
Per side: 23 sts, including the corner sc at each end. The sc above each petal tip is the 12th st, the exact center of the side.
Make All Pieces
Make 21 motifs in sage green. Each motif uses about 28 m (31 yd). Block every motif to 5 in x 5 in (12.7 cm x 12.7 cm) before joining so all the edges match.
Layout grid (3 wide x 7 long, all leaves pointing the same way):
M M M
M M M
M M M
M M M
M M M
M M M
M M M
Joining
Method: Flat slip-stitch seam.
Hold two motifs with RS together and the edges lined up. Insert the hook through the outer loop of each motif. Sl st in the corner ch-2 sps, then sl st in each of the 23 pairs of matching sts, then sl st in the next corner ch-2 sps (25 sl sts per seam). The seam ridge sits on the WS.
Order: First join the motifs into 7 rows of 3. Then join the rows along the long seams, one row at a time. Where four corners meet, sl st through all four corner sps together.
Stitch logic: Each st is joined to exactly one st on the neighboring motif, so the seams add no width or length.
Tension: Keep each sl st as tall as the sc beneath it. Tight seams make the lace pucker, and loose seams leave gaps. If needed, use a 5 mm hook for joining only.
Checkpoint: One row of 3 motifs measures 15 in (38.1 cm). The full grid measures 15 in x 35 in (38.1 cm x 88.9 cm).
Border
Border gauge: 4.6 sts per 1 in (2.5 cm), the same as the motif edges.
Starting counts: Long side = 7 motifs x 23 sts = 161 sts. Short side = 3 motifs x 23 sts = 69 sts. Skip the corner ch-2 sps at the seams: sc in the last st of one motif, then go straight to the first st of the next motif. No sts are added at the seams.
Round 1: With RS facing, join yarn with sc in the first st of a long side. Sc in each st along the side, then (sc, ch 2, sc) in the outer corner ch-2 sp. Rep around. Sl st to first sc.
– Long sides: 161 sts worked once + 2 corner sc = 163 sts each
– Short sides: 69 sts worked once + 2 corner sc = 71 sts each
– Total: 460 + 8 = 468 sts, and 4 ch-2 corner sps
Round 2: Ch 1. Hdc in each st along each side, and (hdc, ch 2, hdc) in each corner ch-2 sp. Sl st to first hdc. Fasten off.
– Long sides: 163 sts worked once + 2 corner hdc = 165 sts each
– Short sides: 71 sts worked once + 2 corner hdc = 73 sts each
– Total: 468 + 8 = 476 sts, and 4 ch-2 corner sps
Why the math works: At 4.6 sts per in, 165 sts measure 35.9 in (91.2 cm) and 73 sts measure 15.9 in (40.4 cm). Both are within normal blocking range of the target size, 36 in x 16 in (91.4 cm x 40.6 cm). Each round adds only 1 st per side at each corner, so the edges stay flat instead of rippling or flaring.
Tassels (Make 6)
Wrap yarn 30 times around the 4.5 in (11.4 cm) card. Slide a 12 in (30.5 cm) tie strand under the loops at the top and knot it tightly. Cut through the loops at the bottom. To make a rounded head, wrap a separate strand 8 times around the bundle, 0.5 in (1.3 cm) below the top. Knot it and hide the ends inside the tassel. Trim the strands to 4 in (10.2 cm).
Placement: On each short side, count the sts of Round 2 from one corner and attach tassels at the 14th, 37th and 60th sts. These sts sit directly below the center of each end motif. Thread the tie strand through the st, knot it securely on the WS, and weave in the ends.
Final Blocking
- Weave in and trim all remaining ends.
- Lay the runner RS up on blocking mats.
- Spray it evenly until damp but not dripping.
- Pin the four corners first, to 16 in x 36 in (40.6 cm x 91.4 cm).
- Pin the long sides straight, then the short sides.
- Pin each petal tip and each corner ring open so the lattice stays crisp.
- Smooth each leaf with your fingers so the center vein runs straight.
- Let the runner dry completely before removing the pins.
- Smooth the tassels with your fingers and trim them evenly.
Final Quality-Control Checklist
- All 21 motifs measure 5 in (12.7 cm) square
- Every motif has 23 sts per side
- All leaves point the same way
- Seams are flat, with no puckers or gaps
- Round 2 of the border has 165 sts on each long side and 73 sts on each short side
- The runner measures 16 in x 36 in (40.6 cm x 91.4 cm)
- All six tassels are 4 in (10.2 cm) long and centered under the end motifs
- All ends are woven in securely
Troubleshooting
Leaf curls into a cup: The Round 2 increases are too tight. Use a hook 0.5 mm larger for Rounds 1 to 3 only.
Leaf ripples: The dc stitches are too loose. Use a hook 0.5 mm smaller for the leaf.
Petals look round, not pointed: Check that you worked (sc, ch 2, sc) in the center ch, and pin the tips during blocking.
Motif is not square: Check that each dtr pair sits in the anchor sl st, not in a petal sc.
Motifs differ in size: Measure each motif again before joining and re-block any that are off.
Border ripples: Extra sts were added at the seams. Rework the round without them.
Border pulls in: The hdc stitches are too tight. Use a 5 mm hook for Round 2.
Tassels look thin: Add 5 to 10 wraps.
Care
Hand wash in cool water with mild soap, then press out the water by rolling the runner in a towel. Dry it flat, reshaping the petals and tassels, and do not tumble dry.
Final Notes
This runner is built on a clear chain of measurements. The leaf reaches 3.5 in (8.9 cm) by Round 3, and the petals reach 4.5 in (11.4 cm) by Round 5. The finished motif is 5 in (12.7 cm) square with 23 sts per side. Three motifs make 15 in (38.1 cm), and seven make 35 in (88.9 cm). The border brings the runner to 16 in x 36 in (40.6 cm x 91.4 cm). If each stage matches its checkpoint, the finished runner will lie flat and square.
Happy crocheting!