

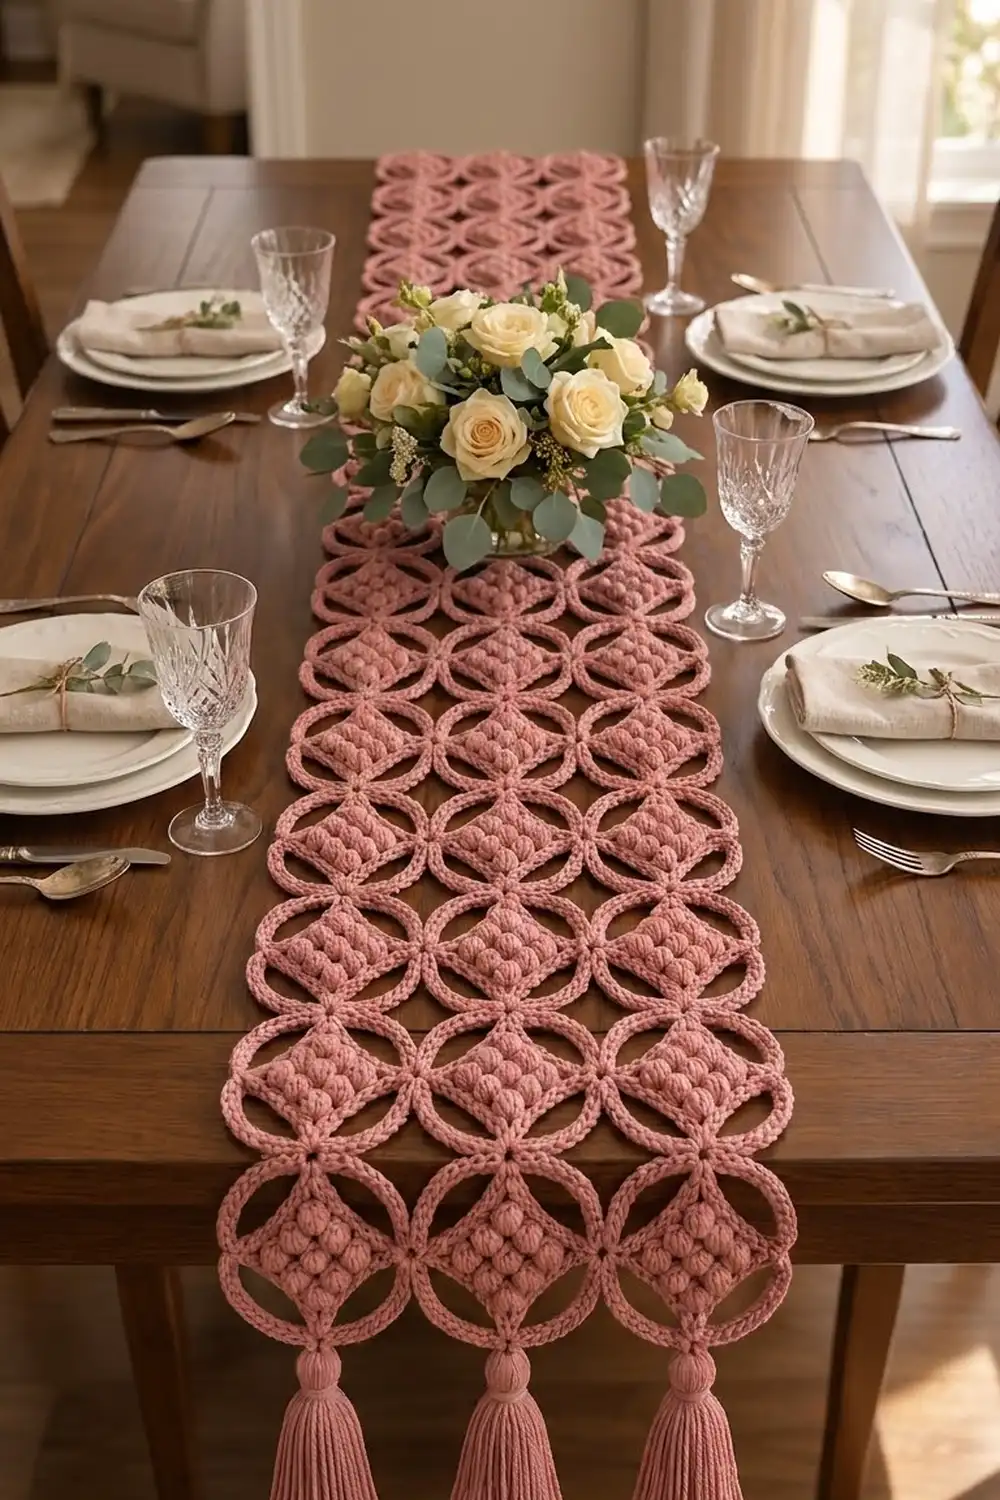
The Rosewater Quatrefoil Table Runner looks like vintage lace but uses simple stitches. Each motif has a small diamond of nine puff stitches framed by four rope-like petal arcs. When you join the motifs tip to tip, the arcs of four neighbors meet and make open rings, so the runner looks like interlocking circles with textured diamonds in between.
The sample is worked in one dusty rose cotton for a soft, romantic look. A single color shows off the texture: you see the puffs, the rope arcs and the round openings. A tassel hangs from the bottom tip of each end motif.
This pattern uses US crochet terms. The finished runner measures 12 in (30.5 cm) wide by 40 in (101.6 cm) long, not counting tassels. With a 3.5 in (8.9 cm) tassel at each end, it is 47 in (119.4 cm) long.
Construction is modular. You crochet a small square in rows, add a single crochet round, turn it on point, then work four chain loops and cover them with single crochet. From the second motif on, you join each motif to its neighbors at the tips as you go, so there is no seaming at the end. The tassels finish the ends.
Finished Size and Construction
- Finished size: 12 in x 40 in (30.5 cm x 101.6 cm), plus 3.5 in (8.9 cm) tassels at each end
- Skill level: Easy intermediate
- Terminology: US crochet terms
- Yarn weight: Worsted (#4) cotton
- Hook: 5.0 mm (H-8)
- Number of pieces: 30 motifs
- Layout: 3 motifs wide x 10 motifs long, set on point
- Motif size: 4 in (10.2 cm) from tip to tip
- Size before border: 12 in x 40 in (30.5 cm x 101.6 cm)
- Border depth: 0 in (0 cm). The petal arcs make a self-finished scalloped edge, so no separate border is added.
Materials
Yarn: Use a smooth, tightly plied worsted-weight cotton or cotton blend. Plied cotton gives the arcs their rope-like look and keeps the puffs crisp. Avoid fuzzy or very splitty yarn, because it hides the texture.
- Dusty rose: about 140 g / 240 m (262 yd)
- Motifs: about 170 m (186 yd)
- Tassels: about 37 m (40 yd)
- The rest is a safety margin.
These quantities include a margin of about 15%. Buy all the yarn from one dye lot.
Tools:
– 5.0 mm (H-8) crochet hook
– Tapestry needle
– Scissors
– Stiff card, 4 in (10.2 cm) tall, for tassels
– 4 stitch markers
– Blocking mats, rust-proof pins and a spray bottle
Abbreviations (US Terms)
- ch: chain
- sc: single crochet
- sl st: slip stitch
- st(s): stitch(es)
- sk: skip
- yo: yarn over
- RS / WS: right side / wrong side
- sp: space
Puff stitch (puff): (yo, insert hook in the stitch, yo and pull up a loop to about 0.5 in / 1.3 cm tall) 3 times, so you have 7 loops on the hook. Yo and pull through all 7 loops, then ch 1 to close. The closing ch-1 does not count as a stitch. Each puff counts as 1 stitch.
Tip join: Instead of ch 3 at a tip, ch 1, sl st into the ch-3 tip space of the neighboring motif, ch 1.
Gauge and Checkpoints
Gauge: 16 sc and 18 rows = 4 in (10.2 cm) in plain single crochet.
Make one full motif before you start the rest, then measure at each stage:
- After Row 7 (center square): 1.75 in (4.4 cm) wide. The puffs make it about the same height.
- After Round 1: each side measures 2.25 in (5.7 cm), corner to corner.
- After Round 3: 4 in (10.2 cm) from tip to tip, across both directions.
If the motif is too big: go down one hook size, to 4.5 mm (7). If only the arcs are too long, chain 14 for each loop in Round 2 instead of 15. Keep 20 sc per arc.
If the motif is too small: go up to a 5.5 mm (I-9) hook. If only the arcs pucker or won’t lie flat, chain 16 instead of 15.
All 30 motifs must match. A difference of only 0.125 in (0.3 cm) per motif adds up to 1.25 in (3.2 cm) over the length of the runner.
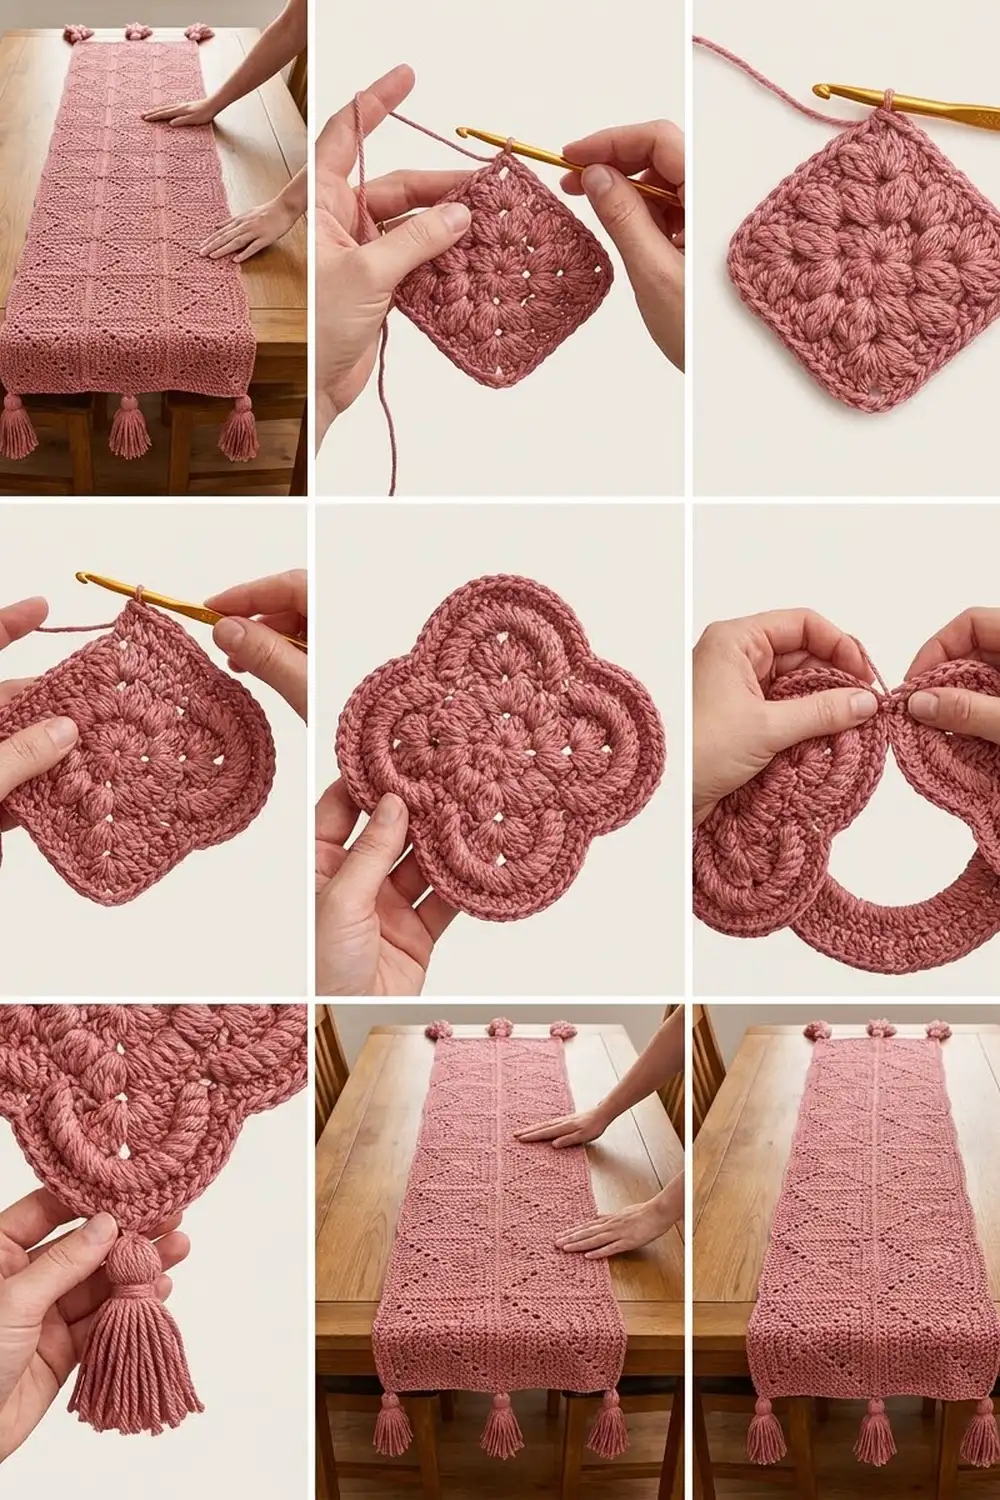
Motif (Make 30)
Center Square
Ch 8.
Row 1 (WS): Sc in 2nd ch from hook and in each ch across, turn. (7 sc)
Row 2 (RS): Ch 1, sc in first st, puff in next st, sc in next st; repeat from * 2 more times, turn. (3 puffs + 4 sc = 7 sts)*
Row 3: Ch 1, sc in each st across. Skip the closing ch-1 of each puff. Turn. (7 sc)
Row 4: Repeat Row 2. (7 sts)
Row 5: Repeat Row 3. (7 sc)
Row 6: Repeat Row 2. (7 sts)
Row 7: Repeat Row 3. Do not turn. (7 sc)
The puffs are in stitches 2, 4 and 6 of Rows 2, 4 and 6. That stacks them into a 3 x 3 grid of nine puffs on the RS.
Round 1: Single Crochet Frame
Work around the square with the RS facing.
Round 1: Ch 1. 3 sc in the first st of Row 7 (corner). Sc in the next 5 sts. 3 sc in the last st (corner).
Work 5 sc evenly down the row ends of Rows 6 to 2.
3 sc in the first foundation ch (corner). Sc in the next 5 ch. 3 sc in the last ch (corner).
Work 5 sc evenly up the row ends of Rows 2 to 6. Join with a sl st to the first sc.
(32 sc: 4 corner groups of 3 + 4 sides of 5)
Put a marker in the center sc of each 3-sc corner group. Counting both corner center stitches, each side is 9 sts, which equals 2.25 in (5.7 cm) at gauge. Turn the piece so one corner points up. It is now a diamond.
Round 2: Petal Loops
Round 2: Sl st in each st up to the first marked corner sc. *Ch 15, sk the side sts, sl st in the next marked corner sc; repeat from * 3 more times. The last sl st goes into the corner where you started.
(4 ch-15 loops)
Each loop spans one side of the diamond and will become one petal arc.
Round 3: Rope Arcs and Tips
Round 3: *Work 20 sc in the next ch-15 loop, then ch 3 for the tip; repeat from * 3 more times. Join with a sl st to the first sc and fasten off.
(80 sc + 4 ch-3 tips)
Push the sc stitches close together along each loop. Packing 20 sc onto 15 chains makes each arc curve outward into a thick half-circle that looks like rope. Each ch-3 tip sits just past a diamond corner. The four tips make the pointed ends of the quatrefoil.
First motif only: Work Round 3 exactly as written.
All other motifs: Work Round 3 with tip joins wherever the motif touches an earlier one. See Joining below.
Make All Pieces
You need 30 motifs, all in dusty rose, set in 10 rows of 3. Make Motif 1 complete. Then make the others and join each one during its Round 3.
Layout (T = tip join between neighbors):
Row 1:   [1] T [2] T [3]
          T     T     T
Row 2:   [4] T [5] T [6]
          T     T     T
Row 3:   [7] T [8] T [9]
         ...  continue ...
Row 10: [28] T[29] T[30]
The top tip of Row 1 motifs and the bottom tip of Row 10 motifs stay free. Tassels hang from those tips. The outer side tips of the left and right columns also stay free.
Joining
Method: Join as you go at the tips during Round 3.
Stitch logic: Each tip of one motif meets one tip of exactly one neighbor:
- Horizontal neighbors: the right tip of one motif joins the left tip of the next.
- Vertical neighbors: the bottom tip of one motif joins the top tip of the motif below.
To join, work the arc up to the tip as usual. Ch 1, sl st into the neighbor’s ch-3 space, ch 1, then continue with the next arc. No stitches are added or removed. Every arc still has 20 sc.
Joins needed:
– 2 per row x 10 rows = 20 horizontal joins
– 3 per column x 9 gaps = 27 vertical joins
– Total: 47 joins
For a motif that joins on two sides, such as Motif 5 (top and left), start Round 3 on an arc that is away from both joins. That way you reach both joining tips in order.
Tension: Keep each sl st join the same size as the ch-3 tip. A tight join pulls neighboring arcs into points. A loose join leaves a sagging gap. When four motifs meet, their four facing arcs should make a round, open ring. If a ring looks oval, check the size of the joins around it.
Size checkpoint:
– After Row 3 of the layout (9 motifs): the piece should measure 12 in x 12 in (30.5 cm x 30.5 cm), tip to tip.
– When all 30 motifs are joined: 12 in x 40 in (30.5 cm x 101.6 cm).
Border: Edge Finish and Tassels
Border gauge: There is no separate border. The outer arcs are the edge. They are worked at the same gauge as Round 3: 20 sc per arc, and each arc is 2.25 in (5.7 cm) along its chord.
Edge count per long side: Each motif in an outer column shows 2 arcs on the long edge. That gives 10 motifs x 2 arcs = 20 arcs, and 20 arcs x 20 sc = 400 sc of scalloped edge per long side.
Edge count per short end: 3 motifs x 2 arcs = 6 arcs, and 6 arcs x 20 sc = 120 sc per end.
Why the math works: Every motif is 4 in (10.2 cm) tip to tip, and the arcs reach exactly to the tip line. A half-circle drawn on one side of a square on point reaches as far sideways as the square’s corner. So the scalloped edge lines up with the motif grid:
- 3 x 4 in = 12 in (30.5 cm) wide
- 10 x 4 in = 40 in (101.6 cm) long
A separate border would cover the scallops and spoil the look of the rings.
Tassels (Make 6)
- Wrap yarn 30 times around the 4 in (10.2 cm) card.
- Slide a 12 in (30.5 cm) tie strand under the top loops and knot it tightly. Leave the ends long for attaching.
- Cut the bottom loops.
- To shape the round head, wrap a separate strand tightly 8 times around the bundle, 0.5 in (1.3 cm) below the top. Knot it and bury the ends inside the tassel.
- Trim the tassel to 3.5 in (8.9 cm).
- Thread the tie ends through the free tip of a Row 1 motif (3 tassels) or a Row 10 motif (3 tassels). Knot securely on the WS and weave the ends into the arc.
Final Blocking
- Weave in all ends along the sc arcs, not through the puffs.
- Lay the runner RS up on blocking mats.
- Spray it evenly until damp.
- Pin the outer tips into a straight 12 in x 40 in (30.5 cm x 101.6 cm) rectangle.
- Pin the center of each outer arc to round out the scallops.
- With your fingertip, shape each inner ring into a circle and lift each puff gently.
- Let it dry completely, then unpin.
- Steam the tassels lightly and comb them straight. Do not press the puffs flat.
Final Quality-Control Checklist
- 30 motifs, each with 9 puffs in a 3 x 3 grid
- Each motif is 4 in (10.2 cm) tip to tip
- Every arc has 20 sc; every motif has 80 sc in Round 3
- 47 tip joins, with no missed or doubled joins
- All inner rings are round and open
- Runner measures 12 in x 40 in (30.5 cm x 101.6 cm)
- 6 tassels, each 3.5 in (8.9 cm), firmly attached at the end tips
- All ends woven in and hidden
Troubleshooting
- Puffs are flat or uneven: Pull every loop up to the same 0.5 in (1.3 cm) height, and always close each puff with ch 1.
- The center square is taller than it is wide: Pull the puff loops up a little less, or use a smaller hook for Rows 1 to 7 only.
- Arcs ruffle: Use fewer chains (ch 14), or work fewer sc per arc. Keep the same number of sc on every arc.
- Arcs pull flat or the diamond cups: Chain 16, or make sure you are working 20 sc per arc, not fewer.
- The runner slants: You may have joined a tip to the wrong neighbor. Check the layout grid.
- The tassel head is loose: Rewrap with a doubled strand and pull firmly.
Care
Hand wash in cool water with mild soap, roll it in a towel, and lay it flat to dry, reshaping the rings. Do not tumble dry, because heat can flatten the puffs and shrink the cotton.
Final Notes
The size of the whole runner comes from one chain of measurements:
- 7 sc gives a 1.75 in (4.4 cm) center square.
- Round 1 brings each side to 2.25 in (5.7 cm).
- 20 sc on a ch-15 loop builds each arc, and the motif measures 4 in (10.2 cm) tip to tip.
- 3 motifs across and 10 motifs long give 12 in x 40 in (30.5 cm x 101.6 cm).
- Tassels add 3.5 in (8.9 cm) at each end, for a total of 47 in (119.4 cm).
Check your gauge on the first motif and every measurement after that should follow.
Happy crocheting!