

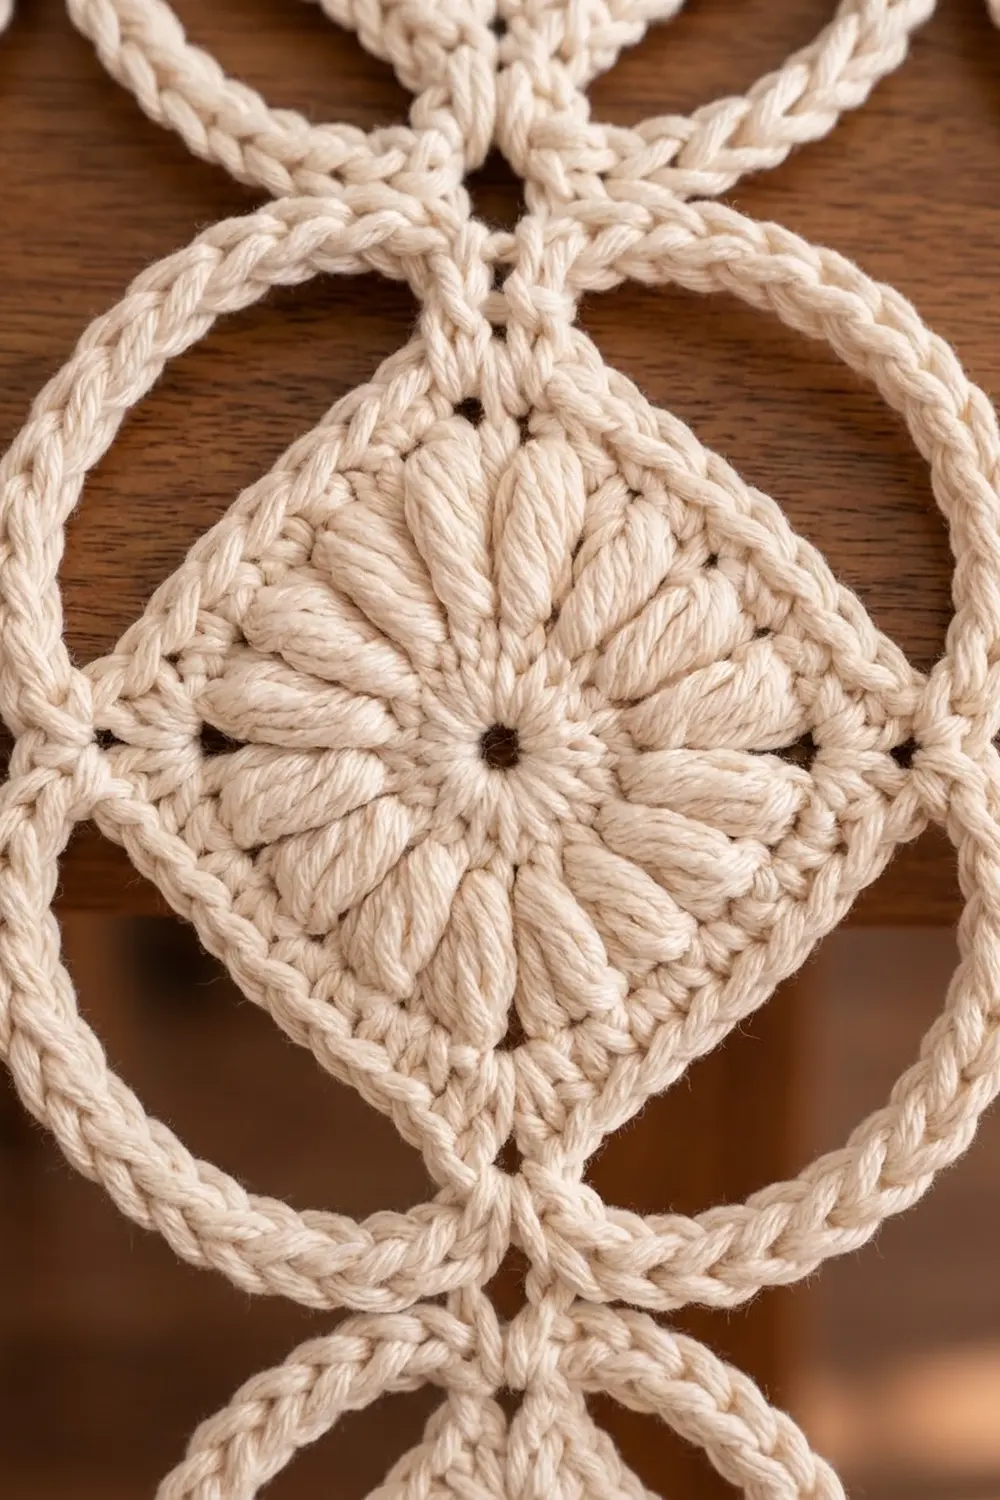
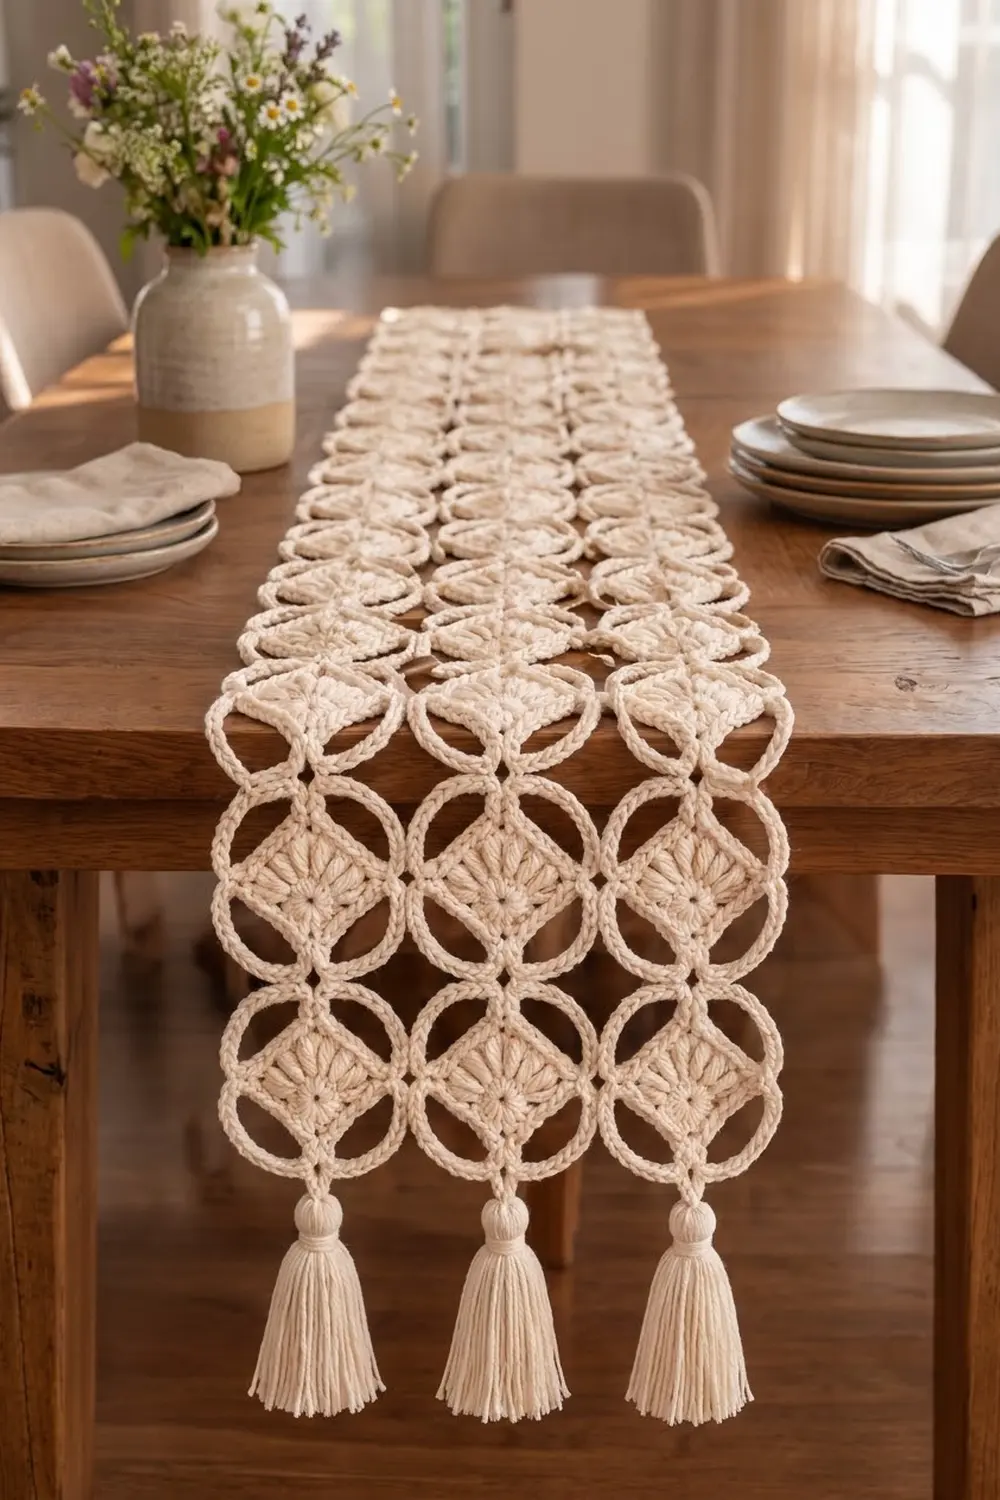
The Moonlit Lattice Table Runner is a lacy, open runner made from diamond motifs joined point to point. Each motif has a solid textured center: a ring of puff stitches around a small hole, framed by a crisp single crochet square. Four rounded, rope-like arcs surround the square. Once the motifs are joined, these arcs form open circles all the way down the runner.
The runner uses one color, a soft cream (natural/ecru) cotton, so the texture does the work. Three chunky tassels hang from the points at each end. It has a farmhouse-meets-boho feel and looks best on a wooden table.
This pattern uses US crochet terms. After the border, the runner measures 15.8″ x 50.8″ (40.1 cm x 129.0 cm), not including tassels. Each tassel adds about 5.75″ (14.6 cm), including its cord.
You make 30 identical diamond motifs in rounds and join them as you go on the last round, at the corner points only. The grid is 3 motifs wide and 10 long. A two-round border neatens the outer arcs, and six tassels finish the ends.
Finished Size and Construction
- Finished size: 15.8″ x 50.8″ (40.1 cm x 129.0 cm), plus tassels
- Skill level: Intermediate
- Terminology: US crochet terms
- Yarn weight: Worsted (category 4) cotton
- Hook: 5.0 mm (US H-8)
- Number of pieces: 30 motifs, joined as you go
- Layout: 3 motifs wide x 10 motifs long, set on point (as diamonds)
- Motif size: 5″ (12.7 cm) corner to corner; center square 3.25″ (8.3 cm) per side
- Size before border: 15″ x 50″ (38.1 cm x 127.0 cm)
- Border depth: 0.4″ (1.0 cm)
Materials
Yarn: Use a smooth, combed worsted-weight cotton or cotton blend. Cotton gives clear puffs and firm, round arcs. Avoid fuzzy or loosely plied yarns, which blur the rope texture.
- Cream (natural/ecru): 400 g, about 680 m
About 300 g goes into the motifs, 25 g into the border and 36 g into the tassels. The quantities include a margin of about 10% for your test motif and for differences between yarns.
Tools:
- 5.0 mm (US H-8) crochet hook
- Tapestry needle
- Scissors
- 4–6 stitch markers
- Stiff card 4.5″ (11.4 cm) tall, for the tassels
- Rust-proof pins and a blocking mat or towels
- Spray bottle
- Tape measure
Abbreviations (US Terms)
- ch: chain
- sl st: slip stitch
- sc: single crochet
- dc: double crochet
- rev sc: reverse single crochet (crab stitch)
- sp(s): space(s)
- st(s): stitch(es)
- MR: magic ring
- rep: repeat
- yo: yarn over
Special stitch: Puff stitch (puff). (Yo, insert hook in indicated st, yo and pull up a loop to about 0.5″ (1.3 cm)) 3 times, for 7 loops on hook. Yo and pull through all 7 loops. Don’t chain to close. The ch 1 that follows in the pattern locks the puff.
Working over an arc: Insert the hook under the whole chain arc, not into individual chains, and work sc around it. This packs the stitches into a rounded, rope-like edge.
Gauge and Checkpoints
Gauge: 16 sc and 18 rows = 4″ (10.2 cm) with a 5.0 mm hook.
Make one complete test motif first. It is your real gauge swatch. Check it at each stage:
- After Round 1: 0.75″ (1.9 cm) across
- After Round 2: 1.75″ (4.4 cm) across
- After Round 3: square, 2.75″ (7.0 cm) per side
- After Round 4: square, 3.25″ (8.3 cm) per side
- After Round 6: 5″ (12.7 cm) from one corner-loop tip to the opposite tip, lightly pressed flat
Too big? If it is more than 1/8″ (0.3 cm) over, use a 4.5 mm hook and make another test motif.
Too small? If it is more than 1/8″ (0.3 cm) under, use a 5.5 mm hook.
Errors add up along the length: a motif just 1/8″ (0.3 cm) too big makes the runner 1.25″ (3.2 cm) too long.
Motif (Make 30)
Work in the round with the right side facing. Rounds 1–5 are the same for every motif. Round 6 is also the joining round.
Round 1: MR, ch 1 (doesn’t count as a st), 12 sc in ring, join with sl st to first sc. Pull the ring snug but leave a small center hole. (12 sc)
Round 2: Ch 1 (doesn’t count), puff in first sc, ch 1, puff in next sc, ch 1; rep from * 10 more times, join with sl st to top of first puff. (12 puffs, 12 ch-1 sps)*
The puffs radiate outward like the ribs of a fan.
Round 3 (squaring round): Sl st into first ch-1 sp. Ch 3 (counts as dc), (dc, ch 2, 2 dc) in same sp, 3 dc in each of next 2 ch-1 sps, (2 dc, ch 2, 2 dc) in next ch-1 sp, 3 dc in each of next 2 ch-1 sps; rep from * 2 more times, join with sl st to top of ch-3.
(40 dc = 4 corners x 4 dc + 8 side sps x 3 dc; 4 ch-2 corner sps)*
Each side has 2 + 3 + 3 + 2 = 10 dc between corner sps.
Round 4: Ch 1, sc in same st as join and in next dc, (sc, ch 2, sc) in ch-2 corner sp, sc in each of next 10 dc, (sc, ch 2, sc) in next corner sp; rep from * 2 more times, sc in each of last 8 dc, join with sl st to first sc.
(48 sc = 40 sc worked 1 per dc + 8 corner sc added; 4 ch-2 corner sps)*
Each side has 12 sc, including its 2 corner sc: 4 x 12 = 48.
Round 5 (arc round): Sl st in next 2 sc, then sl st into the ch-2 corner sp. Ch 1, sc in same sp, ch 18, sc in next ch-2 corner sp, ch 18; rep from * 2 more times, join with sl st to first sc.
(4 sc, 4 ch-18 arcs)*
Each arc runs from corner to corner and skips the whole side. Let it bow outward.
Round 6 (rope round): Ch 1, (sc, ch 3, sc) in corner sc, 22 sc over next ch-18 arc; rep from * 3 more times, join with sl st to first sc. Fasten off and weave in ends.
(96 sc = 4 sides x 24 sc; 4 ch-3 corner loops)*
Each side has 24 sc: 22 over the arc plus the 2 corner sc at its ends. Packing 22 sc over 18 ch curves the arc a little more than a half circle. The arc rises about 1.4″ (3.6 cm) above the side of the square.
Orientation: Hold the motif as a diamond with its corner loops pointing North, East, South and West. The arcs then face NE, SE, SW and NW.
Make All Pieces
You need 30 motifs in Cream. Make Motif 1 in full. For the other 29, work Rounds 1–5, then work Round 6 as you join each one.
Layout grid (Row 1 is at the bottom end):
Row 10:  [28] [29] [30]
Row 9:   [25] [26] [27]
Row 8:   [22] [23] [24]
Row 7:   [19] [20] [21]
Row 6:   [16] [17] [18]
Row 5:   [13] [14] [15]
Row 4:   [10] [11] [12]
Row 3:   [ 7] [ 8] [ 9]
Row 2:   [ 4] [ 5] [ 6]
Row 1:   [ 1] [ 2] [ 3]
Across a row, each East corner joins the next motif’s West corner. Up a column, each North corner joins the South corner of the motif above.
Joining
Method: Join as you go on Round 6, at the corner loops only. Leave the arcs free.
Join stitch: When you reach a corner that meets a finished neighbor, replace (sc, ch 3, sc) with:
(sc, ch 1, sl st in neighbor’s ch-3 loop, ch 1, sc)
The ch 1, sl st, ch 1 replaces the ch 3. Each side still has 24 sc, and no stitches are added at the seam.
Order:
– Motif 2: join its West corner to Motif 1’s East corner. Join Motif 3 to Motif 2 the same way.
– Motif 4: join its South corner to Motif 1’s North corner.
– Motif 5: join its West corner to Motif 4 and its South corner to Motif 2. Continue the same way up the runner.
Each corner joins at most one neighbor. Between every group of four motifs, the four facing arcs frame an open circle.
Tension: Keep the joining sl st snug but not tight. If it’s loose, the points drift apart and the circles distort. If it’s tight, the corners pucker. Lay each row flat before starting the next.
Size checkpoint: Row 1 should measure 15″ (38.1 cm) from tip to tip (3 x 5″). After Row 4, the piece should be 20″ (50.8 cm) long. The fully joined runner should measure 15″ x 50″ (38.1 cm x 127.0 cm).
Border
Border gauge: The same as the main gauge, 16 sc = 4″ (10.2 cm), worked 1 per st.
The outer edge goes in and out. Every outer motif side is a 24-sc arc. Each free corner loop is an outward point, and each join on the edge is an inward V.
Starting counts per side:
– Long side: 10 motifs x 2 outer sides x 24 sc = 480 sc, plus 10 free corner loops x 3 sc = 30, plus 9 joins x 1 sl st = 9. Total 519 sts.
– Short end: 4 outer sides x 24 sc = 96 sc, plus 3 free corner loops x 3 sc = 9, plus 2 joins x 1 sl st = 2. Total 107 sts.
– Whole round: 2 x 519 + 2 x 107 = 1,252 sts.
The end motifs’ outermost arcs are counted on the long sides. That leaves 4 of the 6 end arcs on each short end.
Round 1: Join yarn with sc in a free West corner loop on the long side, then work 2 more sc in the same loop. Then work around: 1 sc in each sc along every arc, 3 sc in each free corner loop, and 1 sl st into the joining sl st at each join. Join with sl st to first sc.
(1,252 sts = 1,230 sc + 22 sl st)
Round 2: Ch 1. Working left to right, rev sc in each sc and sl st in each sl st around. Join.
(1,252 sts = 1,230 rev sc + 22 sl st)
Fasten off.
Why the math works: Each arc gets exactly 1 st per existing sc, so its length doesn’t change and it won’t ruffle or cup. Three sc are just enough to turn each outer point. One sl st at each join keeps the V sharp without adding bulk. Two rounds add 0.4″ (1.0 cm) all around: 15″ + 0.8″ = 15.8″ (40.1 cm) and 50″ + 0.8″ = 50.8″ (129.0 cm).
Tassels (Make 6)
- Wrap yarn 40 times around the 4.5″ (11.4 cm) card.
- Thread a 12″ (30.5 cm) strand under the wraps at the top and tie it tightly. Cut the bottom loops.
- Wrap a 20″ (50.8 cm) strand 6 times around the tassel, 0.75″ (1.9 cm) below the top, to form the head. Tie it and bury the ends inside.
- Trim the tassel evenly to 4.5″ (11.4 cm).
Cord: Join yarn with sl st in the center sc of a free North corner on Row 10 (or a South corner on Row 1). Ch 6, about 1.25″ (3.2 cm), and fasten off. Tie the tassel’s top strand to the end of the cord and bury the ends in the head. Attach 3 tassels at each end.
Final Blocking
- Weave in all remaining ends on the wrong side.
- Lay the runner right side up on a mat or towels.
- Pin the corner points 5″ (12.7 cm) apart both across and along the runner. Check that the width is 15.8″ (40.1 cm).
- Pin the top of each outer arc into a smooth curve. Shape the inner circles with your fingers.
- Spray until damp, not soaked. Pat the puffs to plump them.
- Let it dry completely, at least 24 hours.
- Unpin. Lightly steam the tassels, comb them straight and trim.
Final Quality-Control Checklist
- All 30 motifs measure 5″ (12.7 cm) corner to corner.
- Stitch counts per motif: 12 puffs (Round 2), 40 dc (Round 3), 48 sc (Round 4) and 96 sc (Round 6).
- Joins are at the corner loops only, and all arcs are free.
- The arcs curve evenly, with no twisted chains.
- Border counts are 519 per long side and 107 per short end.
- The runner measures 15.8″ x 50.8″ (40.1 cm x 129.0 cm).
- The six tassels are equal in length, with 3 centered at each end.
- No ends show on the right side.
Troubleshooting
Puffs look flat or uneven: Pull every loop up to the same height before closing the puff.
The square ruffles in Round 4: Round 3 is too loose. Use a smaller hook for Rounds 3–4.
Arcs pinch the square: The chain is too tight. Chain Round 5 with a larger hook.
Arcs flop: Push the 22 sc closer together along the chain.
The runner skews: Check that every join is corner to corner and that no arcs are joined.
The border ripples: Make sure you worked exactly 1 st per sc and 3 sc in each corner loop.
Care
Hand wash in cool water with mild soap. Roll in a towel to remove water, then dry flat and reshape the arcs. Comb the tassels once they are dry.
Final Notes
The measurement chain is simple. A 3.25″ (8.3 cm) square gives a 5″ (12.7 cm) motif. A grid of 3 x 10 motifs gives 15″ x 50″ (38.1 cm x 127.0 cm), and the 0.4″ (1.0 cm) border takes it to 15.8″ x 50.8″ (40.1 cm x 129.0 cm). Check at every stage and the runner will lie flat and even.
Happy crocheting!