

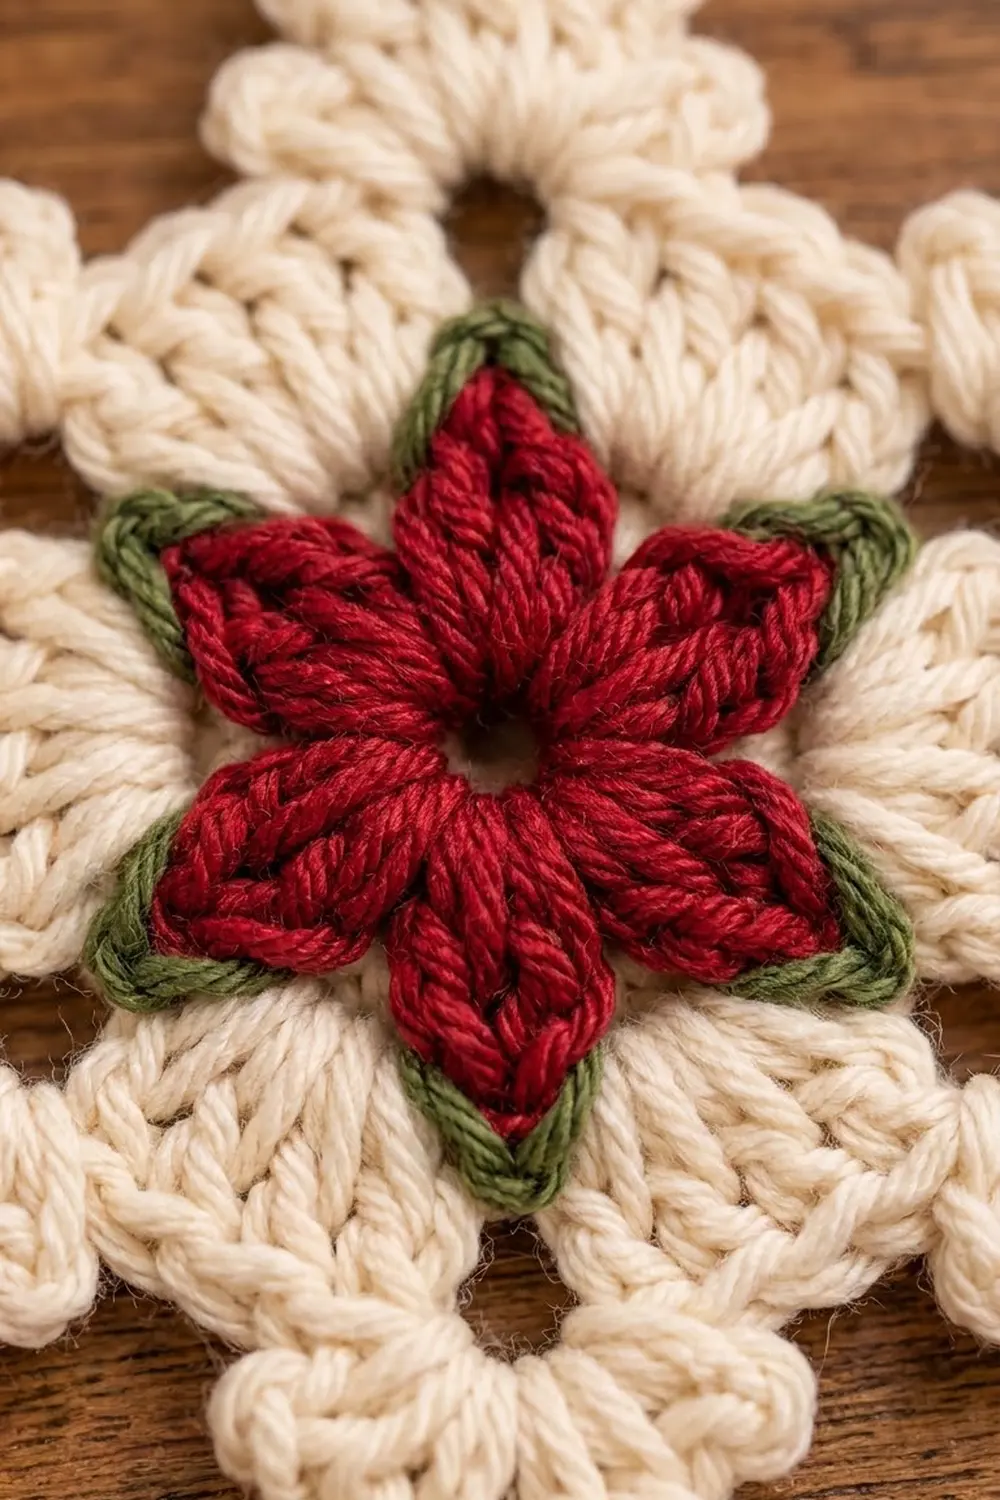
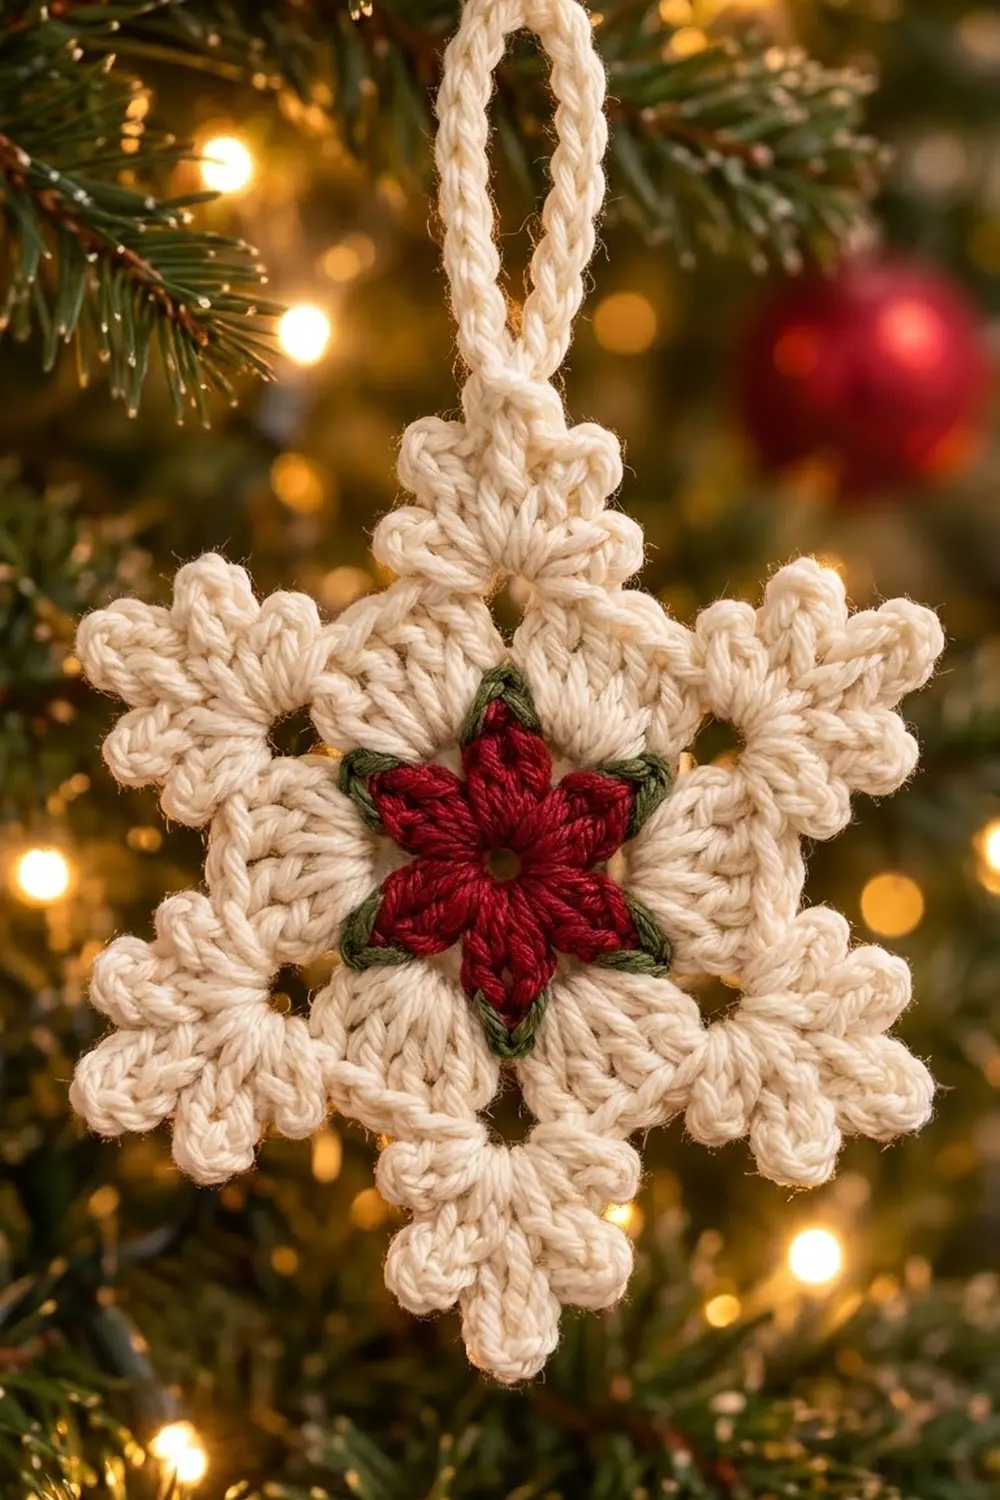
This snowflake ornament has a deep cranberry-red poinsettia center, a thin moss-green outline, and a creamy white six-armed snowflake around it. Each arm ends in a soft trefoil of three rounded lobes, and small windows open between the arms near the center. A slip-stitched chain loop at the top makes it ready to hang.
The colors are classic Christmas: cranberry red, moss green, and warm ivory cream. The style is cozy and slightly chunky rather than lacy, so the ornament holds its shape on the tree without starch. It also makes a good gift topper or a sweet addition to a handmade card.
This pattern uses US crochet terms throughout. The finished ornament measures 4.5 in (11.4 cm) from arm tip to opposite arm tip, plus a 2.25 in (5.7 cm) hanging loop.
The construction is simple. You work one single piece in the round from the center out:
- A red flower (Rounds 1–2)
- A green outline (Round 3)
- Two cream rounds that build the six arms (Rounds 4–5)
- A cream trefoil edging (Round 6)
The hanging loop goes on last.
Finished Size and Construction
- Finished size: 4.5 in (11.4 cm) tip to tip, without the loop
- Hanging loop: 2.25 in (5.7 cm) tall
- Skill level: Easy / advanced beginner
- Terminology: US crochet terms
- Yarn weight: DK (weight 3), cotton or cotton blend
- Hook: 4.0 mm (G-6)
- Number of pieces: 1 (a single motif, no joining)
- Layout: six-armed snowflake, worked in joined rounds
- Flower center (after Round 3): 2 in (5.1 cm) tip to tip
- Size before edging (after Round 5): 3.5 in (8.9 cm) tip to tip
- Edging depth (Round 6): adds 0.5 in (1.3 cm) at each arm tip
Materials
Choose a smooth, tightly plied DK cotton or cotton-acrylic blend. Cotton gives crisp stitch definition and holds the trefoil lobes well. Avoid fuzzy or very splitty yarns, because clusters show every split ply.
If you swap in a different yarn, stay with DK weight and a similar fiber. A thicker yarn makes a bigger ornament and uses more yarn. A thinner yarn makes a more delicate one.
- Color A – Cranberry red: 4 g / 10 m (11 yd)
- Color B – Moss green: 2 g / 5 m (5.5 yd)
- Color C – Ivory cream: 8 g / 20 m (22 yd)
These amounts are for one ornament. They include a margin of about 25% for yarn tails, small swatches, and differences in tension.
Tools:
- 4.0 mm (G-6) crochet hook
- Tapestry needle
- Small scissors
- Ruler or tape measure
- Rust-proof pins and a foam blocking mat
- Spray bottle with water
Abbreviations (US Terms)
- ch – chain
- sl st – slip stitch
- sc – single crochet
- hdc – half double crochet
- dc – double crochet
- tr – treble crochet
- sk – skip
- sp(s) – space(s)
- st(s) – stitch(es)
- rep – repeat
- beg – beginning
Special stitch – dc3tog (3-dc cluster): *Yarn over, insert the hook in the given space, yarn over and pull up a loop, yarn over and pull through 2 loops. Rep from * 2 more times in the same space, so you have 4 loops on the hook. Yarn over and pull through all 4 loops.
Beginning cluster: Ch 2, then work a dc2tog in the same space. A dc2tog is a dc3tog with only 2 repeats. The beginning cluster counts as the first dc3tog.
Gauge and Checkpoints
Gauge isn’t critical for an ornament, but it sets the final size and how much yarn you use. Make one ornament first and measure it at each checkpoint below.
- After Round 1: 1 in (2.5 cm) across
- After Round 2: 1.75 in (4.4 cm) from one petal tip to the opposite petal tip
- After Round 3: 2 in (5.1 cm) tip to tip
- After Round 4: 2.75 in (7.0 cm) tip to tip
- After Round 5: 3.5 in (8.9 cm) tip to tip
- After Round 6: 4.5 in (11.4 cm) tip to tip
Measure with the piece lying flat and relaxed, not stretched.
If your piece is too big: go down to a 3.5 mm hook, or tighten your chains.
If your piece is too small: go up to a 4.5 mm hook. Tight chains are the most common cause, so check those first.
Being off by up to 0.25 in (0.6 cm) at any checkpoint is fine and blocks out easily.
Pattern
Round 1 – Flower Center (Color A)
With Color A, make a magic ring.
Ch 3 (counts as the first dc), then work 11 dc into the ring. Pull the ring closed, leaving a small center hole about the size of a pencil tip. Sl st to the top of the beg ch-3 to join.
Stitch count: 12 dc.
Round 2 – Poinsettia Petals (Color A)
This round makes six pointed petals. Each petal is worked into one stitch, and the slip stitch between petals uses the next stitch.
*(Dc, tr, ch 2, tr, dc) all in next dc, sl st in next dc; rep from * 5 more times. The last sl st lands in the joining stitch at the top of the beg ch-3 of Round 1.
Stitch count: 6 petals = 12 dc, 12 tr, 6 ch-2 tip sps, 6 sl sts.
Fasten off Color A. The ch-2 at the top of each petal makes the sharp poinsettia point. The paired tr stitches give each petal its slightly open, leafy look.
Round 3 – Green Outline (Color B)
This round traces every petal with a thin green edge.
Join Color B with a sl st in any ch-2 tip sp.
Ch 1, (sc, ch 2, sc) in same sp, *sc in next tr, sc in next dc, sl st in next sl st, sc in next dc, sc in next tr, (sc, ch 2, sc) in next ch-2 tip sp; rep from * 4 more times, sc in next tr, sc in next dc, sl st in next sl st, sc in next dc, sc in next tr. Sl st to first sc to join.
Stitch count: 36 sc, 6 sl sts, 6 ch-2 tip sps.
That’s 6 sc and 1 sl st per petal, plus 1 ch-2 tip. This is a trim round: per petal, you work 4 sc and 1 sl st one-per-stitch into the 5 existing stitches, then add 2 sc and a ch-2 at the tip.
Fasten off Color B. The sl st in each valley keeps the outline tucked in between petals, so the green looks like a crisp line instead of a ruffle.
Round 4 – Snowflake Base (Color C)
The cream starts here, and the six arms are set directly above the six petal tips.
Join Color C with a sl st in any green ch-2 tip sp.
Ch 3 (counts as dc), (dc, ch 2, 2 dc) in same sp, *ch 2, sk next 3 sc, tr in next sl st, ch 2, sk next 3 sc, (2 dc, ch 2, 2 dc) in next ch-2 tip sp; rep from * 4 more times, ch 2, sk next 3 sc, tr in next sl st, ch 2, sk next 3 sc. Sl st to top of beg ch-3 to join.
Between two green tips there are 6 sc and 1 sl st. Skipping 3 sc, working the tr in the sl st, and skipping 3 more sc uses exactly those 7 stitches.
Stitch count: 24 dc, 6 tr, 6 ch-2 tip sps, 12 ch-2 side sps.
The tr in each valley, with a ch-2 space on each side, starts the small openings between the arms. Keep these chains relaxed so the openings stay visible after blocking.
Round 5 – Arms (Color C)
Sl st in next dc, then sl st in next ch-2 tip sp.
Ch 3 (counts as dc), (2 dc, ch 3, 3 dc) in same sp, *dc in next 2 dc, hdc in next ch-2 sp, ch 3, sk next tr, hdc in next ch-2 sp, dc in next 2 dc, (3 dc, ch 3, 3 dc) in next ch-2 tip sp; rep from * 4 more times, dc in next 2 dc, hdc in next ch-2 sp, ch 3, sk next tr, hdc in next ch-2 sp, dc in next 2 dc. Sl st to top of beg ch-3 to join.
Stitch count: 60 dc, 12 hdc, 6 ch-3 tip sps, 6 ch-3 valley sps.
That’s 10 dc and 2 hdc per repeat. Counting from a tip ch-3 to the next valley ch-3, each side of an arm has exactly 6 stitches: 3 dc from the tip shell, 2 dc, and 1 hdc. Remember this number for the edging.
The ch-3 over each tr leaves a small window between neighboring arms. That’s the hole you see near the center of the finished snowflake.
Edging: Trefoil Tips
Edging Gauge
Round 6 is a single crochet edging with three clusters at each tip. In DK on a 4.0 mm hook, 5 sc measure about 1 in (2.5 cm). The trefoil adds 0.5 in (1.3 cm) beyond each Round 5 tip. That takes the snowflake from 3.5 in (8.9 cm) to 4.5 in (11.4 cm) tip to tip.
Round 6 – Trefoil Edging (Color C)
Don’t fasten off after Round 5. Sl st in next 2 dc, then sl st in next ch-3 tip sp.
Work the beginning cluster in the same sp, ch 2, dc3tog in same sp, ch 2, dc3tog in same sp. That’s the first trefoil.
*Sc in next 6 sts (3 dc, 2 dc, 1 hdc), sl st in next ch-3 valley sp, sc in next 6 sts (1 hdc, 2 dc, 3 dc), (dc3tog, ch 2, dc3tog, ch 2, dc3tog) in next ch-3 tip sp; rep from * 4 more times, sc in next 6 sts, sl st in next ch-3 valley sp, sc in next 6 sts. Sl st to top of the beginning cluster to join.
Per arm: 3 clusters, 2 ch-2 sps, and 12 sc (6 on each side), plus 1 sl st in the valley after the arm.
Stitch count for the round: 18 clusters, 12 ch-2 sps, 72 sc, 6 sl sts.
Fasten off, leaving a 6 in (15.2 cm) tail.
Why the Math Works
Every side of every arm in Round 5 has 6 stitches. Round 6 puts exactly 1 sc in each of them, so it adds no extra fullness along the arm sides. That keeps the arms straight and narrow.
All the new height goes to the tips. The three clusters fan out from one ch-3 space, and the two ch-2 spaces push them apart into three rounded lobes. The single sl st in each valley pulls the edge inward, so the arms stay cleanly separated. Six arms times 12 sc gives 72 sc, which matches the round total.
Hanging Loop
Pick the arm that sits most upright when the piece lies flat.
Join Color C with a sl st in the top of the center cluster of that arm. Ch 22, then sl st in the top of the same cluster to form the loop. Sl st in each of the 22 ch around the loop, then sl st in the cluster again.
Loop: 22 ch + 22 sl sts.
The slip-stitch pass makes the loop thicker and rounder, like a twisted cord. Fasten off and weave in the ends.
Final Blocking
- Weave in all ends on the back, following stitches of the same color. Hide the red and green tails inside their own rounds so they don’t show through the cream.
- Spray the ornament until it’s evenly damp but not dripping.
- Lay it face up on the blocking mat.
- Put a pin through the center hole of the magic ring.
- Pin each arm tip 2.25 in (5.7 cm) from the center, so opposite tips are 4.5 in (11.4 cm) apart.
- Check that the six arms are evenly spaced, about 60 degrees apart.
- Pin the center lobe of each trefoil, then gently nudge the two side lobes outward with your fingers.
- Pin each valley sl st lightly inward to open the small window between the arms.
- Pin the hanging loop straight up, flat and centered.
- Let it dry completely, usually 6–12 hours, before you remove the pins.
For a firmer ornament, mist it with a light fabric stiffener before it dries. Cotton usually holds its shape well without it.
Final Quality-Control Checklist
- Round 1 has 12 dc and a small, closed center hole.
- There are 6 red petals, each with a pointed tip.
- The green outline is unbroken and dips into every valley.
- There are 6 cream arms, each centered over a petal tip.
- Each arm side has 6 sc in Round 6.
- Each arm ends in 3 rounded cluster lobes.
- There are 6 small windows between the arms near the center.
- Tip to tip measures 4.5 in (11.4 cm).
- The hanging loop measures 2.25 in (5.7 cm) and is attached at an arm tip.
- All ends are woven in, and no color shows through on the front.
Troubleshooting
Petals look round instead of pointed. Make sure the ch-2 sits between the two tr. Pull the tr stitches up to their full height.
The green outline ruffles. You probably worked sc instead of sl st in the valleys, or added extra stitches. Recount to 6 sc and 1 sl st per petal.
The piece cups. Your chains are probably too tight. Loosen the ch-2 and ch-3 spaces in Rounds 4 and 5, or go up a hook size.
The piece ripples. Check Round 5 for extra dc. Each repeat should have exactly 10 dc and 2 hdc.
The windows between arms close up. Make sure you skip the tr in Round 5. In Round 6, work the sl st into the ch-3 space, not around the tr.
The trefoil lobes look flat. Pull up the first loop of each cluster to full dc height, and keep the ch-2 between clusters relaxed.
The arms look uneven. Recount Round 6. Every arm side needs 6 sc.
Care
Hand wash in cool water with mild soap, press out the water in a towel, and reshape it flat to dry. Store it flat in tissue paper so the lobes keep their shape.
Final Notes
The measurements build up in a short, easy chain:
- The 12-dc center grows into a 1.75 in (4.4 cm) poinsettia.
- The green outline brings it to 2 in (5.1 cm).
- The cream base reaches 2.75 in (7.0 cm), and the arms reach 3.5 in (8.9 cm).
- The trefoil edging adds 0.5 in (1.3 cm) at each tip, for a finished 4.5 in (11.4 cm) snowflake.
- A 2.25 in (5.7 cm) loop goes on top.
If your first ornament hits those checkpoints, every one after it will match. Make a few for the tree, a gift topper, or a handmade card.
Happy crocheting!