

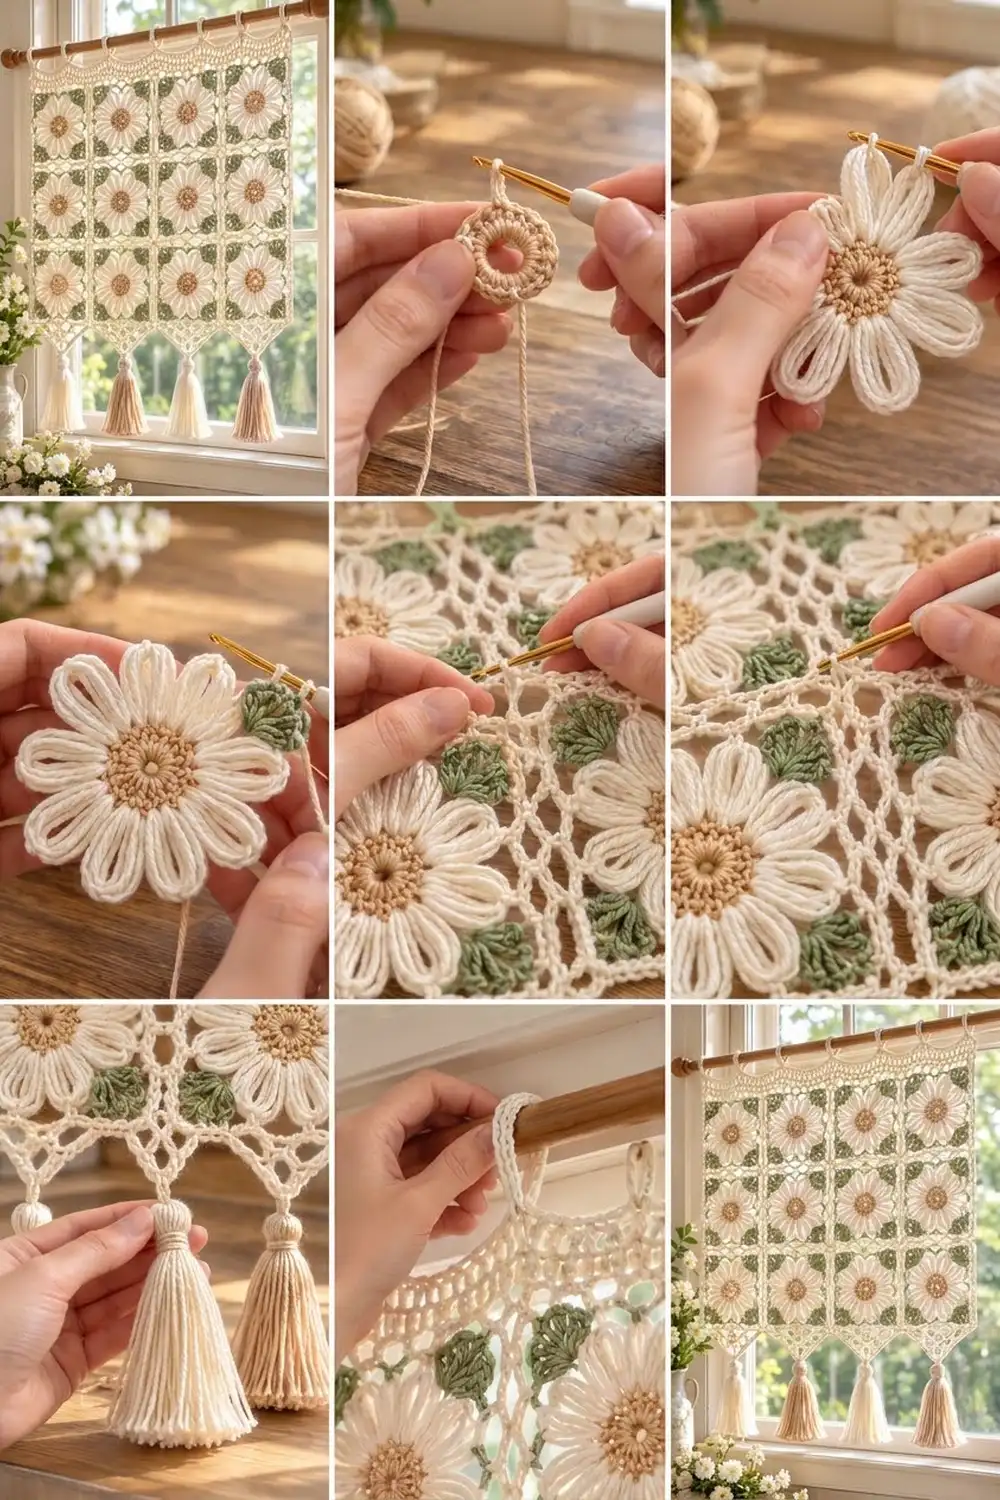
The Daisy Meadow Window Valance is a light cottage-style panel made from sixteen daisy granny squares. Each square has a warm tan center, twelve cream loop petals, and a sage-green leaf cluster in every corner. A cream mesh frame turns each flower into a square, so the joined panel looks like a soft lattice when light comes through it.
The palette is cream, sage, and tan. The cream cord loops at the top slide straight onto a wooden rod. The bottom edge drops into four shallow V-points, and each point ends in a tassel, alternating cream and tan.
This pattern uses US crochet terms. The finished valance is 28.8 in (73.2 cm) wide and 33.4 in (84.8 cm) tall from the top band to the point tips. The rod loops add 1.75 in (4.4 cm) above that, and the tassels add 4.5 in (11.4 cm) below.
Here’s the construction in order. Make 16 squares in rounds, then join them flat with slip stitches. Next, work two border rounds, add the top band with cord loops, and work the four V-points in rows. Finish by attaching the tassels.
Finished Size and Construction
- Finished size: 28.8 x 33.4 in (73.2 x 84.8 cm), not counting the loops and tassels
- Skill level: Intermediate
- Terminology: US
- Yarn weight: DK (#3) cotton
- Hook: 4 mm (G-6)
- Number of pieces: 16 squares, plus 4 tassels
- Layout: 4 squares across x 4 squares down
- Square size: 7 x 7 in (17.8 x 17.8 cm)
- Size before border: 28 x 28 in (71.1 x 71.1 cm)
- Border depth: 0.4 in (1.0 cm) on each side
- Top band: 1.0 in (2.5 cm), plus loops
- V-points: 3.6 in (9.1 cm) deep
Materials
Use a smooth DK cotton or cotton blend. Cotton keeps the petals crisp and holds up well in sunlight. Avoid fuzzy yarns, because they blur the open eyelets and the mesh.
- Color A, Cream: 250 g (about 550 m)
- Color B, Sage Green: 50 g (about 110 m)
- Color C, Tan: 50 g (about 110 m)
These quantities include a margin of about 15 to 20 percent for gauge swatches and differences in tension.
Tools:
– 4 mm (G-6) crochet hook
– Tapestry needle
– Stitch markers
– Scissors
– A stiff card 4.5 in (11.4 cm) tall, for the tassels
– Blocking mats and rust-proof pins
– A wooden rod or dowel at least 32 in (81.3 cm) long and up to 1 in (2.5 cm) in diameter
Abbreviations (US Terms)
- ch: chain
- sl st: slip stitch
- sc: single crochet
- hdc: half double crochet
- dc: double crochet
- sc2tog: single crochet 2 together
- dc2tog / dc3tog / dc4tog: double crochet 2, 3, or 4 together
- BLO: back loop only
- sp: space
- st(s): stitch(es)
- RS / WS: right side / wrong side
Special stitches:
- Cluster (cl): Yarn over, insert the hook in the stitch or space, pull up a loop, yarn over, and draw through 2 loops. Repeat from * 2 more times in the same place, then yarn over and draw through all 4 loops on the hook.
- Beginning cluster (beg cl): Ch 2. Yarn over, insert the hook, pull up a loop, yarn over, and draw through 2 loops. Repeat from * once more, then yarn over and draw through all 3 loops.
- Petal loop: Ch 12, then sl st into the same stitch the chain started from.
Gauge and Checkpoints
Border gauge: 20 sc and 20 sc rows = 4 in (10.2 cm), which works out to 5 sc per 1 in (2.5 cm). A DK dc row is about 0.4 in (1.0 cm) tall.
Make one full square and block it before you start the rest. The square is your real gauge swatch. Every later number depends on it measuring 7 in (17.8 cm).
Checkpoints:
– After Round 2: the center is 1.75 in (4.4 cm) across.
– After Round 4: the flower is about 5 in (12.7 cm) from petal tip to petal tip.
– After Round 7: the square is about 6.6 in (16.8 cm) across.
– After Round 8: the blocked square is 7 in (17.8 cm).
If the square is too big (over 7.25 in / 18.4 cm), go down to a 3.75 mm hook. If it’s too small (under 6.75 in / 17.1 cm), go up to a 4.5 mm hook. Small errors add up: a difference of 0.25 in (0.6 cm) per square becomes 1 in (2.5 cm) across the four squares of the panel.

Daisy Square (Make 16)
Center
Round 1 (C): Make a magic ring. Ch 3 (counts as dc), then work 11 dc into the ring. Join with a sl st to the top of the ch-3. (12 dc)
Round 2 (C): Ch 3 (counts as dc) and work 1 dc in the same st. Work 2 dc in each st around. Join. (24 dc) Fasten off.
Checkpoint: 1.75 in (4.4 cm) across.
Loop Petals
Round 3 (A): Join A with a sl st in any st. Make a petal loop, then sl st in each of the next 2 sts. Repeat from * 11 more times. The last sl st lands in the joining st. (12 petal loops, one on every other st)
Round 4 (A): Sl st into the first petal loop. In each loop, work (2 sc, 2 hdc, 3 dc, ch 2, 3 dc, 2 hdc, 2 sc). Then sl st into the Round 3 sl st between that loop and the next one. Repeat around and join. (12 petals, each with 14 sts and a ch-2 tip)
Because each loop is anchored at a single point, the stitches wrap around both legs of the chain. That leaves an open eyelet in the middle of every petal.
Checkpoint: about 5 in (12.7 cm) across.
Squaring Frame
Round 5 (A): Join A in the ch-2 tip of any petal. Ch 1, then sc in the tip, ch 6, sc in the next tip, ch 6, sc in the next tip, ch 9 (this is the corner). Repeat from * 3 more times and join. (12 sc, 8 ch-6 sps, 4 ch-9 corner sps)
Round 6 (B), leaf corners: These are worked one corner at a time. Join B in a ch-9 corner sp and work (beg cl, ch 2, cl, ch 2, cl) in that space. Fasten off. Repeat for all 4 corners. (3 cl and 2 ch-2 sps per corner)
Work the next round over the B tails so you have fewer ends to weave in.
Round 7 (A): Join A in the center cl of any corner. Ch 6 (counts as dc + ch 3) and work 1 dc in the same cl. Then work each side like this:
Ch 2, dc in the next ch-2 sp, ch 2, dc in the next cl, ch 2, dc in the next sc, ch 2, dc in the next ch-6 sp, ch 2, dc in the next sc, ch 2, dc in the next ch-6 sp, ch 2, dc in the next sc, ch 2, dc in the next cl, ch 2, dc in the next ch-2 sp, ch 2. Then work (dc, ch 3, dc) in the center cl of the next corner.
Repeat from * around, leaving out the final corner. Join to the 3rd ch of the starting ch-6.
Count: Each side has 2 corner dc, 9 inner dc, and 10 ch-2 sps. The round totals 44 dc, 40 ch-2 sps, and 4 ch-3 corner sps.
Checkpoint: about 6.6 in (16.8 cm) across.
Round 8 (A): Ch 1. Sc in the corner dc, then work 2 sc in each ch-2 sp and 1 sc in each inner dc across the side. Sc in the next corner dc, then work 3 sc in the corner ch-3 sp. Repeat from * around and join. Fasten off.
Count: Per corner, 3 sc. Per side, 2 corner-dc sc + 9 + 20 = 31. The round totals 4 x (3 + 31) = 136 sc.
Each side has 35 sts, counting both corner center sts (each middle corner sc is shared by two sides). As a check, 4 x (35 − 1) = 136.
Checkpoint: blocked to 7 in (17.8 cm).
Make All Pieces
Make 16 identical squares. Each one uses all three colors:
- C (Tan): Rounds 1–2, 16 centers
- A (Cream): Rounds 3–5 and 7–8, 16 squares
- B (Sage): Round 6, 64 leaf corners (4 per square)
Block every square to 7 in (17.8 cm) before joining. All squares are the same and face the same way:
[S1 ] [S2 ] [S3 ] [S4 ]
[S5 ] [S6 ] [S7 ] [S8 ]
[S9 ] [S10] [S11] [S12]
[S13] [S14] [S15] [S16]
Joining
Method: Slip-stitch join through BLO, using A.
- Place two squares RS together with the edges lined up.
- Join A at the corner center sts. Sl st through the back loop of both squares in each st across. Each side has 35 sts, so you’re matching 35 sts to 35 sts, one for one.
- First join the squares into four horizontal rows, then join the rows to each other.
- Where four corners meet, work the sl st firmly through all four corner sts.
Tension: Your sl sts should be as loose as the edge stitches. If you work too tightly, the seams pucker and the panel pulls in. If you work too loosely, the lattice sags. Try a hook 0.5 mm bigger for joining if your sl sts tend to be tight.
The join doesn’t add any width, and the front loops left showing outline each square as part of the lattice.
Checkpoint: the panel measures 28 x 28 in (71.1 x 71.1 cm).
Border
Border gauge: 5 sc = 1 in (2.5 cm), and 5 sc rows = 1 in (2.5 cm).
Starting count: Each panel side is 4 squares x 35 sts = 140 sts. That number includes each square’s own corner sts, which sit side by side at every seam. No stitches are added at the seams. The four outer corner sts are each shared by two sides, so the full perimeter is 4 x 139 = 556 sts.
Border Round 1 (A): Join with RS facing in any st. Sc in each st around, working 3 sc in each of the 4 outer corner sts. Join.
Count: 556 sts worked one per st, plus 8 extra sts (2 at each corner) = 564 sc. That’s 142 sts per side, counting both corner centers.
Border Round 2 (A): Ch 1. Sc in each st around, working 3 sc in each corner center st. Join.
Count: 564 sts worked one per st, plus 8 extra sts = 572 sc, or 144 sts per side, counting both corner centers. Don’t fasten off yet.
Why the math works: Each round adds exactly 2 sts per side, and they all go at the corners, so the edges stay flat. The two rounds add 0.4 in (1.0 cm) on each side. That makes the width 28 + 0.4 + 0.4 = 28.8 in (73.2 cm). The final 144 sts per side divide evenly into the top band’s loop spacing and into four V-points of 36 sts each.
Top Band
Work the band in rows across the 144 sts of the top edge, from corner center to corner center.
Row 1 (A): With RS facing, join A in the top-right corner center. Ch 3 (counts as dc), then dc in each st across. Turn. (144 dc)
Row 2: Ch 1, sc in each st across. Turn. (144 sc)
Row 3 (loops): Ch 1. Sc in the first 2 sts. Sc in the next st, ch 18, skip 2 sts, sc in the next st, then sc in the next 13 sts. Repeat from * 7 more times. Then sc in the next st, ch 18, skip 2, sc in the next st, and sc in the last 2 sts. Turn.
Count check: 2 + (8 x 17) + 4 + 2 = 144 sts used. The row has 126 sc and 9 ch-18 loops.
Row 4: Ch 1. Sc in each sc, and work 24 sc into each ch-18 loop. (126 + 216 = 342 sc) Fasten off.
The band is 1.0 in (2.5 cm) tall, and each loop stands about 1.75 in (4.4 cm) high.
V-Points
The bottom edge has 144 sts, divided into 4 sections of 36 sts, one under each column of squares. Place a marker after every 36 sts.
Row 1 (A): With RS facing, join A in the first st of a section. Ch 2, dc2tog over the next 2 sts (the ch-2 and dc2tog together count as the first decrease). Dc across to the last 3 sts of the section, then dc3tog. Turn. (32 sts)
Rows 2–8: Repeat Row 1. Each row loses 4 sts: 28, 24, 20, 16, 12, 8, 4.
Row 9: Ch 2, then dc3tog over the remaining sts (this counts as dc4tog). (1 st) Fasten off.
Repeat for all 4 sections. Each point is 7.2 in (18.3 cm) wide at the top and 3.6 in (9.1 cm) deep.
Height check: 1.0 + 0.4 + 28 + 0.4 + 3.6 = 33.4 in (84.8 cm).
Tassels (Make 4)
Make 2 tassels in A and 2 in C.
- Wrap the yarn 40 times around the 4.5 in (11.4 cm) card.
- Tie the top with a 10 in (25.4 cm) length of yarn, then cut the bottom loops.
- Wrap a neck 0.75 in (1.9 cm) below the top and tie it off.
- Trim the ends even.
Tie one tassel to the tip of each point, alternating cream, tan, cream, tan from left to right.
Final Blocking
- Weave in all ends before blocking.
- Soak the valance in cool water, then gently press out the water. Don’t wring it.
- Lay it flat on mats and pin it to 28.8 in (73.2 cm) wide and 33.4 in (84.8 cm) tall.
- Pin each square’s corners so the lattice lines are straight.
- Pin out the petal tips, and push a pin through each petal eyelet to open it.
- Pin each V-point to a sharp tip.
- Let it dry completely, then attach the tassels if you haven’t already.
Final Quality-Control Checklist
- 16 squares, each 7 in (17.8 cm)
- Every square has 12 petals with open eyelets and 4 sage leaf corners
- All seams lie flat and are matched 35 to 35 sts
- Border Round 2 has 144 sts on each side
- 9 loops, evenly spaced
- 4 matching V-points, each ending in 1 st
- Tassels alternate cream and tan
- Finished panel is 28.8 x 33.4 in (73.2 x 84.8 cm)
Troubleshooting
- Petals curl: Make the ch-12 loop a little looser, or block the petals harder.
- Square cups: Your Round 5 corner chains are too tight. Go up a hook size for that round only.
- Square ruffles: Use ch 8 instead of ch 9 in the corners.
- Seams pucker: Join with a hook 0.5 mm larger.
- Uneven points: Count each section before you start. All four must be exactly 36 sts.
- Loops won’t fit the rod: Use ch 20 instead of ch 18, and work 26 sc into each loop.
Care
Hand-wash in cool water and dry flat, reshaping the points and petals. Over time, strong direct sun may fade the sage and tan.
Final Notes
Each step builds on the last, so checking measurements along the way matters. Each square is 7 in (17.8 cm). Joined 4 x 4, they make a 28 in (71.1 cm) panel. Two border rounds bring the width to 28.8 in (73.2 cm). The top band adds 1.0 in (2.5 cm), the points add 3.6 in (9.1 cm), and the full height comes to 33.4 in (84.8 cm). If you check each stage, the valance will hang straight and even. Happy crocheting!