

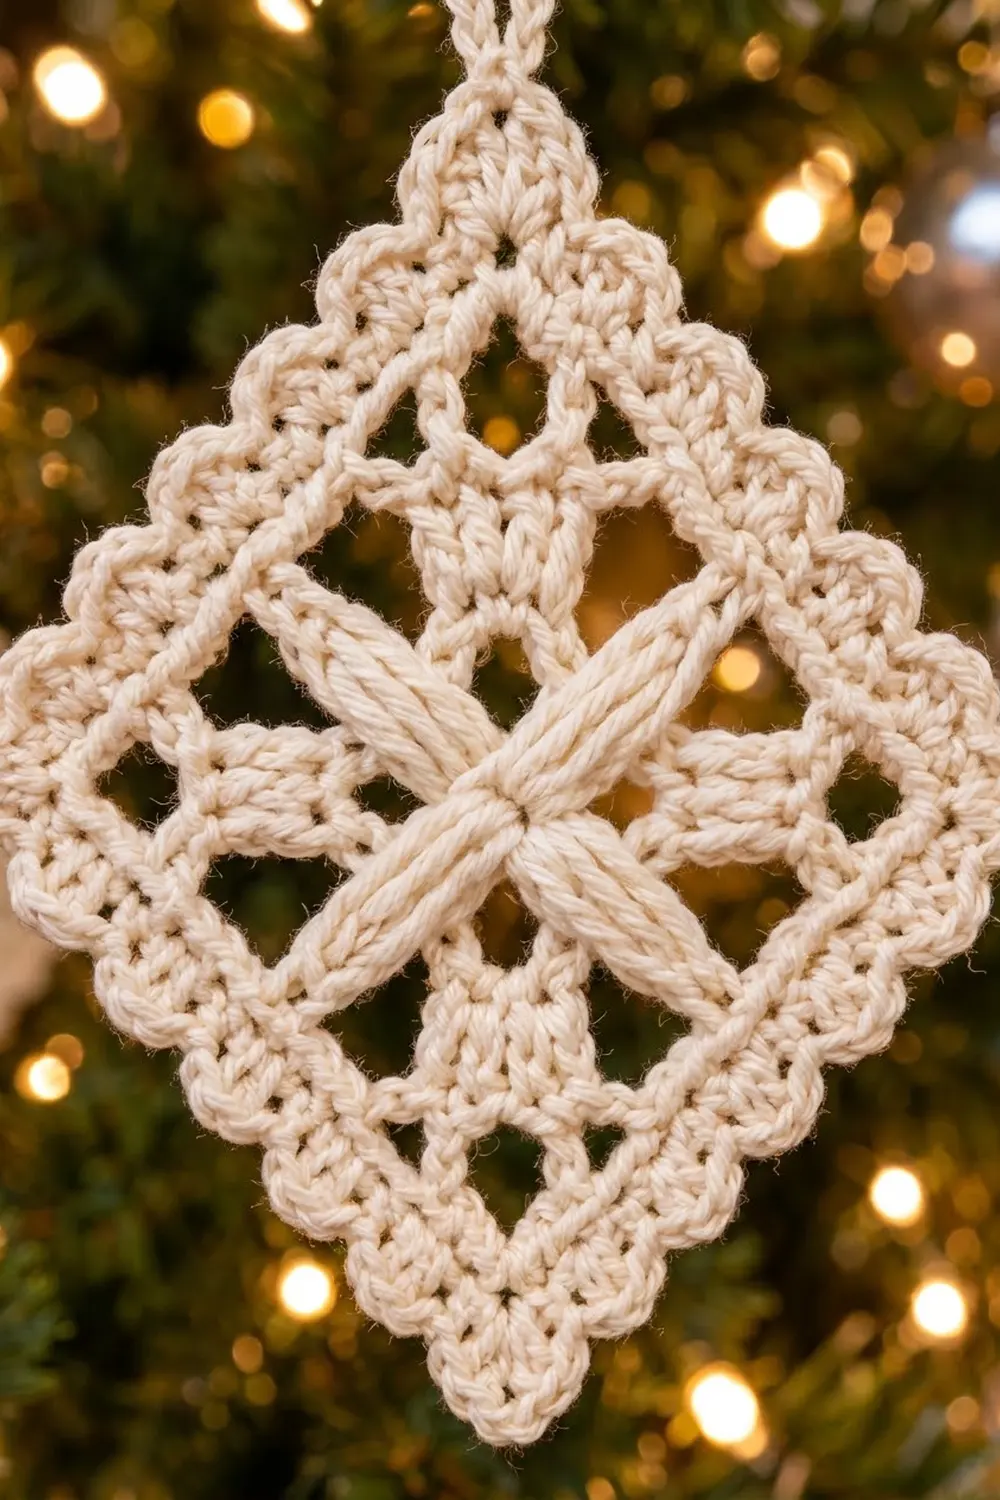
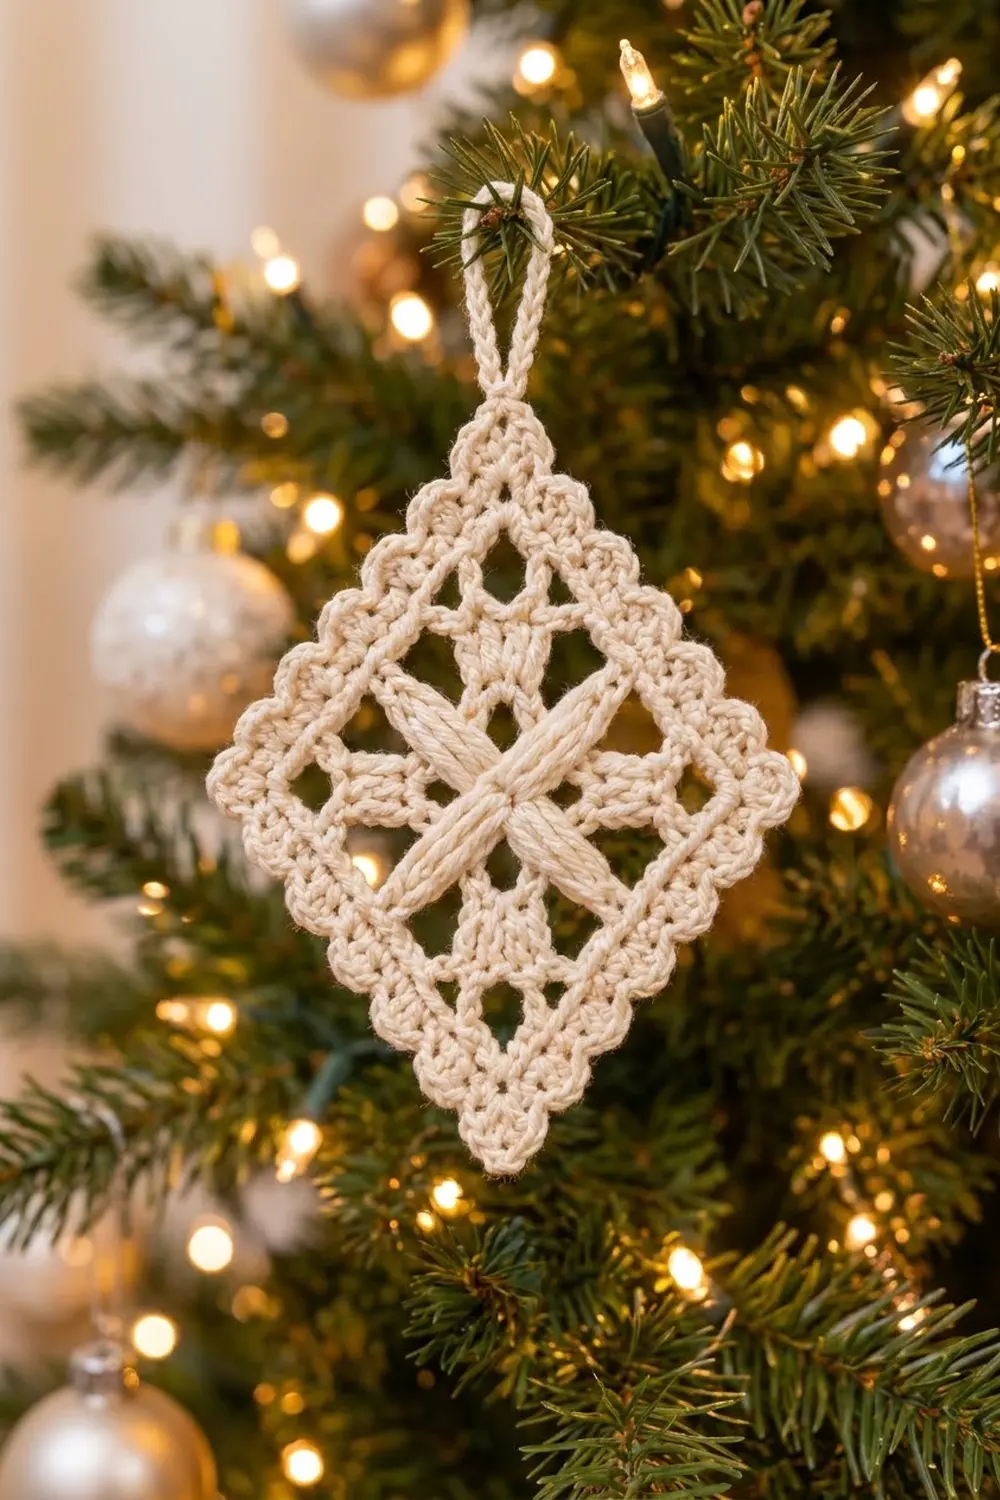
The Frosted Lattice Star is a small lace ornament built from a single square motif and hung on point, so it reads as a diamond. Four long cluster petals cross at the center to form a soft X. Short spokes reach toward the corners, and open chain windows let the tree lights show through.
This is a one-color design in warm cream cotton, so the texture does all the work. Solid double crochet bands frame the star, a row of filet mesh adds a lattice feel, and a small scalloped arch edge finishes it. The look is classic, quiet, and slightly vintage, like a snowflake worked in thread.
The pattern uses US crochet terms. The finished ornament measures 3.75 in (9.5 cm) per side, or about 5.3 in (13.5 cm) from top point to bottom point, not counting the 2 in (5.1 cm) hanging loop.
You work the motif in the round from a magic ring. Rounds 1–4 make the star center and the first solid frame. Rounds 5–7 are the border: filet mesh, a solid band, and the scalloped edge. A chain loop is added at one corner at the end.
Finished Size and Construction
- Finished size: 3.75 in (9.5 cm) per side; 5.3 in (13.5 cm) point to point
- Total hanging height: about 7.3 in (18.5 cm) including loop
- Skill level: Easy-intermediate (clusters and corner shaping)
- Terminology: US crochet terms
- Yarn weight: Sport-weight (#2) mercerized or soft cotton
- Hook: 3.0 mm
- Number of pieces: 1 (single motif)
- Layout: Single square hung on point as a diamond
- Motif size after Round 4: 2.75 in (7.0 cm) per side
- Size before border: 2.75 in (7.0 cm) per side
- Border depth: 0.5 in (1.3 cm) per edge (Rounds 5–7)
Materials
Yarn: Use a smooth sport-weight cotton. Cotton gives crisp stitch definition and blocks flat, which shows off the cluster petals and the mesh windows. Fuzzy or very splitty yarns will blur the lace.
- Cream (one color only): 12 g, about 42 m (46 yd)
One ornament uses about 9 g (32 m). The amount above includes a margin for your gauge swatch and the hanging loop. To make a set of tree ornaments, multiply by the number you need.
Tools:
- 3.0 mm crochet hook
- Tapestry needle
- Scissors
- Stitch marker
- Blocking mat and rust-proof pins
- Spray bottle with water
- Optional: fabric stiffener or spray starch
Abbreviations (US Terms)
- ch – chain
- sl st – slip stitch
- sc – single crochet
- dc – double crochet
- tr – treble crochet
- sk – skip
- sp – space
- st(s) – stitch(es)
- MR – magic ring
- LC – long cluster (see below)
Special stitch – Long Cluster (LC): Yo twice, insert hook in the stitch, yo and pull up a loop, (yo, pull through 2 loops) twice. Repeat from * to * 3 more times in the same stitch (5 loops on hook). Yo and pull through all 5 loops.
Beginning Long Cluster (beg LC): Ch 3. Then work the LC steps from * to * 3 times in the same stitch (4 loops on hook). Yo and pull through all 4 loops. The ch-3 plus the cluster counts as 1 LC.
Gauge and Checkpoints
Gauge matters more for an ornament than you might expect. A loose motif droops on the branch, and a tight one cups.
Gauge: 13 dc = 2 in (5.1 cm) with a 3.0 mm hook.
Make the first ornament as your test piece, then measure at each checkpoint below. Lay the piece flat without stretching it, and measure straight along one side, from corner space to corner space.
- After Round 1: about 0.5 in (1.3 cm) across
- After Round 2: about 1.5 in (3.8 cm) from petal tip to petal tip
- After Round 3: about 2.25 in (5.7 cm) per side
- After Round 4: 2.75 in (7.0 cm) per side
- After Round 5: about 3.25 in (8.3 cm) per side
- After Round 6: 3.5 in (8.9 cm) per side
- After Round 7: 3.75 in (9.5 cm) per side
If your motif is too big by more than 1/8 in (0.3 cm) at Round 4, go down to a 2.75 mm hook. If it’s too small, go up to a 3.25 mm hook. Don’t fix size by changing stitch counts. The border math depends on them.
Pattern
Round 1 – Center
Make a MR. Ch 1, work 8 sc in the ring. Pull the ring closed and sl st to the first sc to join.
Count: 8 sc.
Round 2 – Petals and Spokes
This round makes the four long petals of the X and the four corner spokes.
Beg LC in the same st as the join. Ch 4, tr in next sc, ch 4.
LC in next sc, ch 4, tr in next sc, ch 4. Repeat from * to * 2 more times.
Sl st to the top of the beg LC to join.
Count: 4 LC, 4 tr, 8 ch-4 sps.
The LCs are the petals, and they point to the middle of each finished edge. The tr stitches are the spokes, and they set the four corners. Place a marker in one tr so you can find a corner easily.
Round 3 – Window Round
Ch 1, sc in the top of the same LC. Ch 5, (tr, ch 3, tr) in next tr, ch 5.
Sc in top of next LC, ch 5, (tr, ch 3, tr) in next tr, ch 5. Repeat from * to * 2 more times.
Sl st to the first sc to join.
Count: 4 sc, 8 tr, 8 ch-5 sps, 4 ch-3 corner sps.
The ch-5 lengths pass over the ch-4 spaces of Round 2. This leaves the open windows between the petals and spokes. The square shape starts to show now. Check: about 2.25 in (5.7 cm) per side.
Round 4 – First Solid Frame
Ch 3 (counts as dc in the joining sc). 5 dc in next ch-5 sp, dc in next tr, (2 dc, ch 2, 2 dc) in ch-3 corner sp, dc in next tr, 5 dc in next ch-5 sp.
Dc in next sc, 5 dc in next ch-5 sp, dc in next tr, (2 dc, ch 2, 2 dc) in corner sp, dc in next tr, 5 dc in next ch-5 sp. Repeat from * to * 2 more times.
Sl st to the top of the beginning ch-3 to join.
Count per side: 2 corner dc + 1 + 5 + 1 + 5 + 1 + 2 corner dc = 17 dc.
Total: 68 dc (4 × 17) and 4 ch-2 corner sps.
The 17 stitches on each side include that side’s 2 corner dc at each end. The dc over the Round 3 sc is the 9th stitch, which is the exact center of the side. Checkpoint: 2.75 in (7.0 cm) per side.
Border
The border is Rounds 5–7 and adds 0.5 in (1.3 cm) to each edge. Its gauge is the same as the body, 13 dc = 2 in (5.1 cm). On each side, number the Round 4 stitches 1–17, starting with the first dc after a corner space. Stitch 9 is the center.
Round 5 – Filet Mesh
Sl st in next st (stitch 10). Ch 4 (counts as dc + ch 1). Sk stitch 11, dc in stitch 12, ch 1, sk stitch 13, dc in stitch 14, ch 1, sk stitch 15, dc in stitch 16, ch 1, sk stitch 17.
(Dc, ch 2, dc) in corner sp. [Ch 1, sk 1, dc in next] 8 times (dc in stitches 2, 4, 6, 8, 10, 12, 14, 16). Ch 1, sk stitch 17. Repeat from * to * 3 more times, but on the last side stop after the dc in stitch 8. Then ch 1, sk stitch 9, and sl st to the 3rd ch of the beginning ch-4.
Count per side: 8 dc on the even stitches + 2 corner dc = 10 dc, with 9 ch-1 sps between them.
This is a conversion round. The 17 stitch positions become 8 dc plus 9 ch-1 sps (one per existing stitch), plus 2 new corner dc, for 19 stitches per side counting chains. Totals: 40 dc, 36 ch-1 sps, 4 ch-2 corner sps.
Checkpoint: about 3.25 in (8.3 cm) per side.
Round 6 – Second Solid Frame
Ch 3 (counts as dc). Dc in each ch-1 sp and each dc around. Work (2 dc, ch 2, 2 dc) in each ch-2 corner sp. Sl st to the top of the beginning ch-3 to join.
Count per side: 19 (1 dc in each Round 5 dc and ch-1 sp, corner dc included) + 4 (2 dc on each side of the corner spaces) = 23 dc.
Total: 92 dc (4 × 23) and 4 ch-2 corner sps.
Checkpoint: 3.5 in (8.9 cm) per side. Fasten off, or sl st along the stitches to the next corner space.
Round 7 – Scalloped Arch Edge
If you fastened off, join with a sl st in any ch-2 corner sp. Ch 1.
(Sc, ch 3, sc) in corner sp. Sc in the first dc of the side, [ch 3, sk 1, sc in next] 11 times. Repeat from * to * 3 more times. Sl st to the first sc to join. Fasten off, leaving a 6 in (15.2 cm) tail.
Count per side: 12 sc and 11 ch-3 arches. Every odd-numbered stitch (1, 3, 5 … 23) gets an sc.
Count per corner: 2 sc and 1 ch-3 arch.
Total: 56 sc and 48 ch-3 arches.
Checkpoint: 3.75 in (9.5 cm) per side.
Why the Border Math Works
Each side has an odd number of stitches at every stage: 17, then 19, then 23. An odd count always has a true center stitch, so the X petals stay centered on each edge. The mesh in Round 5 lines up because 8 dc on even stitches plus 9 ch-1 sps uses exactly 17 positions. In Round 7, 1 + (2 × 11) = 23, so the arches begin and end on the corner stitches with no leftovers. All the growth happens at the corners, so the sides stay straight and the diamond points stay sharp.
Hanging Loop
Choose one corner to be the top. Join the yarn in that corner’s ch-3 arch with a sl st. Ch 20, then sl st in the same arch. Fasten off.
The loop hangs about 2 in (5.1 cm) above the point. For a firmer loop, work 1 sl st in each ch back down before fastening off.
Final Blocking
- Weave in all ends and keep them inside the solid dc bands so they don’t show through the windows.
- Spray the ornament until it’s damp all the way through, or soak it in cool water and press it in a towel.
- Pin it to a square of 3.75 in (9.5 cm) per side. Put one pin in each corner arch first.
- Pin the middle of each side, then pull the four petals into a crisp X.
- Open each Round 3 window and each mesh hole with the tip of a pin.
- Pin every few arches so the scallops sit evenly.
- For a stiff ornament, spray it with starch or brush on fabric stiffener now.
- Let it dry completely before unpinning, usually 12–24 hours.
Final Quality-Control Checklist
- Round 4 has 17 dc per side (68 total).
- Round 6 has 23 dc per side (92 total).
- Round 7 has 11 arches per side plus 1 arch at each corner.
- All four petals are the same length and point to the side centers.
- The corner spokes line up with the corners.
- The motif measures 3.75 in (9.5 cm) per side after blocking.
- The point-to-point measurement is about 5.3 in (13.5 cm).
- The hanging loop is centered on the top corner arch.
- No ends are visible in the open windows.
- The ornament hangs straight without twisting.
Troubleshooting
Petals look short or lumpy. Pull each loop up to the full height of a tr before you finish it, and keep your yarn-overs relaxed.
Square is cupping. Your ch-5 lengths in Round 3 are too tight. Chain more loosely, or go up a hook size for that round only.
Edges ruffle. Your tension is loose, or you added stitches. Recount Round 6, which should have 23 per side.
Mesh holes don’t line up. You started Round 5 on the wrong stitch. The dc go in the even stitches, and the center stitch 9 is always skipped.
Corners are rounded. Use exactly ch 2 at the Round 4 and Round 6 corners, and pin the corners hard when blocking.
Ornament hangs crooked. Move the loop so it’s exactly in the corner arch, not the arch beside it.
Care
Hand wash in cool water with mild soap, press out the water in a towel, and re-block flat. Store flat or hung to keep the points crisp.
Final Notes
The measurement chain is simple. The center reaches 2.75 in (7.0 cm) with 17 dc per side. The mesh round brings it to 3.25 in (8.3 cm), the second solid band to 3.5 in (8.9 cm), and the scalloped edge to a finished 3.75 in (9.5 cm). Hung on point, that’s a 5.3 in (13.5 cm) diamond. If your stitch counts and checkpoints match, every ornament in your set will come out the same size.
Happy crocheting!