

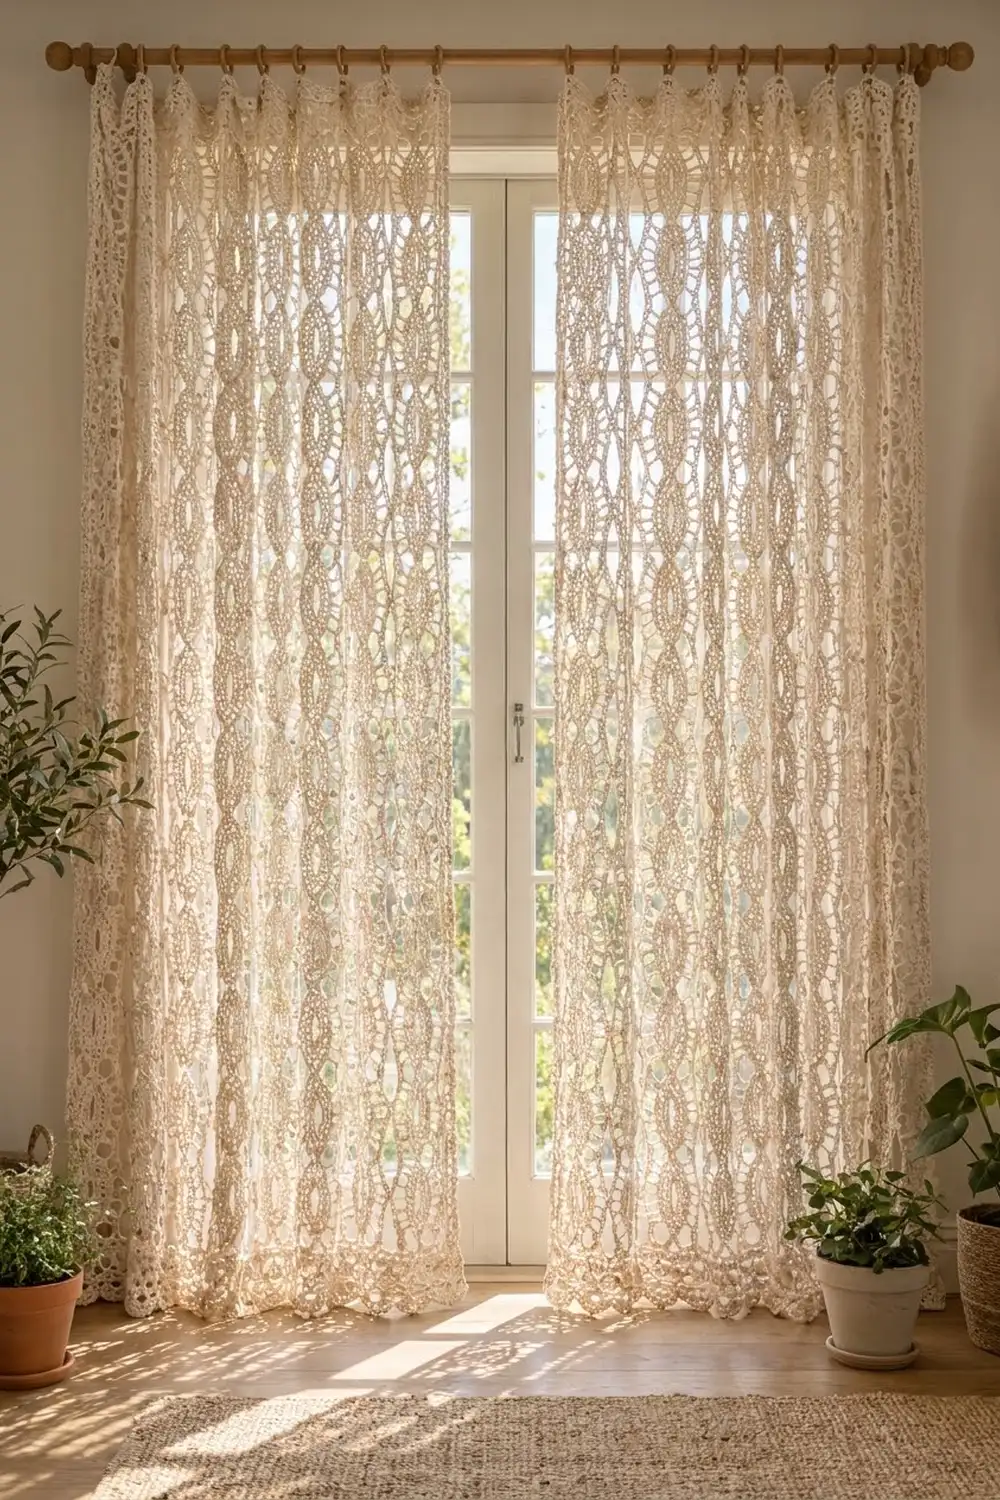
Soft morning light through cotton lace is hard to beat. The Almond Light curtain panel is built from tall columns of solid almond shapes, each split by a slender slit. Diamond lattice crossings connect them, and open chain-ladder columns separate them. A deep scalloped hem finishes the lower edge so the panel hangs with a gentle, weighted drape.
The whole panel is one color: a natural ecru cotton that looks calm and timeless in almost any room. The style sits between vintage filet lace and modern boho. It’s airy enough to filter light but structured enough to hold its shape.
This pattern uses US crochet terms. One finished panel measures 43 x 84 in (109.2 x 213.4 cm) after blocking. The panel in the final photo is part of a pair, so make two identical panels if you want to dress both sides of a window.
The panel is worked flat in one piece from the bottom up. Each row is built from 9-stitch sections, so the stitch count never changes. After the body is done, two rounds of single crochet frame the panel, and two scallop rows are added along the bottom edge only.
Finished Size and Construction
- Finished size: 43 x 84 in (109.2 x 213.4 cm) per panel
- Skill level: Intermediate
- Terminology: US crochet terms
- Yarn weight: DK (light worsted, category 3) cotton
- Hook: 4.0 mm (G-6)
- Number of pieces: 1 per panel (make 2 for a pair)
- Layout: 10 almond columns alternating with 11 ladder columns, starting and ending with a ladder
- Piece size before border: 42 x 81 in (106.7 x 205.7 cm)
- Border depth: 0.5 in (1.3 cm) on the sides and top; 2.5 in (6.4 cm) at the bottom, including the scallops
Materials
Yarn: Use a smooth, mercerized or combed DK cotton. Cotton holds the lace structure crisply, takes blocking well and doesn’t stretch out much when hanging. Avoid fuzzy or very splitty yarns, because they blur the slits and ladder bars.
- Natural ecru / cream: 1,250 g (2,750 m), about 25 balls of 50 g / 110 m, per panel
The quantity includes a margin of roughly 10% for your gauge swatch, tension differences and weaving in. Buy all the yarn from one dye lot. Even “natural” cotton can vary in shade between lots.
Tools:
– 4.0 mm (G-6) crochet hook
– Tapestry needle
– Stitch markers (at least 12)
– Measuring tape
– Rust-proof pins and blocking mats, or a clean carpet covered with a sheet
– Spray bottle
– 12 curtain clip rings for hanging
Abbreviations (US Terms)
- ch – chain
- sk – skip
- sl st – slip stitch
- sc – single crochet
- dc – double crochet
- tr – treble crochet
- st(s) – stitch(es)
- sp – space
- rep – repeat
- RS / WS – right side / wrong side
Special sections (each uses exactly 9 sts):
- Ladder section (L): dc in next st, ch 7, sk next 7 sts, dc in next st. (2 dc + 7 ch = 9 sts)
- First L of a row: ch 3 (counts as first dc), ch 7, sk next 7 sts, dc in next st.
- Last L of a row: dc in next st, ch 7, sk next 7 sts, dc in top of turning ch.
Filet rule: Every stitch is worked into the stitch directly below, whether that’s a dc or a chain. Each “ch X, sk X” replaces exactly X stitches. That keeps each section at 9 sts and every row at 189 sts.
Gauge and Checkpoints
Gauge in pattern: 27 sts (3 sections) = 6 in (15.2 cm) wide, and 10 pattern rows = 5 in (12.7 cm) tall, before blocking.
That works out to 4.5 sts per inch, 2 rows per inch, and 2 in (5.1 cm) per 9-st section.
Test one swatch first. Ch 29. Dc in 4th ch from hook and in each ch across (27 sts). Then work the pattern rows using L, A, L only (one almond column), followed by one closing dc row. Block the swatch, let it dry, and measure.
- Too big: Change to a 3.75 mm hook, or tighten your chains slightly.
- Too small: Change to a 4.5 mm hook. Small panels end up short and narrow at the window.
- Width right but chain bars puckering: Your chains are tighter than your dc. Loosen only the chains.
Checkpoints for the full panel:
- After Row 1: 42 in (106.7 cm) wide.
- After Row 11 (first full repeat): 5.5 in (14.0 cm) tall.
- After Row 81: 40.5 in (102.9 cm) tall.
- After Row 162: 42 x 81 in (106.7 x 205.7 cm).
- After Border Rnd 2: 43 x 82 in (109.2 x 208.3 cm).
- After the scallop rows and blocking: 43 x 84 in (109.2 x 213.4 cm).

Body of the Panel
Foundation: Ch 191.
Row 1 (RS): Dc in 4th ch from hook (skipped 3 ch count as first dc), dc in each ch across. Turn. (189 sts)
Place a marker every 9 sts if that helps you. That gives you 21 sections, read as L, A, L, A … L.
Each pattern row below is worked as: first L, A, L 9 times, A, last L. That makes 11 ladder sections and 10 almond sections, for 9 + (10 x 18) = 189 sts. Turn at the end of every row.
Almond Section (A) for Each Pattern Row
Row 2 (P1, almond tip): In each A: ch 3, sk 3, dc in next 3 sts, ch 3, sk 3. (Per A: 3 dc + 6 ch. Row total: 52 dc + 137 ch = 189 sts)
Row 3 (P2, slit opens): In each A: ch 1, sk 1, dc in next 3 sts, ch 1, sk 1, dc in next 3 sts, ch 1, sk 1. (Per A: 6 dc + 3 ch. Row total: 82 dc + 107 ch = 189 sts)
Row 4 (P3, widest): In each A: dc in next 4 sts, ch 1, sk 1, dc in next 4 sts. (Per A: 8 dc + 1 ch. Row total: 102 dc + 87 ch = 189 sts)
Row 5 (P4, widest): Rep Row 4. (189 sts)
Row 6 (P5, slit narrows): Rep Row 3. (189 sts)
Row 7 (P6, almond tip): Rep Row 2. (189 sts)
The center ch-1 stacks through Rows 3–6 to form the slit. The dc blocks widen from 3 to 4 sts per side and then narrow again, which gives the almond its pointed silhouette.
Row 8 (P7, lattice center post): In each A: ch 4, sk 4, dc in next st, ch 4, sk 4. (Per A: 1 dc + 8 ch. Row total: 32 dc + 157 ch = 189 sts)
Row 9 (P8, lattice split): In each A: ch 2, sk 2, dc in next st, ch 3, sk 3, dc in next st, ch 2, sk 2. (Per A: 2 dc + 7 ch. Row total: 42 dc + 147 ch = 189 sts)
Row 10 (P9): Rep Row 8. (189 sts)
Row 11 (P10): Rep Row 9. (189 sts)
The posts move from the center (position 5) out to positions 3 and 7 and back. This forms the small diamond crossings that link one almond to the next.
Repeat
Rows 12–161: Rep Rows 2–11 fifteen more times, for 16 repeats in total. (189 sts every row)
Row 162 (closing row): Ch 3 (counts as dc), dc in each st across, working into the dc and the chains. (189 dc)
That’s 1 + 160 + 1 = 162 rows. At 2 rows per inch, the body is 81 in (205.7 cm) long. Fasten off.
Border
Border gauge: Along the top and bottom, sc go 1 per st: 189 sts over 42 in (106.7 cm), or 4.5 sc per inch. Along the sides, work 2 sc per dc row-end: 162 rows x 2 = 324 sc over 81 in (205.7 cm), or 4 sc per inch. That matches the slightly shorter reach of sc along row-ends, so the edges lie flat.
In this border, each side’s count includes its own 2 corner sc. Each corner is (sc, ch 2, sc). The first sc belongs to the side you’re finishing, and the second sc belongs to the side you’re starting.
Rnd 1 (RS): Join yarn in the top-right corner st. Work (sc, ch 2, sc) in the corner st.
– Top: sc in each of the next 187 sts. Work (sc, ch 2, sc) in the last st.
– First side: 2 sc in each of the 162 row-ends (324 sc). Work (sc, ch 2, sc) in the first foundation ch.
– Bottom: sc in each of the next 187 ch. Work (sc, ch 2, sc) in the last ch.
– Second side: 2 sc in each row-end (324 sc).
Sl st to the first sc.
Per side, including corner sc: top 189, sides 326, bottom 189. Total: (2 x 189) + (2 x 326) = 1,030 sc plus 4 corner ch-2 sps.
Rnd 2: Ch 1. Sc in each sc around, and work (sc, ch 2, sc) in each corner ch-2 sp. Sl st to the first sc. Fasten off.
Per side: top (189 worked 1-per-st) + 2 new corner sc = 191. Sides (326 worked 1-per-st) + 2 = 328. Bottom (189) + 2 = 191. Total: 1,030 + 8 = 1,038 sc.
This adds 0.25 in (0.6 cm) per round on each edge, so the panel now measures 43 x 82 in (109.2 x 208.3 cm).
Scallop Hem (Bottom Edge Only)
Work these two rows on the 191 sc of the bottom edge, from corner sc to corner sc.
Scallop Row 1 (RS): Join yarn with sc in the first corner sc of the bottom edge. Sk 4 sc, 9 tr in next sc, sk 4 sc, sc in next sc. Rep from * 19 times, ending in the last corner sc. Turn.
(19 shells and 20 sc; sts used: 1 + (19 x 10) = 191 ✓)
Scallop Row 2 (WS): Ch 1. Sc in the first sc.
– Over the shell: sc in the 1st tr, [ch 3, sk 1 tr, sc in next tr] 4 times. You’ll have worked into tr 1, 3, 5, 7 and 9.
– Between shells: sc in the next sc.
Rep from * across. (Per scallop: 5 sc + 4 ch-3 loops. Row total: 95 + 20 = 115 sc and 76 ch-3 loops) Fasten off.
Why the math works: The bottom edge has 191 sts, and 191 − 1 = 190 = 19 x 10. Each scallop uses exactly 10 sts, so the scallops fit edge to edge with a sc anchoring both corners. Each scallop is about 2.25 in (5.7 cm) wide. The tr shell adds about 1.25 in (3.2 cm) of depth and the loop row about 0.75 in (1.9 cm). That’s 2 in (5.1 cm) of scallop on top of the 0.5 in (1.3 cm) sc border, which brings the finished length to 84 in (213.4 cm).
Final Blocking
- Weave in all ends, leaving 6 in (15.2 cm) tails to weave back on themselves for security.
- Soak the panel in lukewarm water with a little wool or cotton wash for 15 minutes.
- Press out the water gently. Roll the panel in large towels to remove most of the moisture. Don’t wring it.
- Lay it flat on mats or a sheet-covered carpet. Pin the top edge straight to 43 in (109.2 cm).
- Pin both sides straight down to 84 in (213.4 cm), with a pin every 4 in (10.2 cm) or so.
- Pin each scallop at its center tip so all 19 points line up evenly.
- Open the almond slits and diamond crossings with your fingers so the posts sit vertical.
- Let the panel dry completely before you unpin it. A large panel can take 24–48 hours.
Final Quality-Control Checklist
- Every row has 189 sts, and the panel has 162 rows.
- All 10 almond columns line up straight from bottom to top.
- Each almond has a clear center slit through 4 rows.
- The ladder posts stack into straight vertical lines.
- The sides measure 81 in (205.7 cm) before the border and lie flat with no wavy edges.
- The border corners have neat ch-2 points.
- There are 19 even scallops across the bottom.
- Blocked size is 43 x 84 in (109.2 x 213.4 cm).
- All ends are secure and invisible from the RS.
Troubleshooting
Almonds drifting sideways: You probably skipped one stitch too many or too few in a chain span. Count each 9-st section, and use markers between sections.
Panel narrowing toward the top: Your chain spans are tightening as you go. Make the chains slightly looser, or chain with a hook one size up.
Ladder bars sagging: Your chains are looser than your dc. Tighten them a little, or keep the ch-7 bars at a consistent tension.
Wavy side edges: Too many sc along the row-ends. Use 2 sc per row-end, not 3.
Tight, pulled side edges: Use a looser tension on Border Rnd 1, but keep 2 sc per row-end.
Scallops curling: Your tr shells are too tight. Lengthen each yarn-over slightly, and block firmly at the tips.
Panel too short: Add one more 10-row repeat for 5 in (12.7 cm) of extra length. The side border will then need 2 sc per added row-end, which is 20 extra sc on each side.
Care
Hand wash cool or machine wash on a delicate cycle inside a mesh bag, then reshape and dry flat. Hang the panel only once it’s completely dry, so the weight of wet cotton doesn’t stretch the lace.
Final Notes
The measurement chain is simple. Each 9-st section is 2 in (5.1 cm) wide, so 21 sections make 189 sts and 42 in (106.7 cm). Every 10-row repeat adds 5 in (12.7 cm), so 162 rows give 81 in (205.7 cm). Two sc border rounds bring the panel to 43 x 82 in (109.2 x 208.3 cm). The 19 scallops finish it at 43 x 84 in (109.2 x 213.4 cm). Check your swatch, count your sections, and let the light do the rest.
Happy crocheting!