

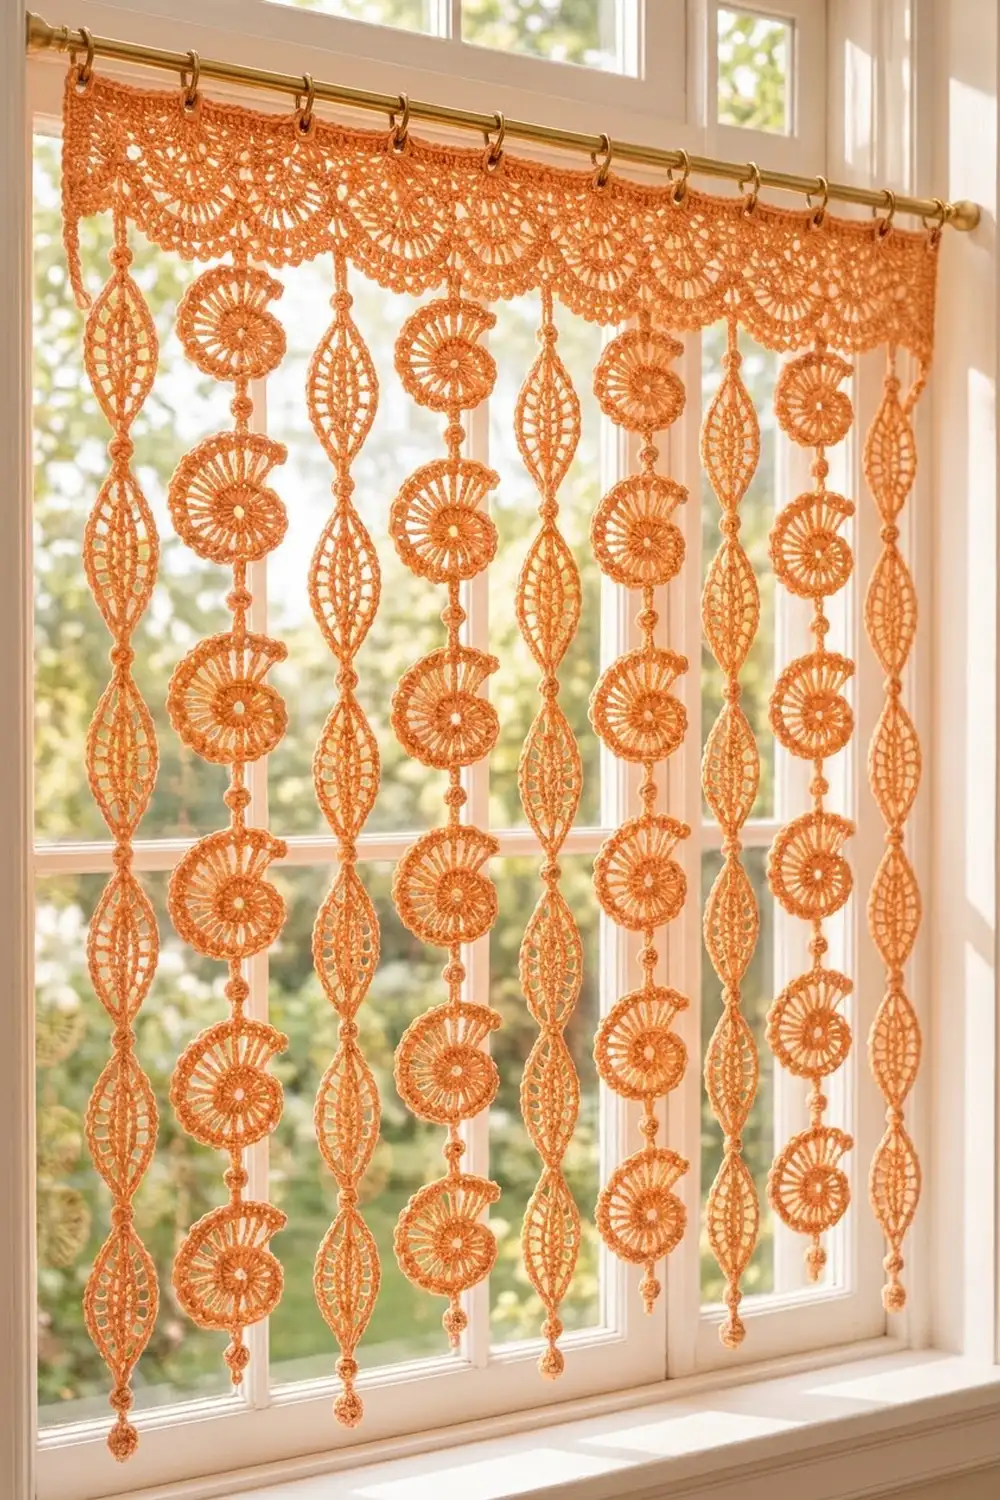
This airy window curtain uses a solid scalloped header and nine hanging strands of spiral shells and slim lacy leaves. Light passes between the strands, so the window stays bright while the glass is softly screened.
The whole curtain is one color, a warm peach-apricot cotton. The single shade keeps the look calm and lets the shapes stand out: the stepped spiral of each shell, the open ribs of each leaf, and the little bobble beads between them.
The pattern uses US crochet terms. The finished curtain measures about 30.2 in (76.7 cm) wide and 39 in (99.1 cm) long, including a 3 in (7.6 cm) header.
You make all the shell and leaf motifs first and join them into strands with bobble connectors. Next you crochet the header band, and last you hang the strands from the centers of its scallops.
Finished Size and Construction
- Finished size: 30.2 in (76.7 cm) wide x 39 in (99.1 cm) long
- Skill level: Intermediate
- Terminology: US
- Yarn weight: DK (#3 light) cotton
- Hook: 3.5 mm (E-4)
- Number of pieces: 45 shell motifs, 28 leaf motifs, 1 header band
- Layout: 9 strands, alternating Shell, Leaf, Shell, and so on (5 shell strands, 4 leaf strands)
- Piece size: shell 3 in (7.6 cm) across; leaf 1.75 in x 4 in (4.4 cm x 10.2 cm)
- Size before border (strands only): shell strand 35 in (88.9 cm); leaf strand 34 in (86.4 cm)
- Border (header) depth: 3 in (7.6 cm)
Materials
Use a smooth mercerized or combed cotton in DK weight. Cotton holds the spiral shape, blocks crisply, and doesn’t sag much under the weight of the strands. Avoid fuzzy blends, because they hide the stitch definition.
- Apricot (peach orange): 200 g, about 440 m (481 yd). For example, 4 balls of 50 g / 110 m.
The curtain uses about 345 m (377 yd). These quantities include a margin of roughly 25% for swatching and dye-lot safety.
Tools:
– 3.5 mm (E-4) crochet hook
– Tapestry needle
– Stitch markers
– Scissors
– Measuring tape
– Blocking mat, rust-proof pins, and a spray bottle
– 11 curtain clip rings and a curtain rod
Abbreviations (US Terms)
- ch – chain
- sl st – slip stitch
- sc – single crochet
- hdc – half double crochet
- dc – double crochet
- tr – treble crochet (yarn over 2 times)
- dtr – double treble (yarn over 3 times)
- trtr – triple treble (yarn over 4 times)
- sk – skip
- sp – space
- st(s) – stitch(es)
Special stitch – Bobble: Yarn over, insert hook in the stitch, pull up a loop, yarn over, pull through 2 loops. Repeat from * to * 4 more times in the same stitch (6 loops on the hook). Yarn over and pull through all 6 loops.
Standard connector: Ch 4, bobble in 3rd ch from hook, ch 2. This is about 1 in (2.5 cm) long.
Long connector: Ch 9, bobble in 3rd ch from hook, ch 2. This is about 2 in (5.1 cm) long.
Gauge and Checkpoints
Gauge: 20 sc x 22 rows = 4 in (10.2 cm) square.
Make one shell and one leaf before anything else, and check them against these sizes:
- Shell after Rnd 1: 1.25 in (3.2 cm) across
- Finished shell: 3 in (7.6 cm) from the top point to the bottom point
- Leaf after Rnd 1: 1.5 in x 3.75 in (3.8 cm x 9.5 cm)
- Finished leaf: 1.75 in x 4 in (4.4 cm x 10.2 cm)
A difference of up to 1/4 in (0.6 cm) is fine. If your motifs are bigger than that, go down a hook size. If they’re smaller, go up a hook size. Change the hook, not the stitch counts, because the strand lengths and header spacing depend on these numbers.
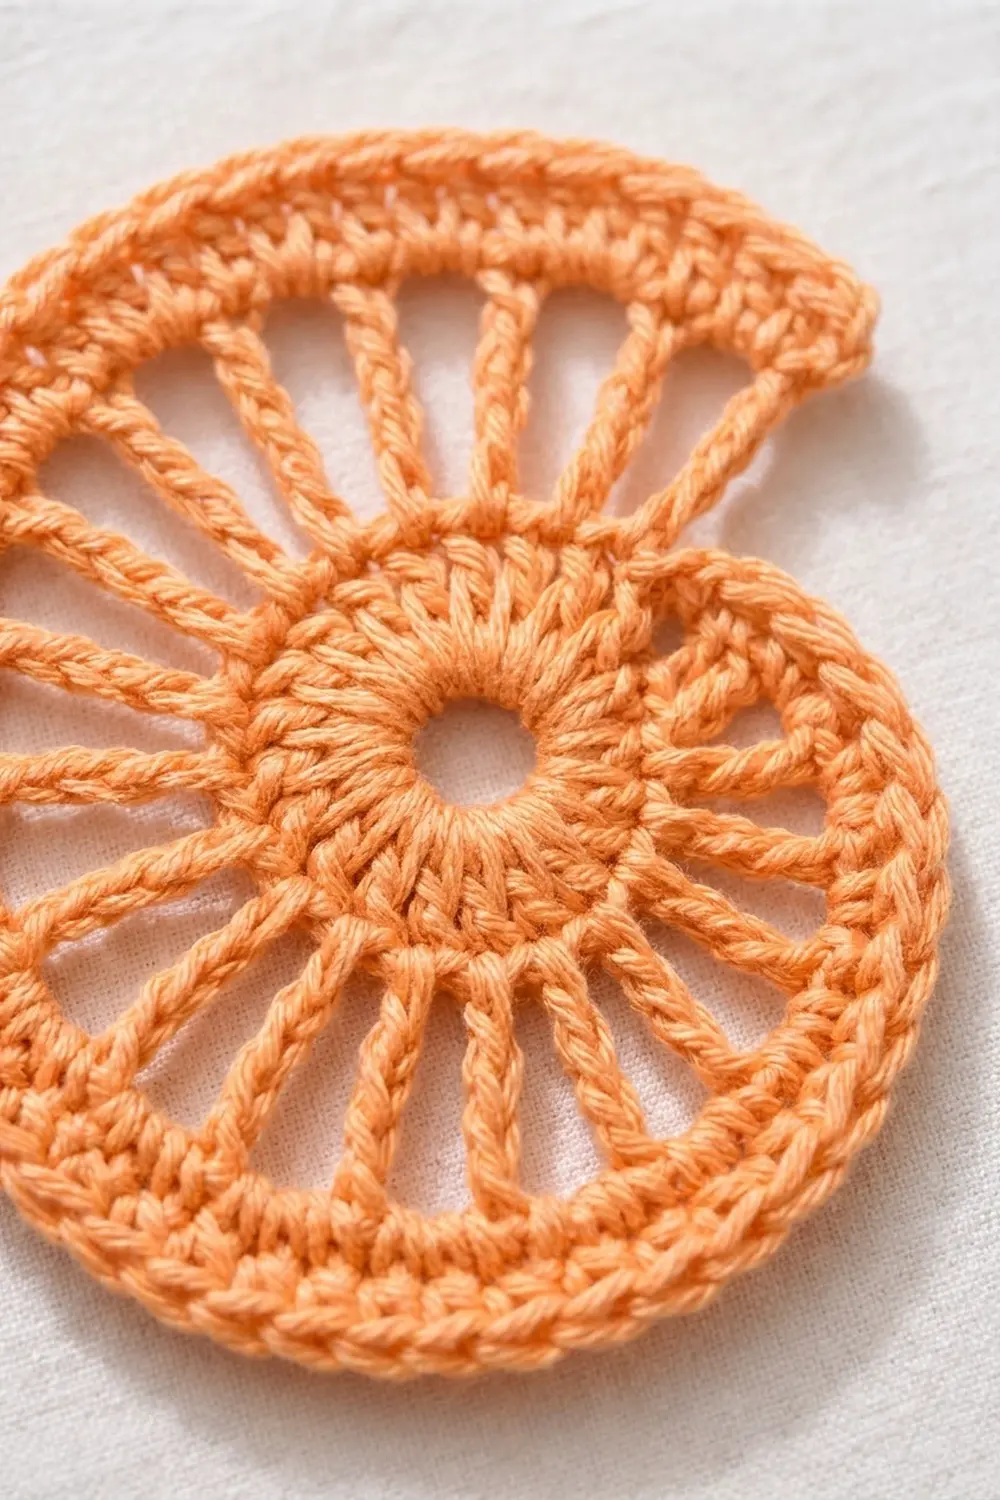
Shell Motif (make 45)
Start with ch 6 and sl st in the first ch to form a ring.
Rnd 1: Ch 3 (counts as dc), work 15 dc in the ring, then sl st in the top of the ch-3 to join. (16 dc)
Rnd 2 (spiral spokes): This round is worked once around without joining. Each “spoke” goes into the next dc of Rnd 1, and the spokes get taller as you go.
- Ch 1, sc in the same st (spoke 1).
- (Ch 1, hdc in next st) 2 times (spokes 2–3).
- (Ch 1, dc in next st) 3 times (spokes 4–6).
- (Ch 2, tr in next st) 4 times (spokes 7–10).
- (Ch 2, dtr in next st) 3 times (spokes 11–13).
- (Ch 3, trtr in next st) 3 times (spokes 14–16).
- To close the spiral, ch 4 and sl st in the top of spoke 1.
Count: 16 spokes, five ch-1 sps, seven ch-2 sps, three ch-3 sps, and one ch-4 closing loop.
The ch-4 runs from the tallest spoke back down to the shortest one. That creates the raised nautilus step.
Rnd 3 (rope edge): Ch 1, then sc in the top of spoke 1.
- 2 sc in the next ch-1 sp, sc in the next spoke. Repeat 5 times (through spoke 6).
- 3 sc in the next ch-2 sp, sc in the next spoke. Repeat 7 times (through spoke 13).
- 4 sc in the next ch-3 sp, sc in the next spoke. Repeat 3 times (through spoke 16).
- Work 5 sc in the ch-4 closing loop, then sl st in the first sc to join.
Count: 16 + 10 + 21 + 12 + 5 = 64 sc.
Fasten off, leaving a 6 in (15.2 cm) tail.
Attachment points:
– Top: sc 62, the middle sc of the 5 in the closing loop. Mark it.
– Bottom: sc 32, the sc above spoke 10. Mark it.
These two points sit nearly opposite each other, so the shell hangs at a slight natural tilt, just like the photo.
Leaf Motif (make 28)
Foundation: Ch 18. The 17 working chains are numbered 1–17 starting from the 2nd ch from the hook.
Rnd 1, Side A (working in the back bumps):
– Sc in ch 1, hdc in ch 2, dc in chs 3 and 4.
– (Ch 1, sk 1, tr in next) 4 times. The tr go in chs 6, 8, 10, and 12.
– Ch 1, sk ch 13.
– Dc in chs 14 and 15, hdc in ch 16.
– Work (sc, ch 3, sc) in ch 17. This is the top tip.
Rnd 1, Side B: Rotate the piece and work along the free loops of the foundation chain.
– Hdc in ch 16, dc in chs 15 and 14.
– (Ch 1, sk 1, tr in next) 4 times. The tr go in chs 12, 10, 8, and 6.
– Ch 1, sk ch 5.
– Dc in chs 4 and 3, hdc in ch 2.
– Work (sc, ch 3) in ch 1. This is the bottom tip.
– Sl st in the first sc to join.
Count: 24 sts, 10 ch-1 sps, and 2 ch-3 tips. The paired tr and ch-1 spaces make the open windows and ribs, and the stitch heights grade down to sharp points at both ends.
Rnd 2: Ch 1. Work sc in each st and 1 sc in each ch-1 sp, with (sc, ch 3, sc) in each ch-3 tip. Join.
Count: 24 + 10 + 4 = 38 sc plus 2 ch-3 tips.
Fasten off with a 6 in (15.2 cm) tail.
The top and bottom attachment points are the two ch-3 tip loops.
Make All Pieces
All pieces are in Apricot:
- Shells: 45 (5 strands x 9)
- Leaves: 28 (4 strands x 7)
- Header: 1
Layout (S = shell strand, L = leaf strand; the numbers are the header fans each strand hangs from):
Header band, fans 1 to 25
Fan:     1   4   7   10  13  16  19  22  25
Strand:  S   L   S   L   S   L   S   L   S
Motifs:  9   7   9   7   9   7   9   7   9
Joining (Building the Strands)
Method: Each connector is worked separately. Join the yarn with a sl st in the bottom attachment point of the upper motif, work a standard connector, and sl st in the top attachment point of the lower motif. Fasten off.
Stitch-to-stitch logic:
– Shells: bottom sc 32 of the upper shell joins to top sc 62 of the lower shell.
– Leaves: bottom ch-3 tip of the upper leaf joins to top ch-3 tip of the lower leaf.
Every link works into exactly one stitch or loop at each end, so nothing gets added to the motifs.
- Shell strand: 9 shells, 8 connectors
- Leaf strand: 7 leaves, 6 connectors
Tension: Keep the connector chains a little firmer than your normal chains. Loose chains stretch under the weight of the strand, and the strands won’t line up at the bottom. Work over the tails as you go to cut down on weaving.
Size checkpoint: Lay each strand flat without stretching it.
– Shell strand: 9 x 3 in + 8 x 1 in = 35 in (88.9 cm)
– Leaf strand: 7 x 4 in + 6 x 1 in = 34 in (86.4 cm)
Border (Header Band)
Border gauge: 20 sc = 4 in (10.2 cm), so each sc is 0.2 in (0.5 cm) wide.
Foundation: Ch 152.
Row 1: Sc in the 2nd ch from the hook and in each ch across. (151 sc)
Rows 2–8: Ch 1, turn, sc in each st across. (151 sc per row)
The band now measures 30.2 in x 1.5 in (76.7 cm x 3.8 cm).
Row 9 (small fans): Ch 1, turn, sc in the first st. Sk 2, 7 dc in the next st, sk 2, sc in the next st. Repeat from * 25 times.
Count: 175 dc + 26 sc = 201 sts (25 fans).
Row 10 (open fans): Ch 1, turn, sc in the first sc. Ch 3, sk 3 dc, then work (dc, [ch 1, dc] 4 times) in the 4th (center) dc of the fan. Ch 3, sk 3 dc, sc in the next sc. Repeat from * 25 times.
Count: 26 sc, 125 dc, 100 ch-1 sps, and 50 ch-3 sps. Each open fan sits directly under a small fan, which gives the two-tier layered scallop.
Row 11 (edge): Ch 1, turn, sc in the first sc. 3 sc in the ch-3 sp, sc in the dc, (2 sc in the ch-1 sp, sc in the next dc) 4 times, 3 sc in the ch-3 sp, sc in the sc. Repeat from * 25 times.
Count: 1 + 25 x 20 = 501 sc. Fasten off.
Fan centers: The center sc of fan k is stitch 20k − 9 of Row 11. For example, fan 1 is stitch 11 and fan 25 is stitch 491. Mark the center sc of fans 1, 4, 7, 10, 13, 16, 19, 22, and 25.
Hanging the strands: For each strand, join the yarn at its marked fan-center sc. Work a connector, then sl st in the top attachment point of the strand’s top motif.
- Shell strands: standard connector. 35 + 1 = 36 in (91.4 cm)
- Leaf strands: long connector. 34 + 2 = 36 in (91.4 cm)
Why the math works:
– The scallop pattern is a multiple of 6 + 1, and 151 = 6 x 25 + 1, so 25 full fans fit edge to edge.
– Each fan covers 6 base sts, or 1.2 in (3.0 cm).
– Strands hang from every 3rd fan, so they are 3.6 in (9.1 cm) apart, just wide enough for a 3 in (7.6 cm) shell.
– The header is a single band, so no seam stitches are added anywhere.
– The total length is 3 in + 36 in = 39 in (99.1 cm).
Final Blocking
- Lightly spray the header and pin it flat to 30.2 in x 3 in (76.7 cm x 7.6 cm). Open each fan into an even curve.
- Pin each shell flat to 3 in (7.6 cm). Pull the closing-loop step slightly outward so it stays crisp.
- Pin each leaf to 1.75 in x 4 in (4.4 cm x 10.2 cm). Put one pin in each tip loop and open the windows.
- Lay all the strands out straight at 36 in (91.4 cm) and pin each bobble bead.
- Let everything dry completely before you unpin.
- Clip 11 rings to the top edge at sts 1, 16, 31, 46, 61, 76, 91, 106, 121, 136, and 151. That puts them 3 in (7.6 cm) apart.
Final Quality-Control Checklist
- 45 shells, each with 64 edge sc and a visible spiral step
- 28 leaves, each with 38 edge sc and two sharp tips
- The header has 151 sc in Rows 1–8, 201 sts in Row 9, and 501 sc in Row 11
- 9 strands hang from fans 1, 4, 7, 10, 13, 16, 19, 22, and 25 in S-L-S order
- All strands are 36 in (91.4 cm) long
- The curtain is 30.2 in x 39 in (76.7 cm x 99.1 cm)
- All tails are woven in securely
Troubleshooting
- Shell cups or ruffles: The tall spokes are pulling too tight or the chains are too long. Check the chain counts, and go down a hook size for Rnd 2 if needed.
- Spiral step looks flat: The ch-4 closing loop is too loose. Work it tighter, or use ch 3 if your tension is very relaxed.
- Leaf twists: You worked Side B into the wrong loops. Work into the free loops only, and block with pins in the tips.
- Header ripples: Your Row 9 count is off. Recount to 201 sts.
- Strands are uneven lengths: The connector tension varies. Redo the longest connectors with firmer chains.
- Strands crowd each other: Make sure each strand hangs from every 3rd fan, not every 2nd.
Care
Hand wash in cool water with mild soap, roll it in a towel, and dry it flat, re-pinning if needed. Keep it out of the dryer so the spirals don’t distort.
Final Notes
Your gauge of 20 sc to 4 in (10.2 cm) controls everything else:
- It sets a 3 in (7.6 cm) shell and a 4 in (10.2 cm) leaf.
- Those give 36 in (91.4 cm) strands once the connectors are added.
- It also sets the 151-stitch header at 30.2 in (76.7 cm), with fan centers every 3.6 in (9.1 cm).
- Header plus strands gives the finished 39 in (99.1 cm) curtain.
Check each link in this chain as you go, and the curtain will hang straight and even. Happy crocheting!