

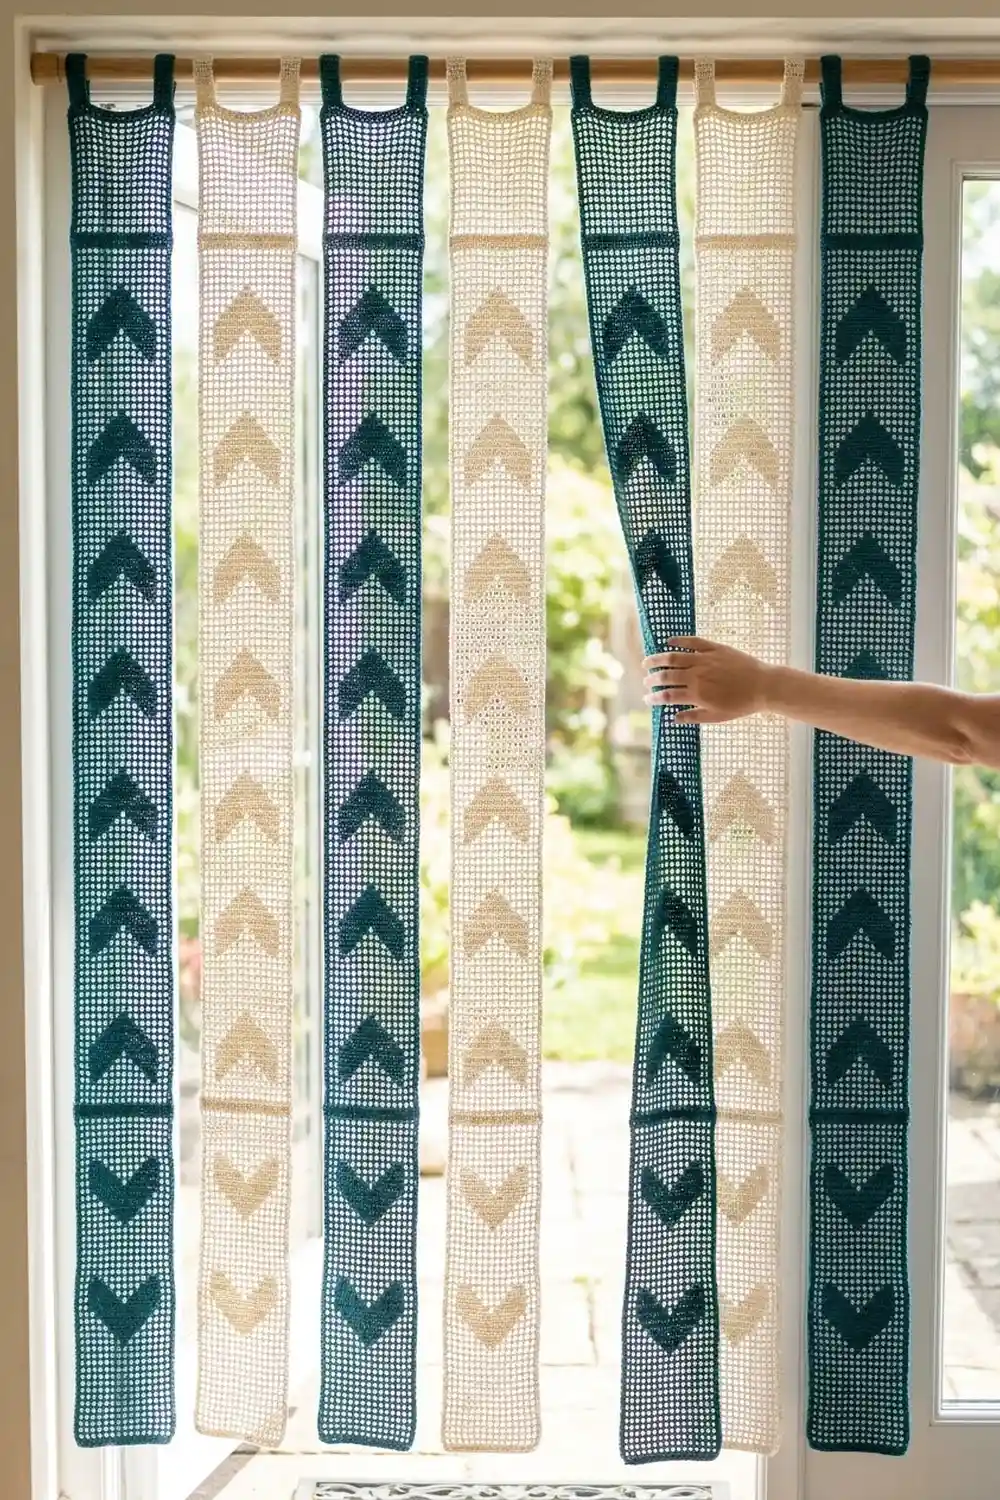
The Arrowhead Lane curtain is a set of seven long filet crochet strips that hang side by side across a doorway. Each strip is an open grid of small squares with a column of solid chevrons pointing upward. The strips are not joined to each other, so you can walk through the curtain and the strips fall back into place behind you.
The sample uses deep teal and soft cream, alternating across the rod with teal at both ends. The look is clean and a little coastal. It lets light and air through but still breaks up the view through the doorway.
This pattern uses US crochet terms. Each finished strip measures 4.8 in (12.2 cm) wide by 76.4 in (194.1 cm) long including the border. The full curtain covers about 36 in (91.4 cm) of rod.
You work each strip from the bottom up in rows of filet mesh, 11 squares wide and 190 rows long. Then you add one round of single crochet around the edge and two hanging tabs along the top.
Finished Size and Construction
- Finished strip size: 4.8 in x 76.4 in (12.2 cm x 194.1 cm)
- Skill level: Intermediate (you should be comfortable reading filet rows)
- Terminology: US crochet terms
- Yarn weight: DK / light worsted (weight 3) cotton
- Hook: 4.0 mm (G-6)
- Number of pieces: 7 strips (4 teal, 3 cream), each with 2 tabs
- Layout: 7 strips in a single row on one rod, about 0.4 in (1.0 cm) apart
- Strip size before border: 4.4 in x 76 in (11.2 cm x 193.0 cm), which is 11 meshes by 190 rows
- Border depth: 0.2 in (0.5 cm) per edge (1 round of single crochet)
- Total curtain width: 7 strips x 4.8 in + 6 gaps x 0.4 in = 36 in (91.4 cm)
Materials
Use a smooth mercerized or matte cotton in DK weight. Cotton keeps the mesh squares crisp, holds its shape while hanging, and washes easily. Avoid fuzzy or stretchy yarns. They blur the squares, and a long strip will slowly grow under its own weight.
- Teal: 250 g, about 575 m (five 50 g / 115 m balls) for 4 strips
- Cream: 200 g, about 460 m (four 50 g / 115 m balls) for 3 strips
One strip uses about 52 g. These quantities allow 60 g (about 138 m) per strip, so they include a margin for your gauge swatch and small differences in tension.
Tools:
- 4.0 mm (G-6) crochet hook
- Tapestry needle
- Stitch markers (2 or 3)
- Measuring tape
- Rust-proof pins and a blocking surface at least 80 in (203.2 cm) long, or a clean floor covered with towels
- Spray bottle
- Curtain rod, 1 in (2.5 cm) in diameter or thinner, at least 40 in (101.6 cm) long
Abbreviations (US Terms)
- ch – chain
- sc – single crochet
- dc – double crochet
- sk – skip
- sp – space
- st(s) – stitch(es)
- sl st – slip stitch
- RS / WS – right side / wrong side
Special stitches (filet):
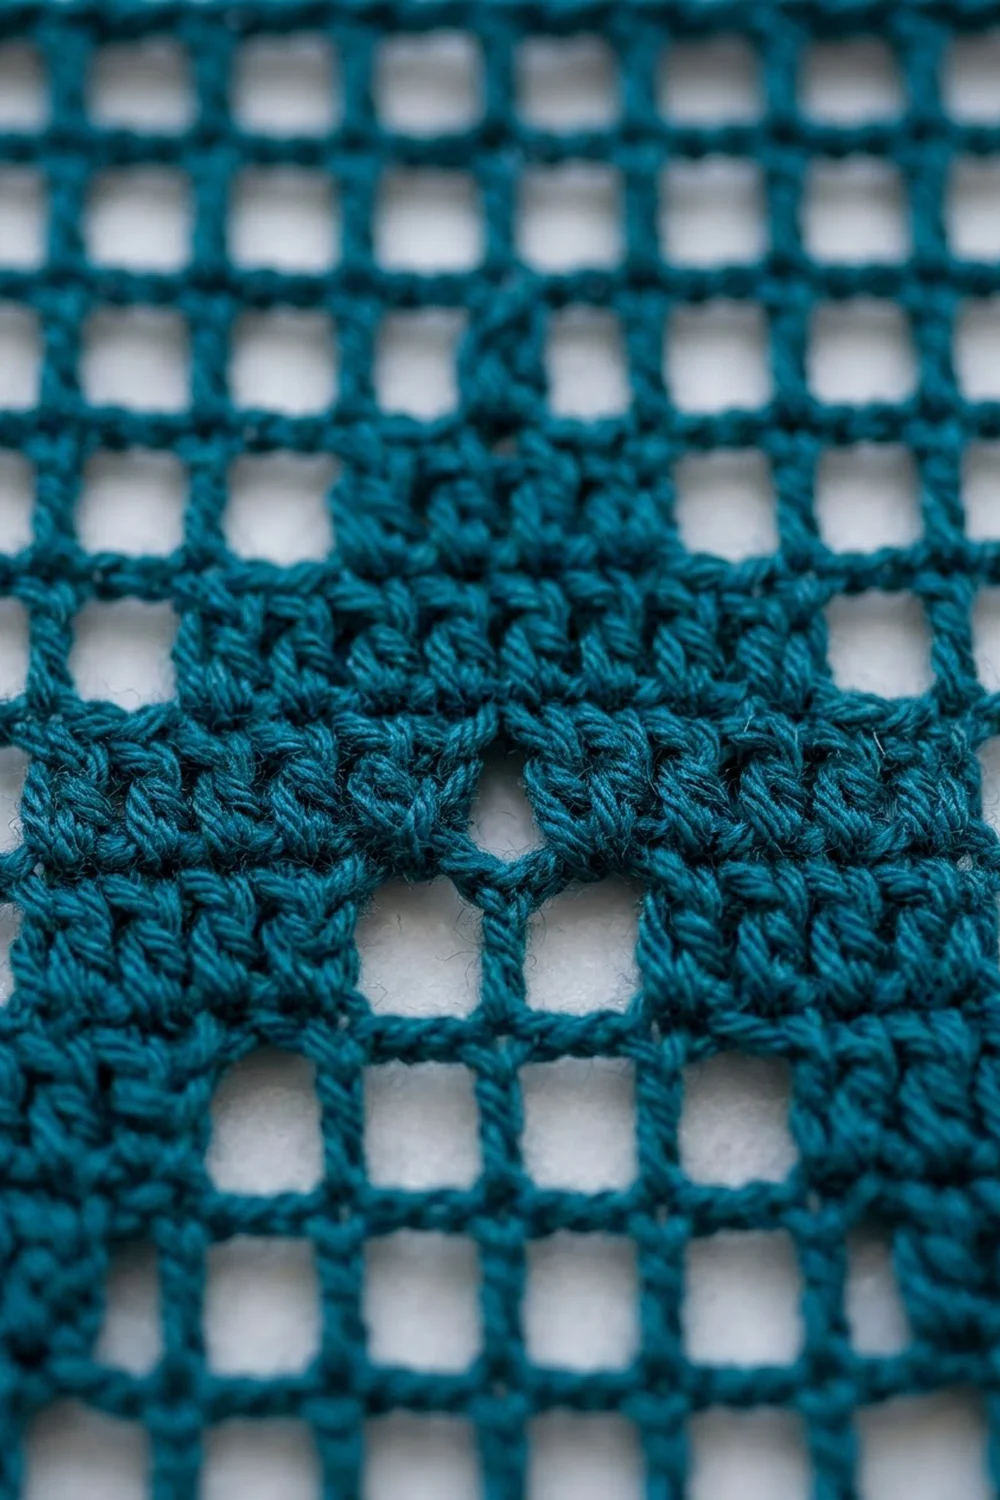
- Mesh (open square): ch 2, sk the ch-2 sp or 2 dc, dc in next dc.
- Block (solid square): over a mesh, 2 dc in next ch-2 sp, dc in next dc. Over a block, dc in each of the next 3 dc.
- Starting mesh: ch 5 (counts as dc + ch 2), sk first ch-2 sp or 2 dc, dc in next dc.
- Starting block: ch 3 (counts as dc), then 2 dc in next ch-2 sp (or 2 dc in next 2 dc), dc in next dc.
- Last dc of a row: work it into the 3rd ch of the starting ch-5, or into the top of the starting ch-3, of the row below.
Every row has 12 dc posts and 11 squares, for a total of 34 sts.
Gauge and Checkpoints
Gauge: 10 meshes and 10 rows = 4 in (10.2 cm) in filet mesh. That makes each square 0.4 in (1.0 cm) wide and 0.4 in (1.0 cm) tall.
Make one complete strip first. Use it to check your gauge, tension, and yarn use before you start the other six.
Checkpoints:
- After Row 1: the row measures 4.4 in (11.2 cm) wide.
- After Row 14: the first chevron and its gap are done, and the strip measures 5.6 in (14.2 cm) long.
- After Row 54: 21.6 in (54.9 cm) long, with 5 chevrons.
- After Row 104: 41.6 in (105.7 cm) long, with 10 chevrons.
- After Row 190: 76 in (193.0 cm) long, with 18 chevrons. Measure without stretching.
If your strip is too big: switch to a 3.75 mm hook. If it is too small: switch to a 4.5 mm hook. If only the length is off, check your dc height: pull up the first loop of each dc to the same height every time.
Strip Pattern
Foundation
Ch 38.
Row 1 (RS): Dc in 8th ch from hook. The skipped 7 ch count as a dc, ch 2, and 2 skipped base ch. Ch 2, sk 2 ch, dc in next ch; repeat from * across. Turn. (11 meshes; 12 dc posts, 34 sts)*
Rows 2–4: Starting mesh, ch 2, dc in next dc; repeat from * across, ending with a dc in the 3rd ch of the turning ch. Turn. (11 meshes per row)*
Chevron Repeat (10 rows)
The motif is symmetrical, so every row reads the same on RS and WS rows.
Motif Row 1: Starting block, 1 block, 7 meshes, 2 blocks. Turn. (2 + 7 + 2 = 11 squares)
Motif Row 2: Starting mesh, 2 blocks, 5 meshes, 2 blocks, 1 mesh. Turn. (1 + 2 + 5 + 2 + 1 = 11 squares)
Motif Row 3: Starting mesh, 1 mesh, 2 blocks, 3 meshes, 2 blocks, 2 meshes. Turn. (2 + 2 + 3 + 2 + 2 = 11 squares)
Motif Row 4: Starting mesh, 2 meshes, 2 blocks, 1 mesh, 2 blocks, 3 meshes. Turn. (3 + 2 + 1 + 2 + 3 = 11 squares)
Motif Row 5: Starting mesh, 3 meshes, 3 blocks, 4 meshes. Turn. (4 + 3 + 4 = 11 squares)
Motif Row 6: Starting mesh, 4 meshes, 1 block, 5 meshes. Turn. (5 + 1 + 5 = 11 squares)
Motif Rows 7–10: Open mesh, worked like Rows 2–4. Turn. (11 meshes per row)
Each chevron arm moves one square inward per row and stays 2 blocks thick. The two arms meet in a 3-block point on Motif Row 5, and Motif Row 6 caps it with a single block. Where a block sits over a block from the row below, work it as “dc in each of the next 3 dc.”
Body
Rows 5–184: Work the 10-row Chevron Repeat 18 times. If it helps, place a marker in the first row of each repeat. (18 chevrons; every row has 11 squares and 34 sts)
Rows 185–190: Work 6 rows of open mesh. Do not fasten off. (11 meshes per row)
This leaves 10 open rows above the last chevron (Motif Rows 7–10 of the last repeat plus Rows 185–190), which forms the taller open band at the top.
Row check: 4 + (18 x 10) + 6 = 190 rows. 190 rows x 0.4 in = 76 in (193.0 cm).
Make All Pieces
Make 7 strips from the same instructions:
- Teal: 4 strips
- Cream: 3 strips
Each strip gets 2 tabs in its own color, for 14 tabs in total.
Layout across the rod (room side):
| T | C | T | C | T | C | T |
  1   2   3   4   5   6   7
T = teal, C = cream. Leave a gap of about 0.4 in (1.0 cm) between strips.
Joining: Tabs and Hanging
The strips are never joined to each other. Each one hangs freely from its own two tabs. Each border is worked around a single strip, so there are no seam stitches to add or subtract.
You work the tabs into the top edge of the border (see below). Each tab folds to the back over the rod and is sewn down, which makes a loop about 1.8 in (4.6 cm) tall.
Tension advice: sew down the end of each tab with small whipstitches through the back loops of the border. Pull them snug but not tight, so the front of the strip doesn’t pucker.
Size checkpoint: hang all seven strips before final blocking. They should span 36 in (91.4 cm) and hang about 78.2 in (198.6 cm) from the top of the rod to the bottom edge.
Border
Border gauge: 5 sc = 1 in (2.5 cm). Each square gets 2 sc along every edge, so 2 sc fill 0.4 in (1.0 cm) and match the mesh exactly.
Round 1 (conversion round)
With RS facing and the yarn still attached after Row 190, ch 1.
- Top edge: 3 sc in the first dc (corner). 1 sc in the next ch-2 sp, 1 sc in the next dc; repeat from * across. Work the last dc as a corner with 3 sc. (23 sts worked 1 per st/sp + 4 corner extras = 27 sc)*
- Long side: 2 sc around each row-end post down all 190 rows. (380 sc)
- Bottom edge: working into the foundation chain, 3 sc in the first base ch (corner). 1 sc in the next ch-2 sp (around the 2 skipped ch), 1 sc in the base of the next dc; repeat from * across, with 3 sc in the last base ch (corner). (23 + 4 extras = 27 sc)*
- Second long side: 2 sc around each row-end post up all 190 rows. (380 sc)
Join with a sl st to the first sc. Round total: (23 + 380 + 23 + 380 = 806 sc worked into the edge) + 8 corner extras = 814 sc.
The 23 sc on each short edge already include that edge’s 2 corner stitches (the center sc of each 3-sc corner group). The 2 extra sc at each corner let the corner turn flat.
Why the math works: 11 squares x 2 sc = 22 sc, which is 4.4 in (11.2 cm) at 5 sc per inch. The 23rd sc sits on the final dc post, inside the corner turn. On the long sides, 190 rows x 2 sc = 380 sc, which is exactly 76 in (193.0 cm). Both directions use the same rate, so the edge neither ruffles nor draws in.
Fasten off.
Tabs (2 per strip)
With RS facing, number the 23 top-edge sc from the right, with the corner sc as st 1. Join yarn in st 2.
Tab Row 1: Ch 1, sc in sts 2–5. Turn. (4 sc)
Tab Rows 2–18: Ch 1, sc in each sc across. Turn. (4 sc per row)
Fasten off and leave a 10 in (25.4 cm) tail. Work the second tab in sts 19–22. That leaves 13 sc open between the tabs and 1 corner sc outside each tab.
Eighteen rows at 5 rows per inch make a 3.6 in (9.1 cm) tab. Fold it to the WS and sew the last row to the back of the border. This makes a 1.8 in (4.6 cm) loop that fits a rod up to 1 in (2.5 cm) thick.
Final Blocking
- Weave in the ends through solid blocks or the border, never across open mesh.
- Soak the strip in cool water for 10 minutes, then press out the water. Don’t wring it.
- Roll it in a towel to remove excess water.
- Lay it flat, RS up.
- Pin the 4 corners first, to 4.8 in x 76.4 in (12.2 cm x 194.1 cm).
- Pin both long sides every 6 in (15.2 cm), keeping the edges straight.
- Nudge each chevron point onto the center column and square up the mesh.
- Let it dry completely, for at least 24 hours.
- Repeat for all 7 strips, pinning each one to the same marks.
Final Quality-Control Checklist
- Every row has 11 squares and 34 sts.
- Each strip has 18 centered, upward-pointing chevrons.
- There are 4 open rows below the first chevron and 10 above the last.
- Border Round 1 has 814 sc: 23 sc per short edge (plus corner extras) and 380 sc per long side.
- Each strip measures 4.8 in x 76.4 in (12.2 cm x 194.1 cm).
- The tabs sit in sts 2–5 and 19–22 and are sewn securely.
- The strips alternate 4 teal and 3 cream, with teal at each end.
- All strips hang within 0.4 in (1.0 cm) of the same length.
Troubleshooting
The strip leans or the edges wave: a starting chain was probably miscounted. Use ch 5 before a mesh and ch 3 before a block.
A chevron is off-center: count squares, not stitches. Every row must total 11.
The squares are taller than wide: make your dc shorter or go down a hook size.
The strip grew after hanging: re-block it and let it dry flat. On the next strips, crochet a little more firmly.
The border ruffles: you are working 3 sc per square. Use 2.
A tab twists: sew it straight down the center back of the strip.
Care
Hand wash, or machine wash cool on a gentle cycle in a mesh bag, then reshape and dry flat. Don’t tumble dry, because heat and weight can stretch the long strips.
Final Notes
Everything in this curtain follows one measurement chain. Each square is 0.4 in (1.0 cm), so 11 squares make a strip 4.4 in (11.2 cm) wide, and 190 rows make it 76 in (193.0 cm) long. Two sc per square on every edge adds a 0.2 in (0.5 cm) border, for a finished strip of 4.8 in x 76.4 in (12.2 cm x 194.1 cm). Seven strips with small gaps fill 36 in (91.4 cm) of rod. If your first strip hits every checkpoint, the other six will match it.
Happy crocheting!