

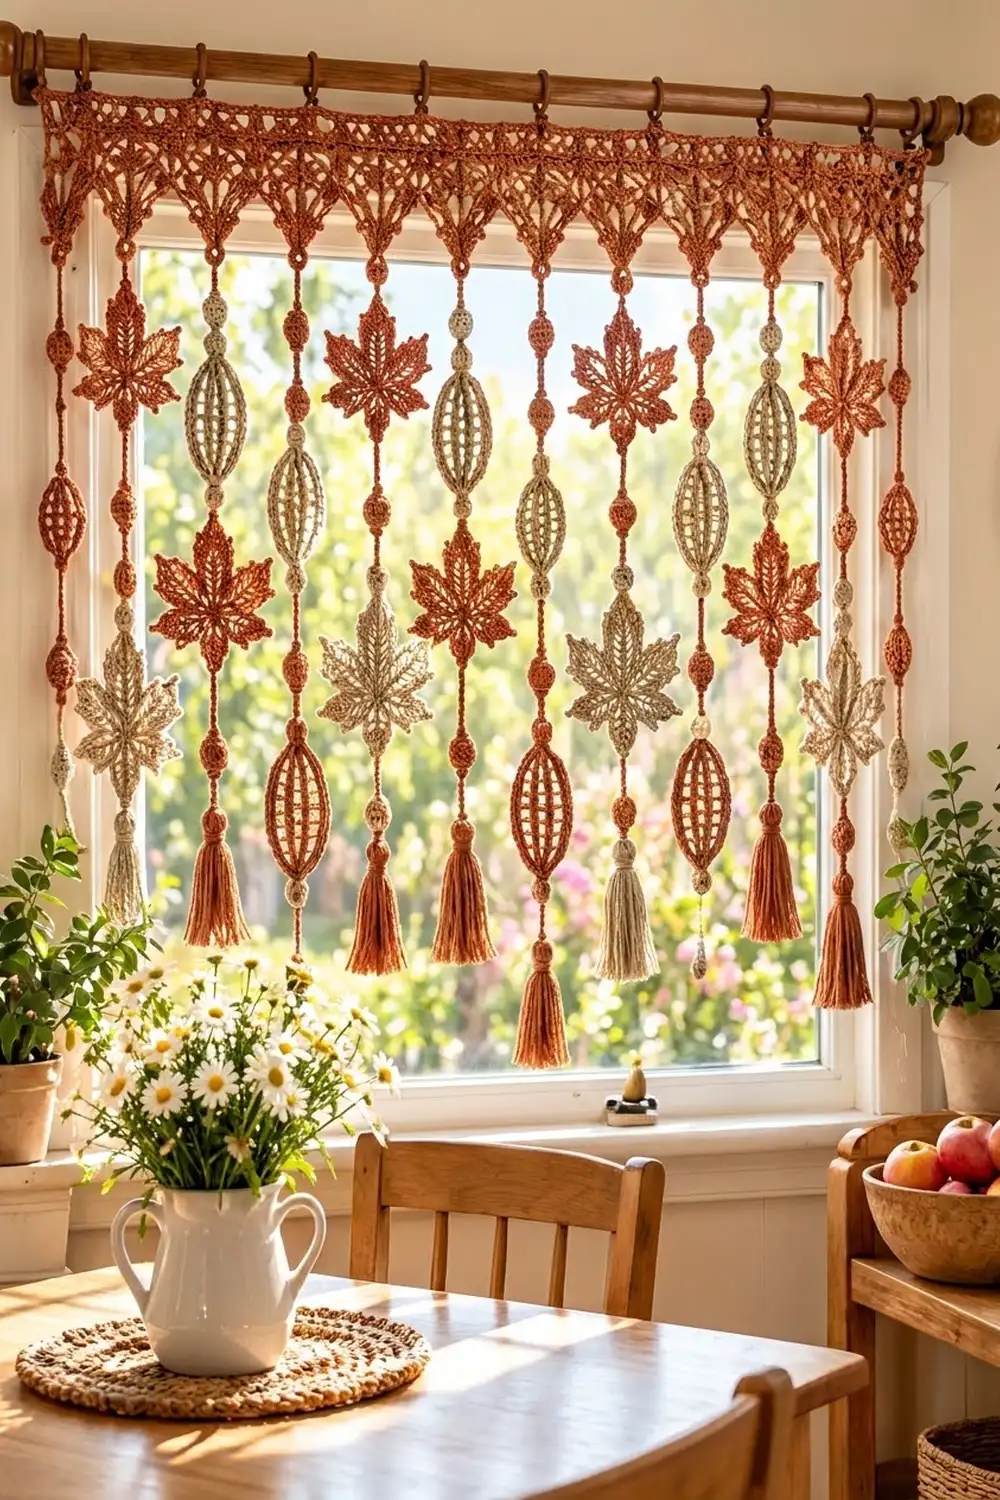
This valance brings autumn to a window. A lacy header of pointed pennants sits on the rod, and from each point hangs a strand of maple leaves, round beads, airy oval lanterns and a soft tassel. Light shines through every open stitch, so the valance looks warm all day.
There are just two colors: rust/terracotta and natural oatmeal. The two colors alternate from strand to strand, so the valance looks rich but stays calm. The style is boho, between macramé and classic lace.
The pattern uses US crochet terms. The finished valance measures 42 in (106.7 cm) wide and 32.5 in (82.6 cm) from the top edge to the tassel tips, not counting the rod loops.
Construction is modular. You make ten pennants, joining them at their upper corners, then crochet a top band with hanging loops across all of them. Next you make the leaves, beads, lanterns and tassels separately. Last, you link them into ten strands with short chain gaps, starting from each pennant point.
Finished Size and Construction
- Finished size: 42 in × 32.5 in (106.7 cm × 82.6 cm)
- Skill level: Intermediate
- Terminology: US
- Yarn weight: DK (3), cotton
- Hook: 4.0 mm (G-6)
- Number of pieces: 10 pennants, 20 leaves, 20 lanterns, 30 beads, 10 tassels
- Layout: 10 pennants in one row; 10 strands, one per pennant point
- Piece size: each pennant is 4.2 in (10.7 cm) wide at the top and 4 in (10.2 cm) deep
- Size before border: 42 in × 4 in (106.7 cm × 10.2 cm) for the joined pennant row
- Border depth: 1 in (2.5 cm), plus hanging loops
Materials
Use a smooth mercerized or matte DK cotton, about 110 m per 50 g. Cotton keeps the leaf points crisp and the strands do not stretch much in sunlight. Avoid fuzzy yarns, as the lace will blur.
- Color R (rust/terracotta): 300 g, about 660 m
- Color N (natural oatmeal): 150 g, about 330 m
Tools:
- 4.0 mm (G-6) crochet hook
- Tapestry needle
- Small amount of polyester fiberfill (for beads)
- Stiff card 3.5 in (8.9 cm) tall for tassels
- Stitch markers
- Rust-proof pins and blocking mat
- Wooden curtain rod
The quantities include a margin of roughly 25% for gauge differences and swatching.
Abbreviations (US Terms)
- ch – chain
- sl st – slip stitch
- sc – single crochet
- hdc – half double crochet
- dc – double crochet
- tr – treble crochet
- sk – skip
- sp – space
- sc2tog – single crochet 2 together
- st(s) – stitch(es)
- RS – right side
Picot: ch 3, sl st in 3rd ch from hook.
Counting note: on the pennants, every ch-1 sp counts as 1 stitch, and every turning ch-3 counts as 1 dc.
Gauge and Checkpoints
Main gauge: 20 sts and 10 rows = 4 in (10.2 cm) in the pennant pattern of alternating solid and mesh dc rows. This means 5 sts and 2.5 rows per 1 in (2.5 cm).
Chain gauge: 4 ch = 1 in (2.5 cm). This controls the strand gaps and lantern ribs.
Make one complete pennant first and treat it as your swatch.
- Pennant after Row 4: 9 sts, about 1.8 in (4.6 cm) wide
- Pennant after Row 10: 21 sts, 4.2 in (10.7 cm) wide, 4 in (10.2 cm) deep
- Leaf after Rnd 2: about 1.5 in (3.8 cm) across
- Finished leaf: about 3.5 in (8.9 cm) tip to stem
- Bead: about 1 in (2.5 cm) across
- Lantern: about 3 in (7.6 cm) tall once bowed
If your pennant is too big, go down half a hook size. If it is too small, go up half a size. Every pennant must be the same width, because the header width is 10 × the pennant width.
Pennants (Make 10 in R)
The pennant is worked bottom-up from the point, adding 1 st at each edge every row. Odd rows are solid; even rows are mesh.
Solid row (odd rows): ch 3 (counts as dc), turn, dc in first st, dc in each st and ch-1 sp across to last st, 2 dc in last st.
Mesh row (even rows): ch 3 (counts as dc), turn, dc in first st, *ch 1, sk next st, dc in next st; rep from * to last 2 sts, ch 1, sk next st, 2 dc in last st.
Row 1: Ch 4, 2 dc in 4th ch from hook (skipped ch count as dc). (3 sts)
Row 2 (mesh): (5 sts)
Row 3 (solid): (7 sts)
Row 4 (mesh): (9 sts)
Row 5 (solid): (11 sts)
Row 6 (mesh): (13 sts)
Row 7 (solid): (15 sts)
Row 8 (mesh): (17 sts)
Row 9 (solid): (19 sts)
Row 10 (mesh): (21 sts: 11 dc and 10 ch-1 sps)
Each row has 2n + 1 sts, where n is the row number. Fasten off and leave a 10 in (25.4 cm) tail. The base of Row 1 is the pennant point, where its strand will hang.
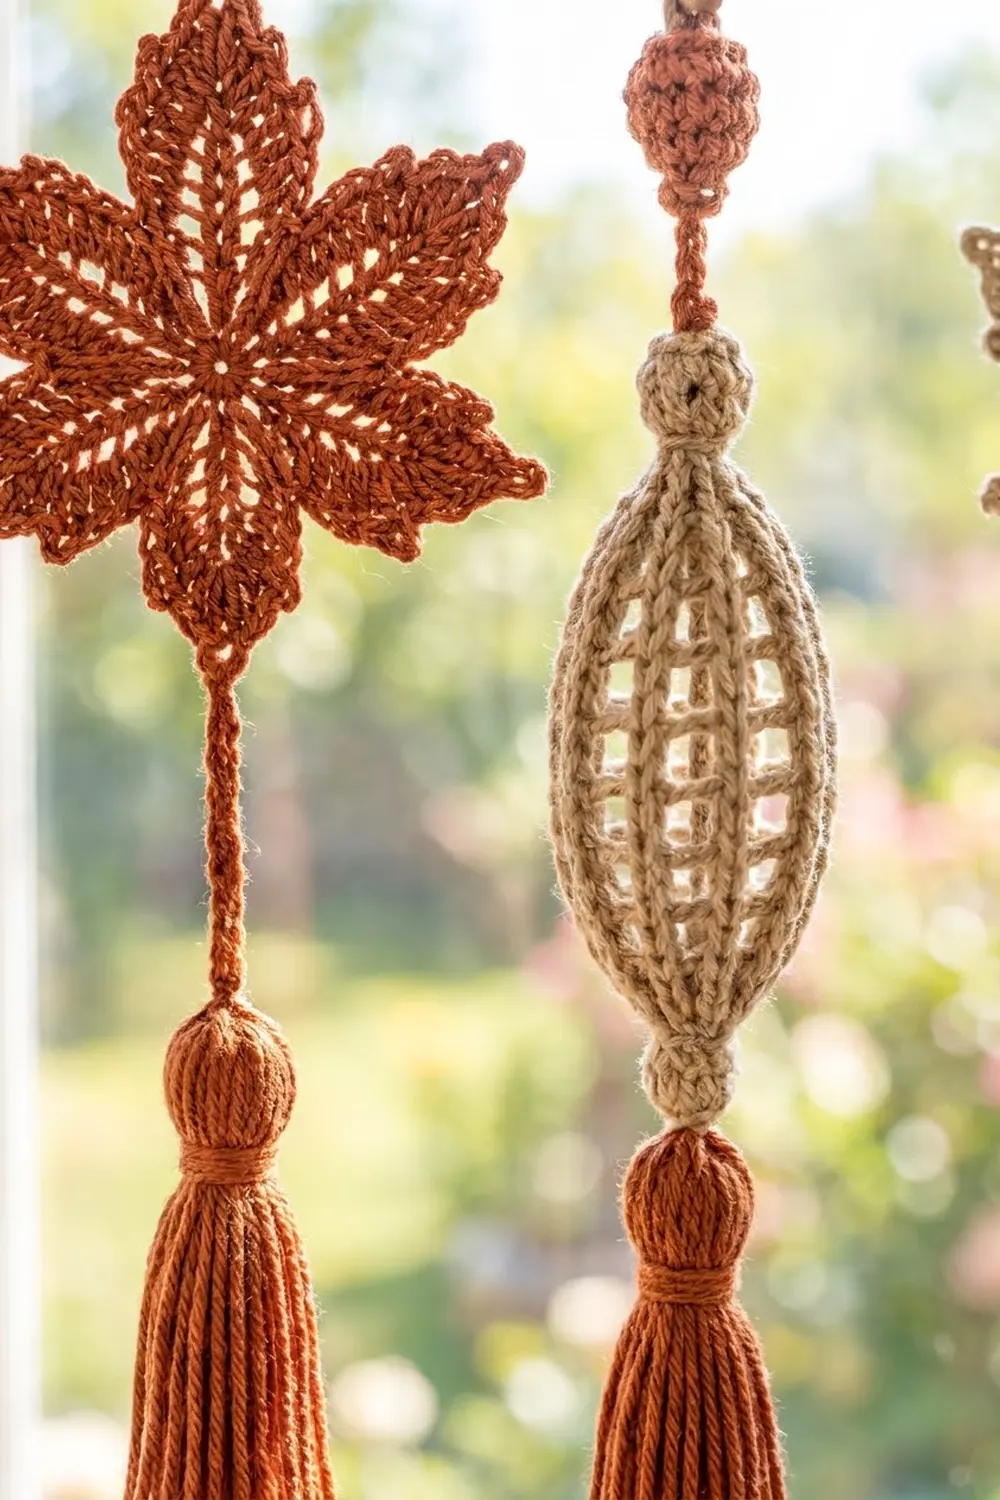
Leaves (Make 15 in R, 5 in N)
Rnd 1: Magic ring, ch 4 (counts as dc + ch 1), [dc, ch 1] 9 times in ring, sl st in 3rd ch of beg ch-4. (10 dc, 10 ch-1 sps)
Rnd 2: Sl st in first ch-1 sp, ch 3 (counts as dc), 2 dc in same sp, 3 dc in each ch-1 sp around, sl st in top of beg ch-3. (30 dc)
Rnd 3: Ch 1, sc in first st, [ch 5, sk 2 sts, sc in next st] 9 times, ch 5, sk 2 sts, sl st in first sc. (10 sc, 10 ch-5 loops)
Rnd 4 (lobes): *(Sc, hdc, dc, 2 tr) in next ch-5 loop, (tr, picot, tr) in next sc, (2 tr, dc, hdc, sc) in next ch-5 loop, sl st in next sc; rep from * 4 more times, ending with the last sl st in the first sc of Rnd 3. (5 lobes; 12 sts and 1 picot per lobe; 60 sts, 5 picots, 5 sl sts in total)
Stem: Ch 5, sl st in 2nd ch from hook and next 3 ch, sl st in same sc. Fasten off.
The stem sits at the bottom. The lobe point directly opposite it (the 3rd lobe) is the top picot, where the strand attaches. Weave in ends.
Lanterns (Make 10 in R, 10 in N)
Each lantern is an open cage with 8 ribs. A shorter inner core chain holds the top and bottom closer together than the ribs are long, so the ribs bow out into an oval.
Rnd 1 (bottom cap and core): Leaving an 8 in (20.3 cm) tail, ch 13. Work 8 sc in 13th ch from hook, sl st in first sc. (8 sc) The first 12 ch form the core, about 3 in (7.6 cm) long.
Rnd 2 (ribs): *Ch 17, sc in 2nd ch from hook and next 15 ch, sl st in next sc of Rnd 1; rep from * 7 more times. (8 ribs of 16 sc, each about 4 in / 10.2 cm) Fasten off.
Rnd 3 (top cap): Bring the core chain up through the center of the ribs. Join yarn in the free tip of any rib, ch 1, sc in tip of each rib, sl st in first sc. (8 sc) Pull the core’s end and tail through the center of this cap. Tighten it until the cap sits 3 in (7.6 cm) above the bottom cap, then sew the core securely to the top cap.
Space the ribs evenly. The top center is the attachment point for the strand above, and the bottom center is where the strand continues.
Beads (Make 15 in R, 15 in N)
Rnd 1: Magic ring, 6 sc in ring. (6 sc)
Rnd 2: 2 sc in each st. (12 sc)
Rnd 3: [Sc in next st, 2 sc in next st] 6 times. (18 sc)
Rnds 4–5: Sc in each st. (18 sc)
Rnd 6: [Sc in next st, sc2tog] 6 times. (12 sc) Stuff firmly.
Rnd 7: Sc2tog 6 times. (6 sc) Close the ring and weave in the end.
Tassels (Make 5 in R, 5 in N)
Wrap yarn 40 times around the 3.5 in (8.9 cm) card. Slide an 8 in (20.3 cm) strand under the wraps at the top and tie it tightly. Cut the loops at the bottom. Wrap a separate strand 6 times around the bundle 0.5 in (1.3 cm) below the top and knot it. Trim the tassel to 3 in (7.6 cm).
Make All Pieces
There are two strand types, used alternately across the valance. Each strand is listed top to bottom:
- Strand A (make 5): R bead, R leaf, N bead, N lantern, N leaf, R bead, R lantern, R tassel
- Strand B (make 5): N lantern, R bead, R leaf, N bead, R leaf, N bead, R lantern, N tassel
Totals: leaves 15 R + 5 N = 20; lanterns 10 R + 10 N = 20; beads 15 R + 15 N = 30; tassels 5 R + 5 N = 10.
Layout grid (pennant 1 at left):
Pennant:   1  2  3  4  5  6  7  8  9  10
Strand:    A  B  A  B  A  B  A  B  A  B
Element 1: Rb NL Rb NL Rb NL Rb NL Rb NL
Element 2: RF Rb RF Rb RF Rb RF Rb RF Rb
Element 3: Nb RF Nb RF Nb RF Nb RF Nb RF
Element 4: NL Nb NL Nb NL Nb NL Nb NL Nb
Element 5: NF RF NF RF NF RF NF RF NF RF
Element 6: Rb Nb Rb Nb Rb Nb Rb Nb Rb Nb
Element 7: RL RL RL RL RL RL RL RL RL RL
Element 8: RT NT RT NT RT NT RT NT RT NT
Key: b = bead, F = leaf, L = lantern, T = tassel; R = rust, N = natural.
Both strand types add up to the same length: 1.5 in (3.8 cm) top gap + 7 gaps of 1 in (2.5 cm) + 19 in (48.3 cm) of elements = 27.5 in (69.9 cm).
Joining
Pennants: Lay the pennants in a row with all Row 10 edges at the top. Hold two neighbors RS together. With R, sl st through both side edges along Rows 9 and 10 only, working 2 sl sts per row-end. That is 4 sl sts per seam, about 0.8 in (2.0 cm). Below this join, the pennants separate into points. Join all 10 pennants this way, which makes 9 seams.
The seams use row-ends only. They add no stitches to the top edge, so the top still has 21 sts per pennant.
Strands: Use R for all chain gaps.
- Join R with a sl st at a pennant point, ch 6 (1.5 in / 3.8 cm), then sl st into the attachment point of Element 1. Fasten off.
- Join R at the bottom of that element (bead bottom center, leaf stem tip or lantern bottom cap), ch 4 (1 in / 2.5 cm), then sl st into the top of the next element. Fasten off.
- Repeat for Elements 2–7.
- After Element 7, ch 4 and tie the tassel’s top strand firmly to the chain end.
Tension: keep the chain gaps snug and even. If one chain is loose, its strand will hang lower than the rest.
Size checkpoint: each strand should measure 27.5 in (69.9 cm), point to tassel tip. The joined pennant row should measure 42 in (106.7 cm) across the top.
Border (Top Band and Rod Loops)
Border gauge: 5 sc = 1 in (2.5 cm); 5 sc rows = 1 in; one dc row = 0.4 in (1.0 cm). The band is worked only along the top edge, so there is one side to count.
Row 1 (RS): Join R in the first st of pennant 1’s Row 10, ch 1, sc in each dc and each ch-1 sp across all 10 pennants. (10 × 21 = 210 sc)
Row 2: Ch 1, turn, sc in each st. (210 sc)
Row 3: Ch 3 (counts as dc), turn, dc in each st across. (210 dc)
Row 4: Ch 1, turn, sc in each st. (210 sc)
Row 5 (loops): Ch 1, turn, *sc in next 8 sts, ch 12, sk 5 sts, sc in next 8 sts; rep from * 9 more times. (160 sc and 10 ch-12 loops) Fasten off.
Why the math works: Each pennant ends with 21 sts and the seams add nothing, so Row 1 equals 10 × 21 = 210 sts. That gives 42 in (106.7 cm) at 5 sts per inch. Each repeat in Row 5 covers 8 + 5 + 8 = 21 sts, which is exactly one pennant. This centers every loop above its pennant point and strand. The band is 1 in (2.5 cm) deep: three sc rows at 0.2 in (0.5 cm) each and one dc row at 0.4 in (1.0 cm). Each ch-12 loop is about 3 in (7.6 cm) of chain.
Final Blocking
- Lay the header face down on a blocking mat.
- Pin the top edge straight to 42 in (106.7 cm).
- Pin each pennant point 4 in (10.2 cm) below the top of Row 10, keeping all points level.
- Pin each leaf flat, opening the lobes. Put one pin in each picot and one in the stem, at 3.5 in (8.9 cm) tip to stem.
- Mist everything with water until damp and leave to dry completely.
- Do not pin or flatten the lanterns or beads. Just fluff the lantern ribs so they are evenly spaced.
- Hang the valance on the rod and let the strands drop freely for a day.
Final Quality-Control Checklist
- 210 sts across border Rows 1–4
- 10 rod loops, each centered over a pennant
- All pennant points level
- 10 strands that alternate A, B, A, B
- Every strand 27.5 in (69.9 cm)
- Leaf top picots point up and stems point down
- Lantern ribs bowed evenly, with cores sewn tightly
- Beads firmly stuffed and closed
- Tassels trimmed to 3 in (7.6 cm)
- All ends woven in securely
Troubleshooting
- Pennant is lopsided: you missed an edge increase. Each row should be exactly 2 sts longer than the row before.
- Header wider than 42 in (106.7 cm): the border sc row is too loose. Rework Row 1 with a smaller hook.
- Lantern ribs lie flat: the core is too long. Shorten it so the caps sit 3 in (7.6 cm) apart.
- Leaf curls: your Rnd 4 tension is too tight. Block it again, or go up half a hook size for the lobes.
- Strands twist: hang the valance and roll each strand gently in the opposite direction. Steam it lightly.
- Beads look lumpy: use less stuffing, and pack it evenly before Rnd 7.
Care
Hand wash in cool water and roll in a towel to remove moisture. Lay the header flat to dry and hang the strands straight, re-pinning the leaves if they need it.
Final Notes
Everything depends on one measurement chain. At 5 sts per inch, each 21-st pennant is 4.2 in (10.7 cm) wide. Ten pennants make 210 sts, which is 42 in (106.7 cm). The band adds 1 in (2.5 cm) to the 4 in (10.2 cm) pennants, for a 5 in (12.7 cm) header. Each strand is 27.5 in (69.9 cm), which gives 32.5 in (82.6 cm) in total. Check your pennant first, and the rest of the valance will follow.
Happy crocheting!