

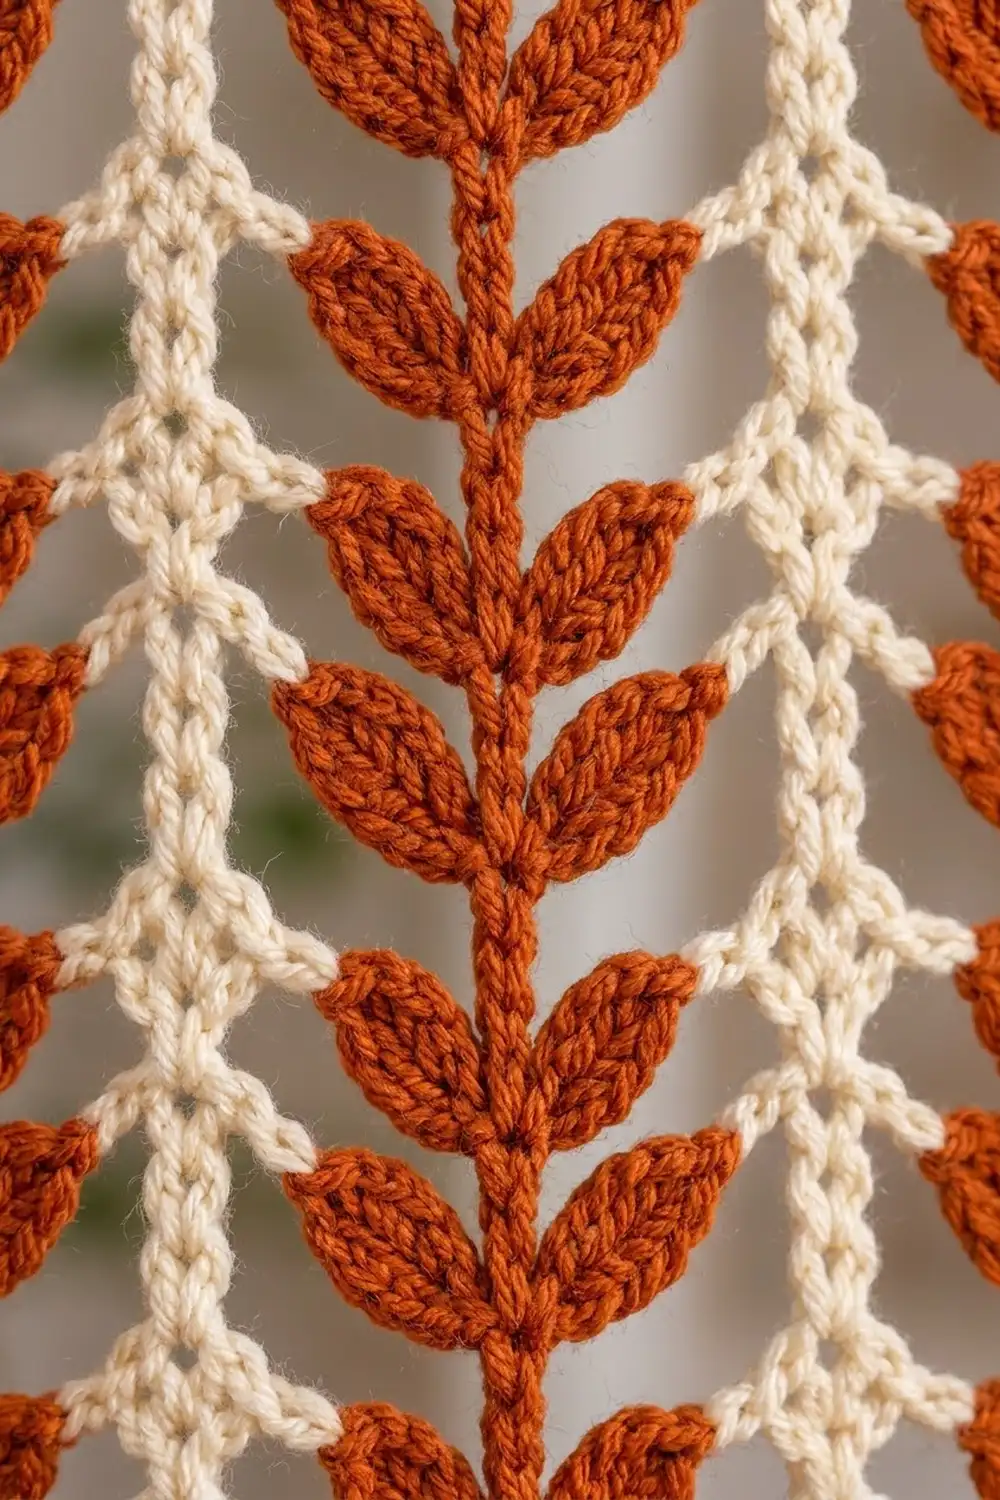
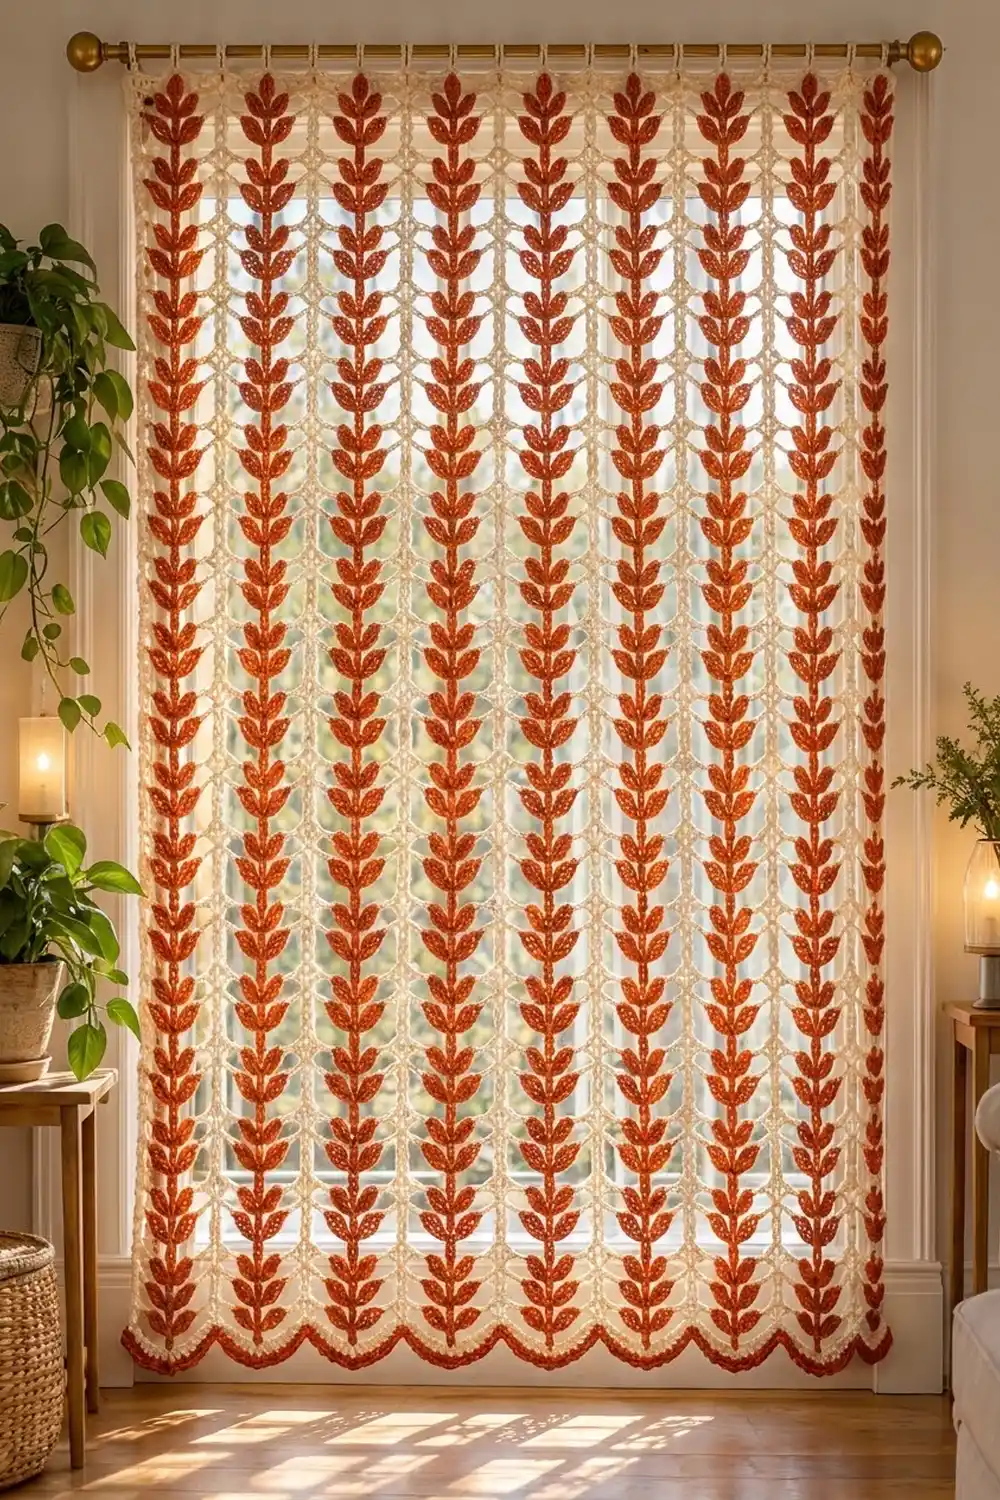
This curtain panel has nine rust-orange leaf vines climbing up a cream lattice. Each vine has a raised center stem with pairs of chunky leaves on either side, and it ends in a single leaf at the top. The bottom edge has rust scallops, and cream tab loops hang the panel from a rod.
Only two colors are used: a warm rust and a soft cream. The rust leaves are worked solid, so they stand out against the open cream mesh. Daylight comes through the lattice while the vines stay bold. The look is boho and earthy, and it suits fall, but the panel works in any room all year.
The pattern uses US crochet terms. The finished panel measures 39.5 in (100.3 cm) wide and 67.25 in (170.8 cm) long at the deepest point of the scallops. The tab loops add about 2.5 in (6.4 cm) above the top edge.
The panel is one piece, worked flat from the bottom up in rows. Rust vine sections and cream lattice sections alternate across each row in intarsia, so every section has its own bobbin. A solid cream header goes on top, and ten tabs are worked directly onto it. A scalloped border along the foundation edge and a cream edging along each side finish the panel.
Finished Size and Construction
- Finished size: 39.5 in (100.3 cm) wide × 67.25 in (170.8 cm) long, tabs not included
- Skill level: Intermediate to experienced (intarsia, clusters, front post stitches)
- Terminology: US crochet terms
- Yarn weight: Worsted / aran (#4)
- Hook: 6.0 mm (US J-10)
- Number of pieces: 1 panel (tabs are worked onto it)
- Layout: 9 rust vine columns alternating with 10 cream lattice columns, plus 1 edge stitch on each side
- Panel width: 117 sts = 39 in (99.1 cm)
- Size before border: 39 in × 66 in (99.1 cm × 167.6 cm)
- Border depth: 1.25 in (3.2 cm) at the bottom, 0.25 in (0.6 cm) on each side
Materials
Pick a smooth worsted-weight yarn so the leaf clusters show clearly. A cotton or cotton-acrylic blend drapes well and holds its shape when hung. Fuzzy yarns will blur the lattice.
- Cream (main color): 750 g, about 1,500 m
- Rust (vines and scallops): 450 g, about 900 m
These amounts assume about 200 m per 100 g. Both quantities include a margin of roughly 10% for the gauge swatch, tabs, and weaving in ends.
Tools:
- 6.0 mm (US J-10) crochet hook
- 19 yarn bobbins (9 rust, 10 cream)
- Tapestry needle
- Locking stitch markers
- Tape measure
- Blocking mats or a large towel, plus rust-proof pins
- Spray bottle
- Scissors
- Curtain rod, about 1 in (2.5 cm) in diameter
Abbreviations (US Terms)
- ch – chain
- sc – single crochet
- hdc – half double crochet
- dc – double crochet
- FPdc – front post double crochet
- rev sc – reverse single crochet (crab stitch)
- sk – skip
- sp – space
- st(s) – stitch(es)
- RS / WS – right side / wrong side
- yo – yarn over
Special stitch – Leaf (L): [Yo, insert hook in the indicated st, pull up a loop, yo, draw through 2 loops] 3 times in the same st, yo, draw through all 4 loops on the hook. A Leaf counts as 1 st. On the following WS row, push each Leaf toward the RS so it puffs.
Stem FPdc: Work an FPdc around the stem st two rows below, and skip the sc behind it.
Intarsia color changes: Change colors on the final yo of the last st in a section. On WS rows, keep the unused strand on the WS. On RS rows, bring it forward between stitches and twist the two colors once so the join doesn’t open into a hole.
Gauge and Checkpoints
Gauge in pattern: 12 sts and 8 rows (two 4-row repeats) = 4 in (10.2 cm). Along the sides, this works out to 3 sc row-ends per inch, the same as the stitch gauge.
Make a test piece first. Ch 22. Work Row 1 over 21 sts (1 edge st, 1 lattice section, 1 vine section, 1 lattice section, 1 edge st). Then work Rows 2–13, which are three repeats. Block the swatch and measure it after it dries, because cotton blends relax a little when wet.
- Width checkpoint: 21 sts = 7 in (17.8 cm)
- Height checkpoint: Rows 2–13 = 6 in (15.2 cm)
Too big? Go down 0.5 mm. Too small? Go up 0.5 mm. If the width is right but the rows run tall, work the leaf clusters more snugly instead of changing hooks.
Checkpoints on the panel:
- After Row 1: 39 in (99.1 cm) wide
- After Row 25: Rows 2–25 measure 12 in (30.5 cm)
- After Row 129: Rows 2–129 measure 64 in (162.6 cm)
- After Row 133: 66 in (167.6 cm) total
- After the bottom border: 67.25 in (170.8 cm)
Panel Pattern
Section layout (every row)
Across the 117 sts, each row has:
edge st (1) + [lattice (7) + vine (5)] × 9 + lattice (7) + edge st (1) = 1 + 108 + 7 + 1 = 117 sts
Each cream bobbin works one lattice section. The two end lattice sections also work the edge sts. Each rust bobbin works one vine section.
Foundation
With cream, ch 118.
Row 1 (WS): Sc in 2nd ch from hook and in each ch across, turn. (117 sc)
Wind your bobbins now. You’ll join the rust and the extra cream bobbins in Row 2. In Row 2, put a marker in the first st of each vine section and move the markers up every few rows. They make stitch counts quick to check.
Four-row repeat
Row 2 (RS, Leaf Row): Ch 3 (counts as edge dc).
- Lattice section: Dc in next st, ch 2, sk 2, dc in next st, ch 2, sk 2, dc in next st (7 sts).
- Vine section (rust): L in next st, ch 1, sk 1, dc in next st (stem), ch 1, sk 1, L in next st (5 sts).
Repeat these two sections 8 more times. Work 1 more lattice section, then dc in last st (edge), turn. (117 sts: 41 dc, 18 L, 20 ch-2 sps, 18 ch-1 sps)
Row 3 (WS): Ch 1 (does not count). Sc in edge st.
- Lattice: Sc in dc, ch 2, sk ch-2 sp, sc in dc, ch 2, sk ch-2 sp, sc in dc (7 sts).
- Vine (rust): Sc in L, sc in ch-1 sp, sc in stem, sc in ch-1 sp, sc in L (5 sc).
Continue across in pattern and end with sc in the edge st, turn. (117 sts)
Row 4 (RS, Stem Row): Ch 3 (counts as edge dc).
- Lattice: Work as in Row 2 (dc into each sc, ch 2 over each ch-2) (7 sts).
- Vine (rust): Dc in next 2 sts, Stem FPdc around the stem dc two rows below, dc in next 2 sts (5 sts).
Continue across and end with dc in the edge st, turn. (117 sts)
Row 5 (WS): Work as in Row 3. (117 sts)
Rows 6–129: Repeat Rows 2–5 another 31 times. From now on, work the stem in each Leaf Row as a Stem FPdc instead of a plain dc. You’ll finish with a Row 5-style WS row, giving 32 repeats and 32 leaf pairs per vine. (117 sts each row)
Checkpoint: Rows 2–129 measure 64 in (162.6 cm).
Tip and header
Row 130 (RS, Tip Row): Ch 3. Work the lattice sections as usual. In each vine section, work dc in next 2 sts, L in the stem st, dc in next 2 sts (5 sts). End with dc in edge st. (117 sts) Cut all rust bobbins and all cream bobbins except the one at the working end.
Row 131 (WS, Conversion Row): Cream only. Ch 1. Work 1 sc in each st and 2 sc in each ch-2 sp.
Count: 77 sts worked 1-per-stitch (2 edge + 30 lattice dc + 45 vine sts) + 40 sc worked into 20 ch-2 sps = 117 sc.
Rows 132–133: Ch 1, sc in each st across, turn. (117 sc)
Checkpoint: 66 in (167.6 cm) from the foundation edge.
Hanging tabs (make 10)
Number the Row 133 sts 1–117 from the right edge. Tabs sit over the center 5 sts of each lattice section: sts 3–7, 15–19, 27–31, and so on, every 12 sts, up to sts 111–115.
Tab Row 1 (RS): Join cream in the first st of the tab, sc in same st and next 4 sts, turn. (5 sc)
Tab Rows 2–18: Ch 1, sc in each st, turn. (5 sc)
The strip measures 6 in (15.2 cm). Fasten off with a 12 in (30.5 cm) tail. Fold the strip to the WS and whipstitch its last row to the base of the header along Row 131. This makes a loop of about 2.5 in (6.4 cm).
Border
Border gauge: 3 sc = 1 in (2.5 cm), matching the panel stitch gauge, so the edges lie flat without ruffling or pulling in.
Bottom edge
Border Row 1 (RS, cream): With the RS facing, join cream at the right corner of the foundation edge. Ch 1, sc in the underside of each foundation ch across. (117 sc) Fasten off.
Number these 117 sc from the right. The scallop points are at sts 5, 17, 29, and so on, every 12 sts, to st 113. That gives 10 points, one under the center of each lattice section. Each 11-st gap between points is centered under a vine (for example, sts 6–16 center on st 11, the first vine’s stem).
Border Row 2 (RS, rust scallops): With the RS facing, join rust at the same right corner.
- Half scallop (sts 1–4): Ch 3 (counts as dc), dc in st 1, dc in st 2, hdc in st 3, sk st 4 (4 sts).
- Point: Sc in st 5 (1 st).
- Full scallop (next 11 sts): Sk 1, hdc in next, dc in next 2, 2 dc in next, 3 dc in next (center), 2 dc in next, dc in next 2, hdc in next, sk 1 (13 sts).
- Repeat [point, full scallop] 8 more times, then work 1 more point in st 113.
- Half scallop (sts 114–117): Sk 1, hdc in next, dc in next, 2 dc in last st (4 sts).
Count: 4 + (10 points × 1) + (9 scallops × 13) + 4 = 135 sts.
Border Row 3 (rust): Do not turn. Ch 1, rev sc in each st back across. (135 rev sc) Fasten off.
Why the math works: The 117-st edge splits into 4 + 10 + (9 × 11) + 4 = 117. Each 11-st gap becomes 13 sts, which is 2 extra sts per scallop. That small increase lets the edge curve without ruffling. The half scallops keep the side edges straight.
Side edging
Side Edging (cream, each side): With the RS facing, work along the row-ends from Row 1 to Row 133. Work 1 sc in each sc row-end and 2 sc in each dc-height row-end.
Per side: Row 1 (1) + 32 repeats × (2 + 1 + 2 + 1) (192) + Row 130 (2) + Rows 131–133 (3) = 198 sc.
Check: 66 in × 3 sc per in = 198 sc, so the edging matches the panel height exactly.
Final Blocking
- Weave in all ends into same-color stitches on the WS. Run each one at least 2 in (5.1 cm) and then back.
- Lay the panel WS up on blocking mats or towels on the floor.
- Pin the top and bottom edges to 39 in (99.1 cm), not counting the side edging.
- Pin the sides to 66 in (167.6 cm) from the foundation edge to the top of the header.
- Pin each scallop point and each scallop center separately so all nine curves match.
- Mist the panel evenly until it’s damp, not soaked.
- Use your fingers to open the lattice spaces and straighten each vine stem.
- Let it dry completely, which takes at least 24 hours, before unpinning.
Final Quality-Control Checklist
- 117 sts in every body row and 135 sts in the scallop row
- 9 vines, each with 32 leaf pairs and 1 tip leaf
- Every Stem FPdc lines up in a straight vertical ridge
- No holes at intarsia color joins
- 10 tabs, evenly spaced, and all the same length
- Scallop points line up under the lattice centers
- Side edging has 198 sc per side and lies flat
- Finished size: 39.5 in × 67.25 in (100.3 cm × 170.8 cm)
Troubleshooting
Holes where colors meet: Twist the two strands once on every RS row, and keep the first st of each new section firm.
Leaves look flat: Push each Leaf to the RS on the WS row, and keep the yarn-overs even.
Lattice is narrower than the vines: The ch-2s are too tight. Chain more loosely or use a hook one size larger for the chains only.
Stem zigzags: You placed the FPdc around the wrong post. It always goes around the stem st two rows directly below.
Bobbins tangling: Turn the work clockwise on one row and counterclockwise on the next to undo twists.
Header flares: Row 131 needs exactly 117 sc. Work 2 sc in each ch-2 sp, not 3.
Tabs twist on the rod: Sew every tab with the strip’s RS facing out, and line all ten up along the same row.
Scallops ruffle: Check that each full scallop has exactly 13 sts and that you skipped the first and last st of each gap.
Sides wave: Count the edging against the 198-sc target, and redo it if you’re over.
Care
Hand wash cold or machine wash on a gentle cycle in a mesh bag, then lay flat to dry and re-pin lightly to reshape. Don’t hang the panel while it’s wet, because the weight will stretch it.
Final Notes
The measurement chain is simple. Gauge is 12 sts and 8 rows = 4 in (10.2 cm). That gives 117 sts = 39 in (99.1 cm), 32 repeats = 64 in (162.6 cm), and 66 in (167.6 cm) with the tip row and header. The borders bring the panel to 39.5 in × 67.25 in (100.3 cm × 170.8 cm). Every edge is tied to the same 3-sts-per-inch gauge, so the borders add size without pulling the panel out of shape. Check gauge on the swatch, count after key rows, and the vines will line up from scallop to header.
Happy crocheting!