

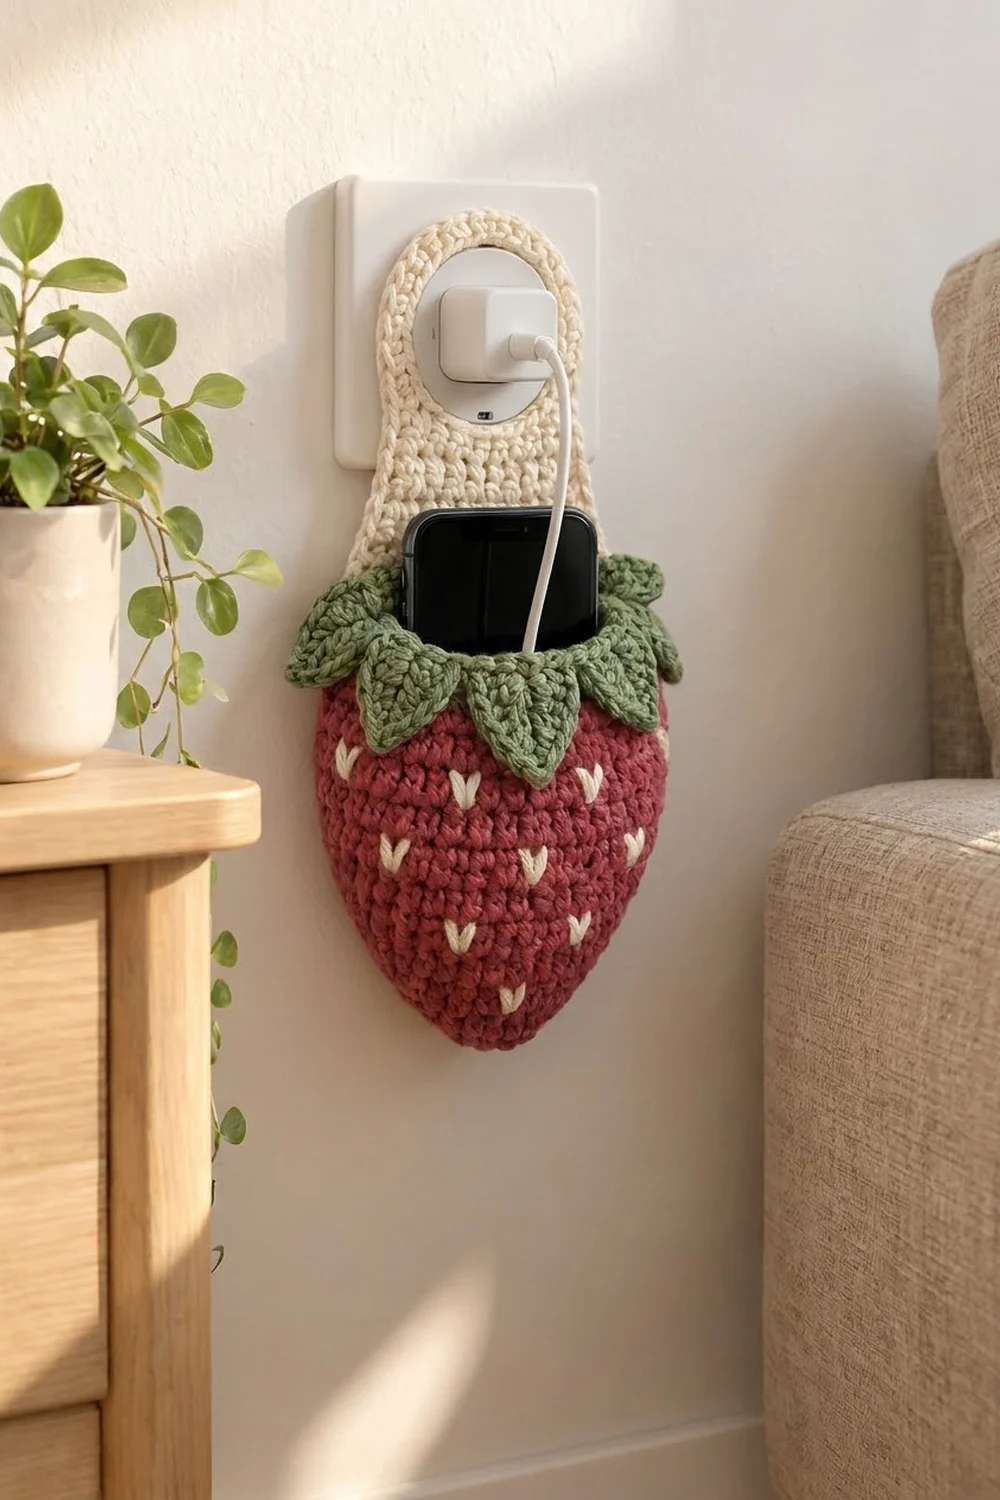
This little strawberry keeps your phone off the floor while it charges. The cream tab slips over a wall charger plug, and the red berry pocket hangs underneath with the phone standing upright inside. It’s practical, quick to make, and much nicer to look at than a cable trailing across the counter.
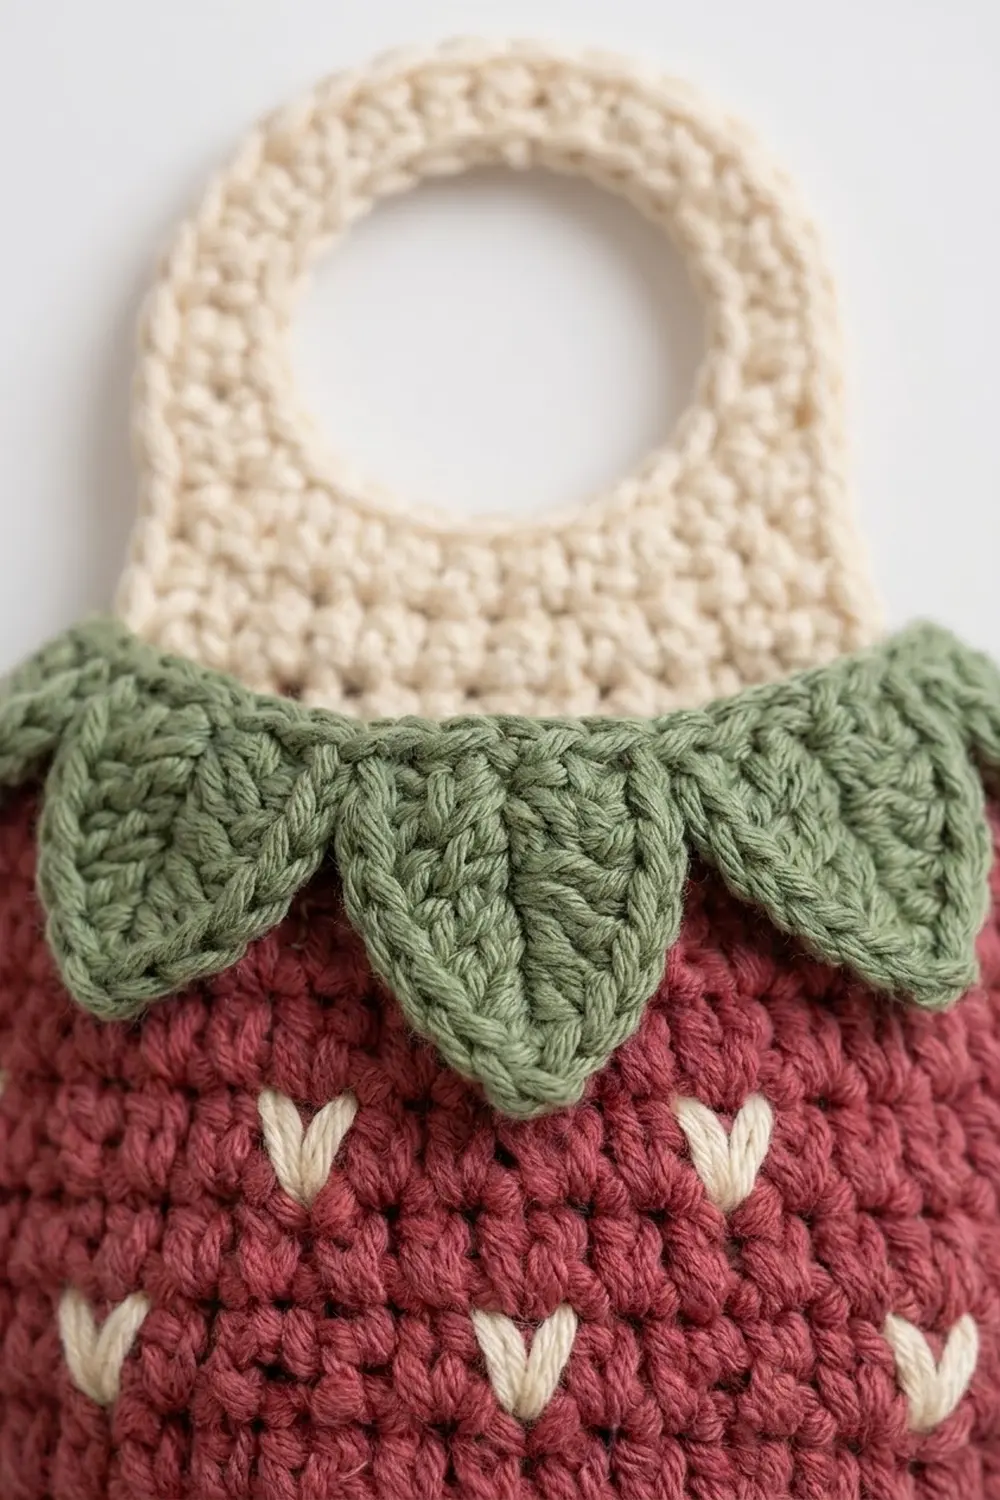
The design uses three colors: berry red for the body, cream for the hanger tab and seeds, and sage green for the leafy calyx. Dense single crochet gives a firm, slightly pebbly fabric that holds its shape. The embroidered V-shaped seeds and the overlapping pointed leaves make it read clearly as a strawberry, even from across the room.
The pattern uses US crochet terms. The finished holder measures about 5 in (12.7 cm) wide and 11 in (27.9 cm) tall, including the tab. The pocket itself is 5.5 in (14.0 cm) deep.
Construction is simple. You crochet the body in continuous rounds from an oval base, then work the cream tab back and forth straight off the back rim, leaving a round opening for the plug. After that you edge the tab, make eight small leaves and sew them on, and embroider the seeds.
Finished Size and Construction
- Finished size: 5 in (12.7 cm) wide x 11 in (27.9 cm) tall
- Skill level: Easy to intermediate
- Terminology: US crochet terms
- Yarn weight: Worsted (#4), cotton or cotton blend
- Hook: 4.5 mm (US 7)
- Number of pieces: 1 body with an integrated tab, plus 8 small leaf appliqués
- Layout: Single item; leaves sewn in a ring around the pocket opening
- Pocket size: 5 in (12.7 cm) wide x 5.5 in (14.0 cm) deep
- Tab size before border: 4 in (10.2 cm) wide x 5.3 in (13.5 cm) tall
- Border depth: 1 round of sc, about 0.25 in (0.6 cm)
- Plug opening: about 2 in (5.1 cm) across after edging
Materials
Use a worsted-weight cotton or cotton blend. Cotton stays firm, doesn’t stretch much under the weight of a phone, and stands up to handling. Acrylic works too, but the tab may stretch a little over time.
- Berry red (body, front rim): 40 g / 70 m
- Cream (tab, border, seeds): 20 g / 35 m
- Sage green (leaves): 12 g / 21 m
These quantities include a margin of about 20% for your gauge swatch and sewing tails.
Tools:
- 4.5 mm (US 7) crochet hook
- 3 stitch markers
- Tapestry needle
- Scissors
- Measuring tape
- Rust-proof pins
- Spray bottle and a blocking surface
Abbreviations (US Terms)
- ch – chain
- sl st – slip stitch
- sc – single crochet
- hdc – half double crochet
- dc – double crochet
- sc2tog – single crochet 2 together
- st(s) – stitch(es)
- rnd(s) – round(s)
- inc – 2 sc in the same stitch
Special technique – sc2tog over row-ends: Insert the hook into the next row-end, yarn over and pull up a loop, insert into the following row-end, yarn over and pull up a loop, then yarn over and pull through all 3 loops on the hook. This turns 2 row-ends into 1 stitch.
Gauge and Checkpoints
Gauge: 16 sc x 18 rnds = 4 in (10.2 cm) in sc.
Treat the body as your test piece. Work through Round 9, then flatten it and measure before going on.
- After Rnd 1: the oval measures about 2 in (5.1 cm) across the long side.
- After Rnd 9 (40 sts): the pocket, flattened, measures 5 in (12.7 cm) wide and about 2 in (5.1 cm) tall.
- After Rnd 25: the pocket is 5.5 in (14.0 cm) deep.
- After Tab Row 24: the tab is 4 in (10.2 cm) wide and 5.3 in (13.5 cm) tall.
If your piece is too big: go down to a 4 mm (US G/6) hook. A loose pocket lets the phone tip forward.
If your piece is too small: go up to a 5 mm (US H/8) hook. Check that your phone still fits; the inside needs to be at least as wide as the phone plus its thickness.
The pocket fits phones up to about 3.1 in (7.9 cm) wide and 0.4 in (1.0 cm) thick, cases included.
Body (Berry Red)
You work the body in continuous spiral rounds. Don’t join at the end of each round. Put a marker in the first stitch of each round and move it up as you go.
Ch 8.
Rnd 1: Sc in 2nd ch from hook, sc in next 5 ch, 3 sc in last ch. Turn the work and, working along the other side of the chain, sc in next 5 ch, 2 sc in the last ch (the one that already holds the first sc). (16 sts)
Rnd 2 (growth): [Sc in next st, inc in next st] 8 times. (24 sts)
Rnds 3–4: Sc in each st around. (24 sts)
Rnd 5 (growth): [Sc in next 2 sts, inc in next st] 8 times. (32 sts)
Rnds 6–8: Sc in each st around. (32 sts)
Rnd 9 (growth): [Sc in next 3 sts, inc in next st] 8 times. (40 sts)
Spacing out the increases makes the bottom a gentle rounded point instead of a flat circle, which is what gives the strawberry its shape.
Rnds 10–25: Sc in each st around. (40 sts)
Find the sides: Flatten the pocket so the oval base runs side to side. If the marker isn’t exactly at one side fold, sc in a few more stitches until your yarn reaches the fold. Don’t count these extra stitches; they only move your starting point. Place a marker at each fold. The front and the back each have 20 sts.
Sl st in the next st and fasten off. Weave in the tail on the inside.
Hanger Tab (Cream)
The tab is worked in rows straight off the 20 back stitches of Rnd 25. With the back facing you, join cream in the first back stitch at the right-hand fold.
Row 1: Ch 1, sc in each of the 20 back sts. Turn. (20 sts)
Row 2: Ch 1, sc2tog, sc in next 16 sts, sc2tog. Turn. (18 sts)
Row 3: Ch 1, sc2tog, sc in next 14 sts, sc2tog. Turn. (16 sts)
These two decrease rows make the sloped shoulders where the tab meets the berry.
Rows 4–8: Ch 1, sc in each st across. Turn. (16 sts)
Plug Opening
First strip, Rows 9–18: Ch 1, sc in first 3 sts only. Turn. Repeat for 10 rows total. (3 sts per row) At the end of Row 18 don’t fasten off. Pull up a long loop and put a marker in it.
Second strip, Rows 9–18: Skip the next 10 sts of Row 8. Join cream in the following st, ch 1, sc in this st and the last 2 sts. Turn. Work 10 rows of 3 sc to match the first strip, then fasten off.
Row 19 (joining row): Put the held loop back on your hook. Ch 1, sc in 3 sts of the first strip, ch 10, sc in 3 sts of the second strip. Turn. (3 + 10 + 3 = 16 sts)
This leaves a hole 10 sts wide and 10 rows tall.
Rows 20–21: Ch 1, sc in each st and each ch across. Turn. (16 sts)
Row 22: Ch 1, sc2tog, sc in next 12 sts, sc2tog. Turn. (14 sts)
Row 23: Ch 1, sc2tog, sc in next 10 sts, sc2tog. Turn. (12 sts)
Row 24: Ch 1, sc2tog, sc in next 8 sts, sc2tog. (10 sts) Fasten off.
These last three rows round off the top of the tab.
Edging the Opening
Join cream at a lower corner of the hole.
Rnd 1: Sc in each of the 10 unused sts of Row 8. Along the side, work [sc in next 4 row-ends, sc2tog over next 2 row-ends, sc in next 4 row-ends] for 9 sts. Sc in each of the 10 ch. Repeat the side sequence down the other side for 9 sts. Join with sl st. (10 + 9 + 10 + 9 = 38 sts)
Rnd 2: Ch 1. Sc in each st around, but work sc2tog over the 2 sts at each of the 4 corners. Join. (38 − 4 = 34 sts)
The corner decreases pull the square hole into a soft circle about 2 in (5.1 cm) across. Fasten off.
Border
Border gauge: The sc rows are a little shorter than the stitches are wide (18 rows vs. 16 sts per 4 in / 10.2 cm), so you work fewer edge stitches than there are row-ends.
Tab border (cream, worked as 1 row): Join cream at the bottom of the tab’s right edge, where Row 1 meets the red rim.
- Right side: [Sc in next 6 row-ends, sc2tog over next 2 row-ends] 3 times. (24 row-ends → 21 sts)
- Top: 3 sc in first st of Row 24, sc in next 8 sts, 3 sc in last st. (14 sts)
- Left side: [Sc in next 6 row-ends, sc2tog over next 2 row-ends] 3 times. (21 sts)
Total: 21 + 14 + 21 = 56 sts. Fasten off.
Why the math works: 24 rows at 18 rows per 4 in is 5.3 in (13.5 cm). Twenty-one sc at 16 sts per 4 in is 5.25 in (13.3 cm), so each side edge lies flat without rippling or pulling in. On the top, the 10 sts plus 2 extra sts at each corner (14 total) let the curve turn smoothly. The border adds 0.25 in (0.6 cm) on each side, bringing the tab to about 4.5 in (11.4 cm) wide.
Front rim (berry red): Join red at one side fold. Sl st loosely in each of the 20 front sts. (20 sts) Fasten off. This firms up the opening so it doesn’t stretch when you put the phone in.
Leaves (Sage Green, Make 8)
Ch 8.
Rnd 1: Sl st in 2nd ch from hook, sc in next ch, hdc in next ch, dc in next 2 ch, hdc in next ch, then (sc, ch 2, sc) in the last ch for the tip. Working along the other side of the chain: hdc in next ch, dc in next 2 ch, hdc in next ch, sc in next ch, sl st in the last ch. Join with a sl st to the first sl st. (6 sts + tip + 6 sts)
Each leaf is pointed and about 1.6 in (4.1 cm) long and 1 in (2.5 cm) wide. The foundation chain leaves a faint center vein. Fasten off and leave a 10 in (25.4 cm) tail for sewing.
Assembly and Seeds
Leaves: Pin 6 leaves across the front, tips pointing down, with each base sitting just at the front rim so its rounded end peeks above the edge. Overlap them slightly; they should be about 0.8 in (2.0 cm) apart. Pin 1 more leaf at each side fold, angled toward the tab shoulder. Sew around the top half of each leaf with small whipstitches, leaving the tips free so they lift a little.
Seeds: Thread a 24 in (61.0 cm) length of cream. Make each seed as a V: bring the needle up at the top-left of a single sc, go down at its center bottom, come up at the top-right, and go back down in the same bottom hole. Stagger the seeds on the front like this:
- Rnd 5: 2 seeds
- Rnd 8: 3 seeds
- Rnd 11: 4 seeds
- Rnd 14: 4 seeds
- Rnd 17: 4 seeds
- Rnd 20: 4 seeds
That’s 21 seeds in total. Offset each row of seeds by half a space from the row below. Keep the stitches snug, but not so tight that they pucker the fabric. The back faces the wall, so seeds there are optional.
Final Blocking
- Weave in all the remaining ends inside the pocket.
- Lightly spray the whole holder with water until it’s damp but not soaked.
- Stuff the pocket with a rolled towel so it holds its rounded berry shape.
- Pin the tab flat at 4.5 in (11.4 cm) wide, with the opening round.
- Pin each leaf tip down against the berry.
- Measure the whole holder: 11 in (27.9 cm) tall overall, and the pocket 5 in (12.7 cm) wide.
- Leave it to dry completely, then take out the towel and pins.
Final Quality-Control Checklist
- The body has 40 sts and is 5 in (12.7 cm) wide when flat.
- The pocket is 5.5 in (14.0 cm) deep.
- The tab is centered on the back, and the two shoulders match.
- The plug opening is about 2 in (5.1 cm) and fits over your charger.
- The tab border lies flat and has 56 sts.
- All 8 leaves are secure, with their tips pointing down.
- There are 21 seeds, evenly staggered.
- Your phone slides in easily and stands upright.
Troubleshooting
The bottom is flat instead of pointed. You probably worked the increases too close together. Keep the plain rounds between Rnds 2, 5, and 9.
The pocket is too tight for the phone. Go up one hook size, or add one more increase round of 8 sts and make the tab 2 sts wider.
The tab edges ripple. Make sure you’re doing the sc2tog over row-ends on both side edges.
The opening won’t fit over the plug. Undo the opening and work 12 sts and 12 rows instead of 10, leaving 2 sts in each strip. Edge the hole the same way.
The holder tips forward. Tighten the front rim sl sts, or switch to firmer cotton.
The seeds look uneven. Keep every V to the size of a single sc.
Care
Hand wash in cool water with a mild soap, press out the water in a towel, and dry flat, reshaped. Take the phone and cable out first, and never wash or wet the holder while it’s hanging on a live plug.
Final Notes
The measurement chain is simple: 16 sts = 4 in (10.2 cm). That makes 40 sts = 5 in (12.7 cm) wide, and 25 rounds = 5.5 in (14.0 cm) deep. The tab’s 24 rows plus border make the total height 11 in (27.9 cm). If you check the pocket width after Rnd 9, everything that comes after it will fall into place: the tab, the border, the leaves, and the fit of your phone.
Happy crocheting!