

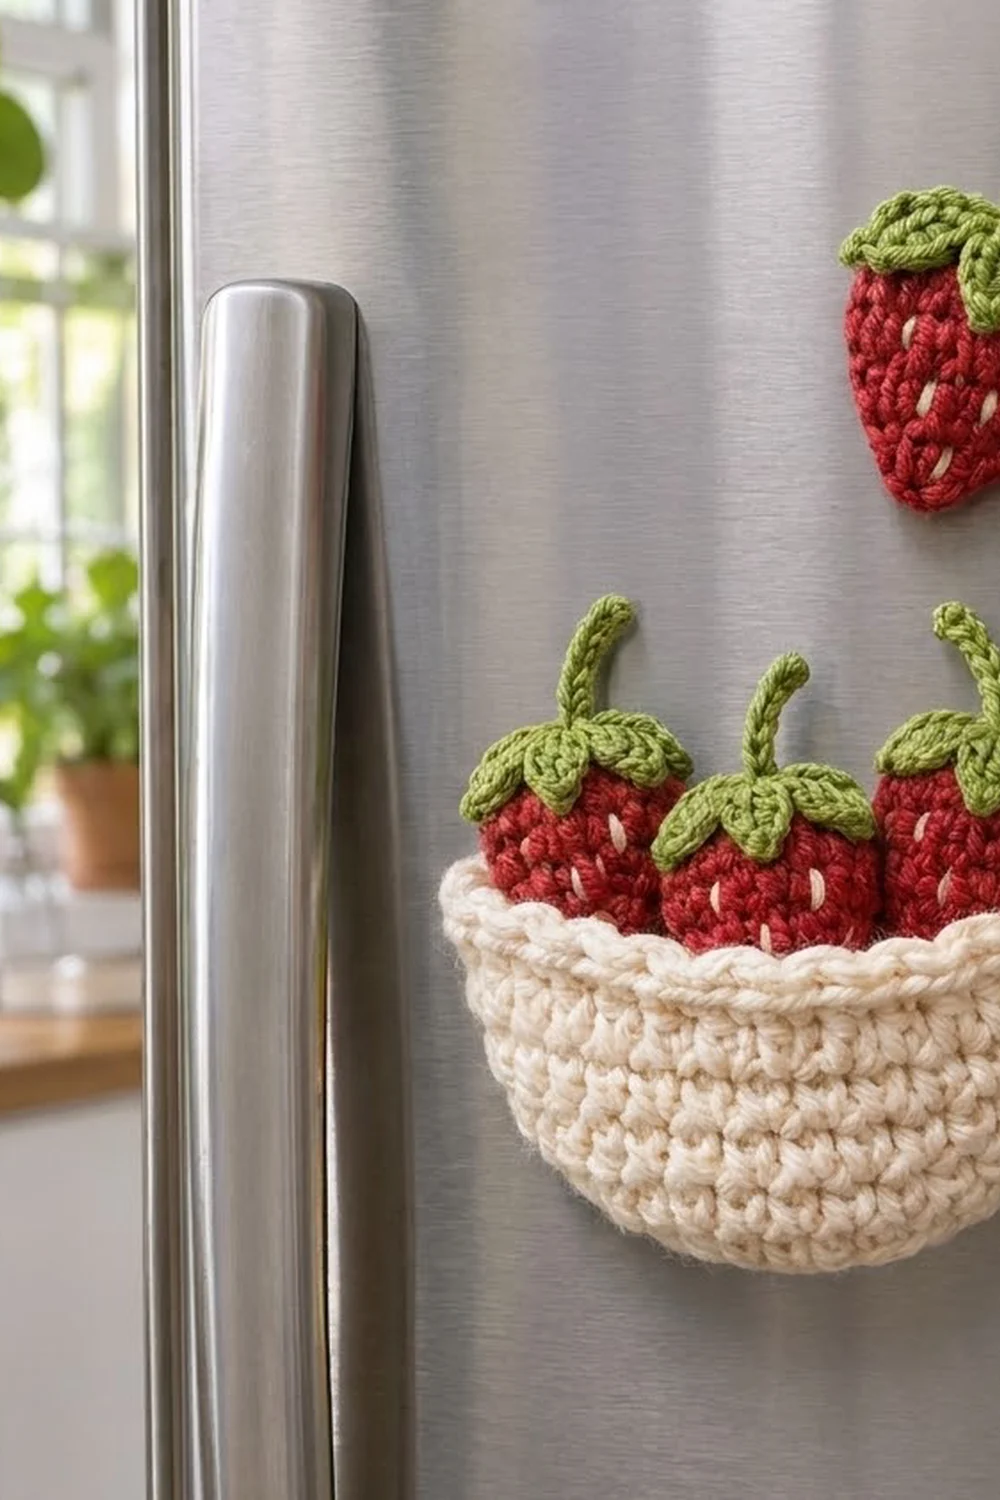
This little set brings a summer fruit stand to your fridge door. It has four flat red strawberries, each with a leafy green top and a curled stem, plus a cream half-bowl basket that holds three of them. The fourth berry can hold a note on its own or swap in and out of the basket.
There are only three colors: berry red, leaf green, and a warm cream for the basket and the tiny stitched seeds. The style is cheerful and cottagecore. Dense single crochet keeps the pieces crisp on a metal surface. The pattern uses US crochet terms throughout.
Each finished strawberry measures about 2.1 in (5.3 cm) wide by 2.1 in (5.3 cm) tall, or about 2.75 in (7.0 cm) tall with the stem. The basket measures about 5.3 in (13.5 cm) wide by 3.0 in (7.6 cm) tall.
The strawberries are worked flat in rows from the pointed tip up, then finished with one edging round. The calyx and stem are a separate piece sewn on top. The basket is two panels, a flat back and a slightly larger front. You seam them with single crochet so the front bows out into a pocket. A magnet is sewn to the back of every piece under a small fabric patch.
Finished Size and Construction
- Finished size: strawberry 2.1 × 2.1 in (5.3 × 5.3 cm); basket 5.3 × 3.0 in (13.5 × 7.6 cm)
- Skill level: easy / advanced beginner
- Terminology: US crochet terms
- Yarn weight: DK (#3) cotton
- Hook: 3.25 mm (US D/3)
- Number of pieces: 10 crocheted pieces: 4 berry bodies, 4 calyx-and-stem tops, and 2 basket panels
- Layout: separate magnets that are not joined to each other; three berries sit in the basket pocket and one stands alone
- Berry body before edging: 1.8 × 1.8 in (4.6 × 4.6 cm)
- Basket back panel before joining: 5.0 × 2.7 in (12.7 × 6.9 cm)
- Border depth: one round of sc, about 1/6 in (0.4 cm) on each edge
Materials
Use a smooth mercerized or combed cotton in DK weight. Cotton holds its shape, shows the stitch texture clearly, and won’t fuzz with frequent handling. Acrylic also works, but the pieces will be softer and slightly larger.
- Red: 15 g, about 35 m
- Green: 10 g, about 23 m
- Cream: 25 g, about 58 m (basket, seeds, and sewing)
These amounts assume cotton with about 115 m per 50 g. They include a margin for a gauge swatch and sewing tails.
Tools:
- 3.25 mm (US D/3) crochet hook
- Tapestry needle
- 6 round magnets, 3/4 in (1.9 cm) diameter: one for each berry and two for the basket
- Scrap of linen or cotton fabric, about 6 × 6 in (15.2 × 15.2 cm)
- Sewing needle and cream sewing thread
- Stitch marker, scissors, ruler
Abbreviations (US Terms)
- ch – chain
- sl st – slip stitch
- sc – single crochet
- hdc – half double crochet
- inc – 2 sc in the same stitch
- sc2tog – single crochet 2 together
- MR – magic ring
- RS / WS – right side / wrong side
- rev sc – reverse single crochet
Special stitch – reverse single crochet (crab stitch): Work from left to right (if you’re right-handed). Insert the hook into the next stitch to the right, yarn over, pull up a loop, yarn over, and pull through both loops. This makes a rolled, corded edge.
Gauge and Checkpoints
Gauge: 6 sc and 6 rows = 1 in (2.5 cm), in sc worked in rows.
Make a swatch first: ch 13, sc in 2nd ch from hook and across (12 sts), then work 11 more rows of sc. The square should measure 2 × 2 in (5.1 × 5.1 cm).
Then make one complete strawberry as a test before you make the rest. Gauge matters here because three berries need to fit side by side in the basket.
Checkpoints:
- Berry after Row 6: 9 sts, 1.5 in (3.8 cm) wide, 1.0 in (2.5 cm) tall
- Berry after Row 11: 1.8 × 1.8 in (4.6 × 4.6 cm)
- Berry after edging: 2.1 × 2.1 in (5.3 × 5.3 cm)
- Basket back after Row 1: 16 sts, 2.7 in (6.9 cm) wide
- Basket back after Row 16: 30 sts, 5.0 in (12.7 cm) wide, 2.7 in (6.9 cm) tall
- Basket front after Row 19: 32 sts, 5.3 in (13.5 cm) wide, 3.2 in (8.1 cm) tall
Too big? Go down to a 3.0 mm hook. Too small? Go up to a 3.5 mm hook. If you change hooks, use the new hook for the whole set so the berries and basket stay in proportion.
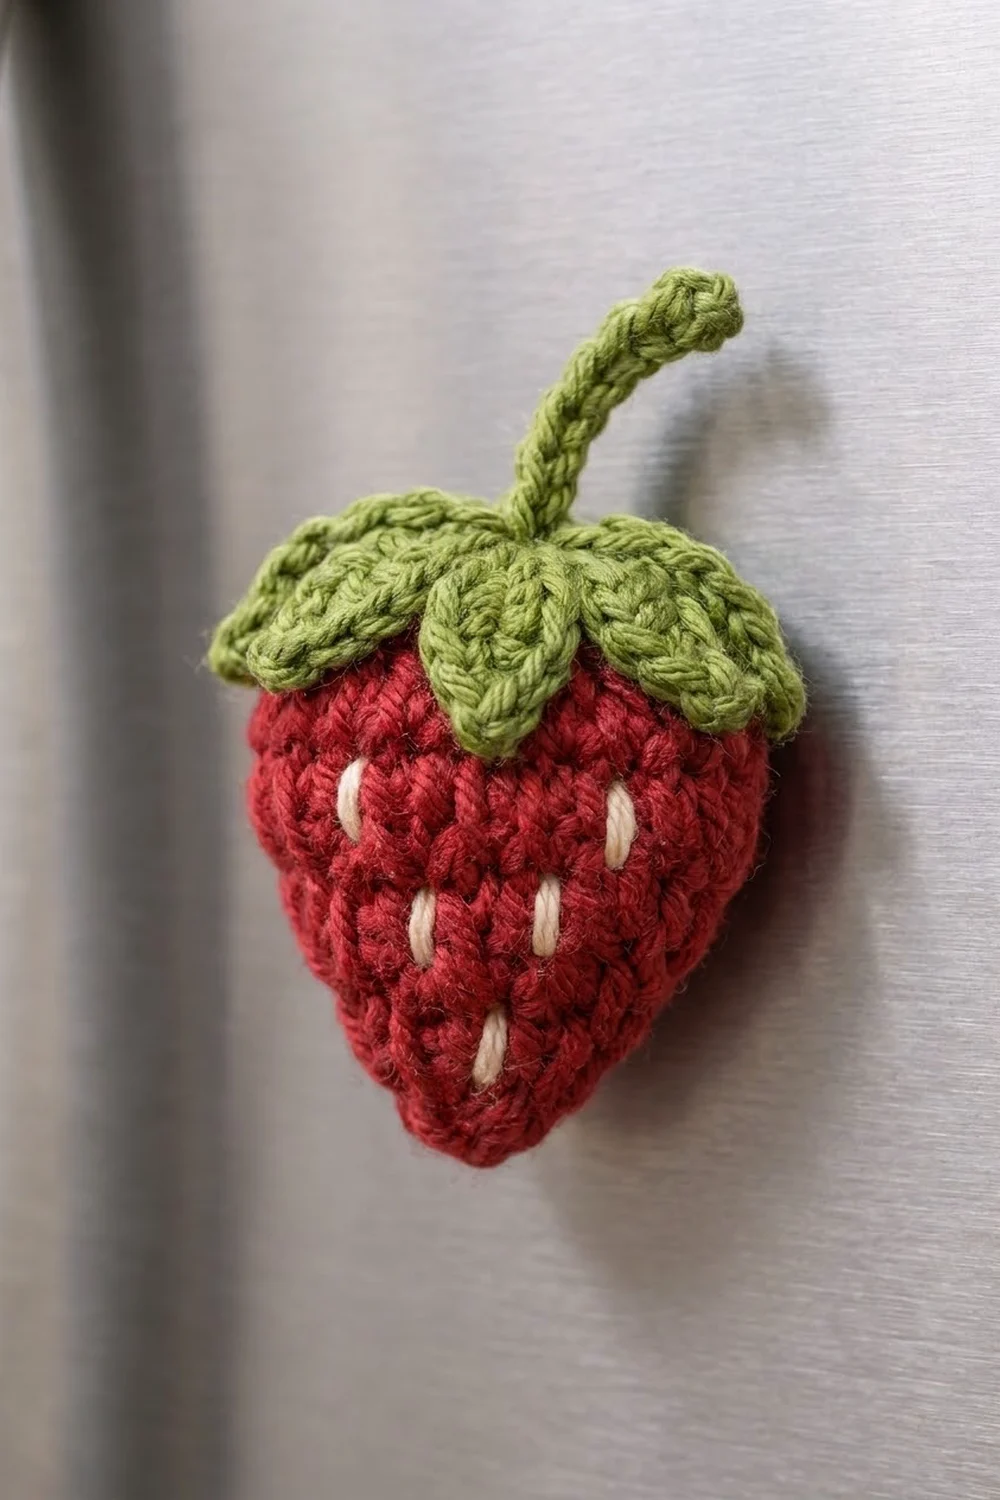
Strawberry Body (make 4)
Use red. Work in rows from the pointed tip up to the rounded shoulders. The ch 1 at the start of each row does not count as a stitch. Turn at the end of every row.
Row 1: Ch 2, 3 sc in 2nd ch from hook. (3 sts)
Row 2: Ch 1, inc in first st, sc 1, inc in last st. (5 sts)
Row 3: Ch 1, sc in each st across. (5 sts)
Row 4: Ch 1, inc, sc 3, inc. (7 sts)
Row 5: Ch 1, sc across. (7 sts)
Row 6: Ch 1, inc, sc 5, inc. (9 sts)
Row 7: Ch 1, sc across. (9 sts)
Row 8: Ch 1, inc, sc 7, inc. (11 sts)
Rows 9–10: Ch 1, sc across. (11 sts each row)
Row 11: Ch 1, sc2tog, sc 7, sc2tog. (9 sts)
Increasing on every other row makes the tapered sides and the point. The decreases in Row 11 round off the shoulders. Don’t fasten off. Go straight into the edging (see Border).
Seeds: After the edging, thread a tapestry needle with cream. Embroider 7 short vertical straight stitches, each about 1/8 in (0.3 cm) long, in a loose staggered pattern: 1 near the tip, 2 in the middle, and 2 on each side above them. Keep the seeds out of the top 0.4 in (1.0 cm), because the calyx will cover that area. Weave in the ends on the WS.
Calyx and Stem (make 4)
Use green.
Round 1: MR, ch 1, 5 sc in ring, sl st to first sc. Pull the ring closed. (5 sts)
Round 2 (leaves): Ch 4, sl st in 2nd ch from hook, sc in next ch, hdc in next ch, sl st in next sc of Round 1; repeat from * 4 more times. (5 leaves)
Stem: Sl st into the center of the ring. Ch 7, sl st in 2nd ch from hook and in each of the next 5 ch. (6 sl sts) Sl st into the ring at the base of the stem.
Fasten off, leaving a 10 in (25.4 cm) tail for sewing. The calyx is about 1.25 in (3.2 cm) across, and the stem is about 0.75 in (1.9 cm) long. Twist the stem gently so it curls to one side.
Basket Back Panel (make 1)
Use cream. The ch 1 does not count as a stitch. Turn at the end of each row.
Row 1: Ch 17, sc in 2nd ch from hook and in each ch across. (16 sts)
Row 2: Ch 1, inc, sc 14, inc. (18 sts)
Row 3: Ch 1, inc, sc 16, inc. (20 sts)
Row 4: Ch 1, inc, sc 18, inc. (22 sts)
Row 5: Ch 1, inc, sc 20, inc. (24 sts)
Row 6: Ch 1, sc across. (24 sts)
Row 7: Ch 1, inc, sc 22, inc. (26 sts)
Row 8: Ch 1, sc across. (26 sts)
Row 9: Ch 1, inc, sc 24, inc. (28 sts)
Row 10: Ch 1, sc across. (28 sts)
Row 11: Ch 1, inc, sc 26, inc. (30 sts)
Rows 12–16: Ch 1, sc across. (30 sts each row)
Fasten off. Increasing on every row in Rows 2–5 makes the rounded bowl bottom. The slower increases and straight rows above it form the upright sides.
Basket Front Panel (make 1)
Rows 1–16: Work as for the back panel. (30 sts)
Row 17: Ch 1, inc, sc 28, inc. (32 sts)
Rows 18–19: Ch 1, sc across. (32 sts each row)
Fasten off. The front is 2 sts wider and 3 rows taller than the back. That extra fabric gets eased into the seam and becomes the pocket bulge.
Make All Pieces
Before you assemble, check that you have:
- Red: 4 strawberry bodies, edged and seeded
- Green: 4 calyx-and-stem tops
- Cream: 1 back panel and 1 front panel
Layout on the fridge:
           [Berry 4]

[Berry 1] [Berry 2] [Berry 3]
[====== Basket pocket ======]
Berries 1–3 sit side by side in the basket, overlapping slightly, with their tops and stems above the rim. Berry 4 hangs on its own a few inches above.
Joining
Calyx to berry: Center the calyx on the top edge of the berry. Round 1 should sit over the middle of the top edging, with the leaves draping down over the red. Use the green tail to sew around Round 1, then tack each leaf tip down with one small stitch.
Basket panels: Place the front over the back with WS together, front facing you, and top edges lined up. Join cream at the top right corner and work through both layers. Unless noted, each sc goes through one front row end and one back row end.
- Right side: Sc 4, sc through 2 front row ends together and 1 back row end, sc 3; repeat from * 2 more times. (16 sc, using 19 front row ends and 16 back row ends)
- Bottom: Inc in first foundation st, sc 14, inc in last foundation st. (18 sc)
- Left side: Sc 3, sc through 2 front row ends together and 1 back row end; repeat from * 2 more times, sc 4. (16 sc)
Total: 16 + 18 + 16 = 50 sc. Fasten off.
On each side, the 3 eased stitches pull the taller front onto the shorter back, which pushes the front outward. The 2 extra front stitches stay free across the top and open up the pocket.
Tension: Keep the joining stitches snug but not tight. If you pull too hard, the seam puckers and the basket curls forward instead of lying flat.
Checkpoint: Before you add the rim, the joined basket should measure about 5.3 in (13.5 cm) wide and 2.8 in (7.1 cm) tall at the back.
Magnets: For each magnet, cut a 1.5 in (3.8 cm) square of fabric and fold each edge under 1/4 in (0.6 cm). Center a magnet on the WS of each berry and cover it with a patch. Whipstitch the patch down with cream thread, catching only the back of the stitches so nothing shows on the front. For the basket, sew two patched magnets to the back panel, each about 1.0 in (2.5 cm) in from a side edge.
Border
Border gauge: The edging uses the same gauge as the body: 6 sc per inch (2.5 cm), and 1 sc per row end at 6 rows per inch (2.5 cm). Because those two numbers match, the edges lie flat without ruffling or cupping.
Strawberry edging (continue from Row 11 without turning):
- Top: Ch 1, inc in first st, sc 7, inc in last st. (11 sc)
- Left side: Sc 1 in each row end from Row 11 down to Row 2. (10 sc)
- Tip: 3 sc in the base of Row 1. (3 sc)
- Right side: Sc 1 in each row end from Row 2 up to Row 11. (10 sc)
Sl st to the first sc. Total: 11 + 10 + 3 + 10 = 34 sc. Fasten off and weave in the ends.
Why the math works: The top has 9 stitches worked once each plus 2 corner increases, which gives 11 and matches the widest row. Each side gets exactly one stitch per row end for Rows 2–11, which is 10. The 3 sc at the tip turn the point without pulling it.
Basket rim: With the RS of the front panel facing, join cream at the top right corner of the front panel only.
- Rim Row 1: Ch 1, sc in each st across. (24 + 8 = 32 sc, worked 1 per existing stitch across all 32 front stitches)
- Rim Row 2: Do not turn. Ch 1, rev sc in each st across. (32 rev sc)
Fasten off. The rim is worked one stitch per stitch, so it adds height but no width. Row 16 of the back panel is the finished back edge.
Final Blocking
- Weave in all remaining ends.
- Lightly mist each piece with water. Don’t soak pieces that already have magnets.
- Pin each berry flat to 2.1 × 2.1 in (5.3 × 5.3 cm), keeping the tip sharp and the shoulders rounded.
- Lay the basket back-down and stuff the pocket loosely with folded tissue so the front holds a smooth curve.
- Shape the leaves with your fingers so they fan out evenly.
- Let everything dry completely, then remove the pins and tissue.
Final Quality-Control Checklist
- Each berry measures 2.1 in (5.3 cm) wide, and all four match within 1/8 in (0.3 cm).
- Each berry edging has 34 sc and a clean point.
- Each berry has 7 cream seeds, and none are hidden under the calyx.
- The leaves are tacked down and the stems curl.
- The basket joining round has 50 sc, and the rim has 32 sc and 32 rev sc.
- The basket measures 5.3 × 3.0 in (13.5 × 7.6 cm).
- Three berries fit side by side in the pocket.
- No magnet stitching shows on the front.
- Every piece holds firmly on a fridge door.
Troubleshooting
Blunt berry tip: Check that Row 1 has exactly 3 sts and that the edging has 3 sc at the tip, not 2.
Wavy berry sides: You worked extra stitches into the row ends. Use exactly 10 per side.
Basket front lies flat: Check that the front has 19 rows and 32 sts, and that you worked all 3 eased stitches on each side.
Basket curls forward: The joining round is too tight. Work it again more loosely or with a 3.5 mm hook.
Berries don’t fit in the basket: Your berry gauge is too loose. Make them again with a smaller hook.
Basket slides down: Use stronger magnets, or move them lower on the back panel.
Care
Spot-clean with a damp cloth and mild soap. If you want to wash the pieces more thoroughly, remove the magnets first and wash gently by hand. Lay flat to dry and reshape while damp.
Final Notes
The measurement chain is short and easy to check. At 6 sc and 6 rows = 1 in (2.5 cm), each berry body reaches 1.8 in (4.6 cm), and the 34-stitch edging brings it to 2.1 in (5.3 cm). The 30-stitch back panel is 5.0 in (12.7 cm) wide. The 50-stitch joining round and the 32-stitch rim finish the basket at 5.3 × 3.0 in (13.5 × 7.6 cm), which is just right for three overlapping berries. Make one berry first and check it against the checkpoints. If it matches, the rest of the set will fit together.
Happy crocheting!