

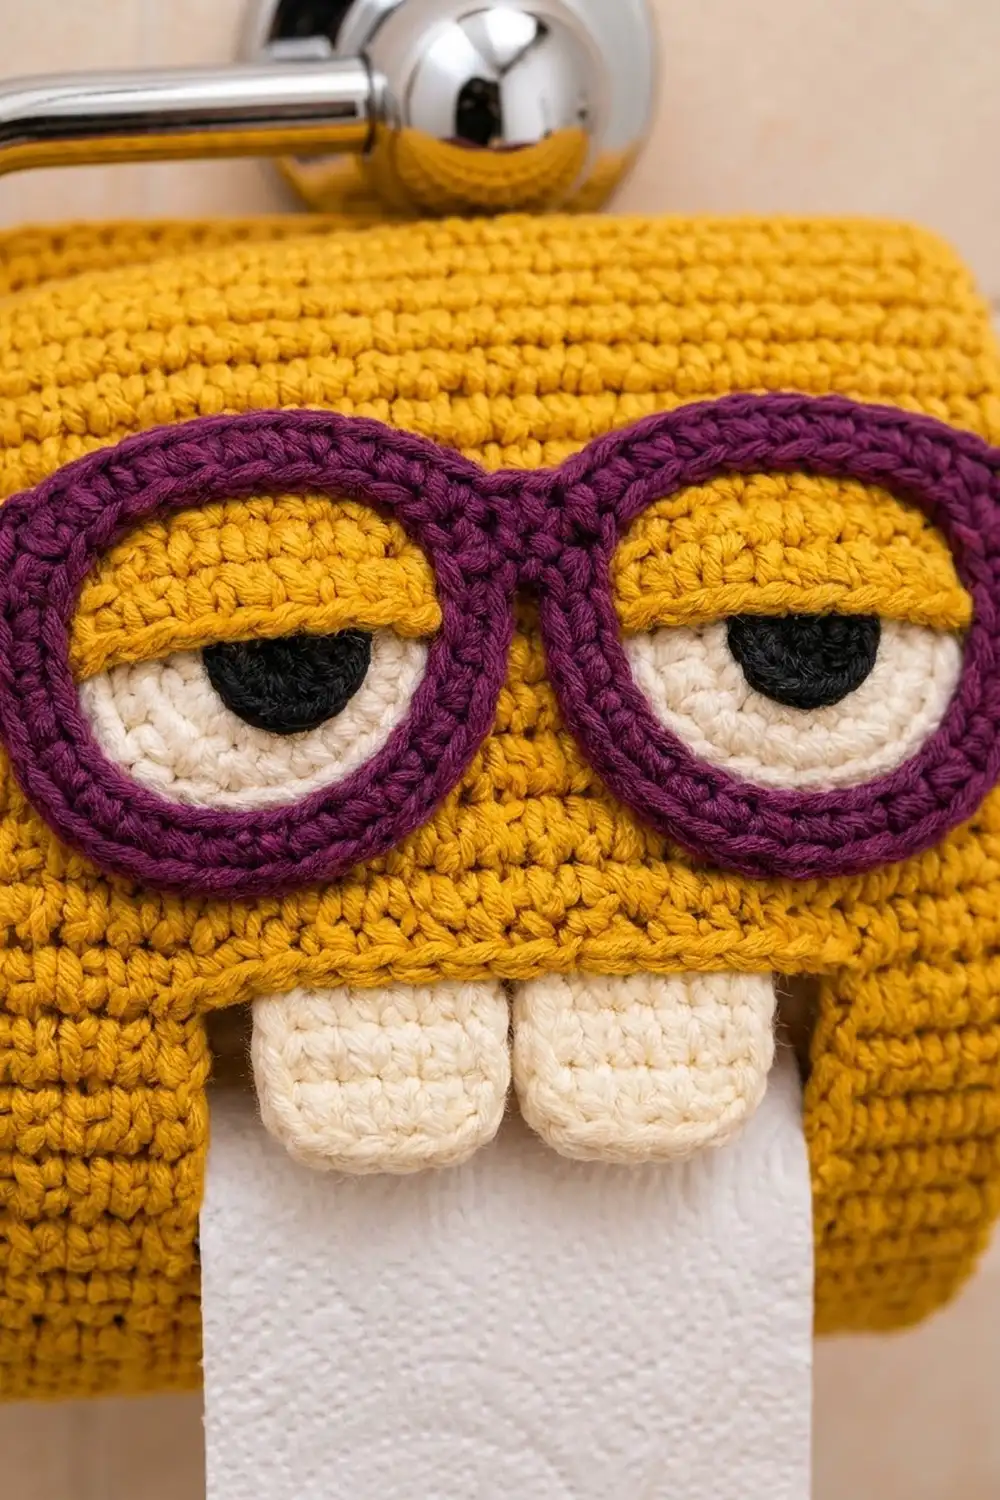
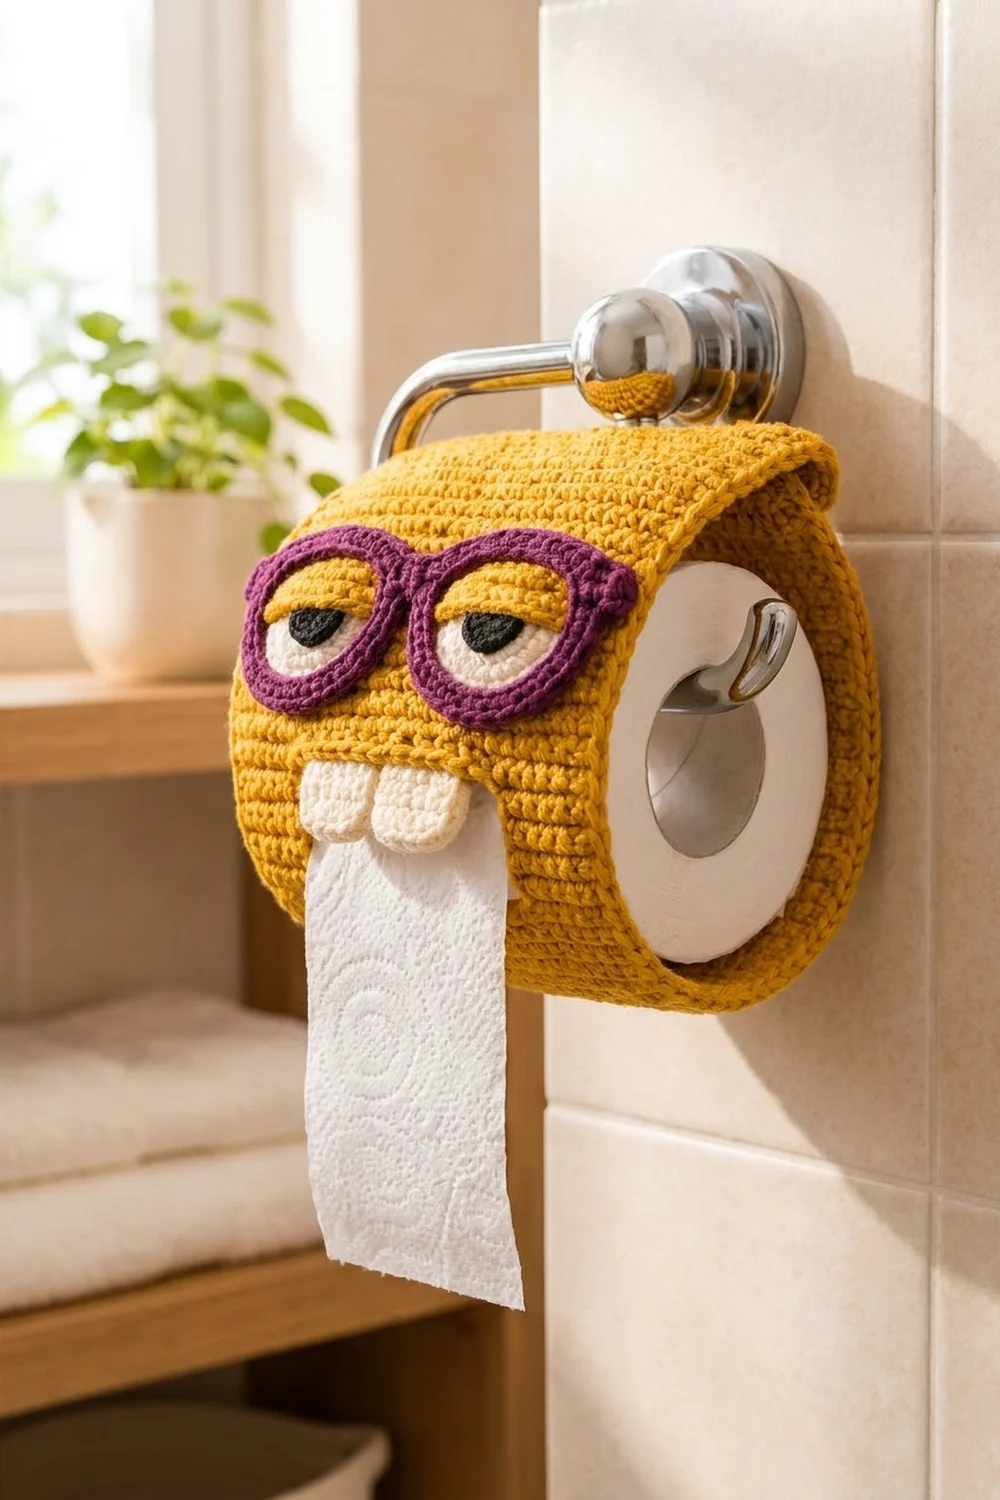
Meet Nerdy Nibbles, a sleepy bookworm who guards your toilet paper with big purple glasses and two cheeky buck teeth. The cover hangs from your holder and drapes over the roll. The paper rolls out from just under his teeth, so he looks like he’s chewing on it.
The palette is warm mustard yellow for the face, plum purple for the glasses, soft cream for the eyes and teeth, and a touch of black for the pupils. The style is cartoon-simple and very readable from across the room. It makes a fun bathroom upgrade and a great gag gift.
This pattern uses US crochet terms. The finished cover measures 6 in wide x 12.5 in long (15.2 x 31.8 cm), border included.
The construction is simple. You work one rectangular panel in rows of single crochet and add one round of border. Then you crochet five small appliqués (two eyes, two eyelids, one pair of glasses and two teeth) and sew them on. Two sew-on snaps turn one end into a loop that holds the cover on the holder’s arm.
Finished Size and Construction
- Finished size: 6 in x 12.5 in (15.2 x 31.8 cm)
- Skill level: Easy / Advanced Beginner
- Terminology: US crochet terms
- Yarn weight: Worsted (#4)
- Hook: 4.5 mm (US 7)
- Number of pieces: 1 main panel, plus appliqués sewn onto it (no joining of panels)
- Layout: a single vertical rectangle; the bottom edge is the front, the top edge is the snap loop
- Panel size before border: 5.5 in x 12 in (14.0 x 30.5 cm)
- Border depth: 1 round of sc, about 0.25 in (0.6 cm) per side
- Fits: standard rolls about 4.25–4.5 in (10.8–11.4 cm) wide, on a holder with an arm across the top
Materials
Yarn: Use a smooth worsted-weight acrylic or cotton blend, about 200 m per 100 g. Acrylic keeps its shape well and handles bathroom humidity. Cotton gives crisper stitch definition but is heavier.
- Mustard yellow (main color): 45 g / 90 m
- Plum purple (glasses): 10 g / 20 m
- Cream (eyes and teeth): 10 g / 20 m
- Black (pupils): 3 g / 6 m
All quantities include a margin for swatching and sewing tails.
Tools:
- 4.5 mm (US 7) crochet hook
- Tapestry needle
- 2 sew-on metal snaps, 1/2 in (1.3 cm)
- Sewing needle and mustard thread (for the snaps)
- Stitch markers
- Straight pins
- Measuring tape
- Small amount of fiberfill (optional, for puffier teeth)
Abbreviations (US Terms)
- ch – chain
- sl st – slip stitch
- sc – single crochet
- inc – 2 sc in the same stitch
- MR – magic ring
- st(s) – stitch(es)
- RS / WS – right side / wrong side
- ( ) x n – repeat the instructions in parentheses n times
Special technique – Color change: Work the last stitch of the old color until 2 loops are left on the hook. Yarn over with the new color and pull through. Carry on in the new color.
Gauge and Checkpoints
Gauge: 16 sc and 18 rows = 4 in (10.2 cm) in rows of sc.
The panel itself works as your test piece. Work the first 9 rows, then measure before going on.
- After Row 1: width is 5.5 in (14.0 cm).
- After Row 9: length is 2 in (5.1 cm).
- After Row 27: length is 6 in (15.2 cm).
- After Row 54: length is 12 in (30.5 cm).
- After the border: 6 in x 12.5 in (15.2 x 31.8 cm).
If your piece is too big: go down to a 4 mm hook and start again.
If your piece is too small: go up to a 5 mm hook.
Width is the measurement that matters most, because the cover has to clear the roll’s width. Length can be adjusted by adding or removing rows in groups of 9, which keeps the border math even.
Main Panel
Use mustard yellow. Row 1 becomes the bottom front edge, under the teeth.
Foundation: Ch 23.
Row 1 (RS): Sc in the 2nd ch from hook and in each ch across, turn. (22 sc)
Row 2: Ch 1 (does not count as a st throughout), sc in each st across, turn. (22 sc)
Rows 3–54: Repeat Row 2. (22 sc in every row)
Check your measurements at Rows 9 and 27 against the checkpoints above. At the end of Row 54 the panel should measure 5.5 in x 12 in (14.0 x 30.5 cm). Do not fasten off; go straight into the border.
Border
Border gauge: At this gauge, 16 sc match 18 rows, so the ratio is 8 sc for every 9 row ends. Along the long sides you will work 48 sc into the 54 row ends. That is (sc in each of the next 8 row ends, skip 1 row end) x 6.
Border Round (mustard): Ch 1, do not turn. Work around the panel as follows:
- Top edge (across Row 54): 3 sc in the first st, sc in each of the next 20 sts, 3 sc in the last st. (26 sc)
- First long side: (sc in each of the next 8 row ends, skip 1 row end) x 6. (48 sc)
- Bottom edge (across the foundation ch): 3 sc in the first ch, sc in each of the next 20 ch, 3 sc in the last ch. (26 sc)
- Second long side: (sc in each of the next 8 row ends, skip 1 row end) x 6. (48 sc)
Join with a sl st to the first sc. (148 sc total)
Count by side: There are 4 corner groups of 3 sc (12), plus 20 sc between the corners on each short side (40), plus 48 sc on each long side (96). That adds up to 148.
If you count each side including both of its corner center stitches, the short sides have 24 sc and the long sides have 52 sc. The four corner centers are shared between sides: (2 x 24) + (2 x 52) − 4 = 148.
Why the math works: Each short side keeps its original 22 stitches. The 2 extra stitches in each corner group let the corners turn flat without cupping. On the long sides, 48 sc across 54 rows matches the 8:9 ratio of the gauge, so the edges don’t ruffle or pull in. One round of sc adds about 0.25 in (0.6 cm) on every side. The panel grows from 5.5 x 12 in to 6 x 12.5 in (15.2 x 31.8 cm).
Fasten off and weave in the ends.
Eyes (make 2)
Rnd 1 (black): 6 sc in MR, change to cream in the last st. Do not join; work in a spiral. (6 sc)
Rnd 2 (cream): Inc in each st around. (12 sc)
Rnd 3 (cream): (Sc in the next st, inc in the next st) x 6. (18 sc)
Sl st in the next st and fasten off, leaving a 12 in (30.5 cm) tail. Pull the black tail tight to close the ring.
Each eye should measure about 1.4 in (3.6 cm) across, with a black center about 0.5 in (1.3 cm) wide.
Eyelids (make 2)
Use mustard. The eyelids are flat half circles worked in rows.
Row 1: 3 sc in MR, turn. (3 sc)
Row 2: Ch 1, inc in each st across, turn. (6 sc)
Row 3: Ch 1, (sc in the next st, inc in the next st) x 3. (9 sc)
Fasten off, leaving a 12 in (30.5 cm) tail. Pull the ring closed so the straight edge lies flat.
Each eyelid is about 1.4 in (3.6 cm) along the straight edge and 0.75 in (1.9 cm) tall.
Attach the eyelid to the eye: Pin it onto the eye so its curved edge lines up with the top edge of the eye. The straight edge crosses the eye just above the center and covers the top of the black pupil. Whipstitch along the curved edge and the straight edge. This sleepy, half-closed look is what gives Nerdy Nibbles his expression.
Glasses (make 1)
Use plum purple. You work the glasses as one connected piece: a lens ring, a bridge, a second lens ring and two side tabs.
First lens: Ch 20 and join with a sl st to the first ch to form a ring, taking care not to twist.
Rnd 1: Ch 1, (sc in each of the next 4 ch, inc in the next ch) x 4. Join with a sl st to the first sc. (24 sc) Fasten off.
Second lens: Work the same way as the first lens, but do not fasten off.
Bridge: Ch 2. Sl st into any sc of the first lens. Fasten off.
Side tabs (one on each lens): Join plum to the sc at the upper outer edge of a lens, directly opposite the bridge and slightly above it. Ch 3, sl st in the 2nd ch from hook and in the next ch, then sl st into the same sc on the frame. Fasten off. Repeat on the other lens.
Size check: Each lens ring is about 1.9 in (4.8 cm) across, with an opening about 1.6 in (4.1 cm) wide. The whole frame spans about 5.3 in (13.5 cm) from tab to tab. The lens centers sit about 2.4 in (6.1 cm) apart.
Lay the glasses flat and press them lightly so the rings lie round. Weave in all the ends except one long plum tail for sewing.
Teeth (make 2)
Use cream.
Foundation: Ch 4.
Row 1: Sc in the 2nd ch from hook and in each ch across, turn. (3 sc)
Rows 2–4: Ch 1, sc in each st across, turn. (3 sc in every row)
Edging Round: Ch 1, do not turn.
- Top: 2 sc in the first st, sc in the next st, 2 sc in the last st. (5 sc)
- Side: 1 sc in each of the 4 row ends. (4 sc)
- Bottom (across the foundation ch): 2 sc in the first ch, sc in the next ch, 2 sc in the last ch. (5 sc)
- Second side: 1 sc in each of the 4 row ends. (4 sc)
Join with a sl st to the first sc. (18 sc total)
The doubled corners round off the tooth shape. Fasten off, leaving an 18 in (45.7 cm) tail. Each tooth is about 1.25 in wide x 1.4 in tall (3.2 x 3.6 cm).
Assembly
Lay the bordered panel RS up, with the Row 1 edge (the bottom front) nearest to you. Every placement below is measured from that bottom edge and from the vertical center line of the panel.
- Teeth: Place the two teeth side by side, touching, and centered on the panel. Together they are about 2.5 in (6.4 cm) wide. Let the bottom half of each tooth hang below the panel edge by about 0.7 in (1.8 cm). Whipstitch only the top half of each tooth to the panel. For puffier teeth, tuck a pinch of fiberfill behind each one before you close the stitching. Sew one or two stitches between the teeth so they hang together.
- Eyes: Place each eye center 2.25 in (5.7 cm) above the bottom edge and 1.2 in (3.0 cm) out from the center line. Whipstitch around the outer cream round, catching only the outer loops so the stitching stays hidden.
- Glasses: Center each lens ring over an eye so the cream shows through the ring opening. The top edge of the frame sits about 3.2 in (8.1 cm) above the bottom edge. The side tabs point outward, toward the long edges of the panel. Sew through the frame from behind, working along the inner and outer edge of each ring, and tack down the bridge and both tabs.
- Snaps: Turn the panel WS up. Sew a socket half of each snap 0.75 in (1.9 cm) from the top (Row 54) edge and 1.75 in (4.4 cm) in from each long edge. Sew the matching ball halves on the WS 3.25 in (8.3 cm) from the top edge, in line with the sockets. When you fold the top edge to the WS, the snaps meet and form a loop about 2.5 in (6.4 cm) around. That loop slips over a holder arm up to about 0.75 in (1.9 cm) thick.
To hang: Wrap the loop over the holder’s upper arm and snap it closed. Let the panel drape over the top and front of the roll. The paper comes out under the teeth.
Final Blocking
- Lightly spray the panel with water, keeping the spray away from the appliqués if you used fiberfill.
- Lay it flat on a blocking mat, RS up.
- Pat it out to 6 in x 12.5 in (15.2 x 31.8 cm) and pin at each corner and every 2 in (5.1 cm) along the edges.
- Gently straighten the glasses frame and the eyelid edges with your fingers.
- Leave it until completely dry, usually 6–8 hours.
- Unpin it and check the measurements again.
Final Quality-Control Checklist
- Every panel row has 22 sc, and there are 54 rows.
- The border round totals 148 sc, with 3 sc in each corner.
- The finished panel measures 6 in x 12.5 in (15.2 x 31.8 cm).
- Both eyes have 18 sts and match in size.
- The eyelids cover the top of each pupil equally.
- The glasses lie flat, with the rings centered over the eyes.
- The teeth hang 0.7 in (1.8 cm) below the edge and are level with each other.
- The snaps line up and close easily.
- All ends are woven in securely.
Troubleshooting
The long edges ruffle or pull in: You worked too many or too few sc into the row ends. Recount to 48 sc per long side, using the 8-and-skip-1 repeat.
The corners curl: Make sure each corner has 3 sc, not 2. Blocking will flatten a slight curl.
The eyes cup instead of lying flat: Your tension is tight. Loosen up, or use a 5 mm hook for the eyes only.
The glasses ring is too small for the eye: Add 4 ch to the foundation ring (ch 24) and work (sc in each of the next 5 ch, inc) x 4 for 28 sc.
The cover is too narrow for your roll: Add 2 sts to the foundation for each extra 0.5 in (1.3 cm) of width. Add 4 sc to each short side of the border.
The teeth flop forward: Sew a few extra stitches across the middle of each tooth, right at the panel edge.
Care
Hand wash in cool water and lay flat to dry. Undo the snaps before washing, and reshape the glasses while the cover is damp.
Final Notes
The measurement chain is simple. The gauge is 16 sc x 18 rows = 4 in (10.2 cm). That gives a 22-stitch, 54-row panel of 5.5 in x 12 in (14.0 x 30.5 cm). One 148-stitch border round brings it to 6 in x 12.5 in (15.2 x 31.8 cm). If every checkpoint matches along the way, the appliqués will land exactly where they should, and Nerdy Nibbles will give you that sleepy, toothy grin every time you reach for the roll.
Happy crocheting!