

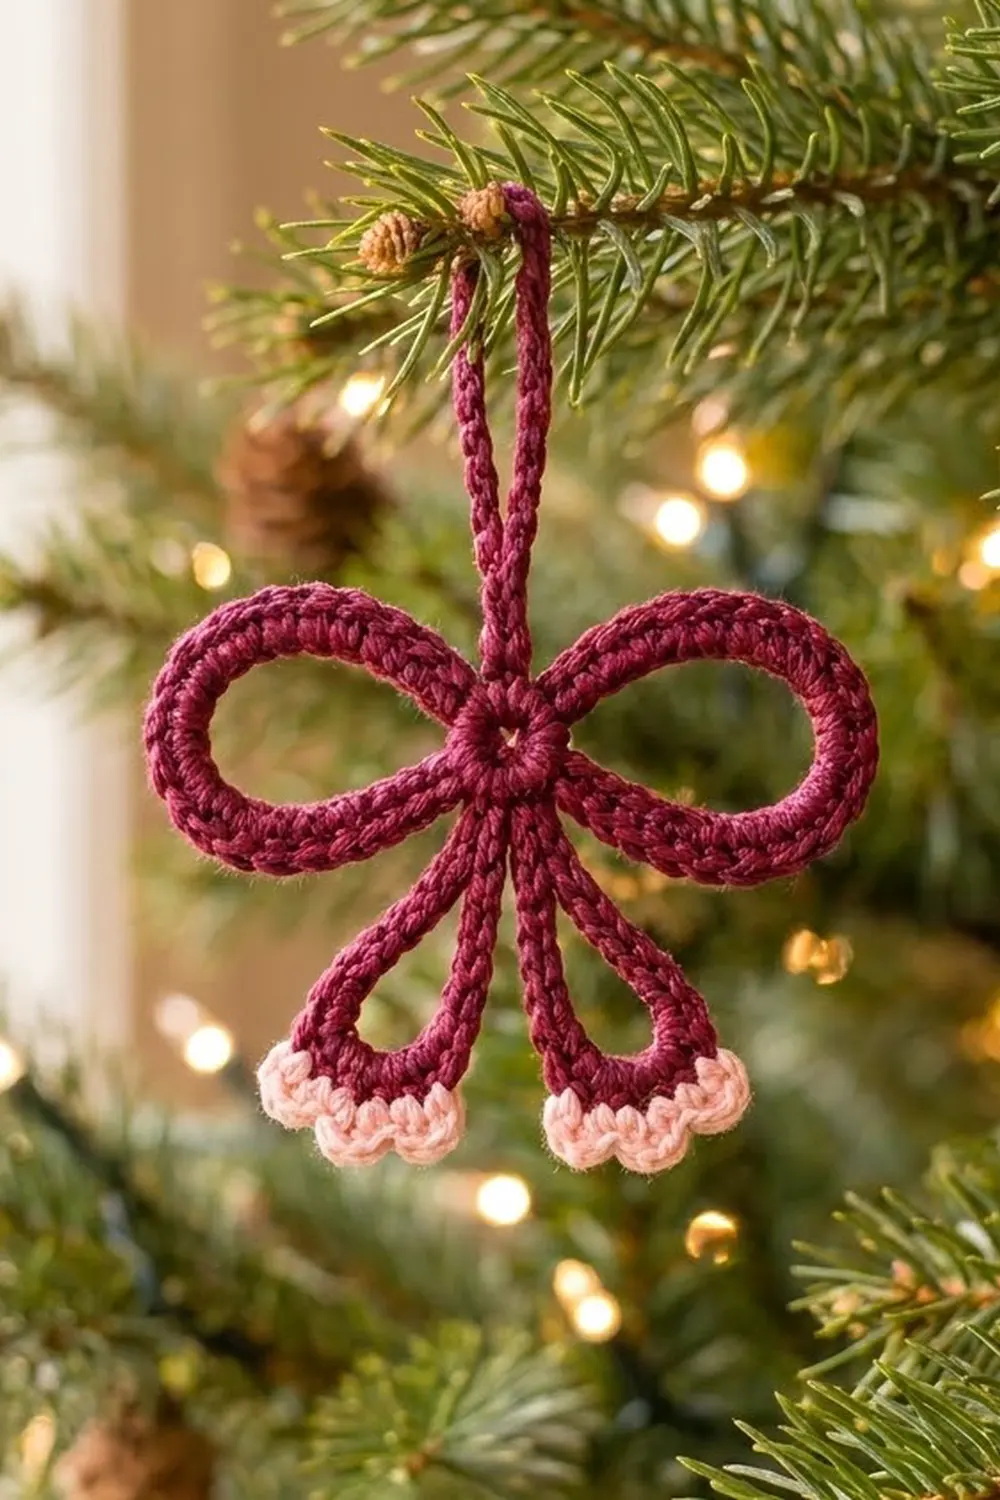
This bow ornament looks like a tied ribbon but is made from crocheted cord. It is a single flat motif. A small burgundy center ring holds five narrow loops: one hanging loop on top, two rounded bow loops at the sides, and two long teardrop tails underneath. Each tail ends in a little blush-pink scalloped tip.
The colors are a deep berry burgundy for the body and a soft blush pink for the tips. The style is classic and a little vintage, so it suits a traditional tree, a gift-wrap topper, or a window hook.
The pattern uses US crochet terms. The finished ornament measures 5 in (12.7 cm) wide by 5 in (12.7 cm) tall, including the hanging loop and the pink tips.
You work the whole ornament in one continuous burgundy piece. First you make a 12-stitch center ring. Then you travel around the ring with slip stitches and build each loop as a chain anchored back into the ring. Each chain is then covered with single crochet to turn it into a thick, rounded cord. Last, you add the pink scallops to the two tail tips. There is no sewing and no joining of separate pieces.
Finished Size and Construction
- Finished size: 5 in (12.7 cm) wide × 5 in (12.7 cm) tall
- Skill level: Easy / advanced beginner
- Terminology: US crochet terms
- Yarn weight: Worsted (weight 4), cotton or cotton blend
- Hook: 4.0 mm (US G-6)
- Number of pieces: 1
- Layout: Single motif. Center ring, 1 hanging loop at the top, 2 bow loops at the sides, 2 tail loops at the bottom.
- Piece size before trim: 5 in (12.7 cm) wide × 4.75 in (12.1 cm) tall
- Trim (border) depth: 0.25 in (0.6 cm), added to the tail tips only
Materials
Yarn advice: Use a smooth, tightly plied worsted cotton. Cotton gives the cord a crisp, rope-like definition, and the bow loops keep their shape after blocking. Acrylic works too, but the loops will be softer and may need light steam to hold their shape.
- Color A – Burgundy (berry): 8 g / 16 m (17.5 yd)
- Color B – Blush pink: 2 g / 4 m (4.4 yd)
Tools:
– 4.0 mm (US G-6) crochet hook
– Tapestry needle
– Scissors
– Stitch marker
– Blocking mat and 5 rust-proof pins
– Spray bottle with water, or a steamer
– Optional: diluted fabric stiffener
The quantities include a margin of about 25% for your gauge swatch and yarn tails.
Abbreviations (US Terms)
- ch – chain
- sl st – slip stitch
- sc – single crochet
- hdc – half double crochet
- dc – double crochet
- st(s) – stitch(es)
- sk – skip
- MR – magic ring
Special stitch – Scallop: (hdc, dc, hdc) all in the same stitch. One scallop counts as 3 stitches.
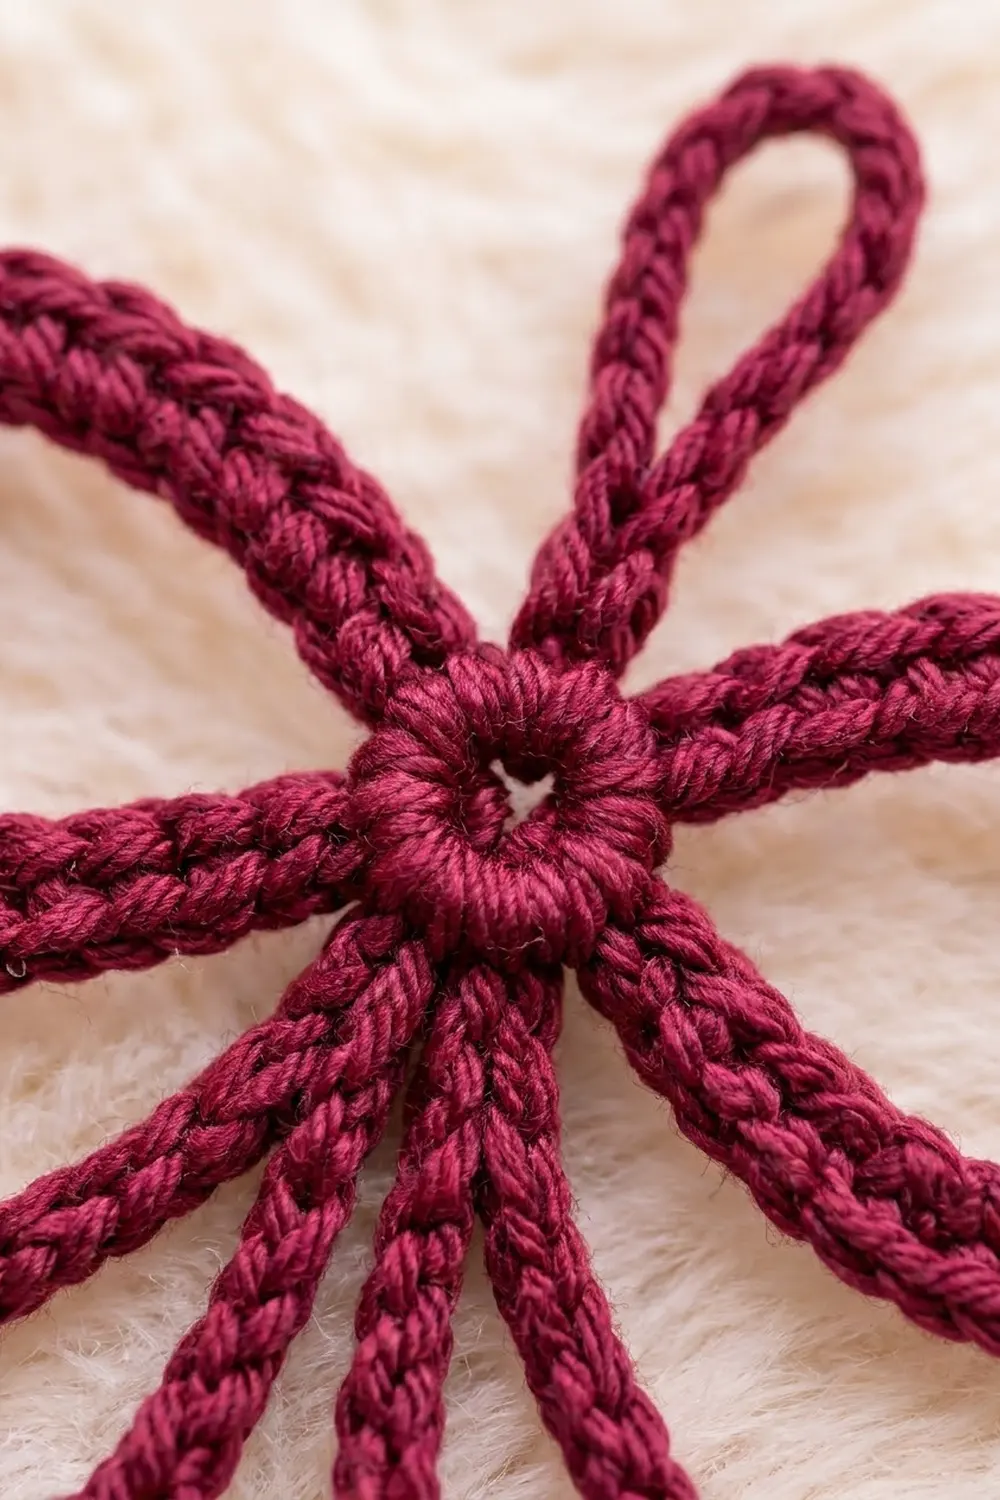
Covered loop technique: Make a chain, then slip stitch back into the ring to close it into a loop. Then work single crochet into the loop space, around the whole chain, not into individual chains. The sc wrap fully around the chain and hide it, which gives the thick, rounded cord. The sc tops line up along the outer edge of the loop.
Gauge and Checkpoints
Cord gauge: 5 sc covering a chain = 1 in (2.5 cm) along the cord. Chain gauge: 5 ch = 1 in (2.5 cm).
Gauge matters here because the loop sizes depend on your chain length. Before you start the ornament, test one piece. Make a ring and one side bow loop, check it against the measurements below, and only then make the full ornament.
Measurement checkpoints:
- Center ring (Round 1): 1 in (2.5 cm) outer diameter. The center hole should be no bigger than about 0.2 in (0.5 cm).
- Hanging loop: reaches 1.5 in (3.8 cm) above the edge of the ring.
- Each bow loop: reaches 2 in (5.1 cm) out from the edge of the ring and is 1.75 in (4.4 cm) tall at its widest.
- Each tail loop: reaches 2.25 in (5.7 cm) below the edge of the ring and is 1 in (2.5 cm) wide at its widest.
- Before trim: 5 in (12.7 cm) wide × 4.75 in (12.1 cm) tall.
- After trim: 5 in (12.7 cm) wide × 5 in (12.7 cm) tall.
If your loops are too big: go down to a 3.5 mm (US E-4) hook, or take 2 chains off each loop and 2 sc off its covering count.
If your loops are too small: go up to a 4.5 mm (US 7) hook, or add 2 chains and 2 sc per loop.
If the cord ripples or twists: you have too many sc for the chain. Take away 1–2 sc.
If the chain shows through the cord: you have too few sc. Add 1–2 sc.
Center Ring
With Color A, leave a 6 in (15.2 cm) tail.
Round 1: Make a MR. Ch 1, work 12 sc in the ring. Pull the ring tightly closed, leaving only a pinhole. Join with sl st to the first sc. (12 sts)
Number the ring stitches 1–12, going clockwise from the join. Stitch 1 sits at the top center of the ornament. Stitch 7 sits at the bottom center. The loops are placed in stitches 1, 4, 6, 8, and 10, which mirror each other across the line from stitch 1 to stitch 7:
            [Hang loop: st 1]
  [Bow loop: st 10]  (ring)  [Bow loop: st 4]
    [Tail: st 8]      st 7     [Tail: st 6]
Checkpoint: the ring measures 1 in (2.5 cm) across.
Hanging Loop
You are at stitch 1.
Step 1: Ch 18, then sl st into the same stitch 1. This makes a ch-18 loop.
Step 2: Work 22 sc into the ch-18 loop space, then sl st into stitch 1 again. (22 sc covering the loop)
Pinch the base of the loop together so it forms a slim teardrop with a short neck.
Checkpoint: the loop reaches 1.5 in (3.8 cm) above the edge of the ring.
Right Bow Loop
Step 1: Sl st in stitches 2, 3, and 4 of the ring. (3 sl st)
Step 2: Ch 26, then sl st into stitch 4. This makes a ch-26 loop.
Step 3: Work 32 sc into the ch-26 loop space, then sl st into stitch 4. (32 sc covering the loop)
The extra sc compared with the chain count make the cord fuller, so the loop opens into a rounded bow shape instead of staying a narrow teardrop.
Checkpoint: the loop reaches 2 in (5.1 cm) to the right of the ring edge and is 1.75 in (4.4 cm) tall.
Right Tail Loop
Step 1: Sl st in stitches 5 and 6. (2 sl st)
Step 2: Ch 24, then sl st into stitch 6. This makes a ch-24 loop.
Step 3: Work 29 sc into the ch-24 loop space, then sl st into stitch 6. (29 sc covering the loop)
Count these sc from 1 to 29 starting at the ring. The tip of the tail is sc 15, which is the middle stitch: there are 14 sc on each side of it. Put a stitch marker in sc 15 now. You will use it for the pink trim.
Checkpoint: the tail reaches 2.25 in (5.7 cm) below the ring edge, angling down and slightly to the right.
Left Tail Loop
Step 1: Sl st in stitches 7 and 8. (2 sl st)
Step 2: Ch 24, then sl st into stitch 8.
Step 3: Work 29 sc into the loop space, then sl st into stitch 8. (29 sc)
Mark sc 15 of this tail as well. Check that it mirrors the right tail: same length, same angle.
Left Bow Loop
Step 1: Sl st in stitches 9 and 10. (2 sl st)
Step 2: Ch 26, then sl st into stitch 10.
Step 3: Work 32 sc into the loop space, then sl st into stitch 10. (32 sc)
Finish the ring: Sl st in stitches 11 and 12, then sl st into stitch 1. (3 sl st)
The sl st around the ring add up to 3 + 2 + 2 + 2 + 3 = 12. That is one pass over each ring stitch, and the round closes where it started. These slip stitches also give the ring the raised, rounded outline seen in the photo. Fasten off and weave in both burgundy tails through the back of the ring.
Check the burgundy body: 12 ring sc, 22 + 32 + 32 + 29 + 29 = 144 covering sc, and 18 + 26 + 26 + 24 + 24 = 118 chains.
Checkpoint: the ornament measures 5 in (12.7 cm) wide (2 in + 1 in + 2 in) and 4.75 in (12.1 cm) tall (1.5 in + 1 in + 2.25 in).
Border: Pink Scalloped Tips
The pink trim is the only border on this ornament. It goes on the bottom tip of each tail loop, on the front face.
Border gauge: 9 sc across the tip = about 1.75 in (4.4 cm) of curved edge. The finished scallop row stands 0.25 in (0.6 cm) beyond the burgundy edge.
Placement: On each tail, the trim covers 9 stitches centered on the marked sc 15. Those are sc 11 through sc 19: 4 stitches on each side of the marker plus the marker stitch itself. Work into the tops of these sc, which sit along the outer edge of the tail.
Right Tail Tip
Row 1: With Color B, join with sl st in sc 11. Ch 1, then sc in sc 11 through sc 19. (9 sc) Turn.
Row 2: Sl st in the first sc. Scallop in the next sc, sl st in the next sc. Repeat from * to * 3 more times. (4 scallops + 5 sl st = 4 × 3 + 5 = 17 sts) Fasten off.
Left Tail Tip
Repeat Rows 1–2 on sc 11 through sc 19 of the left tail. (Row 1: 9 sc. Row 2: 4 scallops + 5 sl st = 17 sts.) Fasten off.
Why the math works: Row 2 uses all 9 stitches of Row 1. It goes sl st, scallop, sl st, scallop, sl st, scallop, sl st, scallop, sl st, which is 9 stitches worked into. The pattern starts and ends with a slip stitch, so both ends of the trim sit flat against the cord. The 4 scallops land evenly on the 2nd, 4th, 6th, and 8th stitches, which centers the middle pair on the tip. Because Row 1 sits on 9 of the 29 tail stitches, centered on sc 15, the pink cap is symmetrical. It wraps the curve of the tip without pulling the teardrop shape.
Weave the pink tails into the back of the burgundy cord so they don’t show through.
Final Blocking
- Lightly mist the ornament with water until it is damp. Do not soak it. Cotton can also be steamed with the iron held about 0.5 in (1.3 cm) above the fabric.
- Lay it face up on the blocking mat. Center the ring on a grid line.
- Pin the top of the hanging loop straight above the ring, 1.5 in (3.8 cm) from the ring edge.
- Pin the outer curve of each bow loop 2 in (5.1 cm) out from the ring edge, level with the ring’s center line. Check that the total width is 5 in (12.7 cm).
- Pin each tail tip just above its pink trim, 2.25 in (5.7 cm) below the ring edge. Leave about 1.25 in (3.2 cm) between the two tips at their centers.
- Pinch each loop’s neck where it meets the ring so all five loops start neatly from the center.
- Shape the pink scallops with your fingertips so the bumps point outward.
- Optional: for a firm hanging ornament, brush on diluted fabric stiffener.
- Let it dry completely before you unpin it.
Final Quality-Control Checklist
- The center ring is closed to a pinhole and measures 1 in (2.5 cm) across.
- All five loops start from the correct ring stitches: 1, 4, 6, 8, and 10.
- No chain shows through any covered loop.
- The two bow loops match each other in length, 2 in (5.1 cm), and height, 1.75 in (4.4 cm).
- The two tail loops match each other at 2.25 in (5.7 cm) and angle down evenly.
- Each pink tip has 4 even scallops, centered on the tail.
- Overall size: 5 in (12.7 cm) × 5 in (12.7 cm).
- All yarn tails are woven in invisibly on the back.
Troubleshooting
The ring hole is too big: Pull the MR tail tighter before you join Round 1. If it is already fastened off, use the tail to sew a small running stitch around the hole.
The bow loops look narrow instead of round: Add 2 covering sc, or use a slightly larger hook for the chain only.
A loop twists: You may have twisted the chain before closing it with the sl st. Keep the chain flat when you anchor it.
The tails are different lengths: Count the chains again. Each tail must have exactly 24 chains and 29 sc.
The pink trim is off-center: Make sure the trim starts in sc 11. Use the sc 15 marker to check.
The scallops cup inward: Work the dc more loosely, or block the tips flat while damp.
Care
Hand wash in cool water with mild soap, press out the water in a towel, and reshape and dry it flat. If you used stiffener, re-block after washing.
Final Notes
The measurements build on each other in this order:
- A 12-stitch center ring, 1 in (2.5 cm) across, holds every loop.
- The 18-chain hanging loop adds 1.5 in (3.8 cm) on top.
- The two 26-chain bow loops each add 2 in (5.1 cm) at the sides, for a width of 5 in (12.7 cm).
- The two 24-chain tails each add 2.25 in (5.7 cm) below, for a height of 4.75 in (12.1 cm) before trim.
- The two-row pink scallop trim adds the last 0.25 in (0.6 cm), for a finished size of 5 in (12.7 cm) by 5 in (12.7 cm).
If the ring and the first loop match their checkpoints, the rest of the ornament will come out the right size. Make one for the tree, a few more for gift toppers, and enjoy how quickly they work up.
Happy crocheting!