

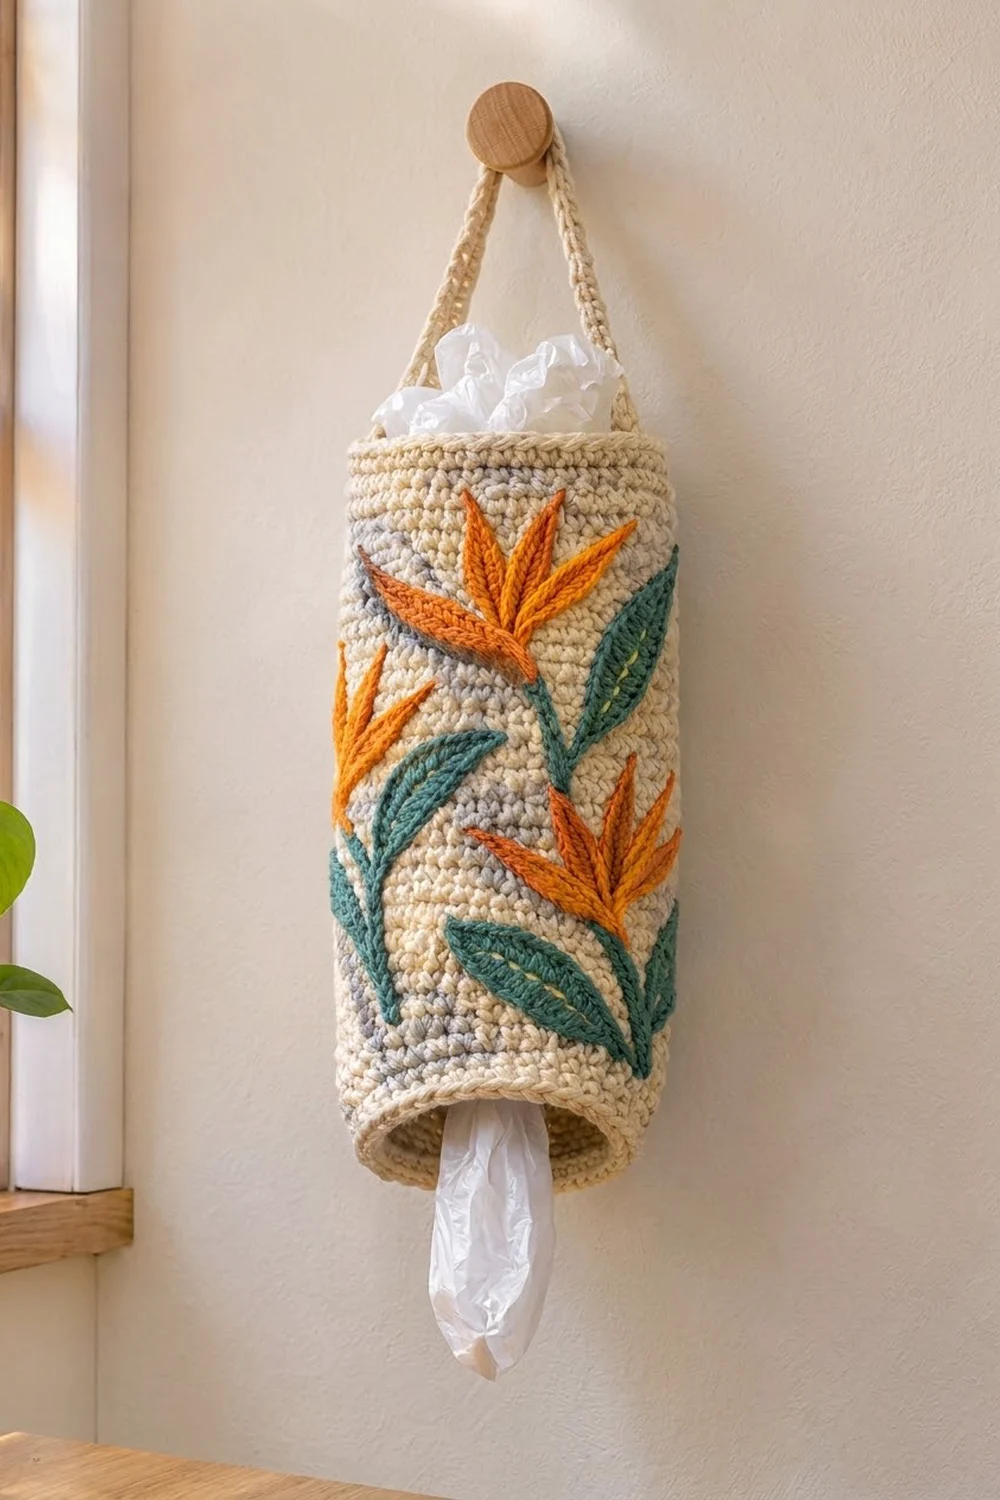
This bag holder is a tall, sturdy tube that keeps plastic grocery bags out of sight. Bags go in at the top and come out one at a time through a slightly narrowed bottom opening. It hangs from a single crocheted strap, so a wall peg or cabinet hook is all you need.
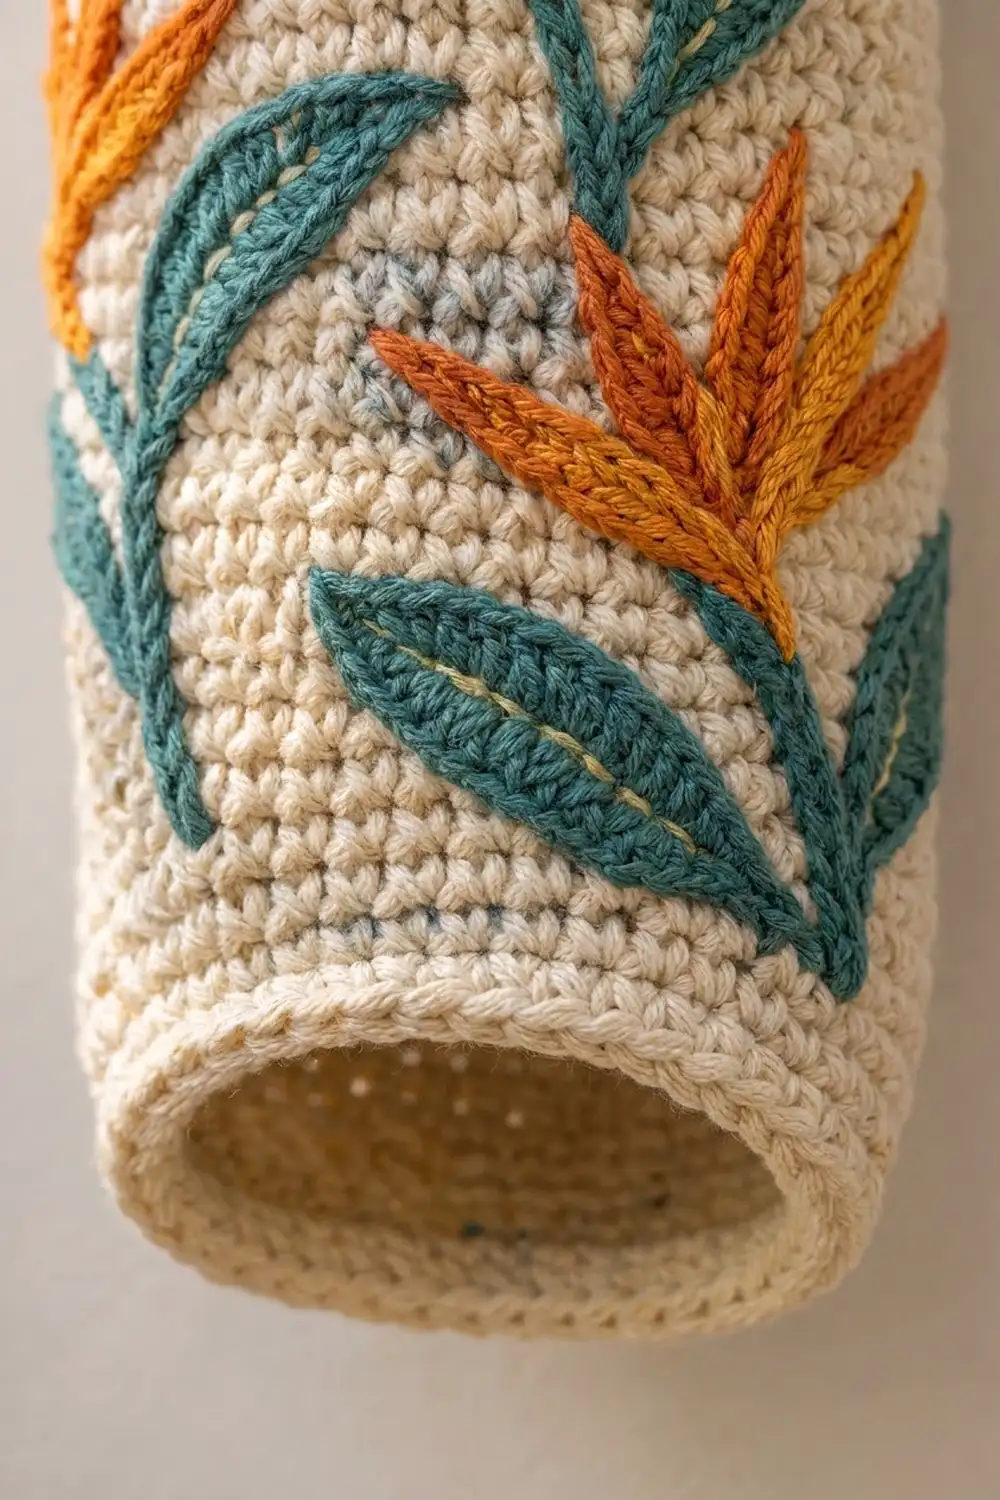
The body is worked in oatmeal-cream single crochet, which makes a firm, plain background for the embroidery. The front shows three bird-of-paradise flowers. Each one has bright orange petals with golden-orange tips, a teal sheath, long teal leaves in fishbone stitch, and a few soft grey shading patches. The look is warm and tropical, a bit like botanical prints.
All terms are US crochet terms. The finished holder is 8 in (20.3 cm) wide when flattened, 16 in (40.6 cm) around, and 14 in (35.6 cm) tall without the strap. The strap loop rises about 5 in (12.7 cm) above the rim.
You work the tube from the bottom up in joined rounds, starting on a foundation chain. Next you add a firm top rim, then go back and work a narrowing rim into the foundation chain at the bottom. Last, you crochet a short strap and sew it inside the top, then embroider the flowers onto the front.
Finished Size and Construction
- Finished size: 8 in (20.3 cm) flat width × 14 in (35.6 cm) tall; 16 in (40.6 cm) circumference
- Skill level: Easy crochet, with intermediate embroidery
- Terminology: US crochet terms
- Yarn weight: Worsted / Aran (#4), cotton or cotton blend
- Hook: 5.0 mm (H-8)
- Number of pieces: 1 tubular body plus 1 strap sewn to it (no motifs to join)
- Layout: Single vertical tube, worked in the round, front face embroidered
- Piece size: 56 stitches around (28 per flattened side) × 52 body rounds
- Size before border: 8 in (20.3 cm) × 13 in (33.0 cm)
- Border depth: 0.5 in (1.3 cm) at the top and 0.5 in (1.3 cm) at the bottom
Materials
Pick a smooth worsted cotton or cotton-acrylic blend. Cotton holds its shape when the tube is full of bags and shows the embroidery clearly. Avoid fuzzy yarns, because they hide the stitch grid you use to place the flowers.
- Color A, Oatmeal Cream: 230 g / 390 m (body, rims, strap)
- Color B, Bright Orange: 20 g / 34 m (petals)
- Color C, Golden Orange: 10 g / 17 m (petal tips and highlights)
- Color D, Teal: 25 g / 42 m (sheaths, stems, leaves)
- Color E, Light Heather Grey: 5 g / 9 m (shading patches)
Tools:
- 5.0 mm (H-8) crochet hook
- Blunt tapestry needle with a large eye
- 2 locking stitch markers
- Water-soluble fabric pen or a few pins
- Tape measure
- Scissors
All quantities include a margin of about 10% for the gauge tube and for any embroidery you redo.
Abbreviations (US Terms)
- ch – chain
- sl st – slip stitch
- sc – single crochet
- sc2tog – single crochet 2 stitches together (1 stitch decreased)
- rev sc – reverse single crochet (crab stitch)
- st(s) – stitch(es)
- Rnd(s) – round(s)
Special stitch: Reverse single crochet (rev sc). Work from left to right (right to left if you crochet left-handed). Insert the hook into the next stitch to the right, yarn over, and pull up a loop. Yarn over again and pull through both loops. Each rev sc uses 1 stitch, so the count stays the same, and the result is a rounded, corded edge.
Gauge and Checkpoints
Gauge: 14 sc and 16 rnds = 4 in (10.2 cm) in sc worked in joined rounds.
Treat the bottom of the tube as your test piece. Ch 56, join, and work Rnds 1–8. Flatten the tube with the round seam on one fold and measure.
- Test checkpoint (after Rnd 8): 8 in (20.3 cm) wide flat, 2 in (5.1 cm) tall.
- After Rnd 12: 3 in (7.6 cm) tall.
- After Rnd 26: 6.5 in (16.5 cm) tall.
- After Rnd 40: 10 in (25.4 cm) tall.
- After Rnd 52 (before rims): 8 in (20.3 cm) × 13 in (33.0 cm).
- After both rims: 14 in (35.6 cm) tall.
If your tube is too wide, your stitches are too loose. Undo it and change to a 4.5 mm hook. If it is too narrow, change to a 5.5 mm hook. Do not change the stitch count; the rim decreases depend on 56 stitches. If only the height is off, add or remove body rounds in pairs between Rnds 14 and 40, where no embroidery sits yet.
Body
Work in joined rounds, not a spiral. Joining keeps the round seam in a straight line, and that line becomes the right-hand fold of the flattened tube.
Foundation: With Color A, ch 56. Join with a sl st to the first ch, taking care not to twist the chain.
Rnd 1: Ch 1 (does not count as a st), sc in each ch around, sl st to first sc to join. (56 sts)
Rnds 2–52: Ch 1, sc in each st around, sl st to first sc to join. (56 sts each round)
After Rnd 52, do not fasten off.
Flatten the tube with the join on the right fold. Sts 1–28 are the front face and sts 29–56 are the back. Put a locking marker in st 1 and another in st 29. These mark the two folds, where the strap will go later.
Checkpoint: 8 in (20.3 cm) × 13 in (33.0 cm) flat, with 28 sts across each side.
Top Rim
The top rim keeps the opening round and firm so bags can be stuffed in easily.
Rnd 1: Ch 1, sc in each st around, sl st to first sc to join. (56 sts: 28 per side)
Rnd 2: Ch 1, rev sc in each st around, sl st to first rev sc to join. (56 sts: 28 per side)
Fasten off and weave in the end.
Bottom Rim
The bottom rim narrows the opening slightly. That small amount of pull keeps bags from falling out on their own while still letting you pull one out.
Turn the tube upside down. Join Color A with a sl st in the free loop of the foundation chain at the round seam.
Rnd 1 (decrease round): Ch 1, sc in each of the next 5 sts, sc2tog over the next 2 sts. Repeat from * 7 more times (8 repeats), then sl st to first sc to join. (48 sts: 40 sc + 8 sc2tog; 24 per side)
Rnd 2: Ch 1, rev sc in each st around, sl st to first st to join. (48 sts: 24 per side)
Fasten off and weave in the end.
Checkpoint: The bottom opening measures about 6.9 in (17.5 cm) flat, or about 13.7 in (34.8 cm) around, and curves inward slightly.
Why the rim math works: The top rim works 1 stitch into each of the 56 body stitches, so it keeps 28 per side and the full 8 in (20.3 cm) width. On the bottom rim, each repeat uses 7 foundation loops (5 + 2) and makes 6 stitches. Eight repeats use exactly 56 loops and make 48 stitches, with no leftover stitches and the decreases evenly spaced. Rev sc keeps the stitch gauge of the round below, so the counts stay the same.
Strap
The strap is crocheted flat in rows and sewn inside the top of the tube.
With Color A, ch 4.
Row 1: Sc in 2nd ch from hook and in the next 2 ch. (3 sts)
Rows 2–52: Ch 1, turn, sc in each st across. (3 sts each row)
Do not fasten off. Ch 1 and work sl sts evenly down one long edge, then repeat along the other long edge. This rounds the edges into a corded look like the one in the photo. Fasten off and leave a 12 in (30.5 cm) tail.
Checkpoint: The strap is 13 in (33.0 cm) long and about 0.9 in (2.3 cm) wide.
Attaching: Put one end of the strap inside the tube, centered over the st 1 fold marker, so it overlaps the top 4 body rounds by 1 in (2.5 cm). Whipstitch all four edges of the overlap to the inside of the tube, staying below the rim. Do the same with the other end at the st 29 marker, making sure the strap is not twisted. That leaves 11 in (27.9 cm) of strap free, which forms a loop about 5 in (12.7 cm) high. Remove the markers.
Embroidery
Flatten the tube with the front face (sts 1–28) up. Number the columns 1 to 28 from left to right and use the round numbers for height. Mark each flower’s position with a water-soluble pen or pins before you start. Stitch with a single strand of yarn and keep the tension loose enough that the fabric does not pucker. Slide one hand inside the tube to keep from catching the back layer.
Placement:
- Flower 1 (top): centered on column 16; petals on Rnds 42–50, sheath on Rnd 41.
- Flower 2 (left): columns 3–10; petals on Rnds 31–37, sheath on Rnd 30.
- Flower 3 (right): columns 17–26; petals on Rnds 21–28, sheath on Rnd 20.
- Leaves: 5 leaves along Rnds 6–34, starting low and angling outward and upward.
Sheath (Color D): For each flower, work satin stitch in a horizontal wedge about 1.5 in (3.8 cm) long. Make it 3 rounds deep at the back end and taper it to a point. Angle the point slightly downward, like a bird’s beak.
Petals (Color B): Starting from the top of each sheath, work 5 or 6 long straight stitches fanning upward. Each one should be 0.75–1.25 in (1.9–3.2 cm) long, and each finished flower head is about 2.5 in (6.4 cm) across. Go over each petal a second time, right next to the first stitch, so it stands out from the background.
Tips (Color C): Work a short straight stitch, about 0.5 in (1.3 cm), over the outer end of each petal so the tips shade from orange to gold.
Stems (Color D): Work chain stitch from the bottom of each sheath down to Rnd 4, curving gently. Let the stems of Flowers 2 and 3 cross the lower leaves.
Leaves (Color D): Work each leaf in fishbone stitch, about 2 in (5.1 cm) long and 0.75 in (1.9 cm) wide, with pointed ends. The slanted stitches meet in the middle and form the center vein on their own. Attach each leaf to a stem with its base.
Shading (Color E): Duplicate stitch over 4–8 sc in two soft clusters: one around columns 1–4, Rnds 28–34, and one around columns 24–28, Rnds 10–16. Keep them partly hidden behind the leaves.
Weave every embroidery tail into the inside of the tube.
Final Blocking
- Fill a basin with cool water and a drop of wool wash or mild soap.
- Soak the holder for 15 minutes, then press the water out without wringing.
- Roll it in a towel to remove more moisture.
- Slide a rolled towel or a 5 in (12.7 cm) wide bottle inside the tube so it stays round.
- Shape it to 14 in (35.6 cm) tall, with the bottom rim curving in slightly.
- Lay the strap flat and straight, then let everything air-dry completely.
- Lift the petals and leaves gently with your fingertip so they look raised.
Final Quality-Control Checklist
- Body is 56 sts around and 52 rounds tall.
- Flat size before rims is 8 in (20.3 cm) × 13 in (33.0 cm).
- Top rim has 56 sts in both rounds.
- Bottom rim has 48 sts in both rounds, and the opening curves inward slightly.
- Total height is 14 in (35.6 cm).
- Strap has 52 rows, is sewn 1 in (2.5 cm) down at both folds, and isn’t twisted.
- All three flowers sit on the front face and none of the embroidery catches the back layer.
- All tails are woven in on the inside.
Troubleshooting
Round seam drifts diagonally: Make sure the ch 1 at the start of each round is not counted as a stitch, and that the first sc goes into the same stitch as the join.
Tube slants or twists: The foundation chain was twisted when it was joined. Start over; the twist can’t be fixed later.
Bags fall out of the bottom: Rework bottom Rnd 1 as sc 4, sc2tog (8 repeats; 40 sts: 32 sc + 8 sc2tog). Then work Rnd 2 with 40 rev sc.
Embroidery puckers: Your stitches are too tight. Take them out and redo them more loosely, and keep the fabric flat over your hand.
Petals look flat: Add a third pass of straight stitches, or work the petals with a doubled strand.
Strap stretches: Cotton relaxes when it carries weight. Take the strap off and remake it with a 4.5 mm hook.
Care
Hand wash in cool water, reshape, and dry flat with a towel inside the tube. Do not tumble dry, because the embroidery may felt or shrink.
Final Notes
Check the measurements at each stage. At gauge, 14 sc per 4 in (10.2 cm) means 28 sts per side gives 8 in (20.3 cm) flat. At 16 rnds per 4 in (10.2 cm), 52 rounds make 13 in (33.0 cm). The two 0.5 in (1.3 cm) rims bring the height to 14 in (35.6 cm). The bottom rim’s 8 decreases take 56 down to 48 sts to narrow the opening, and a 13 in (33.0 cm) strap leaves an 11 in (27.9 cm) hanging loop. If each checkpoint matches, the finished holder will too.
Happy crocheting!