

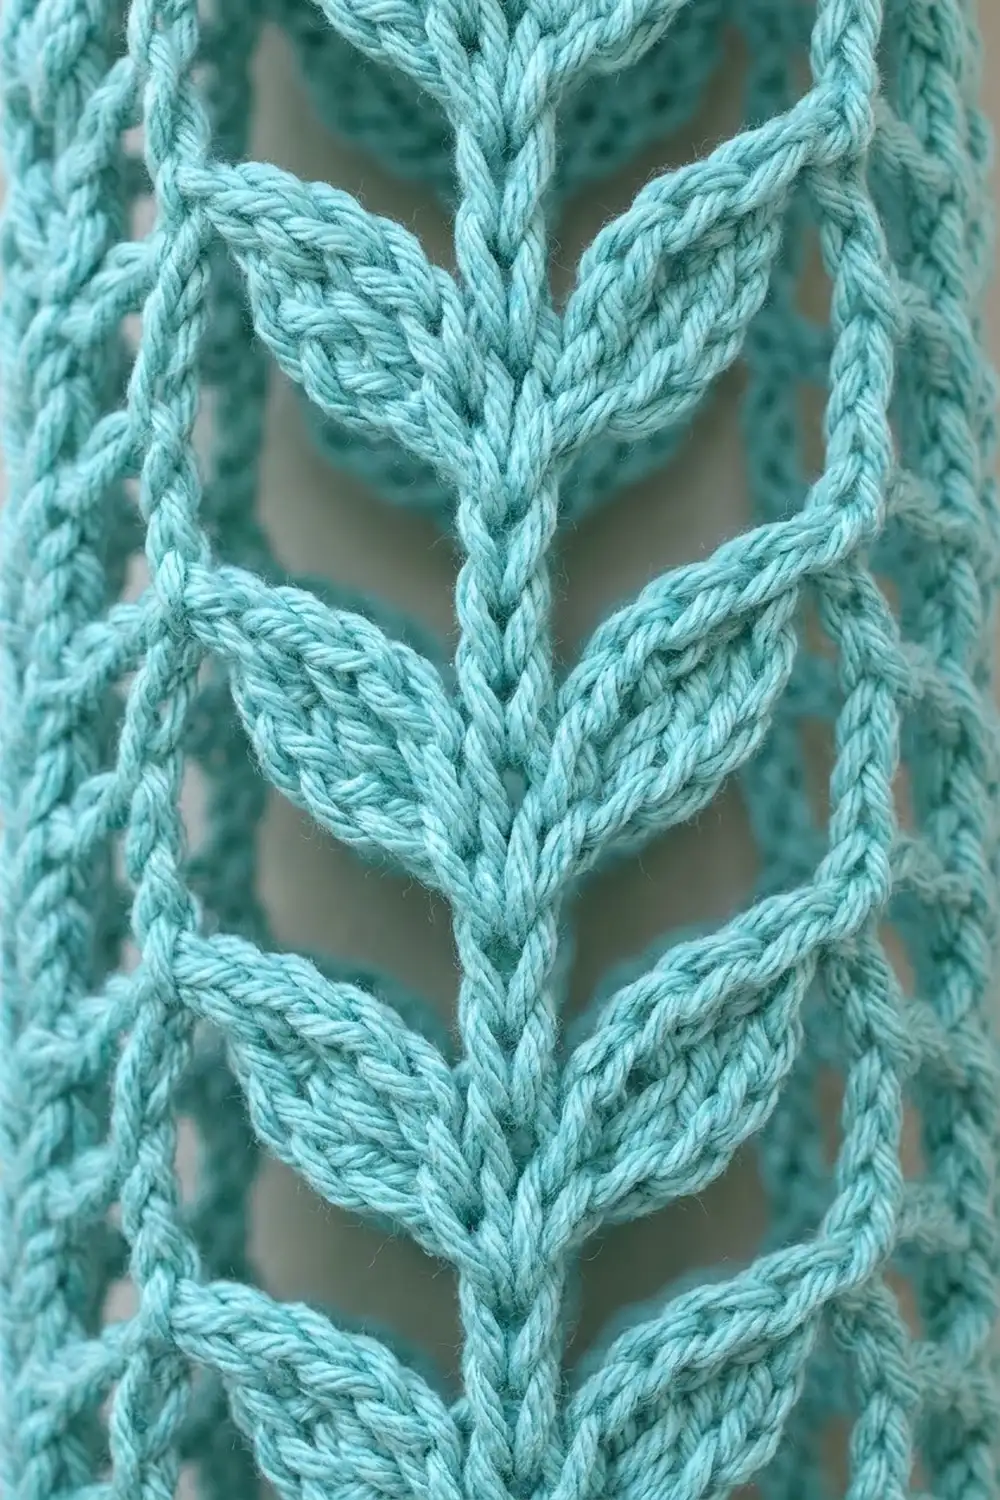
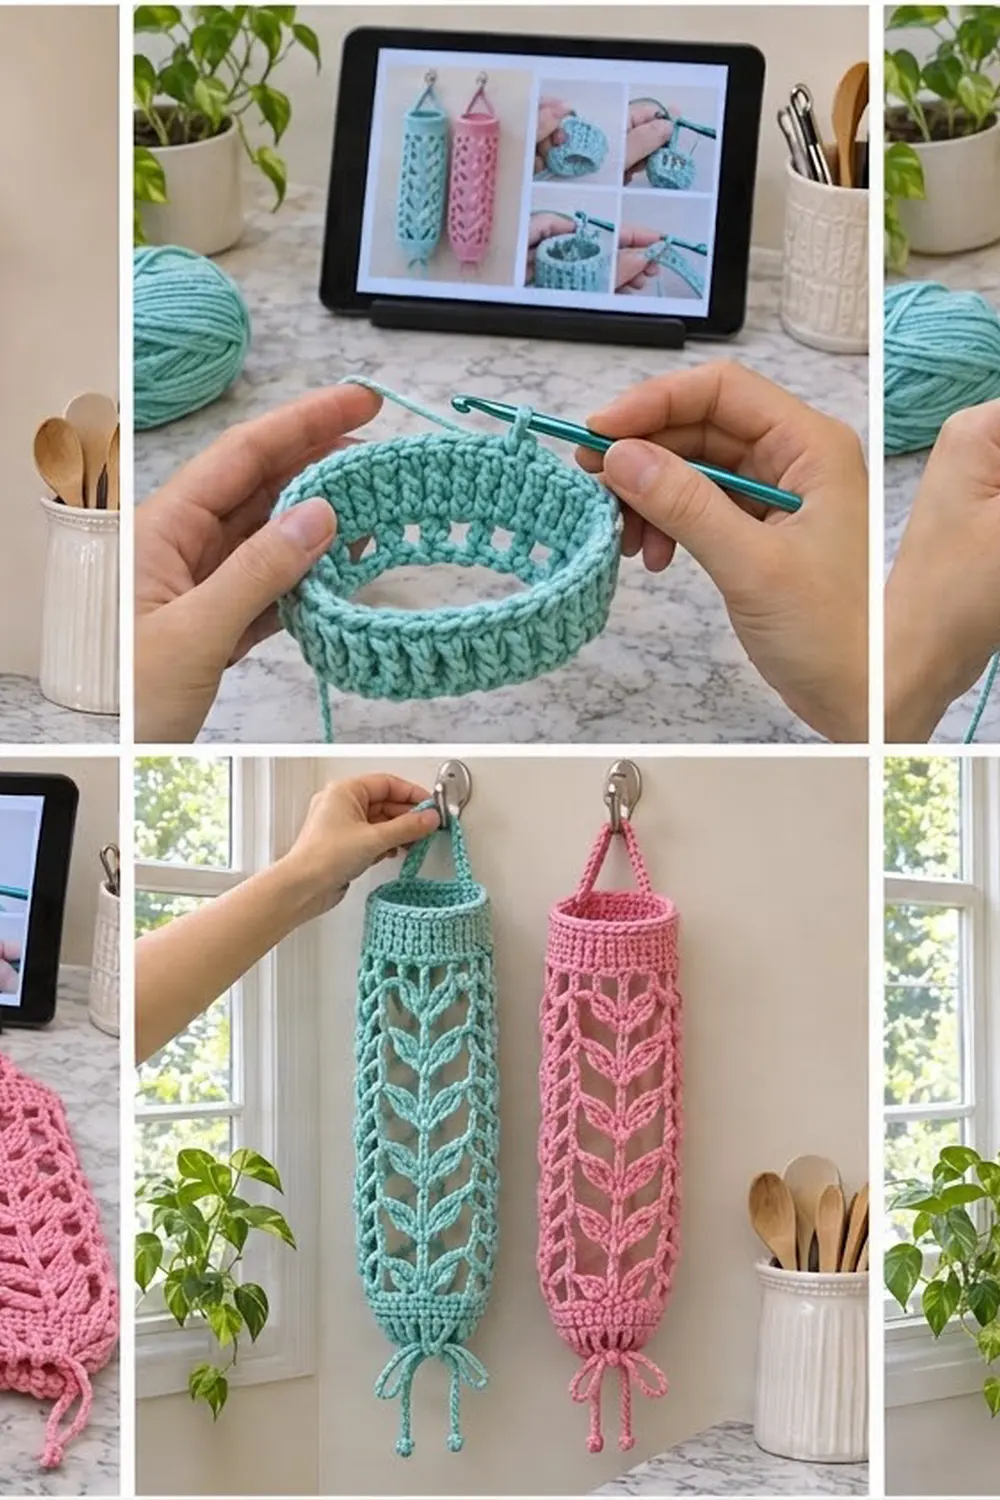
The Fern Trellis Bag Holder is a tall, slim tube that keeps loose plastic bags tidy. You stuff bags in at the top and pull them out one at a time from the bottom. The body is an open trellis of raised leaf columns: a braided center spine with paired cluster leaves stacked on both sides and airy chain windows in between.
The sample is shown in two colorways, soft aqua and coral pink. Each holder uses one color. A solid ribbed rim at the top and a solid band at the bottom frame the lacy middle. A slim strap hangs the holder from a hook, and a bobble-tipped drawstring closes the bottom.
This pattern uses US crochet terms. The finished holder measures 5 in (12.7 cm) wide when flat and 18.75 in (47.6 cm) tall without the strap. The strap adds about 3.75 in (9.5 cm) above the rim.
You work the holder in one piece from the bottom up, in joined rounds: bottom band with eyelets, leaf-trellis body, then the ribbed top band. The strap is worked onto the top edge, and a separate chain drawstring is threaded through the eyelets.
Finished Size and Construction
- Finished size: 5 in (12.7 cm) wide flat × 18.75 in (47.6 cm) tall, without the strap
- Circumference: 10 in (25.4 cm)
- Skill level: Intermediate
- Terminology: US
- Yarn weight: Worsted (CYC 4), cotton or cotton blend
- Hook: 5.0 mm (H-8)
- Number of pieces: 1 tubular body (strap worked on) + 1 drawstring cord
- Layout: One tube, worked bottom-up in joined rounds
- Piece size before top band: 5 in (12.7 cm) flat × 16.5 in (41.9 cm) tall
- Top band (border) depth: 2.25 in (5.7 cm)
Materials
Yarn: Choose a smooth worsted-weight cotton. Cotton holds its shape, resists stretching under the weight of the bags, and makes the leaf clusters crisp. Avoid fuzzy or very stretchy acrylic, because the lattice may sag.
Amounts for one holder:
- Aqua version: 105 g / 180 m
- Coral pink version: 105 g / 180 m
To make both holders as shown, you need 105 g / 180 m of each color. These quantities include a margin of about 15% for swatching and tension differences.
Tools:
- 5.0 mm (H-8) crochet hook
- Stitch marker
- Tapestry needle
- Scissors
- Measuring tape
- Blocking pins and a spray bottle
- A rolled towel or a 2-liter bottle for shaping
Abbreviations (US Terms)
- ch – chain
- sl st – slip stitch
- sc – single crochet
- dc – double crochet
- fpdc – front post double crochet
- bpdc – back post double crochet
- sk – skip
- sp – space
- st(s) – stitch(es)
- rnd(s) – round(s)
Special stitches:
- Cluster (cl): [Yarn over, insert hook in the indicated st, yarn over and pull up a loop, yarn over and pull through 2 loops] 3 times. Yarn over and pull through all 4 loops on the hook. A cluster counts as 1 st.
- Bobble: [Yarn over, insert hook in the indicated ch, yarn over and pull up a loop, yarn over and pull through 2 loops] 5 times. Yarn over and pull through all 6 loops on the hook.
Round notes: The ch 2 at the start of each round does not count as a stitch. Work the first stitch into the same stitch as the join, and join each round with a sl st to the top of the first stitch. Do not turn.
Gauge and Checkpoints
Gauge: 16 dc × 8 rnds = 4 in (10.2 cm) worked in the round.
Before you start, test the gauge by working Rnds 1–4. This bottom band is your gauge swatch.
Checkpoints:
- After Rnd 4: circumference 10 in (25.4 cm), flat width 5 in (12.7 cm), height 2 in (5.1 cm).
- After Rnd 15: height 7.5 in (19.1 cm).
- After Rnd 33: height 16.5 in (41.9 cm), flat width still 5 in (12.7 cm).
- After Rnd 38: height 18.75 in (47.6 cm).
If your band is too big: go down to a 4.5 mm hook. If it’s too small: go up to a 5.5 mm hook. Change hooks after Rnd 4 rather than adding or removing stitches, because the leaf repeat needs exactly 40 sts.
Bottom Band
Ch 40. Without twisting the chain, sl st into the first ch to form a ring.
Rnd 1: Ch 2, dc in each ch around. Join. (40 dc)
Rnd 2: Ch 2, dc in each st around. Join. (40 dc)
Rnd 3 (eyelet round): Ch 2, dc in next 3 sts, ch 2, sk next 2 sts; repeat from * 8 times total. Join. (24 dc + 8 ch-2 sps)*
Rnd 4 (conversion round): Ch 2, dc in next 3 dc, 2 dc in next ch-2 sp; repeat from * around. Join. (24 dc worked 1 per existing st + 16 dc added in the 8 ch-2 sps = 40 dc)*
Check this against the first checkpoint: 10 in (25.4 cm) around and 2 in (5.1 cm) tall.
Leaf Trellis Body
The body has 5 repeats of 8 sts each. Each repeat has four parts:
- a single dc lattice post
- a ch-2 window
- a leaf column: cluster, raised spine, cluster
- a second ch-2 window
Rnd 5 (setup round): Ch 2, dc in next st (lattice post), ch 2, sk next 2 sts, cl in next st (leaf), ch 1, dc in next st (spine), ch 1, cl in next st (leaf), ch 2, sk next 2 sts; repeat from * 5 times total. Join to the first dc.
(Per repeat: 1 post + 2 cl + 1 spine = 4 sts, plus 2 ch-2 sps and 2 ch-1 sps. Total: 20 sts, 10 ch-2 sps, 10 ch-1 sps.)*
Check that the setup round covers all 40 base sts: per repeat, 1 + 2 skipped + 1 + 1 + 1 + 2 skipped = 8; 8 × 5 = 40.
Rnd 6 (body round): Ch 2, dc in next lattice dc, ch 2, sk ch-2 sp, cl in top of next cl, ch 1, sk ch-1 sp, fpdc around next spine st, ch 1, sk ch-1 sp, cl in top of next cl, ch 2, sk ch-2 sp; repeat from * 5 times total. Join. (20 sts, 10 ch-2 sps, 10 ch-1 sps)*
Rnds 7–33: Repeat Rnd 6 another 27 times. Each round has the same count: 20 sts, 10 ch-2 sps, 10 ch-1 sps.
Here is how the rounds build the look in the photo:
- Working the fpdc around the spine every round raises the spine and gives it a braided texture.
- Stacking a cluster on a cluster forms the paired leaves on both sides of the spine.
- The ch-2 windows stack into open lattice channels between the leaf columns, so the bags show through.
Place a marker in the first dc of each round so the lattice posts stay aligned. The round joins sit on a post and are hard to see.
Check after Rnd 15: 7.5 in (19.1 cm) tall. Check after Rnd 33: 16.5 in (41.9 cm) tall and still 5 in (12.7 cm) flat. If the body is flaring, your chains are too loose. If it pulls in, your chains are too tight.
Border: Ribbed Top Band
Border gauge: same as the main gauge, 16 sts = 4 in (10.2 cm).
For counting, flatten the tube so the round’s first stitch sits at the left fold. Each flattened side has 20 sts, made of 2.5 leaf repeats. A tube has no corners, so there are no corner stitches to add; the “sides” are simply the two flat faces.
Rnd 34 (conversion round): Ch 2, dc in next dc, 2 dc in next ch-2 sp, dc in next cl, sk ch-1 sp, dc in top of spine st, sk ch-1 sp, dc in next cl, 2 dc in next ch-2 sp; repeat from * around. Join.
(20 dc worked 1 per existing st + 20 dc added in the 10 ch-2 sps = 40 dc; 20 per side)*
Rnds 35–37 (rib): Ch 2, fpdc around next st, bpdc around next st; repeat from * 20 times total. Join. (40 sts; 20 per side)*
Rnd 38 (edge): Ch 1, sc in each st around. Join. (40 sc; 20 per side)
Why the math works: The bottom band, the setup base, and the top band are all 40 sts, or 20 per flattened side. At 16 sts per 4 in (10.2 cm), 20 sts = 5 in (12.7 cm), so the rim matches the base and the tube stays straight. The ch-1 sps are skipped in Rnd 34 because the 2 dc placed in each ch-2 window already return the count to 8 per repeat. The 4 rounds of the band add 2.25 in (5.7 cm), bringing the height to 18.75 in (47.6 cm).
Hanging Strap
Row 1: Flatten the tube so that st 1 sits at one fold and st 21 at the other. With the outside facing, join yarn with a sl st in st 1 of Rnd 38. Ch 36, then sl st in st 21. Sl st in st 22 and turn. (36 ch)
Row 2: Sc in each of the 36 ch. Sl st in st 2 of Rnd 38. Fasten off. (36 sc)
The strap is about 9 in (22.9 cm) long. Spanning the 5 in (12.7 cm) rim, it forms a narrow triangle that rises about 3.75 in (9.5 cm) above the edge, which matches the photo.
Drawstring
Ch 4. Bobble in the 4th ch from the hook (first end bead). Ch 85, about 21.25 in (54.0 cm). Ch 3, bobble in the 3rd ch from the hook (second end bead). Fasten off.
Starting at the front of the holder, weave the cord in and out through the 8 ch-2 eyelets of Rnd 3 so both ends come out at the front, between two adjacent eyelets. Weave in all tails.
Final Blocking
- Soak the holder in cool water for 10 minutes, then gently press out the water. Do not wring it.
- Roll it in a towel to remove excess moisture.
- Slide the tube over a rolled towel or a 2-liter bottle that is about 10 in (25.4 cm) around.
- Straighten the lattice posts so they run vertically, and center each spine between its leaves.
- Ease the length to 18.75 in (47.6 cm) without stretching the windows open.
- Lay the strap flat and pin it straight.
- Let it dry completely, then remove the form, thread the drawstring if you haven’t yet, and tie a bow.
Final Quality-Control Checklist
- Rnds 1, 2, 4, 34, and 38 each have 40 sts.
- Rnd 3 has 8 evenly spaced eyelets.
- Every body round has 20 sts, 10 ch-2 sps, and 10 ch-1 sps.
- There are 5 leaf columns, all vertical, with raised spines.
- The flat width is 5 in (12.7 cm) at the base, the middle, and the rim.
- The height is 18.75 in (47.6 cm) without the strap.
- The strap is centered, with the two ends exactly opposite each other.
- The drawstring closes the bottom fully, and the bobbles are secure.
Troubleshooting
- The tube twists in a spiral: Your chain twisted on the first join. Restart and keep the chain’s bottom bumps facing the center of the ring.
- The leaf columns drift sideways: You missed or added a ch. Count the 4 sts per repeat on every round, and use markers.
- The spine looks flat: Make sure you are working fpdc around the spine post, not dc into its top.
- The rim ruffles: Check that you skipped the ch-1 sps in Rnd 34. Too many stitches will make it flare.
- The rim is tight: Work the ribbing with a hook one size larger.
- Bags fall out the bottom: Pull the drawstring tighter and double-knot the bow.
Care
Hand wash in cool water, or machine wash gently in a laundry bag. Reshape while damp and lay flat or hang to dry.
Final Notes
The measurement chain is simple:
- 16 dc = 4 in (10.2 cm) gauge.
- 40 sts = 10 in (25.4 cm) around and 5 in (12.7 cm) flat, from the base to the rim.
- 4 band rounds = 2 in (5.1 cm), then 29 trellis rounds bring the height to 16.5 in (41.9 cm).
- The ribbed top band brings the finished height to 18.75 in (47.6 cm).
If each checkpoint matches, your Fern Trellis holder will hang straight and neat.
Happy crocheting!