

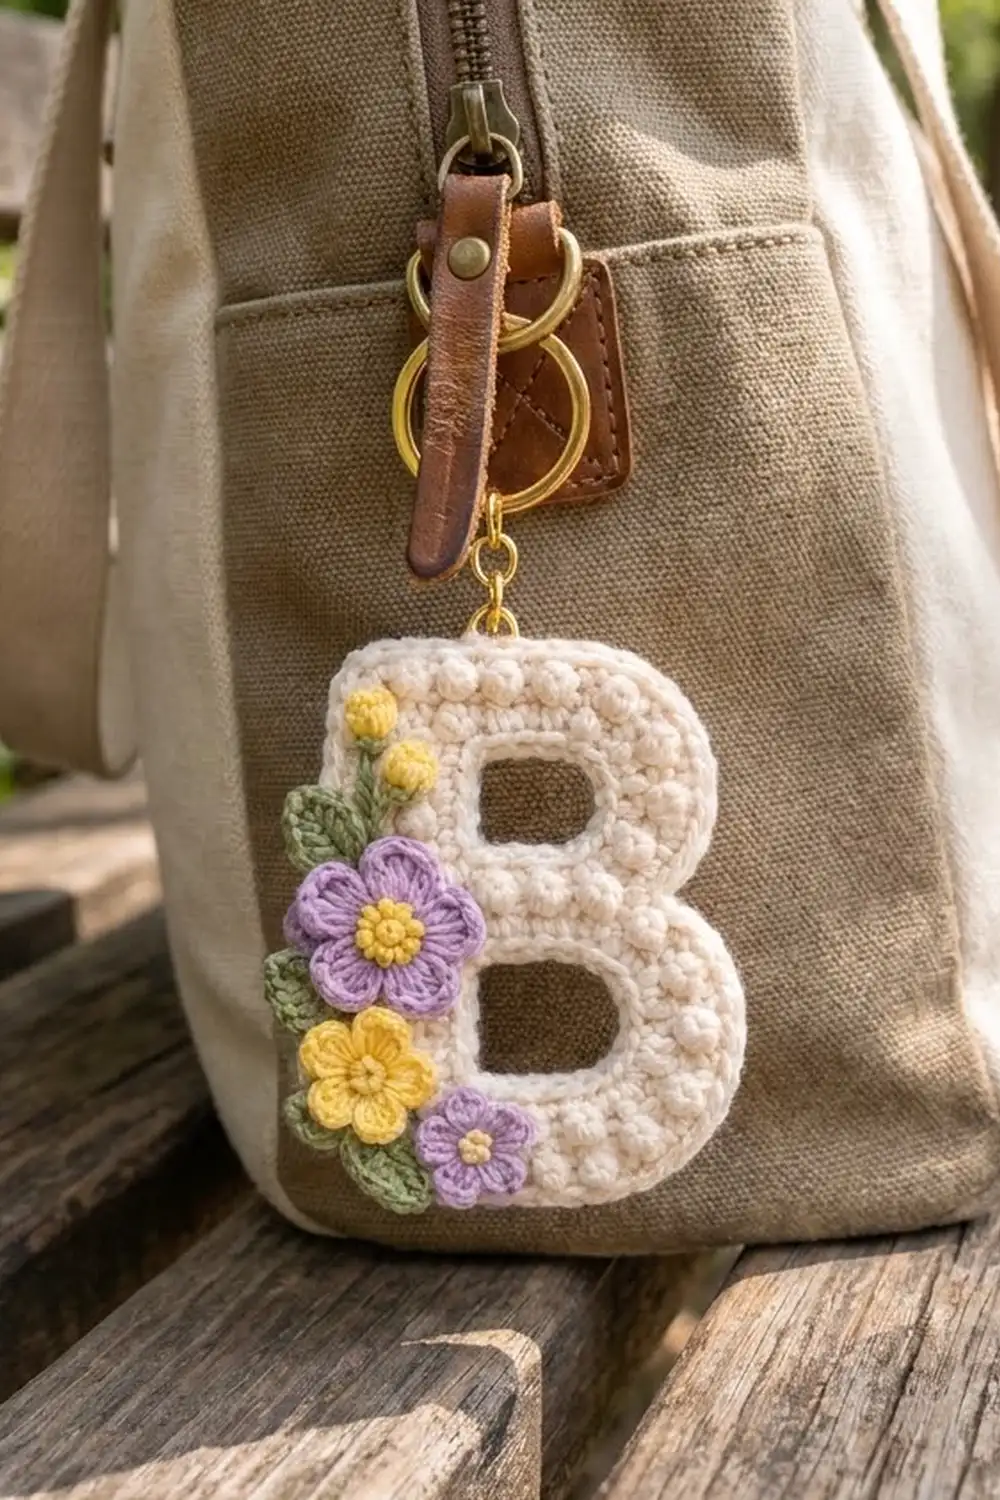
This little keychain is a cream letter B covered in tiny bobbles, with a small spray of lavender and yellow flowers down its stem. It works as a bag charm, a monogram gift, or a quick way to use up DK cotton scraps.
The palette is soft: cream for the letter, lavender and buttery yellow for the flowers, and sage green for the leaves and stems. Bobbles give the letter a pearly, quilted texture, and a smooth single-crochet rim keeps the outline and both openings crisp.
The pattern uses US crochet terms. The finished letter measures 3 in (7.6 cm) wide by 3.4 in (8.6 cm) tall, not counting the key ring.
The letter is one flat piece worked in rows from the bottom up. The two “legs” around each opening are worked separately and then joined with a chain to close each counter. One round of border, a slip-stitch rim, and an edging inside each opening finish the letter. You’ll crochet the flowers and leaves separately and sew them on after blocking.
Finished Size and Construction
- Finished size: 3 in (7.6 cm) wide x 3.4 in (8.6 cm) tall
- Skill level: Intermediate
- Terminology: US
- Yarn weight: DK (light #3) cotton
- Hook: 3.0 mm
- Number of pieces: 1 letter body plus 9 small appliqués (3 flowers, 2 buds, 4 leaves)
- Layout: Single letter, appliqués stacked along the left (stem) edge
- Body size before border: 2.6 in (6.6 cm) wide x 3 in (7.6 cm) tall
- Border depth: 0.2 in (0.5 cm) on every side
- Counter openings after edging: lower about 0.6 in (1.5 cm) wide, upper about 0.4 in (1.0 cm) wide
Materials
Use a smooth mercerized or combed DK cotton. Cotton holds bobble definition, resists stretching on a key ring, and blocks flat. Avoid fuzzy or very soft acrylics, which blur the bobbles.
- Cream (body): 10 g, about 23 m
- Lavender (large and small flowers): 3 g, about 7 m
- Yellow (flower, centers, buds): 3 g, about 7 m
- Sage green (leaves, stems): 2 g, about 5 m
These quantities include a margin for a gauge swatch and weaving in ends.
Tools:
– 3.0 mm crochet hook
– Tapestry needle and a sharp embroidery needle
– 1 in (2.5 cm) gold split key ring
– 8 mm gold jump ring and two pairs of flat-nose pliers
– Blocking board, rustproof pins, spray bottle
– Scissors and stitch markers
Abbreviations (US Terms)
- ch – chain
- sl st – slip stitch
- sc – single crochet
- hdc – half double crochet
- dc – double crochet
- sc2tog – single crochet 2 together
- st(s) – stitch(es)
- RS / WS – right side / wrong side
- BLO – back loop only
Special stitch – Bobble (bob): *Yarn over, insert hook in st, yarn over and pull up a loop, yarn over and pull through 2 loops; repeat from * 3 more times in the same st (5 loops on hook), yarn over and pull through all 5 loops. Each bobble counts as 1 st. You work bobbles on WS rows so they pop out on the RS.
Gauge and Checkpoints
Gauge: 10 sc and 12 rows = 2 in (5.1 cm) in sc with bobble rows, before blocking.
Make a 12-st by 12-row swatch first. Put bobbles on every WS row as in the pattern. It should measure 2.4 in (6.1 cm) wide by 2 in (5.1 cm) tall. The letter is small, so even half a stitch per inch changes the result noticeably.
Checkpoints:
– After Row 3: 2.6 in (6.6 cm) wide.
– After Row 9: 1.5 in (3.8 cm) tall.
– After Row 18: 3 in (7.6 cm) tall.
– After the border: 3 in (7.6 cm) x 3.4 in (8.6 cm).
If your piece is too big, go down to a 2.75 mm hook. If it’s too small, go up to a 3.25 mm hook. Check the bobbles too: if they lean or look flat, push each one gently to the RS as you work the next row.

Letter Body
Orientation: Row 1 is a RS row. The stem is the left side when the RS faces you, so RS rows begin at the bowl (right) edge and end at the stem edge. WS rows begin at the stem edge and end at the bowl edge. All shaping happens at the bowl edge, and the stem edge stays straight.
Foundation: With cream, ch 12.
Row 1 (RS): Sc in 2nd ch from hook and in each ch across, turn. (11 sts)
Row 2 (WS): Sc in first st, (bob in next st, sc in next st) 4 times, bob in next st, 2 sc in last st, turn. (12 sts: 7 sc + 5 bob)
Row 3: 2 sc in first st, sc in each st across, turn. (13 sts)
This is the full width of the lower bowl: 2.6 in (6.6 cm).
Lower Legs (Rows 4–8)
Left leg:
Row 4 (WS): Sc in first st, bob in next st, sc in next 2 sts, turn. Leave the remaining 9 sts unworked. (4 sts)
Row 5: Sc in each st across, turn. (4 sts)
Row 6: Sc in first st, bob in next st, sc in next 2 sts, turn. (4 sts)
Row 7: Sc across, turn. (4 sts)
Row 8: Repeat Row 6. (4 sts) Fasten off.
Right leg: With the WS of Row 3 facing, skip 5 sts after the left leg and join cream in the 10th st counting from the stem edge.
Row 4 (WS): Sc in the same st, bob in next st, sc in last 2 sts, turn. (4 sts)
Rows 5–7: Work as for the left leg. (4 sts)
Row 8: Sc in first st, bob in next st, sc2tog, turn. (3 sts) Don’t fasten off.
The 5 skipped sts of Row 3 form the bottom edge of the lower counter.
Middle Bar (Rows 9–11)
Row 9 (RS): Sc in each of 3 sts of the right leg, ch 5, sc in each of 4 sts of the left leg, turn. (12 sts: 7 sc + 5 ch)
Row 10 (WS): Sc in first st, (bob in next st, sc in next st) 4 times, bob in next st, sc2tog. Work into each chain as a stitch, through the back bump. Turn. (11 sts) This sc2tog makes the waist notch of the B.
Row 11: 2 sc in first st, sc across, turn. (12 sts)
The upper bowl is 12 sts wide: 2.4 in (6.1 cm).
Upper Legs (Rows 12–15)
Here you work the right leg first so the yarn finishes at the stem edge.
Right leg: With the WS of Row 11 facing, join cream in the 9th st counting from the stem edge.
Row 12 (WS): Sc in same st, bob in next st, sc in last 2 sts, turn. (4 sts)
Row 13: Sc across, turn. (4 sts)
Row 14: Sc in first st, bob in next st, sc in next 2 sts, turn. (4 sts)
Row 15: Sc across. (4 sts) Fasten off.
Left leg: With the WS of Row 11 facing, join cream in the first st at the stem edge.
Rows 12–15: Work as for the right leg. (4 sts) Turn at the end of Row 15 and don’t fasten off.
Sts 5–8 of Row 11 stay unworked and form the bottom of the upper counter.
Top Bar (Rows 16–18)
Row 16 (WS): Sc in first st, bob in next st, sc in next 2 sts (left leg), ch 4, sc in first st of right leg, bob in next st, sc in last 2 sts, turn. (12 sts: 6 sc + 2 bob + 4 ch)
Row 17: Sc2tog, sc in each st and ch across, turn. (11 sts)
Row 18: Sc in first st, (bob in next st, sc in next st) 4 times, sc2tog. (10 sts) Don’t fasten off. Turn so the RS faces you.
The body now measures 2.6 in (6.6 cm) wide by 3 in (7.6 cm) tall.
Appliqués
Leave 6 in (15.2 cm) tails on every appliqué for sewing.
Large lavender flower (make 1): With yellow, make a magic ring and work 10 sc in it. Join with sl st and pull the ring closed. Change to lavender. (Hdc, 2 dc, hdc) in next st, sl st in next st; repeat from * 4 more times. (5 petals)* Fasten off. It should be about 1.1 in (2.8 cm) across.
Yellow flower (make 1): With yellow, make a magic ring and work 5 sc in it. Join. (Sl st, ch 2, 2 dc, ch 2, sl st) in next st; repeat from * 4 more times. (5 petals)* Fasten off. It should be about 0.9 in (2.3 cm) across. Embroider 3 yellow French knots in the center.
Small lavender flower (make 1): With lavender, make a magic ring. (Ch 2, dc, ch 2, sl st) in ring; repeat from * 4 more times. (5 petals)* Pull the ring closed. It should be about 0.7 in (1.8 cm) across. Work 1 yellow French knot in the center.
Bud (make 2): With yellow, ch 3 and work 1 bob in the 3rd ch from hook. Fasten off. Each bud is about 0.3 in (0.8 cm).
Leaf (make 4): With green, ch 7. Starting in the 2nd ch from hook: sc, hdc, dc, dc, hdc, (sc, ch 1, sc) in last ch. Working down the other side of the chain: hdc, dc, dc, hdc, sc, then sl st into the first sc. Fasten off. Each leaf is about 0.8 in (2.0 cm) long.
Border
Border gauge: Work 1 sc per stitch along the top and bottom edges and 1 sc per row end along the sides. The letter is 18 rows tall, so 18 sc fit each side.
Round 1 (RS): With the RS facing, continue from Row 18 at the top bowl corner.
- Top edge: 2 sc in the last st of Row 18, sc in next 8 sts, 3 sc in the first st of Row 18 (stem corner). (13 sc)
- Stem side: 1 sc in each of the 18 row ends. (18 sc)
- Bottom edge: Work into the unused loops of the foundation chain. 3 sc in the first loop (stem corner), sc in next 9, 2 sc in the last loop (bowl corner). (14 sc)
- Bowl side: 1 sc in each row end from Row 1 to Row 8, sc2tog over the row ends of Rows 9 and 10, then 1 sc in each row end from Row 11 to Row 18. (17 sc)
Join with sl st to the first sc. (62 sc)
Why the math works: The top edge is 10 sts, so 8 single sc plus 2 corner groups (2 sc and 3 sc) gives 13. The bottom edge is 11 sts, so 9 single sc plus 2 corner groups (3 sc and 2 sc) gives 14. Each side has 18 row ends. On the bowl side, the sc2tog uses 2 of them, so that side has 17 sc. Total: 13 + 18 + 14 + 17 = 62. The 3-sc groups turn the square stem corners. The 2-sc groups follow the bowl curves that are already shaped, and the sc2tog deepens the waist.
Round 2: Loosely sl st in the BLO of each st around. (62 sl sts) Join and fasten off. This makes the smooth raised rim.
Counter edging (lower opening): Join cream in any skipped st of Row 3. Work sc in each of the 5 skipped sts, 5 sc along the inner row ends of the right leg, 5 sc into the underside of the 5 chains, and 5 sc along the inner row ends of the left leg. Join. (20 sc) Fasten off.
Counter edging (upper opening): Work the same way with 4 sc on each side. Join. (16 sc) Fasten off.
Final Blocking
- Weave in all ends on the body. Leave the appliqué tails long.
- Pin the letter face up to a 3 in (7.6 cm) x 3.4 in (8.6 cm) outline. Put pins at the 2 stem corners, the top and bottom of each bowl curve, and the waist notch.
- Mist until damp but not soaked. Don’t press the bobbles flat.
- Use a finger to round out the bobbles and square up both openings.
- Let it dry completely, about 2–3 hours.
- Pin the appliqués in place on the RS. Starting from the top: 2 buds on stems, 1 leaf, the large lavender flower centered at the middle bar, 1 leaf below it, the yellow flower, then the small lavender flower near the lower bowl with the last 2 leaves tucked behind. Let the flowers overlap the stem edge by about 0.2 in (0.5 cm).
- With green, embroider each bud stem as a 0.5 in (1.3 cm) line of backstitch. Sew each appliqué around its edge with small stitches through the front loops only, so nothing shows on the back.
- Open the jump ring sideways with pliers. Thread it through the center sc of the top stem corner, through both border rounds. Add the split key ring and close the jump ring.
Final Quality-Control Checklist
- The letter measures 3 in (7.6 cm) x 3.4 in (8.6 cm).
- Row 3 had 13 sts, Row 9 had 12, Row 11 had 12, and Row 18 had 10.
- All bobbles face the RS.
- Border Round 1 has 62 sc and the counter edgings have 20 and 16.
- The waist notch is visible and both stem corners are square.
- The appliqués are secure and no stitches show through to the back.
- The jump ring is fully closed.
Troubleshooting
- Bobbles pop to the back: You worked them on a RS row. Keep bobbles on WS (even-numbered) rows only.
- The opening is lopsided: The chain is too tight or too loose. Remake it to match your sc tension.
- The sides ruffle: Your border tension is loose. Go down a hook size for Round 1 only.
- The B looks like an 8: Make sure you did the Row 10 sc2tog and the border sc2tog at the waist.
- Petals curl forward: Steam the flowers lightly before sewing them on.
Care
Hand wash in cool water, press the water out in a towel, and dry flat. Remove the metal ring before washing if you can.
Final Notes
The measurements build on each other. A 2 in (5.1 cm) gauge swatch gives a 2.6 in (6.6 cm) wide Row 3 and a 3 in (7.6 cm) tall body after Row 18. The 0.2 in (0.5 cm) border then brings it to the finished 3 in (7.6 cm) x 3.4 in (8.6 cm). If you check each stage, the letter, the openings, and the flower spray will all fit as shown.
Happy crocheting!