

This little keychain is a powder-blue letter H in firm single crochet, finished with a smooth rope-like edge. A small posy is stitched down the left upright: a pink five-petal flower with a cream center, a white flower with a yellow center, a lilac flower with a cream center, two pink buds on green stems, and three soft green leaves.
The look is soft and pastel. It makes a good bag charm, a gift for someone whose name starts with H, or a quick craft-fair item. A gold split ring on a short chain clips it to a handle, zipper, or set of keys.
The pattern uses US crochet terms. The finished letter measures 3.4 in (8.6 cm) wide and 4.0 in (10.2 cm) tall, including the border.
You work the two lower legs separately in rows, join them with a chained crossbar, work the crossbar rows, then split again for the two upper legs. One sc round and one reverse sc round outline the whole letter. The flowers, buds, and leaves are made separately in a finer yarn and sewn on.
Finished Size and Construction
- Finished size: 3.4 in (8.6 cm) wide x 4.0 in (10.2 cm) tall
- Skill level: Advanced beginner
- Terminology: US
- Yarn weight: DK (3) cotton for the letter; sport (2) cotton for the appliqués
- Hook: 3.25 mm for the letter; 2.25 mm for the appliqués
- Number of pieces: 1 letter piece, plus 8 small sewn-on appliqués (3 flowers, 2 buds, 3 leaves)
- Layout: a single flat letter H with the flowers stacked down the left upright
- Piece size before border: 3.0 in (7.6 cm) wide x 3.6 in (9.1 cm) tall
- Leg width before border: 1.0 in (2.5 cm), 5 stitches
- Border depth: 0.2 in (0.5 cm) on every edge
Materials
Use a smooth mercerized or combed cotton. It shows the single crochet texture clearly and keeps the letter flat and firm. Avoid fuzzy or very stretchy yarn, because the letter needs crisp corners.
- Light blue, DK cotton: 10 g, about 23 m
- Pink, sport cotton: 2 g, about 7 m (petals and buds)
- White, sport cotton: 1 g, about 4 m
- Lilac, sport cotton: 1 g, about 4 m
- Green, sport cotton: 2 g, about 7 m (leaves and embroidered stems)
- Cream, sport cotton: 1 g, about 3 m (two flower centers)
- Yellow, sport cotton: 1 g, about 3 m (white flower center)
All quantities include extra for swatching and sewing tails.
Tools:
- 3.25 mm (D-3) crochet hook
- 2.25 mm (B-1) crochet hook
- Sharp-point tapestry needle
- Gold split ring, 1 in (2.5 cm) across, a 1 in (2.5 cm) length of chain, and 2 jump rings
- Small flat-nose pliers
- Blocking mat and rust-proof pins
- Stitch markers, scissors, ruler
Abbreviations (US Terms)
- ch: chain
- sl st: slip stitch
- sc: single crochet
- hdc: half double crochet
- dc: double crochet
- sc2tog: single crochet 2 together
- rev sc: reverse single crochet
- st(s): stitch(es)
- RS / WS: right side / wrong side
Special stitches:
- sc2tog: Insert hook in the first place given, yarn over, pull up a loop. Insert hook in the second place given, yarn over, pull up a loop. Yarn over and pull through all 3 loops.
- rev sc (crab stitch): Working left to right (if you’re right-handed), insert hook in the next st to the right, pull up a loop, yarn over, and pull through both loops. This makes the rounded, corded edge.
Gauge and Checkpoints
Gauge: 10 sc and 10 rows = 2 in (5.1 cm) with DK cotton and a 3.25 mm hook.
With 5 stitches and 5 rows per inch (2.5 cm), one border sc per row end lies flat. The whole pattern depends on this, so check it first.
Use one lower leg as your test piece. After Row 7 it should measure 1.0 in (2.5 cm) wide and 1.4 in (3.6 cm) tall. It becomes Leg 1, so you don’t waste any yarn.
Checkpoints:
- After Row 7 (each lower leg): 1.0 in (2.5 cm) x 1.4 in (3.6 cm)
- After Row 11 (crossbar): 3.0 in (7.6 cm) wide x 2.2 in (5.6 cm) tall
- After Row 18 (upper legs): 3.0 in (7.6 cm) x 3.6 in (9.1 cm)
- After border: 3.4 in (8.6 cm) x 4.0 in (10.2 cm)
If your piece is too big, go down 0.25 mm in hook size. If it is too small, go up 0.25 mm. If only the height is off, change how tightly you pull up loops instead of changing the stitch counts.
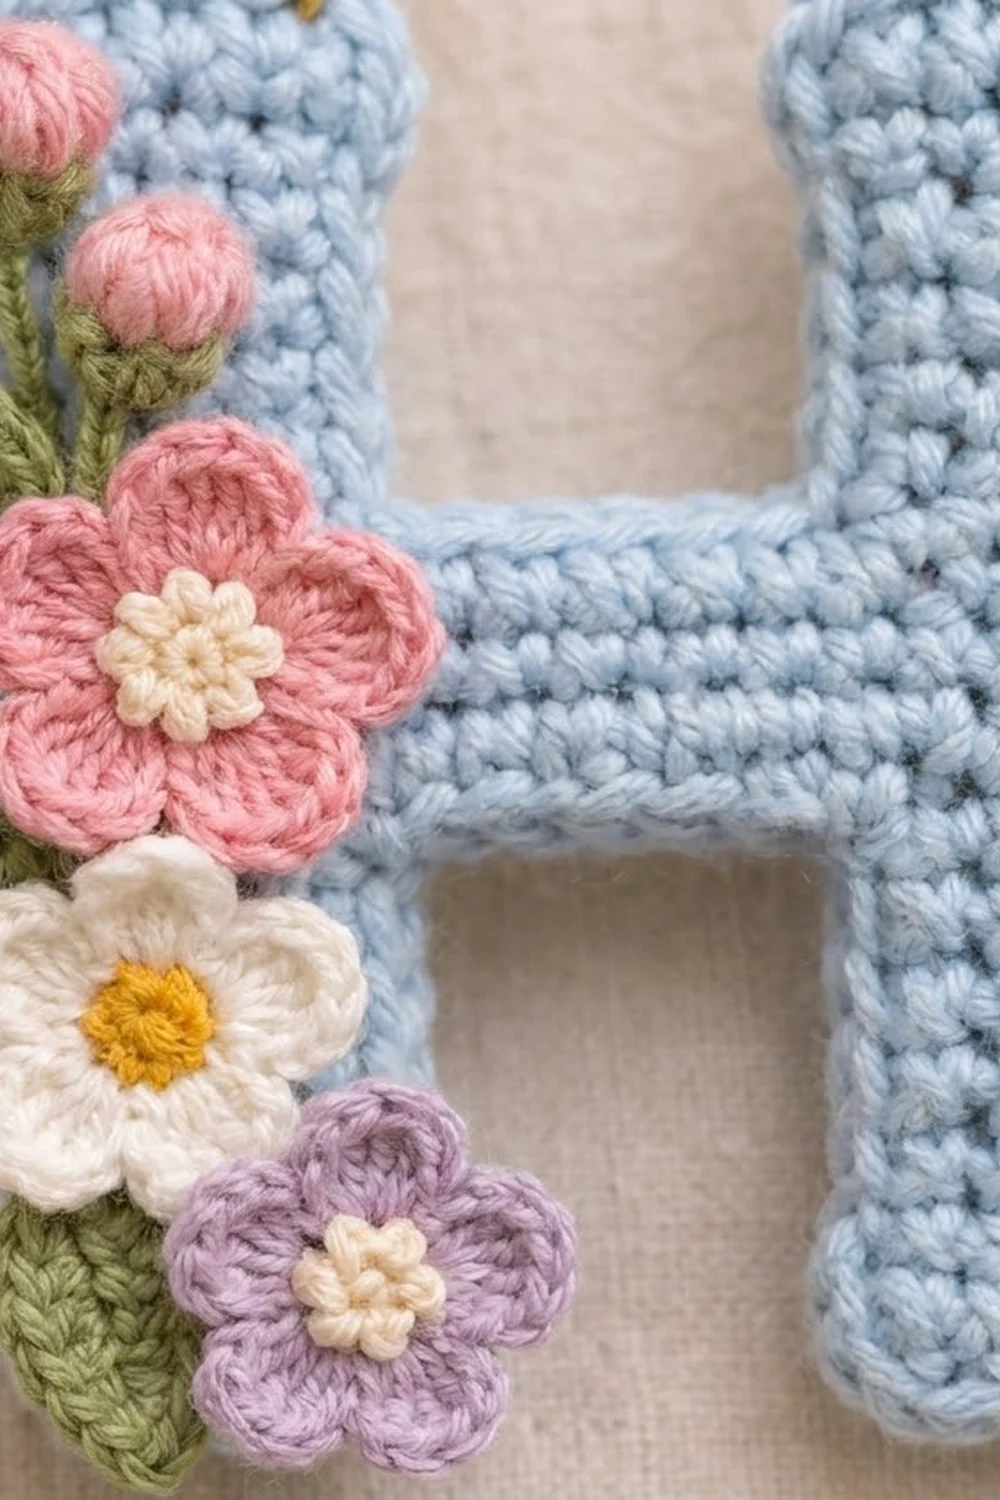
Letter H
Use the light blue DK and the 3.25 mm hook. The ch 1 at the start of a row never counts as a stitch.
Leg 1 (Lower Left Leg)
Foundation: Ch 6.
Row 1: Sc in 2nd ch from hook and in each ch across, turn. (5 sts)
Rows 2–7: Ch 1, sc in each st across, turn. (5 sts)
Fasten off. Checkpoint: 1.0 in (2.5 cm) x 1.4 in (3.6 cm).
Leg 2 (Lower Right Leg)
Work the Foundation and Rows 1–7 exactly as for Leg 1. (5 sts) Do not fasten off.
Crossbar
Lay Leg 1 to the left of Leg 2 with the bottoms lined up. Your working loop is at the top of Leg 2.
Row 8: Ch 1, turn, sc in each of the 5 sts of Leg 2, ch 5, then sc in each of the 5 sts of Row 7 of Leg 1, starting at its inner edge, turn. (15 sts: 5 sc + 5 ch + 5 sc)
Row 9: Ch 1, sc in next 5 sts, sc in each of the 5 ch, sc in last 5 sts, turn. (15 sts)
Rows 10–11: Ch 1, sc in each st across, turn. (15 sts)
Checkpoint: 3.0 in (7.6 cm) x 2.2 in (5.6 cm). The ch-5 bridge leaves a notch below the crossbar that is 1.0 in (2.5 cm) wide and 1.4 in (3.6 cm) deep.
First Upper Leg
Row 12: Ch 1, sc in next 5 sts, turn. Leave the other 10 sts unworked. (5 sts)
Rows 13–18: Ch 1, sc in each st across, turn. (5 sts)
Fasten off.
Second Upper Leg
Row 12: With the same side facing as for the first Row 12, skip the next 5 sts of Row 11 (these form the top of the crossbar). Join yarn in the 11th st, ch 1, sc in the same st and in the next 4 sts, turn. (5 sts)
Rows 13–18: Ch 1, sc in each st across, turn. (5 sts)
Fasten off. Checkpoint: 3.0 in (7.6 cm) x 3.6 in (9.1 cm). Choose the neater face as the RS and mark the left upright. The flowers go there.
Border
Use the light blue DK and the 3.25 mm hook. With the RS facing, join yarn in the 2nd st along the top of the left upper leg.
Border gauge: 5 sc = 1 in (2.5 cm), which matches both the stitch gauge and the row gauge. Work 1 sc in each st and 1 sc in each row end.
Rnd 1 (work clockwise):
- Top of left leg: Sc in the same st and the next 2 sts, then 3 sc in the last st (corner).
- Inner edge of left upper leg (7 row ends): Sc in 6 row ends, then sc2tog over the last row end and the first st of the crossbar top.
- Crossbar top (5 sts): Sc in next 3 sts, then sc2tog over the last crossbar st and the first row end of the right upper leg.
- Inner edge of right upper leg: Sc in 6 row ends.
- Top of right leg: 3 sc in first st, sc in next 3, 3 sc in last st. (9 sts)
- Outer right edge: Sc in each of 18 row ends. (18 sts)
- Bottom of right leg (foundation loops): 3 sc in first, sc in next 3, 3 sc in last. (9 sts)
- Inner edge of right lower leg: Sc in 6 row ends, then sc2tog over the last row end and the first free loop of the ch-5.
- Crossbar underside: Sc in next 3 loops, then sc2tog over the last loop and the first row end of the left lower leg.
- Inner edge of left lower leg: Sc in 6 row ends.
- Bottom of left leg: 3 sc in first, sc in next 3, 3 sc in last. (9 sts)
- Outer left edge: Sc in each of 18 row ends. (18 sts)
- Finish: 3 sc in the first st of the top of the left leg (corner). Sl st to the first sc.
Count per section:
- 4 leg ends: 9 sts each = 36 (top of left leg: 3 + 3 corner + 3 corner = 9)
- 2 outer edges: 18 sts each = 36
- 2 notches (6 + sc2tog + 3 + sc2tog + 6): 17 sts each = 34
- Total: 106 sts
Rnd 2: Ch 1, rev sc in each st around. (106 sts) Sl st to the first st and fasten off.
Why the math works: The bare outline has 94 stitches and row ends: four 5-st leg ends, two 18-row outer edges, four 7-row inner edges, and two 5-st crossbar edges. Each of the 8 outer corners adds 2 sts (+16), and each of the 4 inner corners loses 1 st to a sc2tog (−4). That gives 94 + 16 − 4 = 106.
Gauge is 5 per inch both ways, so Rnd 1 adds exactly 0.2 in (0.5 cm) on every side. The letter becomes 3.0 + 0.4 = 3.4 in (8.6 cm) wide and 3.6 + 0.4 = 4.0 in (10.2 cm) tall. The rev sc round rolls over the edge and adds no measurable size.
Flower Appliqués
Use the sport cotton and the 2.25 mm hook. Leave 8 in (20.3 cm) tails for sewing.
Pink Flower (make 1)
Rnd 1: With cream, make a magic ring, ch 1, work 5 sc in the ring, pull tight, and sl st to the first sc. (5 sts) Fasten off.
Rnd 2: Join pink in any sc. In each st around work (sc, hdc, 2 dc, hdc, sc). Sl st to the first sc. (30 sts: 5 petals of 6 sts) It measures about 1.0 in (2.5 cm) across.
White Flower (make 1)
Rnd 1: With yellow, work as for Pink Flower Rnd 1. (5 sts)
Rnd 2: Join white. In each st around work (sc, hdc, dc, hdc, sc). Sl st to the first sc. (25 sts: 5 petals of 5 sts) It measures about 0.8 in (2.0 cm) across.
Lilac Flower (make 1)
Rnd 1: With cream, work as for Pink Flower Rnd 1. (5 sts)
Rnd 2: Join lilac. In each st around work (sc, 2 dc, sc). Sl st to the first sc. (20 sts: 5 petals of 4 sts) It measures about 0.7 in (1.8 cm) across.
Buds (make 2)
With pink, make a magic ring, ch 2, and work 5 dc in the ring. Pull the ring very tight so the dc curl into a ball, then sl st to the top of the ch-2. (5 dc) Each bud is about 0.3 in (0.8 cm).
Leaves (make 3)
With green, ch 7. Starting in the 2nd ch from the hook and working along one side: sl st, sc, hdc, dc, hdc, then 3 sc in the last ch. Working along the other side of the chain: hdc, dc, hdc, sc, sl st. Sl st to the first sl st. (13 sts) Each leaf is about 0.8 in (2.0 cm) long.
Placement
Attach the appliqués after the border. With the letter RS up, place them from the top down:
- Two buds near the top of the left upright on Rows 15–17, the second slightly lower and to the right.
- A 0.4 in (1.0 cm) green backstitch stem from each bud down toward the pink flower.
- The pink flower centered on Rows 11–13, spilling slightly onto the crossbar.
- One leaf behind the pink flower’s left edge, pointing up and out.
- The white flower on Rows 5–7, with its left petals just past the outer edge.
- One leaf behind the white flower, pointing left.
- The lilac flower on Rows 2–4, overlapping the inner edge of the leg.
- The last leaf at the lower left, under the white and lilac flowers.
Pin everything in place and check the arrangement. Sew each flower and bud with small whipstitches around its center and at the petal tips. Tack each leaf along its center only, so the tips stay free.
Hardware
Open a jump ring with pliers. Pass it through the center border stitch along the top of the left leg, add the end link of the chain, and close the ring. Use the second jump ring to attach the split ring to the other end of the chain.
Final Blocking
- Weave in all ends, hiding each one in stitches of the same color.
- Take the hardware off, or wrap it in a cloth, so it doesn’t tarnish.
- Mist the letter with water until it is just damp.
- Lay it RS up on the blocking mat.
- Pin the outer corners to 3.4 in (8.6 cm) wide and 4.0 in (10.2 cm) tall.
- Pin the inner notches so each upright stays 1.4 in (3.6 cm) wide and straight.
- Shape the petals gently with your fingertips.
- Let it dry completely, at least 6 hours, before you take out the pins.
Final Quality-Control Checklist
- The letter measures 3.4 in (8.6 cm) x 4.0 in (10.2 cm).
- Each upright is 1.4 in (3.6 cm) wide.
- The crossbar is level and centered.
- Border Rnd 1 and Rnd 2 each have 106 sts.
- Inner corners are sharp and don’t pucker.
- All 3 flowers, 2 buds, and 3 leaves are secure.
- The jump rings are fully closed.
- No ends show on the RS.
Troubleshooting
Edges ruffle: You’ve added too many border sts. Work 1 sc per row end, not 2.
Edges curl: The border is too tight. Work Rnd 1 with a hook 0.25 mm larger.
Inner corners gape: Make sure each sc2tog spans the corner, with one part on each edge.
Crossbar slants: Line the legs up at the bottom before Row 8, and recount the ch-5.
Buds open up: Pull the ring tighter and add a securing stitch on the WS.
Petals lift: Add a tack stitch at each petal tip.
Rev sc twists: Keep your loops loose and work strictly left to right.
Care
Hand wash in cool water with mild soap, press the water out in a towel, and dry flat. Take off or protect the metal hardware before washing.

Final Notes
The measurements build on each other. At 5 sts and 5 rows per inch, each leg is 1.0 in (2.5 cm) wide, and the letter is 3.0 x 3.6 in (7.6 x 9.1 cm) before the border. The 106-st border adds 0.2 in (0.5 cm) on each side, so the finished keychain is 3.4 x 4.0 in (8.6 x 10.2 cm). Check your gauge on the first leg and count at every checkpoint, and the posy will sit right where it belongs.
Happy crocheting!