

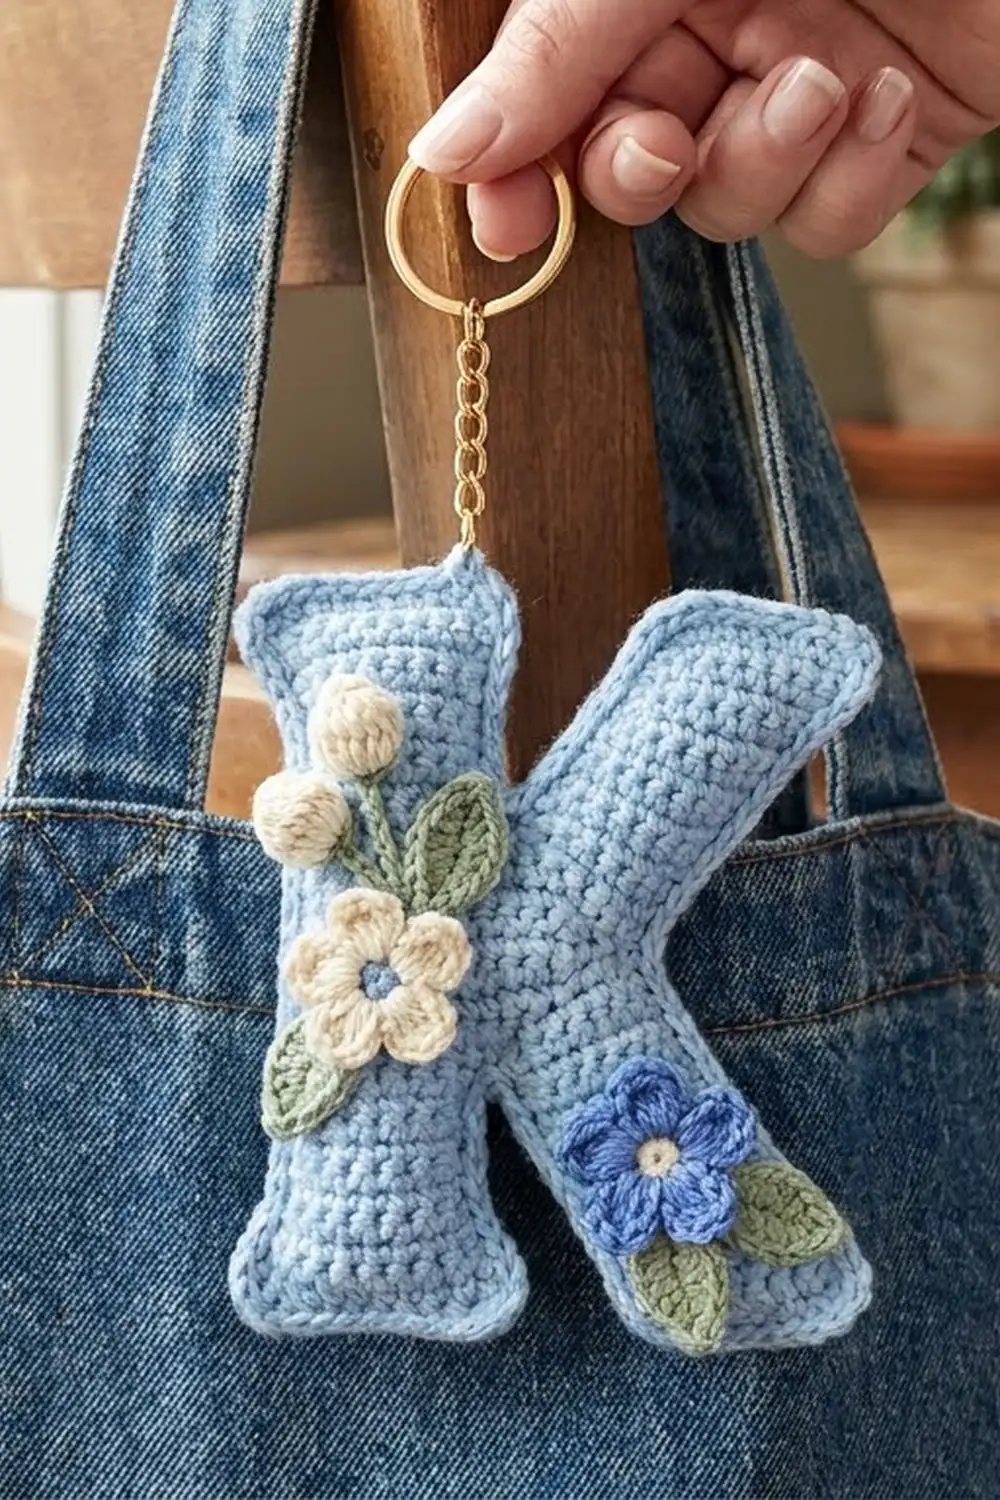
This little letter K is a monogram keychain with a soft, knitted look. Every stroke is made in waistcoat stitch, so neat V columns run along the length of each line, just like knit stockinette. A small cluster of flowers trims the left side of the stem: a cream blossom, a cornflower blue blossom, three sage leaves and three tiny cream buds.
The palette is light baby blue for the letter, cream and soft yellow for the large flower, a slightly deeper blue for the small flower, and sage green for the leaves and stems. The keychain hangs from a gold split ring on a short chain, so it works as a bag charm, a key fob or a personalized gift tag.
The pattern uses US crochet terms. The finished letter is 4 in (10.2 cm) tall and about 3 in (7.6 cm) wide. With the ring and chain, it measures about 6 in (15.2 cm) long overall.
Here is how it’s built. The stem, arm and leg are each worked as a small flattened tube in spiral rounds. The tubes are unstuffed and are closed with a row of single crochet through both layers. You sew the three strokes into a K, outline the front with a round of surface slip stitches, block it, sew on the appliqués and add the hardware.
Finished Size and Construction
- Finished size: 4 in (10.2 cm) tall × 3 in (7.6 cm) wide
- Skill level: Easy-intermediate
- Terminology: US
- Yarn weight: DK (#3 light)
- Hook: 3.5 mm (E-4)
- Number of pieces: 1 finished keychain (3 letter strokes plus 8 small appliqués, all sewn into one piece)
- Layout: Vertical stem on the left, arm going diagonally up to the right, leg going diagonally down to the right
- Stroke widths (flattened): stem 0.8 in (2.0 cm), arm 0.6 in (1.5 cm), leg 0.8 in (2.0 cm), all serifs 1.2 in (3.0 cm)
- Size before border: 4 in (10.2 cm) × 3 in (7.6 cm)
- Border depth: adds no width; forms a raised rim about 0.1 in (0.3 cm) high
Materials
Use a smooth DK cotton or cotton blend. Cotton keeps the V texture crisp and stands up to life on a key ring. Avoid fuzzy or brushed yarns, which blur the stitches.
- Light blue (main): 12 g / 28 m
- Cream: 3 g / 7 m
- Yellow: 1 g / 2 m
- Cornflower blue: 2 g / 5 m
- Sage green: 2 g / 5 m
All quantities include a small safety margin.
Tools:
– 3.5 mm (E-4) crochet hook
– Tapestry needle
– Stitch marker
– Gold split ring, 1 in (2.5 cm), with a short chain and a jump ring
– Two pairs of flat-nose pliers
– Blocking mat and rust-proof pins
– Spray bottle with water
Abbreviations (US Terms)
- ch – chain
- sl st – slip stitch
- sc – single crochet
- hdc – half double crochet
- dc – double crochet
- st(s) – stitch(es)
- MR – magic ring
- ws – waistcoat stitch
- ws2tog – waistcoat stitch 2 together
- inc – 2 ws in the same stitch
Waistcoat stitch (ws): This is a single crochet worked into the center of the V of the stitch below, between its two legs, rather than under the top loops. Push the hook through to the back of the fabric, yarn over, pull up a loop and finish as a regular sc.
ws2tog: Insert the hook into the center of the next V and pull up a loop. Insert it into the center of the following V and pull up a loop. Yarn over and pull through all 3 loops on the hook.
Surface slip stitch: Hold the yarn behind the work. Insert the hook from front to back through the fabric, pull up a loop, then pull it through the loop on the hook.
Gauge and Checkpoints
Gauge: 10 ws and 10 rounds = 2 in (5.1 cm), measured on a flattened tube. One face of the tube shows half the stitches in the round.
Make the arm first. It is the smallest stroke and doubles as your gauge test.
- After Arm Rnd 3: the flattened serif is 1.2 in (3.0 cm) wide.
- After Arm Rnd 6: the flattened arm is 0.6 in (1.5 cm) wide.
- Finished arm: 2.4 in (6.1 cm) long.
If the arm comes out too big, go down to a 3.25 mm hook. If it’s too small, or the stitches are hard to work into, go up to a 3.75 mm hook. Waistcoat stitch is naturally tight, so keep your loops relaxed and pull each one up a little taller than usual.
Work every stroke in a continuous spiral. Do not join rounds, and move the marker up to the first stitch of each round.

Arm (make 1, light blue)
The serif end is made first.
Rnd 1: Ch 6. Starting in the 2nd ch from the hook, sc 4, then 3 sc in the last ch. Rotate and work along the other side of the foundation: sc 3, then 2 sc in the last ch (the same ch as the first sc). (12 sts)
Rnds 2–3: ws in each st around. (12 sts)
Rnd 4: [ws 4, ws2tog] twice. (10 sts)
Rnd 5: [ws 3, ws2tog] twice. (8 sts)
Rnd 6: [ws 2, ws2tog] twice. (6 sts)
Rnds 7–12: ws in each st around. (6 sts)
Close: Flatten the tube so the round’s first stitch sits at one folded edge. Sc 3 through both layers. Fasten off and leave a 12 in (30.5 cm) tail for sewing.
Checkpoint: 2.4 in (6.1 cm) long, with a 1.2 in (3.0 cm) serif.
Leg (make 1, light blue)
Rnds 1–5: Work as for Arm Rnds 1–5. (8 sts)
Rnds 6–13: ws in each st around. (8 sts)
Close: Flatten and sc 4 through both layers. Fasten off and leave a 12 in (30.5 cm) tail.
Checkpoint: 2.6 in (6.6 cm) long, 0.8 in (2.0 cm) wide, with a 1.2 in (3.0 cm) serif.
Stem (make 1, light blue)
The stem has a serif at both ends.
Rnds 1–5: Work as for Arm Rnds 1–5. (8 sts)
Rnds 6–16: ws in each st around. (8 sts)
Rnd 17: [ws 3, inc] twice. (10 sts)
Rnd 18: [ws 4, inc] twice. (12 sts)
Rnds 19–20: ws in each st around. (12 sts)
Close: Flatten in line with the bottom serif and sc 6 through both layers. Fasten off and weave in the end.
Checkpoint: 4.0 in (10.2 cm) long (20 rounds at 5 rounds per inch). Both serifs are 1.2 in (3.0 cm) wide and the body is 0.8 in (2.0 cm) wide.
Assembly of the Letter
- Lay the stem flat with the Rnd 1 serif at the bottom. Choose a front face where the V columns are straightest.
- Position the arm with its serif at the upper right. Its closed end should butt against the right edge of the stem, with its upper edge meeting the stem at Rnd 13 and its lower edge at about Rnd 11. Angle it at about 45 degrees.
- Sew the arm’s 3 closing sc to the stem’s right edge using whipstitch through the outer loops only.
- Position the leg with its serif at the lower right. Tuck its closed end under the lower edge of the arm. Its lower edge should meet the stem at Rnd 8.
- Whipstitch the leg to both the stem and the underside of the arm. Work on the back face, then add a few stitches on the front where the strokes meet.
- Weave in all tails between the layers of the tubes.
Checkpoint: The K measures 4 in (10.2 cm) tall and about 3 in (7.6 cm) from the stem’s left edge to the tip of the arm serif.
Border: Surface Slip-Stitch Outline
Border gauge: Work 1 surface sl st per round along the long edges, and 1 per stitch across the serif ends and closing seams. Both run at 5 stitches per inch, the same as the fabric gauge.
Use light blue. Work through the outermost V column on the front face only. Pivot at each corner without adding stitches; every corner stitch is already counted in the segment that ends there.
Start at the bottom left corner of the stem. Work counter-clockwise from the front: up the left side, across the top, and around each stroke in turn.
- A – Stem, left edge (Rnds 1–20): 20 sl st
- B – Stem, top edge (closing sc): 6 sl st
- C – Stem, right edge from Rnd 20 down to Rnd 14: 7 sl st
- D – Arm, upper edge (Rnds 12–1): 12 sl st
- E – Arm serif end: 6 sl st
- F – Arm, lower edge back to the leg (Rnds 1–6): 6 sl st
- G – Leg, upper edge (Rnds 11–1): 11 sl st
- H – Leg serif end: 6 sl st
- I – Leg, lower edge back to the stem (Rnds 1–13): 13 sl st
- J – Stem, right edge (Rnds 8–1): 8 sl st
- K – Stem, bottom edge: 6 sl st
Total: 101 sl st. Join with a sl st to the first stitch, fasten off and weave the end into the tube.
Why the math works: The fabric has 5 rounds per inch and 5 stitches per inch, so 1 sl st per round or per stitch lands exactly on the fabric gauge. The rim lies flat and doesn’t ruffle or pucker. It covers the seams where the strokes meet and gives the rounded, raised edge without adding any width.
Appliqués
Large Cream Flower (make 1)
Rnd 1 (yellow): MR, 10 sc. Join with a sl st. Fasten off yellow. (10 sts)
Rnd 2 (cream): Join in any st. [(hdc, dc, dc, hdc) in next st, sl st in next st] 5 times. (5 petals)
Fasten off and leave a 10 in (25.4 cm) tail. Size: 1.1 in (2.8 cm) across.
Small Blue Flower (make 1)
Rnd 1 (yellow): MR, 5 sc. Join with a sl st. Fasten off yellow. (5 sts)
Rnd 2 (cornflower blue): [(ch 2, 2 dc, ch 2, sl st) in next st] 5 times. (5 petals)
Size: 0.8 in (2.0 cm) across.
Leaves (make 3, sage green)
Ch 6. Starting in the 2nd ch from the hook: sc, hdc, dc, hdc, then 3 sc in the last ch. Working along the other side of the chain: hdc, dc, hdc, sc. Sl st to the first sc and fasten off.
Size: 0.8 in (2.0 cm) long.
Buds (make 3, cream)
MR, 5 sc. Pull the ring tight, sl st to the first sc and fasten off.
Size: 0.3 in (0.8 cm) across.
Attaching the Appliqués
Pin everything before you sew. Work from the bottom up so each layer overlaps the one before.
- Pin a leaf at the lower right of the stem near Rnd 3, pointing out to the right.
- Pin the blue flower over the leaf’s base, centered on the stem at Rnds 2–5.
- Pin a leaf on the lower left at Rnds 6–8, pointing out to the left.
- Pin a leaf on the upper left at Rnds 12–14, pointing up and to the left.
- Pin the cream flower at Rnds 8–12 so it overlaps the stem’s left edge by about 0.2 in (0.5 cm) and covers both leaf bases.
- Pin the three buds at Rnds 14–18 in a small fan.
- With green, backstitch a stem about 0.4 in (1.0 cm) long from each bud down toward the cream flower.
- Sew every piece down with small stitches through the front layer of the tube only.
Final Blocking
- Mist the letter lightly until it is damp, not soaked.
- Lay it face up on the mat.
- Pin each serif corner square, checking the 4 in (10.2 cm) height and 3 in (7.6 cm) width.
- Run your fingertip along each stroke so the V columns sit straight.
- Use a pin to lift and fluff the flower petals.
- Leave it to dry completely, at least 6 hours.
- Open the jump ring with pliers and pass it under the 6 top closing sc of the stem. Add the chain and split ring, then close the jump ring firmly.
Final Quality-Control Checklist
- The letter is 4 in (10.2 cm) tall and about 3 in (7.6 cm) wide.
- All three serifs are 1.2 in (3.0 cm) wide.
- The V columns run straight along each stroke.
- The outline has 101 sl st and lies flat.
- No seams show where the strokes meet.
- The flowers and leaves are secure, with no loose petals.
- The jump ring is fully closed and passes through both layers.
Troubleshooting
- The strokes twist or spiral: This is normal for waistcoat stitch in a spiral. Flatten each tube along a straight V column before closing, then block firmly.
- The stitches are too tight to work into: Go up a hook size, or pull each loop taller.
- The outline ruffles: You added stitches at the corners. Keep strictly to 1 sl st per round or per stitch.
- The outline puckers: Loosen your tension or go up a hook size for the border only.
- The serifs flare unevenly: Check that the decreases fall at both folded edges, then pin them square while blocking.
- The appliqués lift: Add a few tacking stitches under the petal tips.
Care
Spot clean with mild soap and cool water, then reshape and dry flat. Don’t put it in the dryer, because the metal hardware can snag.
Final Notes
The measurement chain is simple. The gauge is 5 stitches and 5 rounds per inch. That gives a 2.4 in (6.1 cm) arm, a 2.6 in (6.6 cm) leg and a 4 in (10.2 cm) stem, with 1.2 in (3.0 cm) serifs. Together they make a 4 in × 3 in (10.2 cm × 7.6 cm) letter, outlined by exactly 101 surface slip stitches. Check the arm first and everything else will follow.
Happy crocheting!