

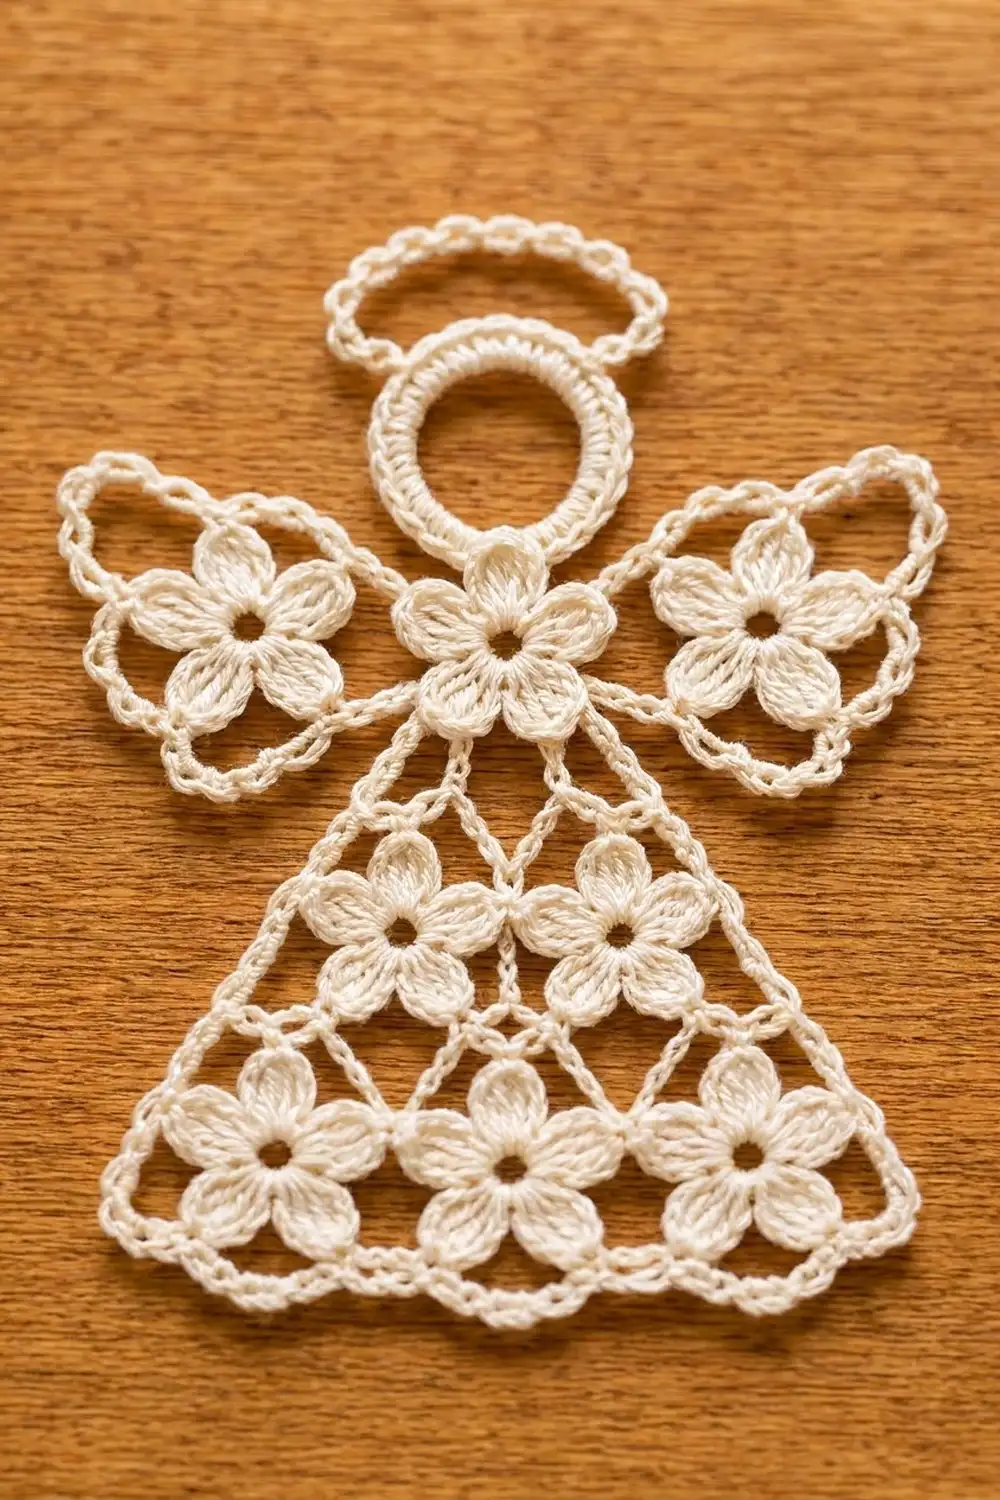
The Blossom Lace Angel is a flat thread-crochet ornament with an oval halo, a round head and a body made from eight small five-petal flowers. One flower forms the neck, one fills each wing and five make up a triangular skirt. Open chain bridges link the flowers into a light diamond lattice, and a picot edging outlines the whole shape.
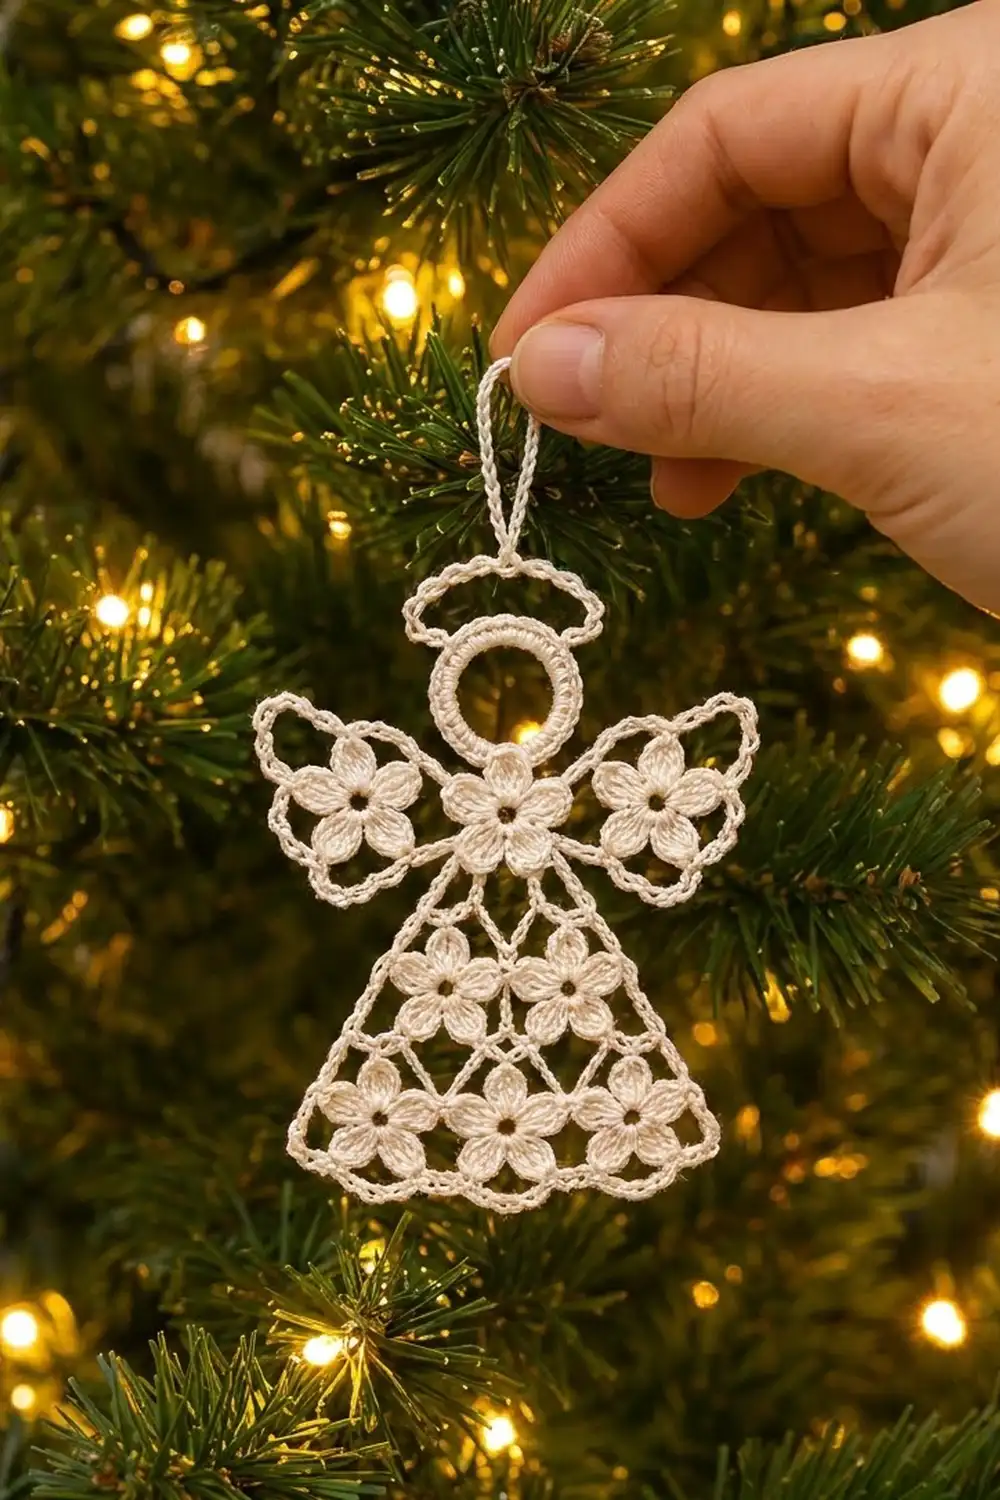
It’s worked in one color, soft ivory cotton thread, so it looks like heirloom lace. The style is vintage and wintry, and it looks lovely against tree lights or hung in a frosty window. Make one as a gift tag or a whole flight of them for your tree.
The pattern uses US crochet terms. After blocking, the angel measures 4.5 in (11.4 cm) wide across the wings and 5 in (12.7 cm) tall from the top of the halo to the hem. The hanging loop adds 1.25 in (3.2 cm), so the total height is 6.25 in (15.9 cm).
Construction is join-as-you-go, so you finish with one single piece. You make the head ring and halo first, then the neck flower joined to the head. The other seven flowers each join to earlier flowers on their last round. A two-row edging then wraps the wings and skirt, and the hanging loop goes on last.
Finished Size and Construction
- Finished size: 4.5 in (11.4 cm) wide × 5 in (12.7 cm) tall, plus a 1.25 in (3.2 cm) loop
- Skill level: Intermediate
- Terminology: US
- Yarn weight: Size 10 crochet cotton thread (Lace, 0)
- Hook: 1.5 mm (US steel 7)
- Number of pieces: 1 (eight flowers joined as you go into one angel)
- Layout: halo, head, neck flower, 1 flower in each wing, 2 + 3 flowers in the skirt
- Flower size: 0.75 in (1.9 cm) across the petal tips
- Size before edging: 3.5 in (8.9 cm) wide × 4.5 in (11.4 cm) tall
- Edging depth: about 0.5 in (1.3 cm) at the deepest wing and hem loops
Materials
Use a mercerized size 10 cotton thread. Mercerized cotton keeps crisp stitch definition, takes stiffener well and won’t fuzz on the tree. Choose a warm ivory or cream for a vintage look, or bright white for a snowy one.
- Ivory size 10 cotton thread: 8 g, about 45 m (49 yd)
These quantities include a margin of about 30% for your test flower and for weaving in ends.
Tools:
- 1.5 mm (US steel 7) crochet hook
- Fine tapestry needle
- 2 locking stitch markers
- Foam blocking board and rustproof pins
- Fabric stiffener or heavy spray starch
- Small sharp scissors
Abbreviations (US Terms)
- ch – chain
- sl st – slip stitch
- sc – single crochet
- hdc – half double crochet
- dc – double crochet
- sp – space
- st(s) – stitch(es)
- rep – repeat
- picot – ch 3, sl st in 3rd ch from hook
- bridge join – in place of a petal’s ch-2 tip: ch 3, sl st in the ch-2 tip of the earlier flower, ch 3
- direct join – in place of a petal’s ch-2 tip: ch 1, sl st in the named stitch, ch 1
Petal names: hold each flower right side up in its final position. Its five petal tips are called Top, Upper-Right (UR), Lower-Right (LR), Lower-Left (LL) and Upper-Left (UL).
Gauge and Checkpoints
Before you start the angel, make one flower on its own as a test piece. Once blocked, it should measure 0.75 in (1.9 cm) across from petal tip to petal tip. In the edging, 12 sc = 1 in (2.5 cm).
Measure at each of these checkpoints:
- Head ring: 1 in (2.5 cm) outer diameter.
- Halo: blocks to an oval 1.5 in (3.8 cm) × 0.5 in (1.3 cm).
- Angel before edging: 3.5 in (8.9 cm) × 4.5 in (11.4 cm).
- Finished angel: 4.5 in (11.4 cm) × 5 in (12.7 cm).
If your test flower is larger than 0.75 in (1.9 cm), switch to a 1.25 mm (US steel 8) hook. If it’s smaller, switch to a 1.75 mm (US steel 6) hook. With thread, gauge affects the look more than the fit, but tight work makes the chain lattice pucker.
Head Ring
Ch 14, sl st in first ch to form a ring.
Rnd 1: Ch 1, work 24 sc into the ring, sl st in first sc. (24 sc)
Rnd 2: Ch 1, *sc in next 5 sc, 2 sc in next sc; rep from * 3 more times, sl st in first sc. (28 sc)
Don’t fasten off. Number the Rnd 2 stitches 1–28 and turn the ring so that sc 1 is at the top. Sc 15 is then at the bottom, sc 11 is on the lower right and sc 19 is on the lower left. Mark sc 15 and sc 19.
Halo
You work the halo straight up from the top of the head.
Stem and ring: Ch 36. Sl st in the 33rd ch from the hook, which is the 4th ch you made. This makes a ring of 32 ch on top of a 4-ch stem.
Halo round: Ch 1, work 48 sc into the 32-ch ring, sl st in first sc. (48 sc)
Sl st in each of the 4 stem ch, then sl st in head sc 1. Fasten off. The top center of the halo is sc 25, directly opposite the stem.
Flowers
Every flower is worked the same way. Only the joins on Rnd 3 change.
Ch 4, sl st in first ch to form a ring.
Rnd 1: Ch 1, work 10 sc into the ring, sl st in first sc. (10 sc)
Rnd 2: Ch 1, *sc in next sc, ch 3, skip next sc; rep from * 4 more times, sl st in first sc. (5 sc, 5 ch-3 sps)
Rnd 3: In each ch-3 sp work (sc, hdc, dc, ch 2, dc, hdc, sc), sl st in first sc. Fasten off. (30 sts, 5 ch-2 tips)
Each petal has 6 stitches plus its ch-2 tip, so 6 × 5 = 30 sts. When a petal needs to join, replace its ch-2 with the named join and finish the petal as usual. The stitch count stays at 30.
Lay the angel flat next to you while you work. That way each new flower sits in its real position, and it’s easy to see which petal is which. Make every bridge chain at the same relaxed tension. Bridges that are too tight pull the lattice out of shape, and that’s hard to fix even with blocking.
Flower 1 (neck): Top: direct join to head sc 15. The other four petals are plain.
Flower 2 (right wing): UL: bridge join to Flower 1 UR.
Flower 3 (left wing): UR: bridge join to Flower 1 UL.
Flower 4 (upper-left skirt): Top: bridge join to Flower 1 LL.
Flower 5 (upper-right skirt): Top: bridge join to Flower 1 LR. UL: bridge join to Flower 4 UR.
Flower 6 (lower-left skirt): UR: bridge join to Flower 4 LL.
Flower 7 (lower-center skirt): UL: bridge join to Flower 4 LR. UR: bridge join to Flower 5 LL. LL: bridge join to Flower 6 LR (this is bridge B).
Flower 8 (lower-right skirt): UL: bridge join to Flower 5 LR. LL: bridge join to Flower 7 LR (this is bridge A).
Flower 7’s Top petal stays free and points up into the lattice. Bridges A and B are the lowest points of the skirt and will anchor the hem. Weave in all the flower ends now, hiding the tails inside the petals.
Checkpoint: lay the angel flat. It should measure 3.5 in (8.9 cm) across the wing flowers and 4.5 in (11.4 cm) from the halo top to the lowest petal tips.
Edging
The edging has two rows. It runs as one arc from the right side of the head, out around the right wing, down the skirt, across the hem and back up to the left side of the head. The arc is split into five sections: right wing, right skirt side, hem, left skirt side and left wing.
Edging gauge: 12 sc = 1 in (2.5 cm).
Row 1 (chain framework)
With the right side facing, join the thread with sc in head sc 11.
- Right wing: ch 7, sc in Flower 2 Top tip; ch 9, sc in Flower 2 UR tip; ch 9, sc in Flower 2 LR tip; ch 9, sc in Flower 2 LL tip.
- Right skirt side: ch 7, sc in Flower 5 UR tip; ch 5, sc in Flower 8 Top tip; ch 5, sc in Flower 8 UR tip; ch 7, sc in Flower 8 LR tip.
- Hem: ch 9, sc in sl st of bridge A; ch 9, sc in sl st of bridge B; ch 9, sc in Flower 6 LL tip.
- Left skirt side: ch 7, sc in Flower 6 UL tip; ch 5, sc in Flower 6 Top tip; ch 5, sc in Flower 4 UL tip; ch 7, sc in Flower 3 LR tip.
- Left wing: ch 9, sc in Flower 3 LL tip; ch 9, sc in Flower 3 UL tip; ch 9, sc in Flower 3 Top tip; ch 7, sc in head sc 19.
Row 1 counts:
| Section | Chains | Anchor sc | Total |
|---|---|---|---|
| Right wing | 34 | 5 | 39 |
| Right skirt side | 24 | 3 | 27 |
| Hem | 27 | 4 | 31 |
| Left skirt side | 24 | 3 | 27 |
| Left wing | 34 | 5 | 39 |
| Total | 143 | 20 | 163 |
The right wing total includes the head sc 11 anchor, and the left wing total includes the head sc 19 anchor.
Row 2 (sc and picots)
Turn and ch 1. Now work back from the left side of the head to the right side.
Work 1 sc in each sc and 1 sc in each ch. In every ch-9 loop, add a picot after the 5th sc. In every ch-7 loop, add a picot after the 4th sc. The ch-5 loops get no picots. At the end, sl st in head sc 10 and fasten off.
Row 2 counts: (stitches worked 1 per existing stitch) + (picots added)
- Left wing: 39 sc + 4 picots
- Left skirt side: 27 sc + 2 picots
- Hem: 31 sc + 3 picots
- Right skirt side: 27 sc + 2 picots
- Right wing: 39 sc + 4 picots
- Total: 163 sc + 15 picots
Why the math works: the two halves mirror each other loop for loop. Each wing runs 7-9-9-9 and each skirt side runs 7-5-5-7, so both sides block to the same shape. The hem has 31 sts, and at 12 sc per inch that gives a straight base of 2.6 in (6.6 cm). That matches the width across Flowers 6–8, so the hem lies flat instead of rippling. Row 2 adds no extra sc, only picots, so the edge doesn’t flare.
Hanging Loop
Join the thread with sl st in halo sc 25. Ch 30, sl st in the same sc. Turn and work 40 sc into the ch-30 loop, then sl st in halo sc 25. Fasten off. The loop stands 1.25 in (3.2 cm) above the halo.
Final Blocking
- Weave in any remaining ends and trim them close.
- Soak the angel in fabric stiffener (full strength or diluted with water) until it’s wet through.
- Press out the extra liquid in a towel. Don’t wring it.
- Pin the head into a circle 1 in (2.5 cm) across. Pin the halo into an oval 1.5 × 0.5 in (3.8 × 1.3 cm).
- Pin out each flower’s petal tips evenly so the flower measures 0.75 in (1.9 cm).
- Pin every bridge straight so the skirt shows clean diamonds.
- Pin each edging loop at its picot. Check the width, 4.5 in (11.4 cm), and the height, 5 in (12.7 cm).
- Pin the hanging loop into a neat teardrop.
- Let the angel dry completely, at least 12 hours, before unpinning.
Final Quality-Control Checklist
- Head Rnd 2 has 28 sc and the halo has 48 sc.
- Every flower has 30 sts and 5 tips.
- There are 11 bridges in total: 4 from the neck flower and 7 inside the skirt. There’s also 1 direct join to the head.
- Edging Row 1 has 163 sts, including 20 anchors.
- Edging Row 2 has 163 sc + 15 picots.
- The left and right halves mirror each other exactly.
- The hem is straight and measures 2.6 in (6.6 cm).
- The finished angel measures 4.5 × 5 in (11.4 × 12.7 cm) and holds its shape when hung.
Troubleshooting
- Head ring cups: check that Rnd 2 has all 4 increases. If it still cups, work Rnd 1 more loosely.
- Halo twists: the 32-ch ring was twisted when you closed it. Undo it and make sure the chain lies flat before the sl st.
- Skirt looks crooked: a bridge went into the wrong petal. Check each join against the flower list.
- Hem ripples: your edging is loose. Work Row 2 with a smaller hook.
- Hem pulls up: your edging is tight. Add 1 ch to each hem loop and to the matching loops on both sides.
- Wings look uneven: recount the Row 1 loops on each wing. They should be 7-9-9-9.
- Angel droops on the tree: re-block it with a stronger stiffener.
Care
Store the angel flat in tissue paper. If it gets dusty, rinse it gently in cool water, then stiffen and block it again.
Final Notes
The measurements build on each other. A 0.75 in (1.9 cm) flower and a 1 in (2.5 cm) head give an angel of 3.5 × 4.5 in (8.9 × 11.4 cm) before the edging. The mirrored 163-stitch edging adds 0.5 in (1.3 cm) of depth and brings it to 4.5 × 5 in (11.4 × 12.7 cm), and the loop adds 1.25 in (3.2 cm) on top. Check each stage as you go, and every angel you make will match.
Happy crocheting!