
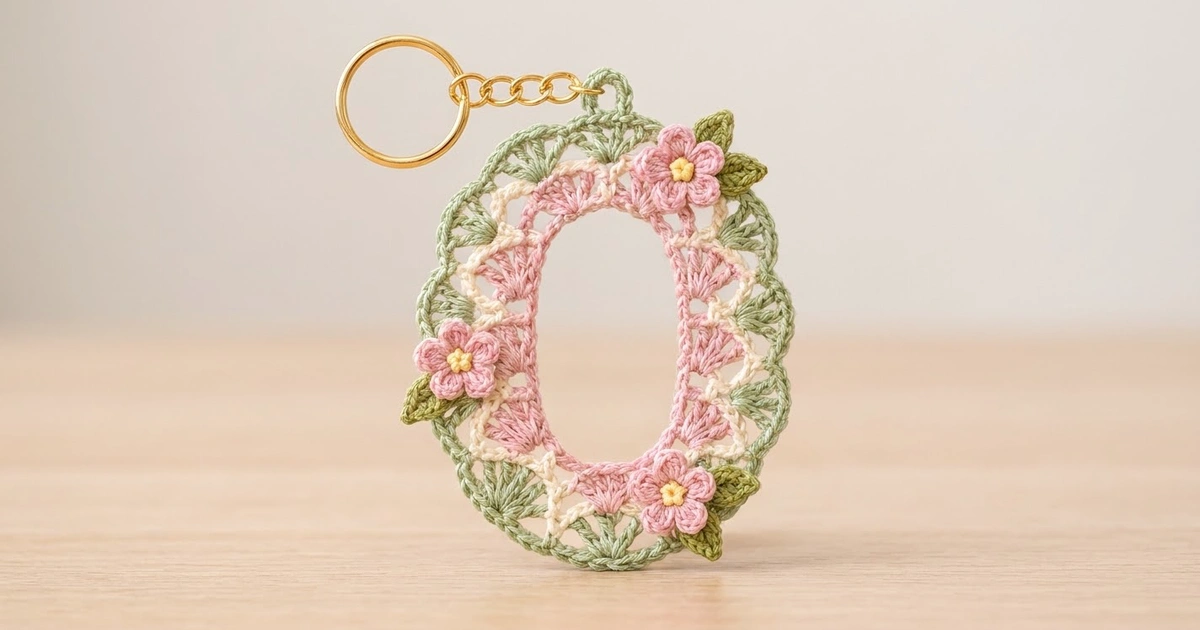
The Blossom Lace Letter O is a small, lacy oval that you can clip onto a tote bag, backpack or set of keys. Rings of fans surround a tall oval opening, so the charm reads clearly as the letter “O”. Three tiny flowers on top add a garden feel.
The color scheme is soft and vintage: a dusty pink inner ring, cream chain arches, a sage green outer ring of fans, and pink blossoms with butter-yellow centers. Fine cotton gives crisp stitches and a light, airy look.
This pattern uses US crochet terms. The finished charm measures 4 in (10.2 cm) tall × 3.25 in (8.3 cm) wide, not counting the hanging loop and hardware.
The main motif is one piece, worked in joined rounds around a chain ring and then pinned into an oval while blocking. You change color at the start of each band. After that you make three flowers and five leaves, sew them on, add a hanging loop and attach a key ring.
Finished Size and Construction
- Finished size: 4 in (10.2 cm) tall × 3.25 in (8.3 cm) wide
- Center opening: 2.25 × 1.5 in (5.7 × 3.8 cm)
- Skill level: Intermediate
- Terminology: US crochet terms
- Yarn weight: Fingering (Super Fine, #1) cotton or size 3 crochet thread
- Hook: 2.25 mm (US B-1)
- Number of pieces: 1 main motif, plus 3 flowers and 5 leaves as appliqués
- Layout: Single oval motif with no joining
- Size before border (after Rnd 5): 3.75 × 3 in (9.5 × 7.6 cm)
- Border depth: about 1/8 in (0.3 cm) on each side
Materials
Use smooth mercerized cotton. It holds the shape of the fans, shows the lace clearly and stands up to a charm that gets handled every day. Avoid fuzzy or very stretchy yarns, because the opening will lose its shape.
- Dusty pink: 5 g / 14 m (Rnds 1–2 and flower petals)
- Cream: 3 g / 8 m (Rnds 3–4)
- Sage green: 5 g / 14 m (Rnds 5–6, hanging loop and leaves)
- Soft yellow: 1 g / 3 m (flower centers)
Tools:
– 2.25 mm (US B-1) crochet hook
– Tapestry needle with a small eye
– 1 in (2.5 cm) gold split key ring with a short chain and a jump ring
– Rustproof pins and a blocking mat
– Spray bottle
– Scissors
– Stitch marker
The quantities above include a margin of about 25% for swatching and weaving in ends.
Abbreviations (US Terms)
- ch – chain
- sl st – slip stitch
- sc – single crochet
- hdc – half double crochet
- dc – double crochet
- sk – skip
- sp – space
- st(s) – stitch(es)
- rep – repeat
- Rnd – round
Special stitches:
– Fan: 5 dc in the same stitch (Rnd 2) or 7 dc in the same stitch (Rnd 5).
– V-st: (dc, ch 2, dc) in the same stitch.
Gauge and Checkpoints
Gauge: 8 sc = 1 in (2.5 cm) with a 2.25 mm hook.
Make Rnds 1–2 first as your test. If the size matches, keep going. If it doesn’t, rip back and change your hook before you have used much yarn.
Checkpoints (measure with the piece pinned flat as an oval):
– After Rnd 1: the inner edge measures about 6 in (15.2 cm) around, and the opening flattens to 2.25 × 1.5 in (5.7 × 3.8 cm).
– After Rnd 2: 2.75 × 2 in (7.0 × 5.1 cm)
– After Rnd 4: 3.25 × 2.5 in (8.3 × 6.4 cm)
– After Rnd 5: 3.75 × 3 in (9.5 × 7.6 cm)
– After Rnd 6: 4 × 3.25 in (10.2 × 8.3 cm)
If your piece is too big: go down to a 2.0 mm hook, or tighten your chains. Loose chain arches in Rnds 3–4 are the most common cause.
If your piece is too small or cups: go up to a 2.5 mm hook. If only the fans are cupping, make your dc a little taller.
Being 1/8 in (0.3 cm) off at each checkpoint is fine, because blocking evens it out.

Main Motif
Turn the piece only where the pattern tells you to. Work every round with the right side facing you.
Rnd 1 (Pink)
Ch 48 and join with a sl st to the first ch to form a ring, taking care not to twist the chain.
Ch 1, sc in each ch around, then join with a sl st to the first sc. (48 sc)
The ring will look round for now. You will shape it into a tall oval while blocking.
Rnd 2 (Pink): Pink Fans
Ch 1. Sc in the same st as the join. Sk 1 st, work a 5-dc fan in the next st, sk 1 st, sc in the next st. Rep from * around, but leave out the final sc on the last repeat. Join with a sl st to the first sc. Fasten off.
(12 fans and 12 sc = 72 sts)
Each repeat uses 4 sts of Rnd 1, and 48 ÷ 4 = 12 repeats. The 3rd dc of each fan is its center stitch.
Rnd 3 (Cream): Arches and V-Stitches
Join cream with a sc in the center dc of any pink fan. Ch 4, V-st in the next sc, ch 4, sc in the center dc of the next fan. Rep from * around, but on the last repeat end with ch 4 and join to the first sc.
(12 sc, 12 V-sts, 24 ch-4 sps)
The V-sts sit between the pink fans and form the cream points.
Rnd 4 (Cream): Tacked Arches
Sl st in each of the next 4 ch, sl st in the next dc, then sl st into the ch-2 sp of the V-st.
Ch 1. Sc in the ch-2 sp of the V-st, ch 4, sc in the next sc (the one above a pink fan), ch 4. Rep from * around and join to the first sc. Fasten off.
(24 sc, 24 ch-4 sps)
Of these, 12 sc sit at the V points and 12 sc sit above the pink fans.
Rnd 5 (Green): Green Fans
Join green in any sc that sits above a V-st. Ch 3 (counts as dc) and work 6 dc in the same sc. Sk the ch-4 sp, sc in the next sc (above a pink fan), sk the ch-4 sp, work a 7-dc fan in the next sc (above a V-st). Rep from * around, but leave out the last fan. End with sc in the last sc-above-fan, sk the ch-4 sp, and join to the top of the beginning ch-3.
(12 fans of 7 dc and 12 sc = 96 sts)
This is a growth round, and 96 sts is its own complete count. Each green fan starts at a cream point and spreads out to sit between the pink fans. Place a marker on the 4th dc (the center) of the fan you will use as the top of the charm.
Border
Border Gauge
The Rnd 6 border is a scalloped sc edge at the same gauge as before: 8 sc = 1 in (2.5 cm). It adds about 1/8 in (0.3 cm) on each side.
Rnd 6 (Green): Scalloped Edge
Ch 1. Sc in the same st as the join, sc in the next 2 dc, 3 sc in the next dc (the center dc), sc in the next 3 dc, and sk the next sc. Sc in the next 3 dc, 3 sc in the next dc, sc in the next 3 dc, sk the next sc. Rep from * around and join to the first sc. Do not fasten off.
Count per fan: 7 sc worked one per dc + 2 extra sc at the center = 9 sc. The sc between the fans is skipped, so it adds 0.
Total: 12 × (7 + 2) = 84 + 24 = 108 sc
Why the math works: The 3 sc at each center dc turn the fan tip outward to make the scallop point. Skipping the Rnd 5 sc pulls the edge in between fans, which makes the dip. Because the count stays at 9 per fan and every fan is treated the same, the scallops come out even all the way around. You don’t add anything at the seams between fans, so the edge lies flat instead of rippling.
Hanging Loop (Green)
Sl st along Rnd 6 to the middle sc of the 3-sc group at the marked top fan. Ch 12, then sl st in the same sc to form a loop.
Work 18 sc into the ch-12 loop and sl st into the base sc. Fasten off, leaving a 6 in (15.2 cm) tail. Use the tail to stitch through the base of the loop twice so it is reinforced.
The finished tab sticks up about 1/2 in (1.3 cm).
Flowers and Leaves (Appliqués)
Flower (make 3)
Center (yellow): Make a magic ring. Ch 1, work 5 sc into the ring, and join to the first sc. Pull the ring closed and fasten off. (5 sc)
Petals (pink): Join pink in any sc. (Sl st, ch 2, 2 dc, ch 2, sl st) in the same sc, then move to the next sc. Rep from * 5 times in total and join. Fasten off, leaving a 10 in (25.4 cm) tail for sewing. (5 petals)
Each flower measures about 3/4 in (1.9 cm) across.
Leaf (make 5)
With green, ch 6. Starting in the 2nd ch from the hook, work sl st, sc, hdc, dc, then sc in the last ch. Fasten off, leaving an 8 in (20.3 cm) tail.
Each leaf is about 0.6 in (1.5 cm) long and comes to a point.
Placement
Picture the charm as a clock face, with the hanging loop at 12.
- Upper right flower: place it at about 1 o’clock, over the pink and cream bands. Tuck one leaf under it on each side, pointing outward over the green band.
- Left flower: place it at about 9 o’clock, with one leaf tucked under its lower left edge.
- Lower right flower: place it at about 5 o’clock, with one leaf tucked under each side.
Sew the leaves on first, stitching through their bases. Then sew each flower through its yellow center and the inner base of each petal, so the petal tips stay free.
Final Blocking
- Weave in all ends, except leave the flowers unsewn if you want to block flat first.
- Spray the motif until it is evenly damp, but not dripping.
- Pin the opening into a tall oval of 2.25 × 1.5 in (5.7 × 3.8 cm), with the marked fan at the top and the opposite fan at the bottom.
- Ease the outer edge out to 4 × 3.25 in (10.2 × 8.3 cm). Put one pin at the tip of each scallop.
- Open each pink and green fan with your fingertips so the dc spread out evenly.
- Leave it to dry completely, which takes about 4–6 hours.
- If you haven’t already, sew on the leaves and flowers, then attach the key ring to the hanging loop with the jump ring.
Final Quality-Control Checklist
- Rnd 2 has 12 pink fans and Rnd 5 has 12 green fans.
- Rnd 6 has 108 sc and 12 even scallops.
- The opening measures 2.25 × 1.5 in (5.7 × 3.8 cm).
- The overall size is 4 × 3.25 in (10.2 × 8.3 cm).
- The hanging loop sits at the tip of the top fan and is centered.
- Every chain arch lies flat, with none twisted or sagging.
- The flowers are at 1, 9 and 5 o’clock and the leaves are firmly tacked.
- All ends are woven in and none show on the front.
Troubleshooting
The opening is round instead of oval.
Pin it more firmly at the top and bottom while blocking, and let it dry fully before you unpin it.
The fans cup or ruffle.
Cupping means your stitches are too tight, so loosen up or go up a hook size. Ruffling means they are too loose, so tighten up or go down a hook size.
The cream arches droop.
Your chains are too loose. Work them on a smaller hook, or tighten your tension on the chain only.
Rnd 6 doesn’t come to 108.
Check that you skipped every Rnd 5 sc and worked exactly 3 sc into each center dc.
The flowers curl.
Steam them lightly and press them flat under your fingers before sewing.
The loop stretches.
Add a second round of sl sts around the loop’s sc.
Care
Hand wash in cool water with mild soap, press out the water in a towel, and reshape it flat to dry. Don’t wring it or put it in the dryer.

Final Notes
Here is the measurement chain:
– Rnd 1 ring: 48 sc, about 6 in (15.2 cm) around, shaped into a 2.25 × 1.5 in (5.7 × 3.8 cm) opening
– Rnd 2: 72 sts, 2.75 × 2 in (7.0 × 5.1 cm)
– Rnd 4: 3.25 × 2.5 in (8.3 × 6.4 cm)
– Rnd 5: 96 sts, 3.75 × 3 in (9.5 × 7.6 cm)
– Rnd 6 border: 108 sc, 4 × 3.25 in (10.2 × 8.3 cm)
If you match these checkpoints as you go, your letter O will block into a neat, even oval ready for its blossoms.
Happy crocheting!