

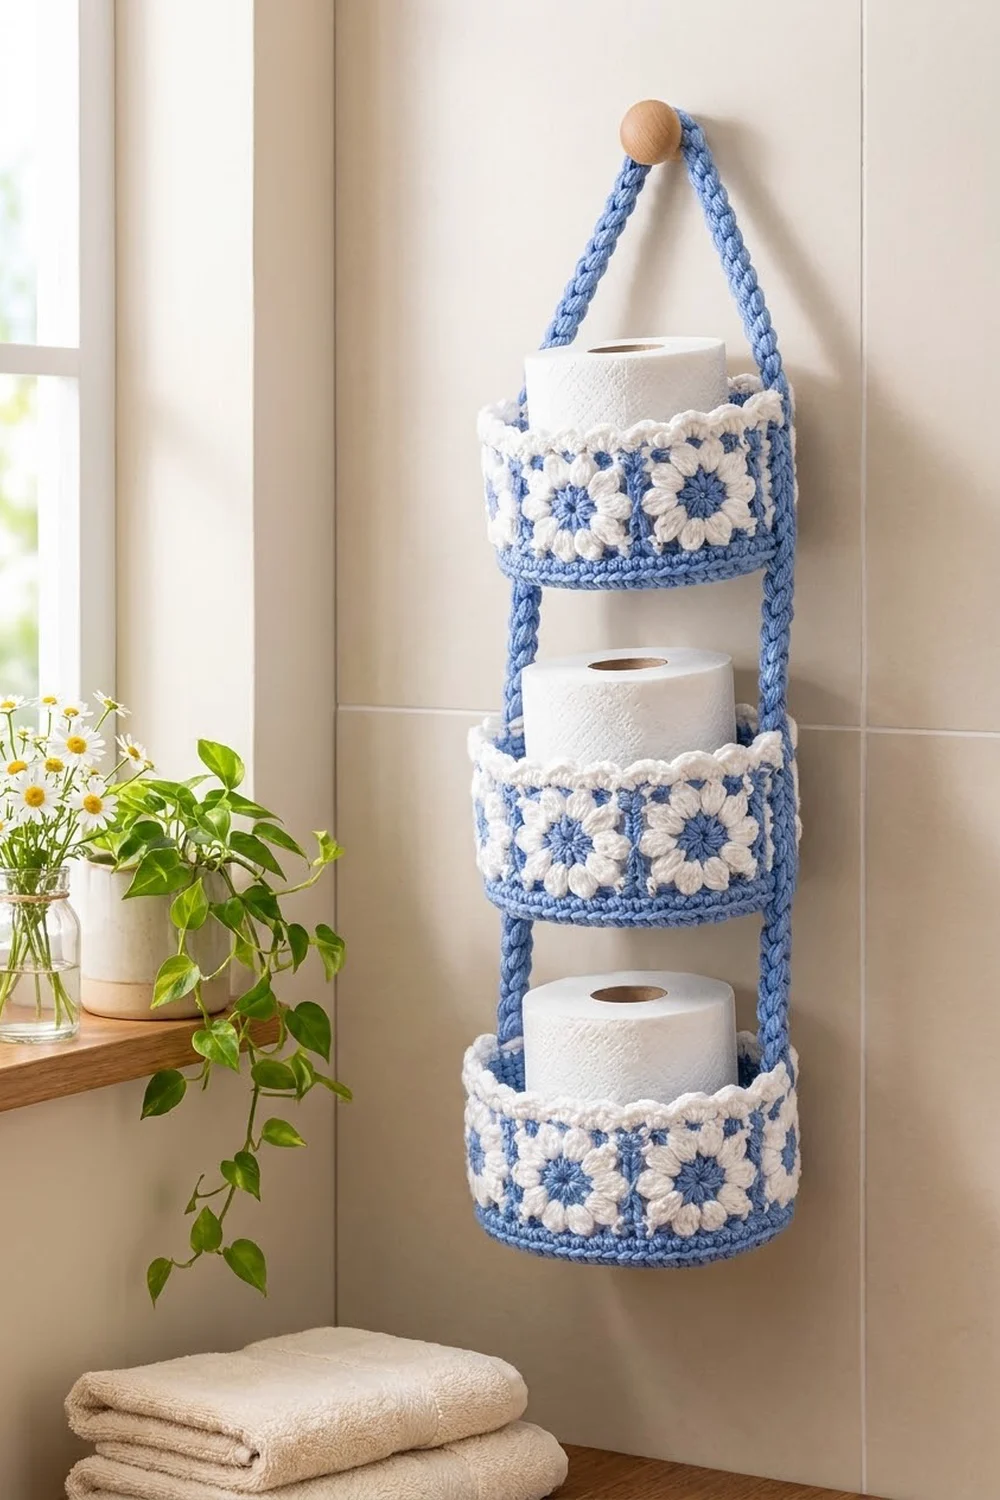
This three-tier hanging organizer is made from three matching cornflower-blue baskets connected by two chunky braided straps. Each basket has a solid single crochet base, a short blue wall, a band of white-and-blue flower squares, and a white scalloped rim. Hung from a peg, it holds three standard toilet paper rolls, small towels, or bath supplies.
The palette is simple: cornflower blue for the bases, walls, straps, and flower centers, and bright white for the petals and rim. The look is cottage-style and fresh, and it suits a bathroom, nursery, or craft corner.
All instructions use US crochet terms. Each basket measures 6 in (15.2 cm) square at the base and 3.75 in (9.5 cm) tall. The assembled organizer hangs about 22 in (55.9 cm) from the bottom basket to the top of the hanging point.
Construction is modular. You work each base in the round as a square and then turn up the wall. Next you make twelve small flower squares, join them into a ring, and crochet that ring to the top of the wall. A white sc round and a shell round finish the rim. Last, you braid two straps and sew them to the sides of all three baskets.
Finished Size and Construction
- Finished size (each basket): 6 in x 6 in (15.2 cm x 15.2 cm) base, 3.75 in (9.5 cm) tall
- Finished size (assembled): about 6 in (15.2 cm) wide x 22 in (55.9 cm) long
- Skill level: Intermediate
- Terminology: US
- Yarn weight: Worsted (#4) cotton
- Hook: 4.0 mm (G-6)
- Number of pieces: 3 basket bodies, 36 flower squares (12 per basket), 6 cord strands braided into 2 straps
- Layout: 3 baskets stacked vertically, 2.5 in (6.4 cm) apart, joined by 2 side straps
- Flower square size: 2 in x 2 in (5.1 cm x 5.1 cm)
- Basket height before rim: 3 in (7.6 cm)
- Rim depth: 0.75 in (1.9 cm)
Materials
Use a worsted cotton or cotton blend with good stitch definition. Cotton holds the basket shape well and washes easily. Avoid stretchy acrylic, which can make the walls slump under a full roll.
- Cornflower blue: 300 g / 570 m (about 623 yd)
- White: 100 g / 190 m (about 208 yd)
Both quantities include a margin of about 15% for gauge differences and seaming.
Tools:
- 4.0 mm (G-6) crochet hook
- 4 locking stitch markers
- Tapestry needle
- Scissors
- Measuring tape
- Rust-proof pins and a blocking mat
- Spray bottle
- Optional: a 4.5 in (11.4 cm) wide jar or box to shape the walls while blocking
Abbreviations (US Terms)
- ch – chain
- sl st – slip stitch
- sc – single crochet
- hdc – half double crochet
- dc – double crochet
- BLO – back loop only
- MR – magic ring
- st(s) – stitch(es)
- sp – space
- RS / WS – right side / wrong side
Special stitch – 2-dc cluster (cl): Yarn over, insert hook in the stitch, pull up a loop, yarn over and pull through 2 loops. Repeat once in the same stitch, then yarn over and pull through all 3 loops on the hook.
Beginning cluster (beg cl): Ch 2, then work one partial dc as above and pull through both loops on the hook.
Gauge and Checkpoints
Gauge: 16 sc and 16 rounds = 4 in (10.2 cm), worked firmly in the round.
Make one flower square before anything else. It should measure 2 in (5.1 cm) per side, unblocked. This single square tells you if your tension suits both the band and the base.
Base checkpoints (measured side to side, not corner to corner):
- After Round 4: 2 in (5.1 cm)
- After Round 8: 4 in (10.2 cm)
- After Round 12: 6 in (15.2 cm)
Wall checkpoints:
- After Round 16 (joining round): wall is 1 in (2.5 cm) tall
- With band attached: 3 in (7.6 cm) tall
- After Round 18: 3.75 in (9.5 cm) tall
If your pieces are too big, go down to a 3.75 mm hook. If they are too small, go up to a 4.5 mm hook. Check the square and the base with the same hook. The square must match the base exactly, because 3 squares must fit along each 6 in (15.2 cm) side.
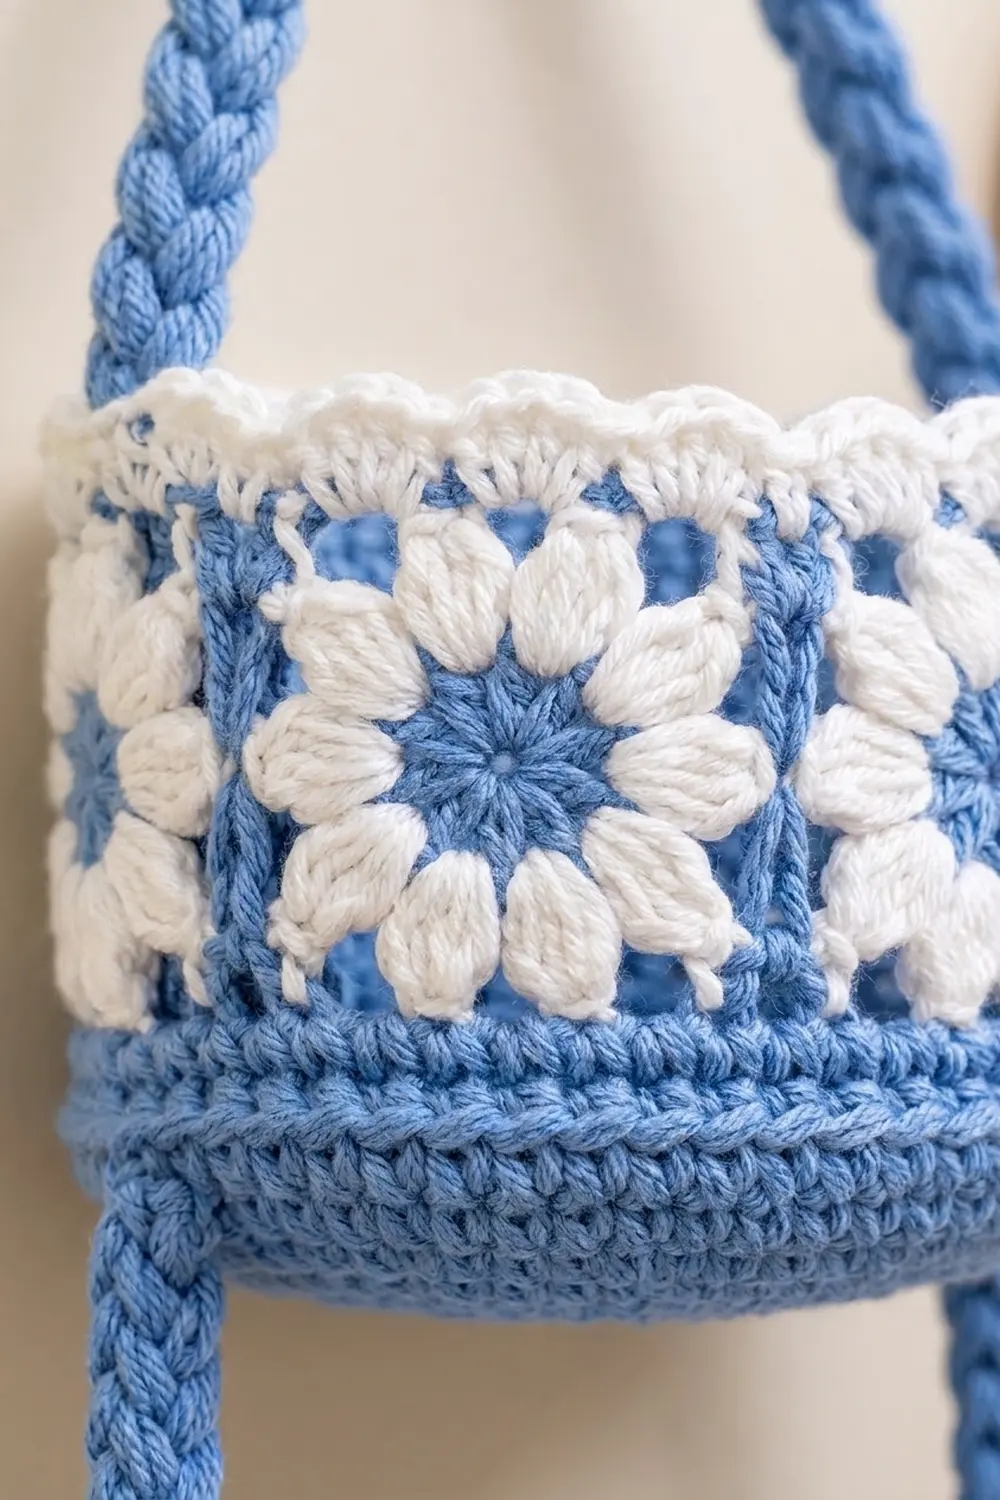
Basket Body (make 3)
Work in joined rounds with the RS facing. Ch 1 at the start of each round does not count as a stitch.
Round 1: With blue, MR, ch 1, 8 sc in ring, sl st to first sc to join. (8 sts)
Round 2: Ch 1, [3 sc in next st, sc in next st] 4 times, join. (16 sts) Place a marker in the middle sc of each 3-sc group. These are the corner stitches.
Rounds 3–12: Ch 1, sc in each st around, working 3 sc in each marked corner st. Move each marker up to the middle sc of the new 3-sc group, then join. Each round adds 8 sts.
- Round 3: 24 sts
- Round 4: 32 sts
- Round 5: 40 sts
- Round 6: 48 sts
- Round 7: 56 sts
- Round 8: 64 sts
- Round 9: 72 sts
- Round 10: 80 sts
- Round 11: 88 sts
- Round 12: 96 sts
The base now measures 6 in (15.2 cm) per side. Keep the 4 corner markers in place, because you will need them to line up the flower band.
Round 13: Ch 1, sc in BLO of each st around, join. (96 sts) This turning round makes a crisp ridge where the base meets the wall. Move each marker up to the stitch directly above the corner stitch.
Rounds 14–15: Ch 1, sc in each st around, join. (96 sts) Keep the markers moving up. Fasten off after Round 15.
The wall is now 0.75 in (1.9 cm) tall. There are 24 sts between the markers on each side, counting from one marked st up to but not including the next one.
Flower Squares (make 36)
Round 1: With blue, MR, ch 1, 8 sc in ring, join. (8 sts) Fasten off.
Round 2: Join white in any st. Beg cl in the same st, ch 2, [cl in next st, ch 2] 7 times, sl st to top of beg cl. (8 clusters, 8 ch-2 sps) Fasten off. These are the 8 white petals around the blue center.
Round 3: Join blue in any ch-2 sp. Ch 3 (counts as dc), (dc, ch 2, 2 dc) in the same sp for the corner, 2 hdc in next sp. *(2 dc, ch 2, 2 dc) in next sp, 2 hdc in next sp; repeat from * 2 more times, sl st to top of ch-3. (24 sts: 16 dc and 8 hdc, plus 4 corner ch-2 sps) Each side has 6 sts between the corner spaces.
Round 4: Ch 1, sc in each st around, working 2 sc in each corner ch-2 sp, join. Total: 24 sts worked one per existing stitch + 8 corner sc added = 32 sts. Fasten off with a 12 in (30.5 cm) blue tail.
Each side has 8 sts: 6 side sts plus 1 corner sc at each end. This count of 8 already includes both corner stitches. The square measures 2 in (5.1 cm) per side.
Braided Straps (make 6 strands, braid into 2 straps)
Strand: With blue, ch 113. Sc in the back bump of 2nd ch from hook and in each ch across. (112 sc) Fasten off. Each strand is 28 in (71.1 cm) long.
Braiding: Lay 3 strands side by side and sew their top ends together. Braid them firmly and evenly into a 3-strand plait, then sew the bottom ends together. The finished strap should be about 24 in (61.0 cm) long. Make a second strap the same way.
Make All Pieces
Totals:
- Basket bodies: 3 (blue)
- Flower squares: 36 (blue Round 1, white Round 2, blue Rounds 3–4)
- Cord strands: 6 (blue), braided into 2 straps
Band layout per basket (one ring of 12 squares, seen from above):
          Back:  [F][F][F]
Left: [F][F][F]          [F][F][F] :Right
          Front: [F][F][F]
There are 3 squares per side, and a seam between two squares sits at each base corner.
Hanging layout (front view):
        /\        <- straps sewn together, hanging point
       /  \
      |    |      <- 6.25 in (15.9 cm) free strap each side
   [ BASKET 1 ]
      |    |      <- 2.5 in (6.4 cm) gap
   [ BASKET 2 ]
      |    |      <- 2.5 in (6.4 cm) gap
   [ BASKET 3 ]
Joining
Squares into a ring: Hold 2 squares RS together. With the blue tail, whipstitch through the BLO of the matching side edges, stitch for stitch, 8 sts to 8 sts. Join 12 squares into a strip, then join the last square to the first to close the ring. Keep the stitches snug but not tight, so the seams lie flat like a single blue line between the flowers.
Band to wall (Round 16): Turn the basket RS out. Set the ring on top of the wall so that one seam sits above each corner marker. Join blue at a corner. Working through both loops of Round 15 and the bottom edge of the squares together, ch 1, sc in each st around, join. (96 sts) This adds no extra stitches because 12 squares x 8 sts = 96 sts. Fasten off.
The wall now measures 3 in (7.6 cm): 1 in (2.5 cm) of blue plus the 2 in (5.1 cm) flower band.
Straps to baskets: Lay the 3 finished baskets in a column with 2.5 in (6.4 cm) gaps between them. Lay one strap down the center of the left sides, across the middle squares, and the other down the center of the right sides. Line up the bottom end of each strap with the base ridge of the bottom basket.
Using the strap positions from the bottom up:
- 0–3.75 in (0–9.5 cm): bottom basket
- 3.75–6.25 in (9.5–15.9 cm): gap
- 6.25–10 in (15.9–25.4 cm): middle basket
- 10–12.5 in (25.4–31.8 cm): gap
- 12.5–16.25 in (31.8–41.3 cm): top basket
With blue yarn, sew each strap to the wall with small stitches along both strap edges, from base ridge to rim. That leaves 7.75 in (19.7 cm) of free strap on each side. Overlap the two top ends by 1.5 in (3.8 cm) and sew through all layers to make the hanging point. That leaves 6.25 in (15.9 cm) of visible strap rising on each side.
Checkpoint: The assembled organizer is about 22 in (55.9 cm) long when hanging.
Border (Rim)
Work the rim on each basket after the band is attached and before the straps are sewn on. Leave the straps loose until all 3 rims are done.
Border gauge: 16 sc = 4 in (10.2 cm), the same as the body.
Round 17: Join white at a corner seam on the top edge of the band. Ch 1, sc in each st around, join. (96 sts, 24 per side)
Round 18: Ch 1, *sc in next st, sk 1 st, 5 dc in next st, sk 1 st; repeat from * around, sl st to first sc. (24 scallops, 6 per side) Fasten off and weave in the end.
Why the math works: Each side has 3 squares x 8 sts = 24 sts. Each scallop uses 4 sts, so each side holds 24 ÷ 4 = 6 scallops, and 4 sides x 6 = 24 scallops. Each scallop starts on a sc, so the rim forms an even wave all the way around. Round 17 adds 0.25 in (0.6 cm) and Round 18 adds 0.5 in (1.3 cm), for a rim depth of 0.75 in (1.9 cm).
Final Blocking
- Weave in all ends before blocking.
- Spray each basket until it is damp but not soaked.
- Slip a 4.5 in (11.4 cm) box or jar inside, padded with a towel, so the walls stand straight.
- Pinch the scallops into even, rounded shells with your fingers.
- Check that each side measures 6 in (15.2 cm) and that each wall is 3.75 in (9.5 cm) tall.
- Lay the braided straps flat, pin them straight, and mist them.
- Let everything dry completely before sewing on the straps.
Final Quality-Control Checklist
- Each base has 96 sts in Round 12 and measures 6 in (15.2 cm) per side.
- Every flower square has 32 sts in Round 4 and measures 2 in (5.1 cm).
- Each ring has 12 squares, with one seam at each base corner.
- Round 16 has 96 sts, and the band is not puckered or stretched.
- Each rim has 24 scallops, 6 per side.
- The straps are centered on the left and right sides of all baskets.
- The gaps between baskets are 2.5 in (6.4 cm).
- The hanging point is sewn securely through all layers.
Troubleshooting
The base cups upward: Your tension is too tight. Go up a hook size, or check that you are not missing corner increases.
The base ruffles: Make sure you work exactly 3 sc in each corner st, not in the stitches next to it.
The band is wider than the wall: Your squares are too big. Remake them with a smaller hook so each one measures 2 in (5.1 cm).
The seams between squares bulge: Whipstitch through the back loops only, and don’t pull the yarn tight.
The scallops look uneven: Count 96 sts in Round 17 before starting Round 18.
The baskets tilt when hanging: Re-measure each strap from the bottom up, and match the positions on both sides.
The straps stretch: Braid them more firmly, and add a few extra tacking stitches through the baskets.
Care
Hand wash in cool water with mild soap, gently press out the water, and dry flat over a form. Do not tumble dry, because heat can shrink cotton and warp the baskets.
Final Notes
The whole organizer depends on one measurement chain. With a gauge of 16 sc = 4 in (10.2 cm), a 96-st base measures 6 in (15.2 cm) per side. Each 2 in (5.1 cm) square has 8 sts per side, so 12 squares give the same 96 sts. A 4-st scallop repeat then divides evenly into 24 shells. Check your gauge, the base, and one square, and the rest of the project falls into place.
Happy crocheting!