
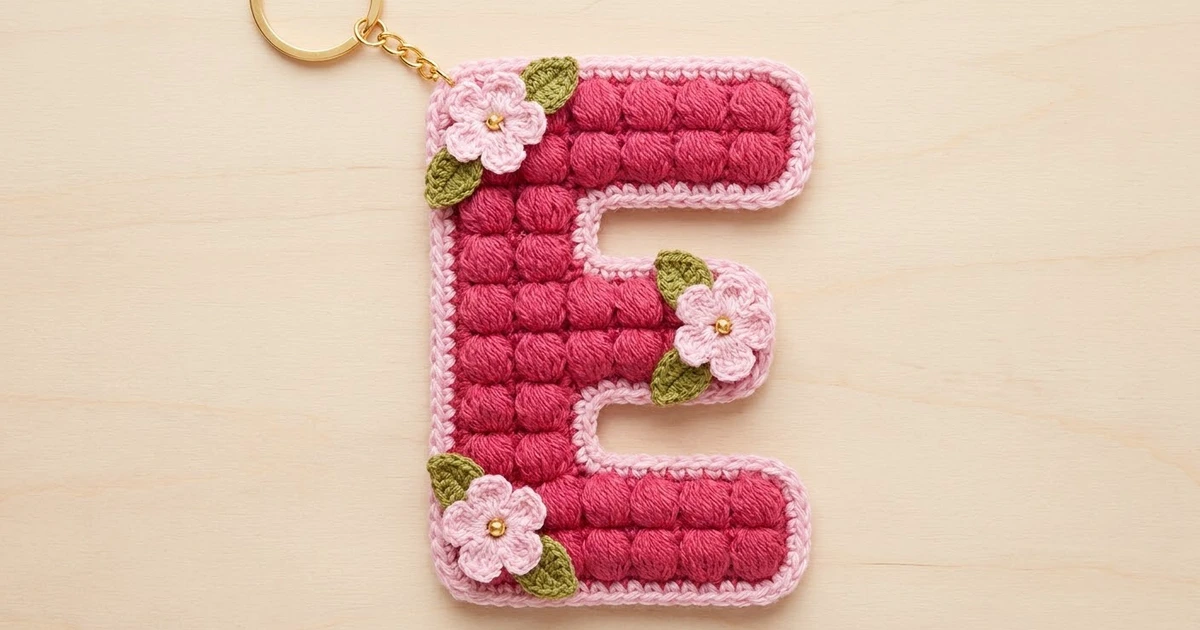
This little keychain is a chunky, squishy capital “E” made of raspberry puff stitches. A soft pink border runs around it, and three tiny flowers with gold centers finish it off. It’s bright, tactile and personal, so it makes a good initial gift, bag charm or belt-loop accessory.
The palette is simple. Raspberry pink forms the letter, light pink outlines it and makes the flowers, and olive green adds five small leaves. Gold beads and a gold keyring warm up the whole piece.
This pattern uses US crochet terms. The finished keychain measures 3 in wide × 4 in tall (7.6 × 10.2 cm), not counting the hardware.
The letter is worked flat in one piece from the bottom up. The rows alternate between puff rows and single crochet rows. You shorten the work to the spine by leaving stitches unworked, and you add the middle arm and top bar by chaining out from the spine. One round of border smooths the outline. Then you sew on the flowers, leaves, beads and keyring.
Finished Size and Construction
- Finished size: 3 in × 4 in (7.6 × 10.2 cm)
- Skill level: Easy–Intermediate
- Terminology: US crochet terms
- Yarn weight: DK (light worsted, #3) cotton
- Hook: 3.5 mm (E-4) for the letter and border; 2.5 mm (C-2) for the flowers and leaves
- Number of pieces: 1 letter, plus 3 flowers and 5 leaves sewn on as decoration
- Layout: a single standalone letter; nothing is joined
- Piece size before border: 2.75 in × 3.75 in (7.0 × 9.5 cm)
- Border depth: 1 round of sc, adding 0.125 in (0.3 cm) on each side
Materials
Use a smooth mercerized or combed cotton in DK weight. Cotton shows off the puff stitches crisply and holds its shape on a keychain that gets handled a lot. Avoid fuzzy or very splitty yarns, because they blur the puffs.
- Color A – Raspberry Pink: 12 g / 28 m
- Color B – Light Pink: 6 g / 14 m
- Color C – Olive Green: 1 g / 2 m
These quantities include a small safety margin.
Tools:
– 3.5 mm (E-4) and 2.5 mm (C-2) crochet hooks
– Tapestry needle
– 3 gold beads, 4–5 mm (0.2 in / 0.5 cm)
– Sewing needle and pink thread for the beads
– 1 gold split keyring, 1 in (2.5 cm), with about 1 in (2.5 cm) of gold chain and a jump ring
– 2 pairs of flat-nose pliers
– Stitch markers, a ruler and blocking pins
Abbreviations (US Terms)
- ch – chain
- sl st – slip stitch
- sc – single crochet
- hdc – half double crochet
- dc – double crochet
- sc2tog – single crochet 2 together
- st(s) – stitch(es)
- RS / WS – right side / wrong side
Puff stitch (puff): (Yarn over, insert hook in the stitch, yarn over and pull up a loop to about 0.4 in / 1.0 cm) 3 times. You now have 7 loops on the hook. Yarn over and draw through all 7 loops. Each puff counts as 1 stitch. Do not chain to close it.
Gauge and Checkpoints
Your first two rows are your gauge test. Measure them before you go on.
- After Row 2: the bottom bar measures 2.75 in (7.0 cm) wide across 15 sts and about 0.4 in (1.0 cm) tall.
- Row gauge: each pair of rows (1 puff row + 1 sc row) measures 0.4 in (1.0 cm).
- After Row 10: the piece is 2.0 in (5.1 cm) tall. The spine is 0.9 in (2.3 cm) wide, and the middle arm reaches 2.4 in (6.1 cm) from the left edge.
- After Row 19: 2.75 in × 3.75 in (7.0 × 9.5 cm).
- After the border: 3 in × 4 in (7.6 × 10.2 cm).
Too big? Go down 0.5 mm in hook size, or make the puff loops shorter. Too small? Go up 0.5 mm, or pull the puff loops a little taller. If you change size, restart from Row 1 so that the whole letter stays proportional.
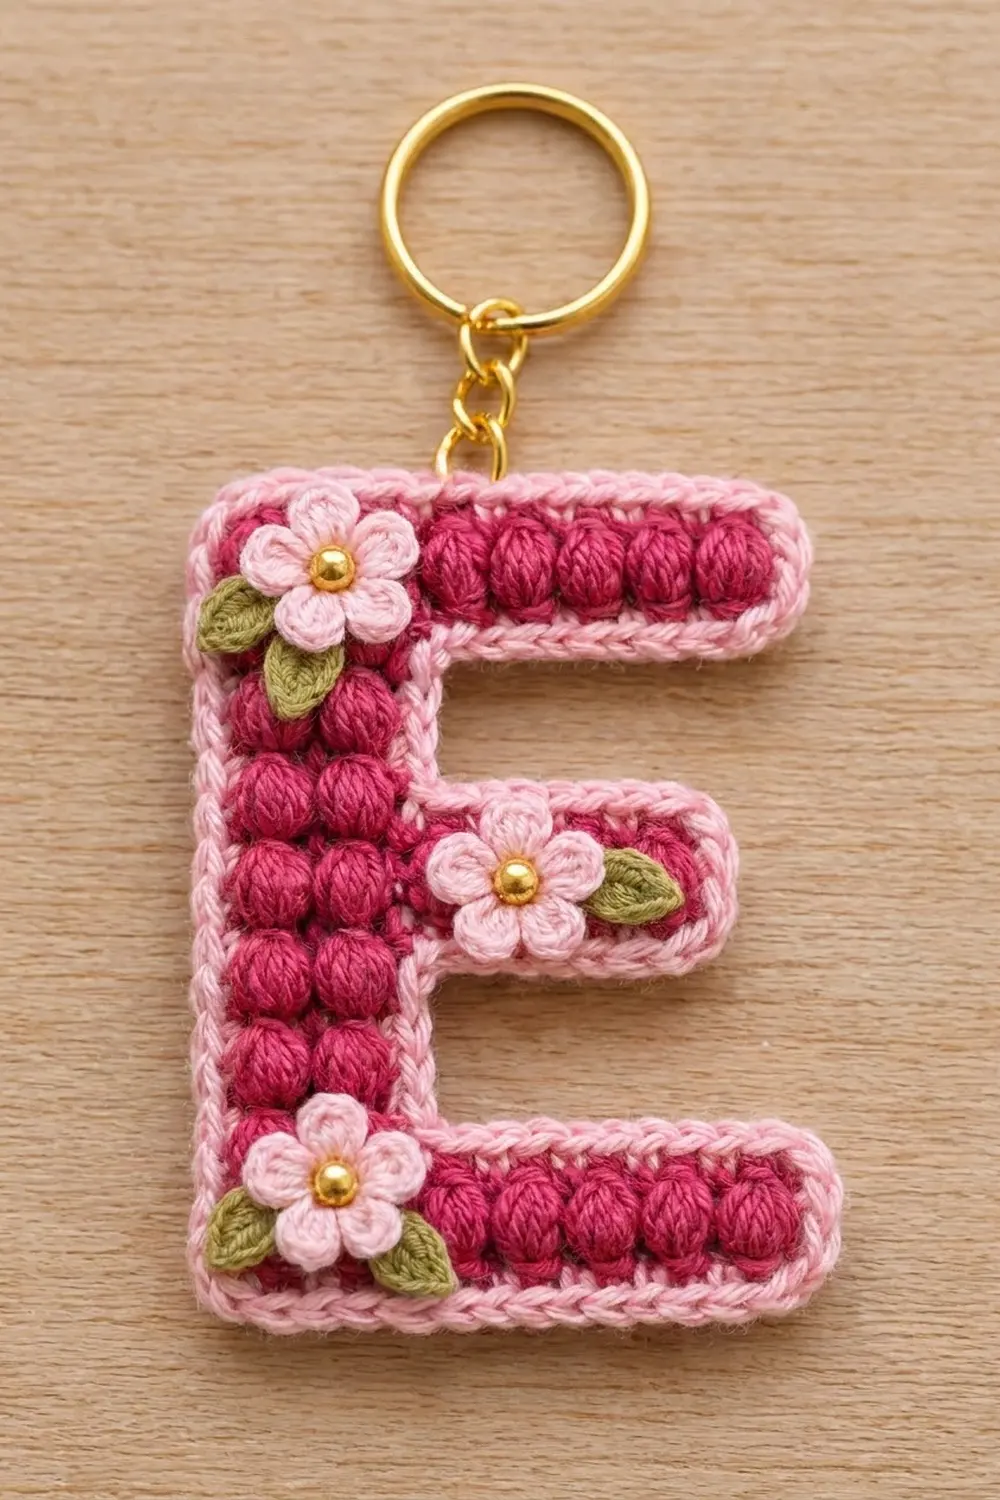
The Letter E
Use Color A and the 3.5 mm hook. The turning ch 1 never counts as a stitch.
The letter has a stitch rhythm: on every puff row, the sc stitches sit in the odd positions and the puffs sit in the even positions. Because of this, the puffs stack in straight columns, and the arms line up with the spine.
Bottom Bar
Foundation: Ch 16.
Row 1 (WS): Sc in the 2nd ch from the hook and in each ch across, then turn. (15 sc)
Row 2 (RS): Ch 1, sc in the first st, puff in the next st, sc in the next st; repeat from * 6 more times, then turn. (15 sts: 7 puffs, 8 sc)
Row 2 ends at the left edge, as seen from the RS. That is where the spine begins.
Lower Spine
Row 3 (WS): Ch 1, sc in the first 5 sts, then turn. Leave the remaining 10 sts unworked. (5 sc)
Row 4 (RS): Ch 1, sc, puff, sc, puff, sc, then turn. (5 sts: 2 puffs, 3 sc)
Row 5 (WS): Ch 1, sc in each st across, then turn. (5 sc)
Rows 6–8: Repeat Rows 4–5 once, then work Row 4 once more. (5 sts)
Row 9 (WS): Ch 1, sc in each of the 5 sts, then ch 9 and turn. (5 sc + 9 ch)
Middle Arm
Row 10 (RS): Sc in the 2nd ch from the hook, puff in the next ch, sc in the next ch 3 times, then puff in the next ch. You have now used 8 ch. Continue across the spine: sc, puff, sc, puff, sc. Turn. (13 sts: 6 puffs, 7 sc)
Row 11 (WS): Ch 1, sc in the first 5 sts, then turn. Leave 8 sts unworked. (5 sc)
At this stage, you have the L-shaped start plus the middle arm.
Upper Spine
Rows 12–16: Repeat Rows 4–5 twice, then work Row 4 once more. (5 sts)
Row 17 (WS): Ch 1, sc in each of the 5 sts, then ch 11 and turn. (5 sc + 11 ch)
Top Bar
Row 18 (RS): Sc in the 2nd ch from the hook, puff in the next ch, sc in the next ch 4 times, then puff in the next ch. You have now used 10 ch. Continue across the spine: sc, puff, sc, puff, sc. Turn. (15 sts: 7 puffs, 8 sc)
Row 19 (WS): Ch 1, sc in each st across. (15 sc) Fasten off and weave in the ends.
Puff check: 9 puff rows in the spine (Rows 2, 4, 6, 8, 10, 12, 14, 16 and 18), with 2 puffs in each. The bottom bar has 7 puffs, the middle arm 6 and the top bar 7.
Border
Use Color B and the 3.5 mm hook. Work with the RS facing.
Border gauge: Work 1 sc into each stitch, row end or free chain loop along the edge. Every row end gets exactly 1 sc, whether it belongs to a puff row or an sc row. This keeps the edge flat at the gauge given above.
Join with a sl st in the first st of Row 19, at the top-right corner. Then work counterclockwise:
- Top edge (15 sts): Ch 1, work 3 sc in the first st, sc in the next 13 sts, then 3 sc in the last st. (19)
- Left side (19 row ends): Work 1 sc in each row end. (19)
- Bottom edge (15 free loops of the foundation ch): Work 3 sc in the first loop, sc in the next 13, then 3 sc in the last. (19)
- Right end of the bottom bar (2 row ends): 1 sc in each. (2)
- Top of the bottom bar (10 unworked sts of Row 2): Work 3 sc in the first st and sc in the next 8. Then sc2tog over the 10th st and the row end of Row 3. (11 + 1 = 12)
- Lower inner spine (row ends of Rows 4–8): Sc in the row ends of Rows 4–7, then sc2tog over the Row 8 row end and the first free loop under the middle arm. (4 + 1 = 5)
- Underside of the middle arm (7 remaining ch loops): Sc in the next 6 loops, then 3 sc in the last loop. (9)
- Tip of the middle arm (1 row end): 1 sc. (1)
- Top of the middle arm (8 unworked sts of Row 10): Work 3 sc in the first st and sc in the next 6. Then sc2tog over the 8th st and the row end of Row 11. (9 + 1 = 10)
- Upper inner spine (row ends of Rows 12–16): Sc in the row ends of Rows 12–15, then sc2tog over the Row 16 row end and the first free loop under the top bar. (4 + 1 = 5)
- Underside of the top bar (9 remaining ch loops): Sc in the next 8 loops, then 3 sc in the last loop. (11)
- Right end of the top bar (2 row ends): 1 sc in each. (2)
Join with a sl st to the first sc. (Total: 114 sc)
Why the math works: The edge has 102 places to work into: 15 + 19 + 15 + 2 + 10 + 6 + 8 + 1 + 8 + 6 + 10 + 2. Each of the 8 outer corners gets 3 sc in 1 st, which adds 2 sts per corner, so 102 + 16 = 118. Each of the 4 inner corners uses sc2tog, which removes 1 st per corner, so 118 − 4 = 114.
The outer corners get extra stitches so they lie flat. The inner corners lose a stitch so they don’t ruffle.
Fasten off, leaving an 8 in (20.3 cm) tail. Use the tail to attach the keyring later.
Flowers and Leaves
Flower (make 3): Use Color B and the 2.5 mm hook.
- Round 1: Make a magic ring, ch 1, and work 5 sc into the ring. Join with a sl st. (5 sc)
- Round 2: In the next sc, work (ch 2, 2 dc, ch 2, sl st); repeat 4 more times. (5 petals)
Fasten off, leaving a 10 in (25.4 cm) tail. Each flower measures about 0.75 in (1.9 cm) across.
Leaf (make 5): Use Color C and the 2.5 mm hook. Ch 4. Sc in the 2nd ch from the hook, hdc in the next ch, then sl st in the last ch. (3 sts) Fasten off, leaving a tail.
Each leaf is about 0.5 in (1.3 cm) long.
Placement:
– Top-left corner: 1 flower, with 2 leaves (1 to the left and 1 below).
– Tip of the middle arm: 1 flower, with 1 leaf to its right.
– Bottom-left corner: 1 flower, with 2 leaves (1 to the left and 1 to the right).
Sew each leaf down first, then sew the flower so that it overlaps the leaf’s base. Finally, sew a gold bead into the center of each flower with pink thread.
Final Blocking
- Lightly mist the letter with water. Do not soak it, because the puffs may flatten.
- Pin it RS up to 3 in × 4 in (7.6 × 10.2 cm), squaring all 8 outer corners.
- Check that each bar edge is straight and parallel to the bar above or below it.
- Gently re-plump any flattened puffs with your fingertip.
- Let it dry completely before you sew on the flowers and hardware.
- Attach the jump ring through the border at the top of the spine. Then reinforce that spot with a few stitches of the Color B tail on the WS.
Final Quality-Control Checklist
- [ ] The letter measures 3 in × 4 in (7.6 × 10.2 cm).
- [ ] The spine is 2 puffs wide and has 9 puff rows.
- [ ] The bars have 7, 6 and 7 puffs, from bottom to top.
- [ ] The puff columns line up between the spine and the arms.
- [ ] The border has 114 sc and lies flat with no cupping.
- [ ] The inner corners are snug, and the outer corners are crisp.
- [ ] The three flowers are secure, and each bead is tight.
- [ ] The keyring holds when you tug it firmly.
- [ ] All ends are woven in on the WS.
Troubleshooting
- The puffs lean or stagger: Check the stitch rhythm. The sc stitches must fall in the odd positions on every puff row.
- The arm is crooked: Your chain was probably too tight. Remake it a little looser, or chain with a hook one size larger.
- The border ruffles: Your border tension is loose. Go down to a 3.0 mm hook for the border only.
- The border cups: Check that every outer corner has 3 sc.
- There are gaps at the inner corners: Make the sc2tog firmly, or close the gap from the WS with the yarn tail.
- The keychain is floppy: Use a tighter gauge, or stitch a felt backing to the WS.
Care
Spot-clean with mild soap and cool water, then press the letter flat and let it air-dry. Avoid the dryer, which can crush the puffs and tarnish the gold hardware.

Final Notes
The measurement chain works like this:
- Rows 1–2 confirm your gauge at 2.75 in (7.0 cm) wide.
- Each row pair adds 0.4 in (1.0 cm) of height.
- After 19 rows, the letter is 2.75 in × 3.75 in (7.0 × 9.5 cm).
- The 114-stitch border adds 0.125 in (0.3 cm) on every side, for a finished size of 3 in × 4 in (7.6 × 10.2 cm).
If each checkpoint matches, your E will come out square, plump and ready to clip onto keys or a belt loop.
Happy crocheting!