

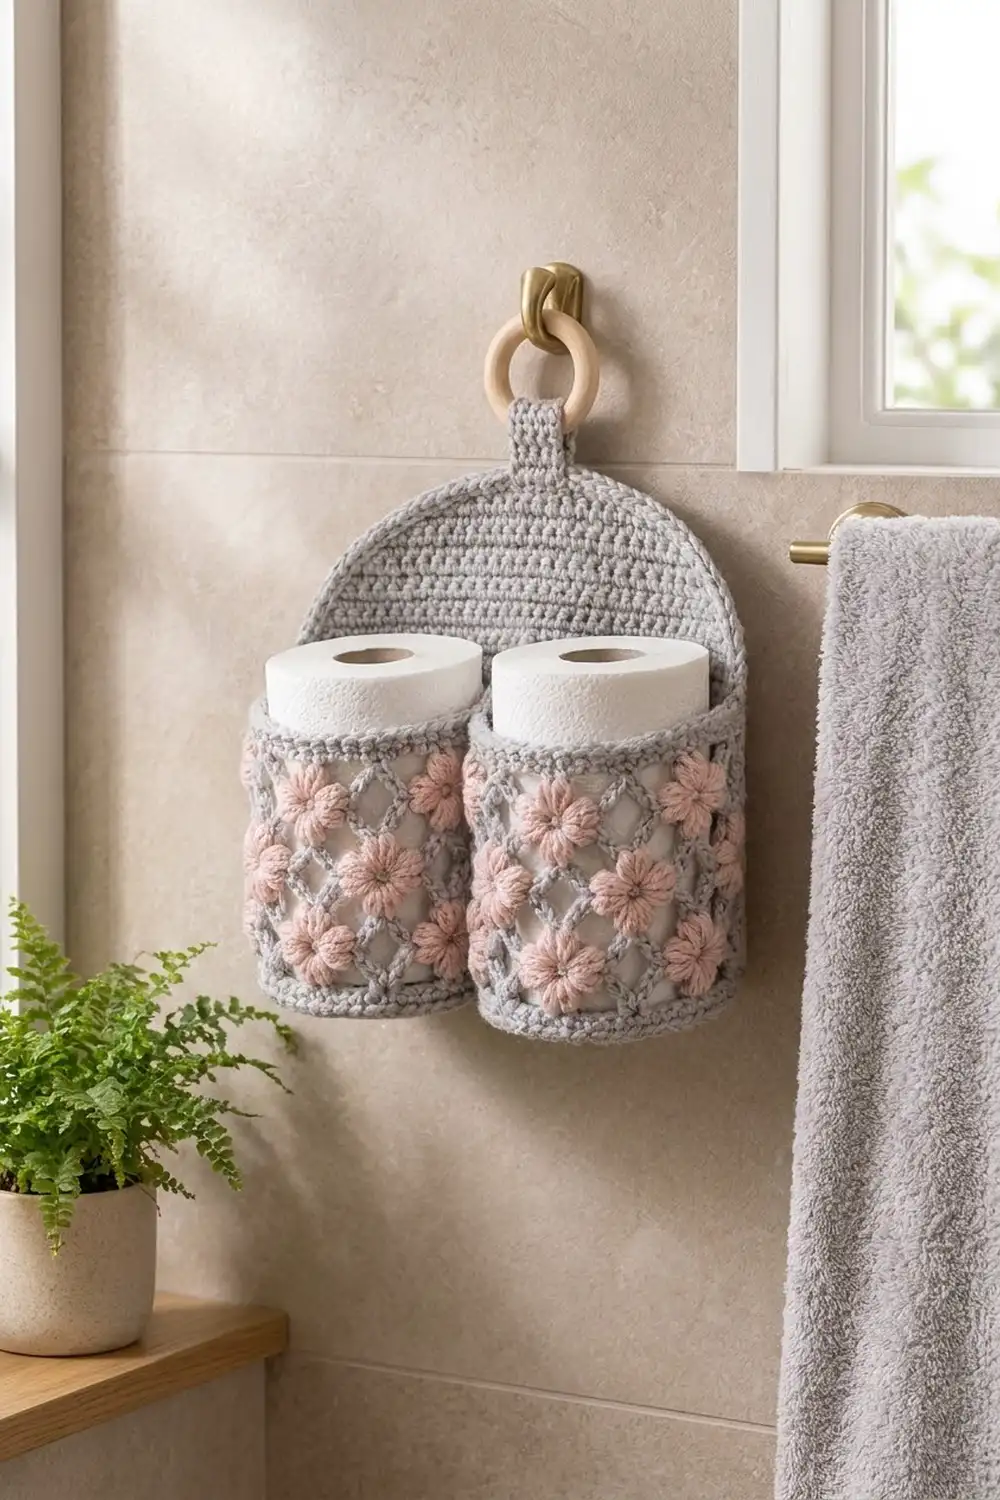
This wall-hanging holder keeps two spare rolls in reach and looks nice in a bathroom. A solid grey back panel with a rounded top hangs from a wooden ring. Two round pockets sit side by side across the lower half, each made from an open diamond trellis with small pink puff flowers sewn on.
The colors are soft and simple: light grey for the structure and dusty pink for the flowers. The solid single crochet panel gives a calm background, so the open trellis and flowers stand out.
The pattern uses US crochet terms. The finished panel measures about 11.75 in (29.8 cm) wide by 10.75 in (27.3 cm) tall without the tab and ring. Each pocket fits a standard roll about 4.5 in (11.4 cm) across.
Construction overview: work the back panel flat in rows and shape the dome with decreases. Work each pocket from the bottom up: a flat circular base, a solid band, a trellis section, then a top band. Make 18 small puff flowers and sew them onto the pockets. Sew the pockets to the panel and to each other, then add a two-round border and the hanging tab.
Finished Size and Construction
- Finished size: 11.75 in (29.8 cm) wide x 10.75 in (27.3 cm) tall, plus the tab and ring
- Skill level: Intermediate
- Terminology: US crochet terms
- Yarn weight: worsted (#4)
- Hook: 5.0 mm (H-8)
- Number of pieces: 1 back panel, 2 pockets, 1 tab, 18 flowers
- Layout: two pockets side by side across the lower panel
- Panel size before border: 11 in (27.9 cm) x 10 in (25.4 cm)
- Pocket size: 4.75 in (12.1 cm) across, 3.5 in (8.9 cm) tall
- Border depth: about 0.375 in (1.0 cm) on each edge
Materials
Yarn: Use a smooth worsted-weight acrylic or cotton blend that can handle a humid bathroom and gentle washing. A plied yarn shows the stitches clearly and keeps the puff petals rounded.
- Light grey: 150 g, about 270 m (295 yd)
- Dusty pink: 50 g, about 90 m (98 yd)
These quantities include a margin of about 20% for gauge differences and swatching.
Tools:
– 5.0 mm (H-8) crochet hook
– 1 wooden ring, 2.75 in (7.0 cm) outside diameter
– Tapestry needle
– 6–8 locking stitch markers
– Scissors
– Blocking mats and rust-proof pins
– Spray bottle
Abbreviations (US Terms)
- ch: chain
- sl st: slip stitch
- sc: single crochet
- dc: double crochet
- sc2tog: single crochet 2 together
- BLO: back loop only
- rev sc: reverse single crochet (crab stitch)
- MR: magic ring
- st(s): stitch(es)
- sk: skip
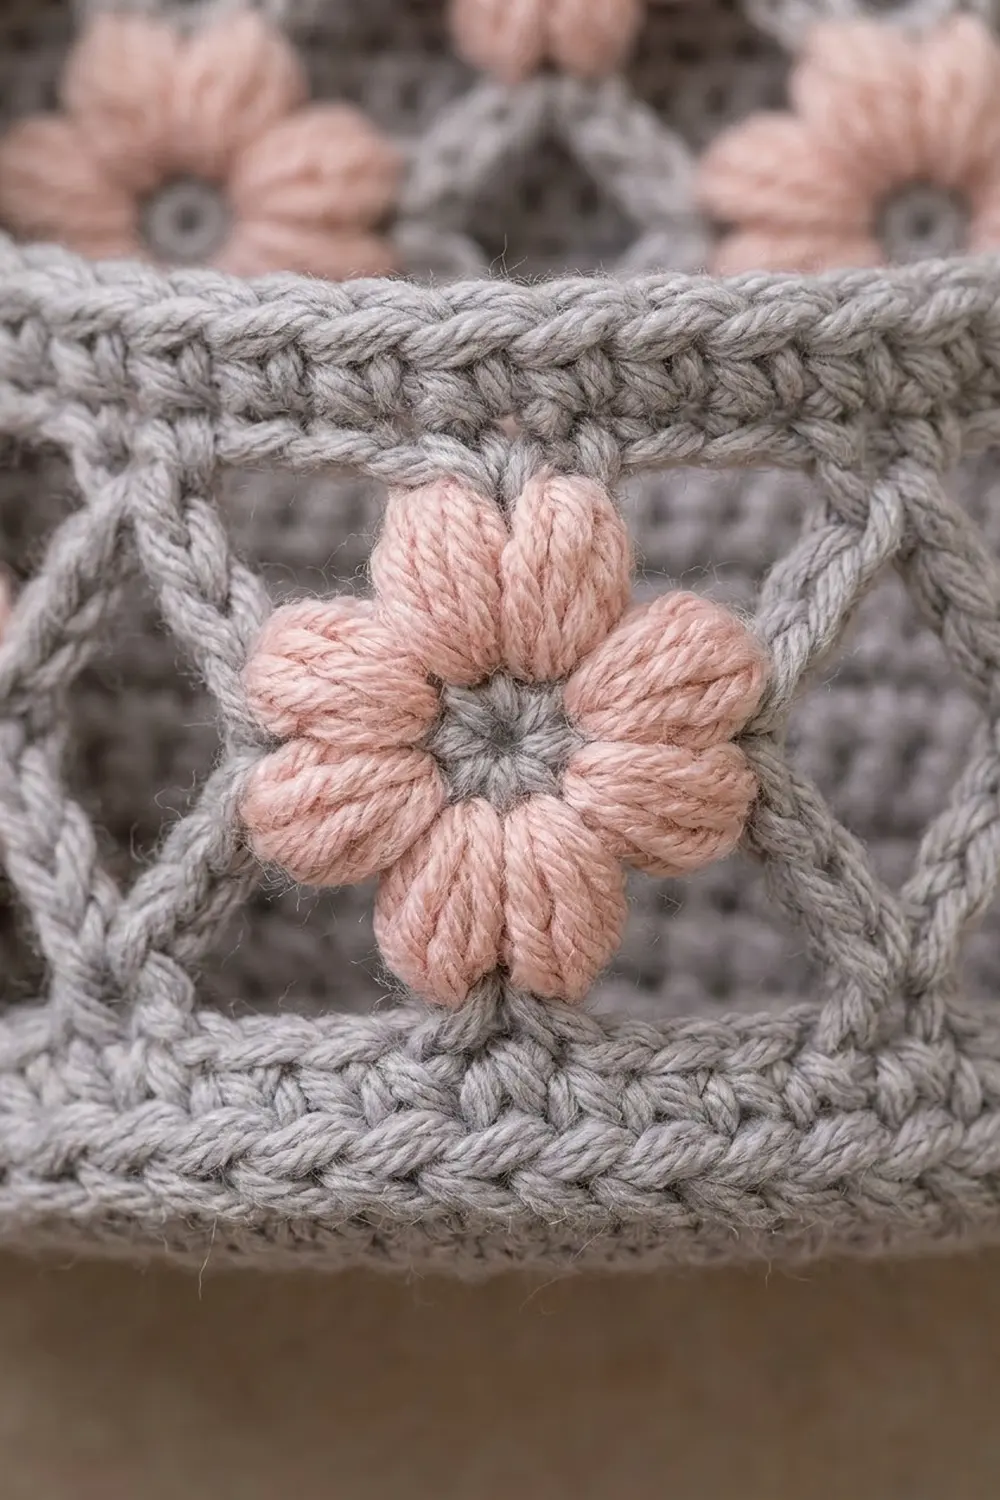
Puff stitch (puff): (yarn over, insert hook in ring, yarn over, pull up a loop to about 0.5 in / 1.3 cm) 3 times. You now have 7 loops on the hook. Yarn over, pull through all 7 loops, then ch 1 to close.
Reverse single crochet (rev sc): work single crochet from left to right (right to left if you crochet left-handed), inserting the hook into the next stitch to the right.
Gauge and Checkpoints
Gauge: 16 sc and 18 rows = 4 in (10.2 cm) in sc worked flat. That works out to 4 sts and 4.5 rows per inch.
Test one piece first: before starting the panel, crochet one pocket base (Rounds 1–10 below). It should measure 4.75 in (12.1 cm) across and lie flat. This is your gauge swatch, and you can keep it as a real base.
Checkpoints:
– Panel Row 10: 11 in (27.9 cm) wide, 2.2 in (5.6 cm) tall
– Panel Row 32: 7.1 in (18.0 cm) tall
– Panel Row 45: 10 in (25.4 cm) tall at the center
– Pocket wall: 3.5 in (8.9 cm) tall from the base fold to the top edge
– Flower: about 1 in (2.5 cm) across
If your piece is too big, go down 0.5 mm in hook size. If it is too small, go up 0.5 mm. If only your row height is off, keep your hook and add or remove plain rows in the straight section of the panel (Rows 2–32). The pockets need the stitch gauge to fit a roll.
Back Panel
Work in grey. Ch 1 at the start of each row doesn’t count as a stitch. Turn at the end of each row.
Row 1: Ch 45. Sc in 2nd ch from hook and in each ch across. (44 sts)
Rows 2–32: Ch 1, sc in each st across. (44 sts)
Checkpoint: 11 in (27.9 cm) wide and 7.1 in (18.0 cm) tall.
Shaping the dome: decreases come slowly at first and faster near the top, which gives a smooth curve.
Row 33: Ch 1, sc2tog, sc to last 2 sts, sc2tog. (42 sts)
Row 34: Ch 1, sc in each st across. (42 sts)
Row 35: Repeat Row 33. (40 sts)
Row 36: Repeat Row 34. (40 sts)
Row 37: Repeat Row 33. (38 sts)
Row 38: Repeat Row 33. (36 sts)
Row 39: Repeat Row 33. (34 sts)
Row 40: Repeat Row 33. (32 sts)
Row 41: Repeat Row 33. (30 sts)
Row 42: Ch 1, (sc2tog) 2 times, sc to last 4 sts, (sc2tog) 2 times. (26 sts)
Row 43: Repeat Row 42. (22 sts)
Row 44: Repeat Row 42. (18 sts)
Row 45: Repeat Row 42. (14 sts)
Fasten off and weave in the ends.
Checkpoint: the dome adds about 2.9 in (7.4 cm), for a center height of 10 in (25.4 cm). The top edge is 14 sts, or 3.5 in (8.9 cm), wide. The border will round off the steps along the dome.
Pockets (make 2)
Work in grey, in joined rounds. Join each round with a sl st to the first st and ch 1. The ch 1 doesn’t count as a stitch.
Base
Round 1: MR, 6 sc in ring. (6 sts)
Round 2: 2 sc in each st around. (12 sts)
Round 3: (Sc in next st, 2 sc in next st) around. (18 sts)
Round 4: (Sc in next 2 sts, 2 sc in next st) around. (24 sts)
Round 5: (Sc in next 3 sts, 2 sc in next st) around. (30 sts)
Round 6: (Sc in next 4 sts, 2 sc in next st) around. (36 sts)
Round 7: (Sc in next 5 sts, 2 sc in next st) around. (42 sts)
Round 8: (Sc in next 6 sts, 2 sc in next st) around. (48 sts)
Round 9: (Sc in next 7 sts, 2 sc in next st) around. (54 sts)
Round 10: (Sc in next 8 sts, 2 sc in next st) around. (60 sts)
Checkpoint: the base is flat and 4.75 in (12.1 cm) across. The circumference is 15 in (38.1 cm).
Bottom Band
Round 11: Sc in the BLO of each st around. (60 sts) This round makes the wall turn upward.
Round 12: Sc in each st around. (60 sts)
Trellis
Round 13: Sc in first st, ch 5, sk 4 sts, sc in next st. Repeat from * 10 more times. Ch 2, sk 4 sts, dc in first sc to finish the 12th loop. (12 ch-5 loops)
The math: each repeat uses 5 sts (1 sc + 4 skipped), so 12 repeats × 5 = 60 sts. That’s every stitch of Round 12.
Rounds 14–16: Ch 1, sc around the post of the dc below you. Ch 5, sc in next ch-5 loop. Repeat from * 10 more times. Ch 2, dc in first sc. (12 ch-5 loops)
Round 17: Ch 1, sc around the post of the dc below you. Ch 5, sc in next ch-5 loop. Repeat from * 10 more times. Ch 5, sl st in first sc. (12 full ch-5 loops)
Each round of sc worked into the loops below shifts the trellis by half a loop, which creates the diamond openings.
Top Band
Round 18 (conversion round): Ch 1, 5 sc in each ch-5 loop around. (12 loops × 5 sc = 60 sts)
Rounds 19–20: Sc in each st around. (60 sts)
Fasten off, leaving a 24 in (61.0 cm) grey tail for sewing.
Checkpoint: the wall measures 3.5 in (8.9 cm) tall. The two bands total about 1.1 in (2.8 cm), and the trellis is about 2.4 in (6.1 cm). Test the fit with a roll: it should slide in easily and stand about 0.5 in (1.3 cm) above the top edge.
Puff Flowers (make 18)
Work in pink.
Round 1: MR, ch 2 (doesn’t count as a stitch). Puff in ring, ch 2. Repeat from * 4 more times. Sl st to the top of the first puff. (5 puffs, 5 ch-2 spaces)
Pull the ring tight, but leave a small center hole. Fasten off, leaving an 8 in (20.3 cm) pink tail.
Center: with grey, make one French knot in the center hole and wrap the yarn twice around the needle.
Checkpoint: each flower is about 1 in (2.5 cm) across and fits inside a trellis diamond, which is about 1.25 in (3.2 cm) wide.
Flower Placement
Lay a pocket flat with the Round 13 starting point at the center back. Count the 12 loops of any trellis round. Loops 4–9 face the front.
Number the front loops 1 to 6 from left to right, then sew 9 flowers per pocket:
– Round 13 loops: flowers on front loops 1, 3 and 5
– Round 15 loops: flowers on front loops 2, 4 and 6
– Round 17 loops: flowers on front loops 1, 3 and 5
This gives a staggered checkerboard of 3 rows of 3 flowers. Sew each flower by its pink tail with small stitches through the ch-5 loop and the sc above it, so the flower covers the diamond opening. Leave the petal tips free.
Make All Pieces
Before assembly, check that you have:
- Grey: 1 back panel, 2 pockets, 1 tab (below)
- Pink: 18 flowers, 9 sewn on each pocket
Hanging tab: with grey, ch 7. Row 1: sc in 2nd ch from hook and across (6 sts). Rows 2–24: ch 1, sc across (6 sts). The tab measures 1.5 in (3.8 cm) x 5.25 in (13.3 cm). Fasten off, leaving a long tail.
Layout grid (front view, panel stitch columns 1–44):
[ dome: Rows 33–45, plain sc        ]
[ plain panel: Rows 20–32           ]
[ 3 ][ Pocket A: 4–22 ][ Pocket B: 23–41 ][ 3 ]
[ bottom: Rows 1–2 below pockets    ]
Joining
Use whipstitch with the grey sewing tails, stitch to stitch. Pin everything before you sew.
Pocket placement: each pocket is 4.75 in (12.1 cm), or 19 panel stitches, wide. Together they use 38 of the 44 panel stitches, leaving 3 stitches at each side.
– Pocket A covers panel columns 4–22, with its center at column 13.
– Pocket B covers columns 23–41, with its center at column 32.
Bottom seam: turn each pocket so the trellis starting point faces the panel. Mark the 15 back stitches of Round 10 (the base edge). Whipstitch them to panel Row 3, one pocket stitch to one panel stitch:
– Pocket A to columns 6–20
– Pocket B to columns 25–39
Both 15-stitch spans are centered on the pocket centers.
Top seam: mark the matching 15 back stitches of Round 20. Whipstitch them to panel Row 19 on the same columns. The pocket now hangs straight, with its back flattened against the panel and its front rounded out.
Center join: where the two pockets touch, whipstitch 4 stitches of Round 20 on Pocket A to 4 stitches of Round 20 on Pocket B. Repeat at Round 12. This keeps the pair from separating when you pull out a roll.
Tension: pull each stitch snug, just enough to close the seam. Tight sewing puckers the panel, and loose sewing lets the pockets sag forward.
Size checkpoint: the panel should still lie flat at 11 in (27.9 cm) x 10 in (25.4 cm), with 0.75 in (1.9 cm) of plain panel on each side of the pockets.
Border
The border goes only around the panel’s outer edge. The pockets sit inside it, so they don’t change the count.
Border gauge: match the body gauge of 4 sc per inch. Along the row ends, 32 rows measure 7.1 in (18.0 cm), so you need about 28 sc there to keep the edge flat.
Round 1: with the right side facing, join grey at the bottom-right corner.
| Edge | How to work it | Count |
|---|---|---|
| Bottom | 3 sc in first foundation st, sc in next 42 sts, 3 sc in last st | 48 sts (42 + 6 corner sts) |
| Left side (Rows 1–32) | Sc in row ends, skipping every 8th row end | 28 sts |
| Dome | 1 sc in each of the 13 row ends, sc in each of the 14 top sts, 1 sc in each of the 13 row ends | 40 sts |
| Right side (Rows 32–1) | Same as left side | 28 sts |
Join with a sl st. (48 + 28 + 40 + 28 = 144 sts)
Round 2 (trim round): ch 1, rev sc in each st around. (144 worked 1 per st + 0 added = 144 sts) Fasten off.
Why the math works: each side carries 28 sc over 7.1 in, which is almost exactly 4 sc per inch, so the edge doesn’t ruffle or pull in. The dome edges run on a diagonal, which is longer than straight rows, so 1 sc per row end fits the curve. The 3-sc corner groups turn the bottom corners. The border adds about 0.375 in (1.0 cm) on each side, so 11 x 10 in becomes about 11.75 x 10.75 in (29.8 x 27.3 cm).
Tab: fold the tab through the wooden ring. Overlap the two ends 1 in (2.5 cm) behind the center top of the panel, then sew them securely through the back loops only so no stitches show on the front. About 1.5 in (3.8 cm) of tab shows above the border.
Final Blocking
- Fill the pockets with rolled towels or two toilet paper rolls inside plastic bags.
- Lay the holder face up on blocking mats.
- Pin the panel to 11.75 in (29.8 cm) x 10.75 in (27.3 cm). Pin the dome as a smooth curve.
- Mist the whole piece until it’s damp, not soaked.
- Press each flower’s petals open with your fingertips.
- Let it dry completely, at least 12 hours.
- Unpin, remove the fillers, and hang it.
Final Quality-Control Checklist
- Panel is 11.75 in (29.8 cm) x 10.75 in (27.3 cm) and lies flat
- Dome curves smoothly with no visible steps
- Border has 144 stitches, and the rev sc rim is even all around
- Each pocket is 4.75 in (12.1 cm) across and 3.5 in (8.9 cm) tall
- Each pocket has 12 trellis loops per round
- 9 flowers per pocket, staggered in 3 rows of 3
- Pockets are centered with 3 panel stitches free at each side
- Tab is sewn securely, and the ring hangs straight
- All ends are woven in on the wrong side
Troubleshooting
Pocket base cups or ruffles: a base that cups is too tight, so go up a hook size. A base that ruffles is too loose, so go down a hook size.
Roll doesn’t fit: check that Round 10 has 60 stitches. Add one more increase round (66 sts) only if your stitch gauge is tight. If you do, Round 13 needs (ch 5, sk 5) to keep 11 loops, and you’ll need to rebalance the flower layout.
Trellis leans or twists: start each round in the loop directly above the previous round’s starting point.
Panel edges wave: you have too many border stitches on the sides. Skip one more row end per side.
Holder tilts forward: sew the top seam lower, at Row 18, and tighten the center join.
Flowers droop: add one extra tacking stitch at the base of each petal.
Care
Hand wash in cool water with mild soap, press out the water in a towel, and dry flat with the pockets lightly stuffed. Keep it away from direct shower spray.
Final Notes
Here’s how the measurements connect. The panel is 44 sc (11 in / 27.9 cm) wide and 45 rows (10 in / 25.4 cm) tall. Each pocket has a 60-stitch base (4.75 in / 12.1 cm across), a 12-loop trellis and 3.5 in (8.9 cm) walls, and the two pockets use 38 of the 44 panel columns. A 144-stitch, two-round border brings the panel to 11.75 x 10.75 in (29.8 x 27.3 cm). If you check gauge on the first base and test the fit with a real roll, the rest of the project follows from those numbers.
Happy crocheting!