

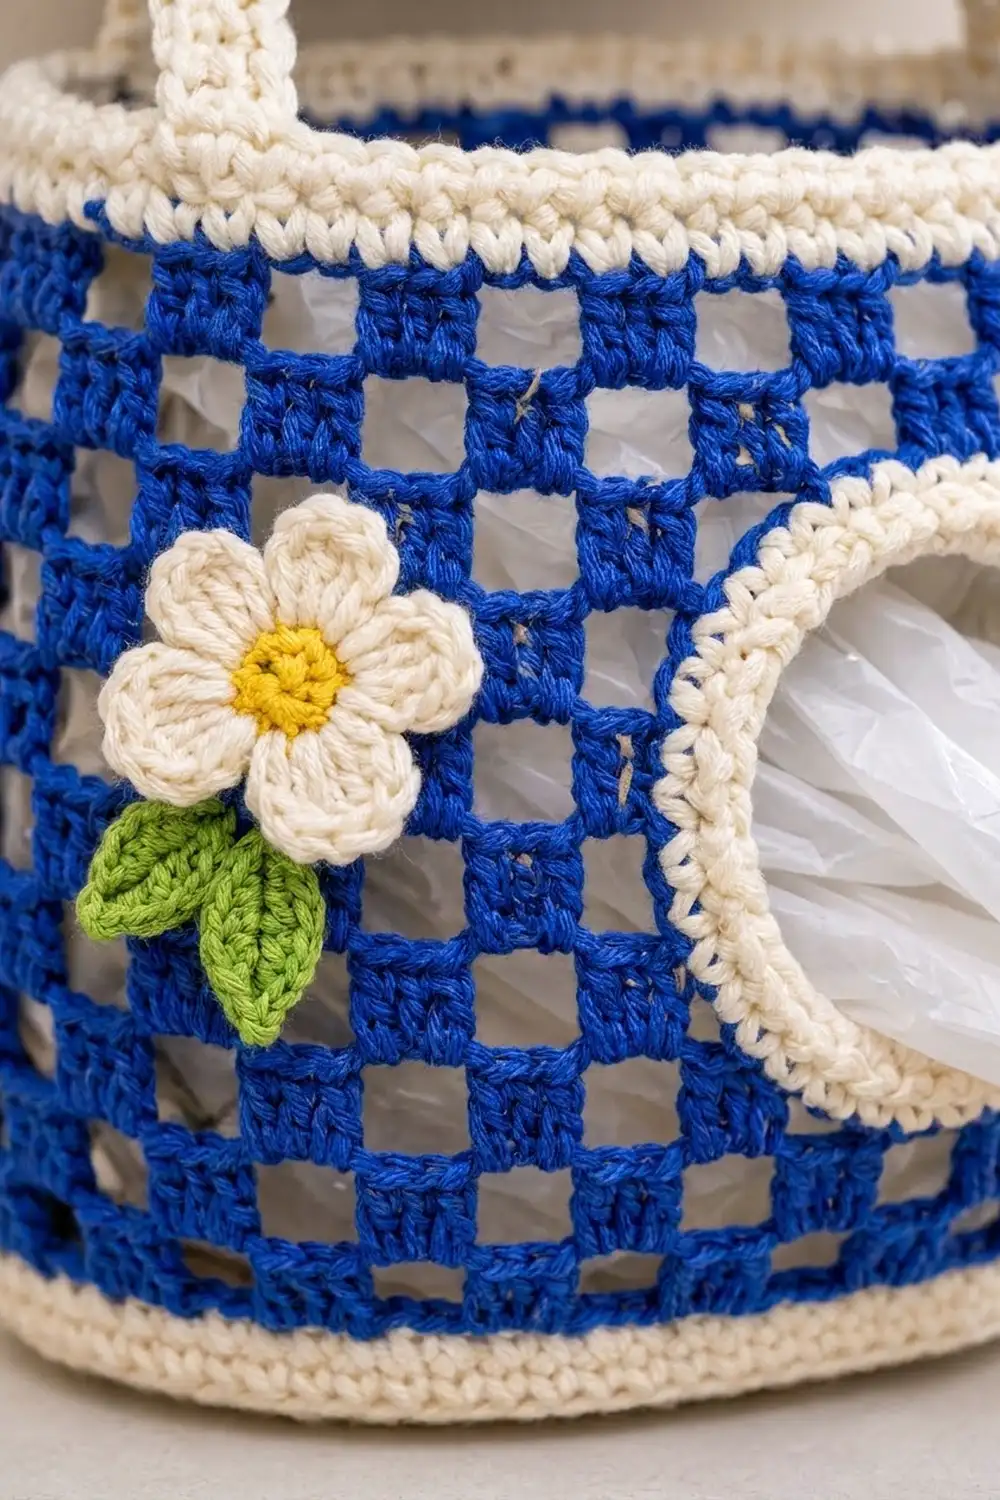
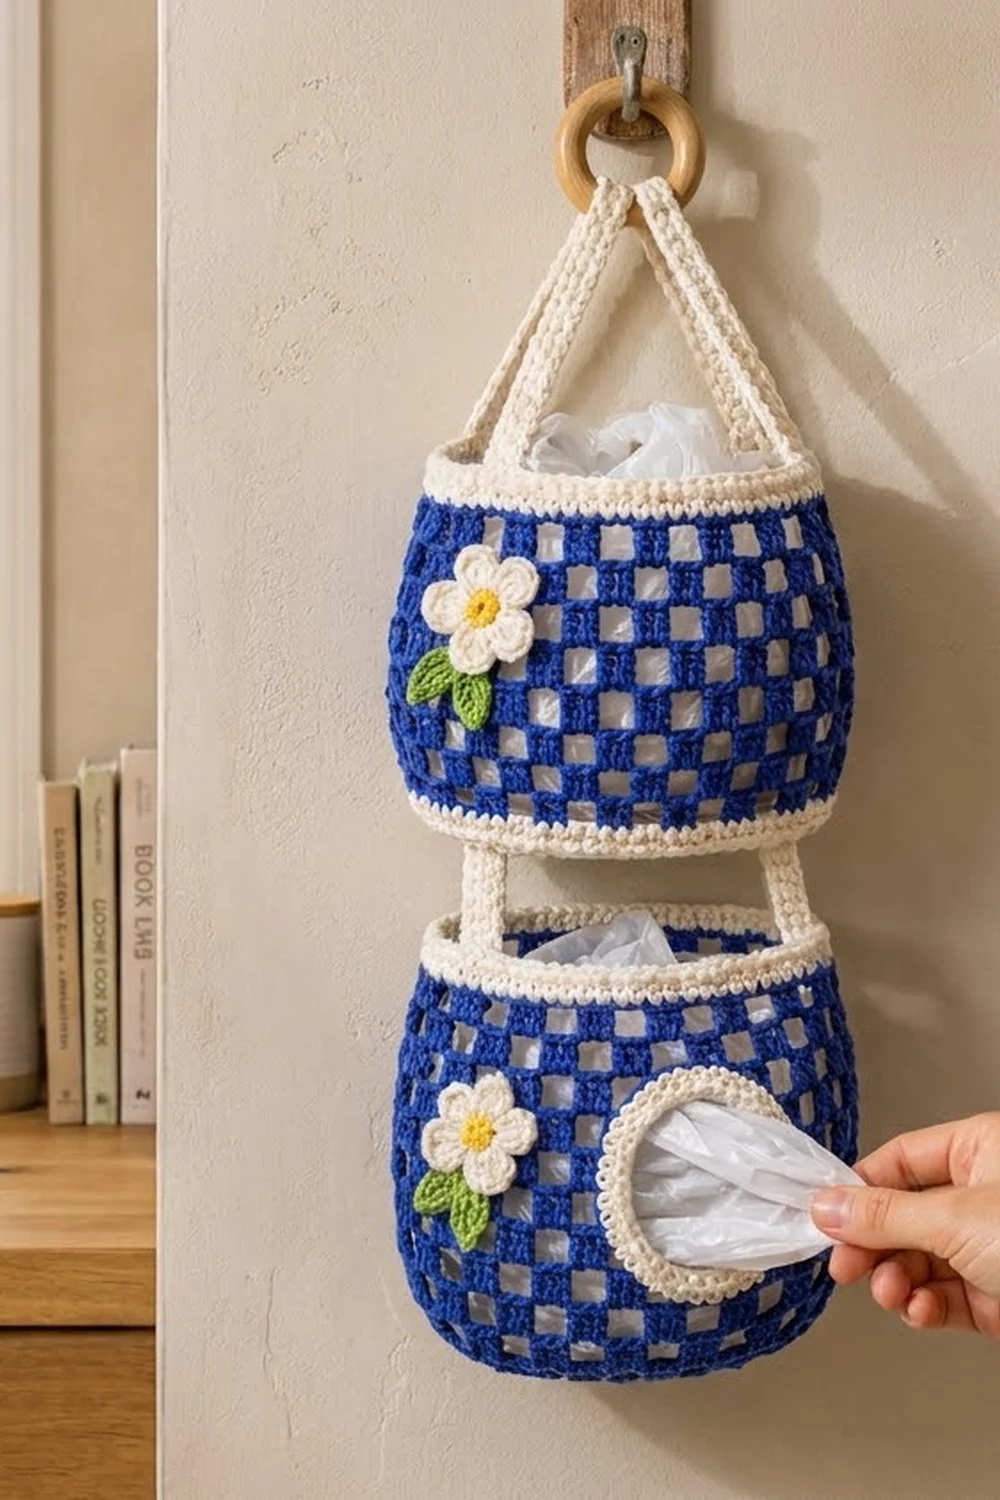
This two-tier bag holder hangs from a simple wooden ring. It holds a big stash of plastic grocery bags and still looks good enough to leave on show. Each basket body is cobalt-blue filet mesh, a crisp grid of bars and open squares, finished with clean cream bands at the base and rim.
You push bags in through the open top of the upper basket and pull them out one at a time through the round, cream-edged opening on the lower basket. Each basket has a cream daisy with a yellow center and two small green leaves, which keeps the look cheerful and farmhouse-fresh.
This pattern uses US crochet terms. Each basket is about 6 in (15.2 cm) across and 6.7 in (17.0 cm) tall. The whole holder hangs about 24 in (61.0 cm) from the top of the ring to the bottom of the lower basket.
How it’s built: each basket body is a flat mesh panel worked in rows and seamed into a tube. A round single-crochet base is then joined on with a cream round, and a cream rim is worked around the top. The lower basket’s opening is built into the panel by working two sections separately and then bridging them with a chain. Three straps, two daisies and four leaves finish the piece.
Finished Size and Construction
- Finished size (each basket): 6 in (15.2 cm) diameter × 6.7 in (17.0 cm) tall
- Total hanging length: about 24 in (61.0 cm)
- Skill level: Intermediate
- Terminology: US
- Yarn weight: Worsted (#4) cotton
- Hook: 5 mm (H-8)
- Number of pieces: 2 body panels, 2 bases, 3 straps, 2 daisies, 4 leaves
- Layout: 2 baskets stacked vertically, hung from 1 ring
- Body panel size (flat): 18.9 in (48.0 cm) wide × 5.9 in (15.0 cm) tall
- Size before rim: 6 in (15.2 cm) × 6.1 in (15.5 cm), including the base band
- Rim depth: 0.6 in (1.5 cm); opening edging is 0.4 in (1.0 cm) wide
Materials
Choose a firm, smooth worsted-weight cotton or cotton blend. Cotton holds the mesh shape and doesn’t stretch when the baskets are full. The amounts below assume about 85 m per 50 g.
- Cobalt blue (A): 100 g / 170 m
- Cream (B): 75 g / 128 m
- Yellow (C): 5 g / 9 m
- Green (D): 5 g / 9 m
Tools:
– 5 mm (H-8) hook
– One 2.75 in (7.0 cm) wooden ring
– Stitch markers
– Tapestry needle
– Sewing pins
– Scissors
– Rustproof pins and a towel for blocking
All quantities include a safety margin of about 25%.
Abbreviations (US Terms)
- ch – chain
- sl st – slip stitch
- sc – single crochet
- hdc – half double crochet
- dc – double crochet
- sc2tog – single crochet 2 together
- sk – skip
- sp – space
- MR – magic ring
- RS / WS – right side / wrong side
Mesh (special stitch): one mesh is (ch 1, dc in next dc). Each mesh is 2 stitches wide. A “post” is one dc bar of the grid.
Gauge and Checkpoints
- Single crochet: 18 sc and 20 rows = 4 in (10.2 cm)
- Filet mesh: 9 meshes (18 sts) and 8 rows = 4 in (10.2 cm)
Make the upper basket first. It has no opening, so it’s a quick test of your gauge.
Checkpoints:
– Base after Rnd 14: 6 in (15.2 cm) across, within 0.25 in (0.6 cm)
– Body panel after Row 13: 18.9 in (48.0 cm) wide × 5.9 in (15.0 cm) tall
– Finished basket: 6.7 in (17.0 cm) tall
If your pieces are too big, go down half a hook size. If they’re too small, go up half a size. Don’t change the stitch counts, because the base and panel must still match 84 to 84.
Body Panel (make 2: 1 plain, 1 with opening)
With A, ch 86.
Row 1 (RS): Sc in 2nd ch from hook and in each ch across. Turn. (85 sc)
Row 2: Ch 4 (counts as dc + ch 1), sk next sc, dc in next sc. Ch 1, sk next sc, dc in next sc; repeat from * across. Turn. (43 dc, 42 ch-1 sps = 85 sts, 42 meshes)
Row 3: Ch 4 (counts as dc + ch 1), dc in next dc. Ch 1, dc in next dc; repeat from * across, working the last dc in the 3rd ch of the turning ch. Turn. (42 meshes)
Plain panel (upper basket)
Rows 4–12: Repeat Row 3. (42 meshes per row)
Row 13: Ch 1, sc in each dc and each ch-1 sp across. (85 sc) Fasten off.
The panel has 11 mesh rows in total, which gives a mesh height of 5.5 in (14.0 cm).
Panel with opening (lower basket)
Work Rows 1–3 as above. Number the posts 0 to 42 along the row. The opening replaces meshes 18–25, the space between post 17 and post 25.
Row 4 (left section): Ch 4, dc in next dc. Work meshes until you have placed the dc on post 17. Turn. (17 meshes)
Rows 5–8 (left section): Work 17 meshes per row as in Row 3. Fasten off at the end of Row 8, which finishes at post 17.
Rows 4–8 (right section): With the same side facing as the left section’s Row 4, join A with a sl st in post 25 of Row 3. Ch 4 (counts as dc + ch 1), dc in next dc, and work across to the edge. (17 meshes) Continue the right section through Row 8, ending at the outer edge. Don’t fasten off.
Row 9 (bridge row): Work 17 meshes across the right section, ending with a dc in post 25. Ch 15, then dc in post 17 of the left section. Work 17 meshes across the left section. Turn.
(18 dc + 17 ch-1 sps + 15 ch + 18 dc + 17 ch-1 sps = 85 sts)
Row 10: Work in pattern to post 17. Over the bridge, ch 1, sk 1 ch, dc in next ch 7 times, then ch 1, sk last ch, dc in post 25. Continue across. (42 meshes)
Rows 11–12: Repeat Row 3.
Row 13: Work as for the plain panel. (85 sc) Fasten off.
The opening is 8 meshes wide and 6 rows tall: 3.6 in × 3 in (9.1 cm × 7.6 cm).
Base (make 2)
With B, work in continuous rounds and move a marker up each round.
Rnd 1: MR, 6 sc in ring. (6)
Rnd 2: 2 sc in each st. (12)
Rnd 3: Sc 1, 2 sc in next; repeat around. (18)
Rnds 4–14: On each round, work 1 more sc between increases than on the previous round. Every round adds 6 stitches, so Rnd 4 = 24, Rnd 5 = 30, and so on up to Rnd 14 = 84.
Don’t fasten off. Check that the base measures 6 in (15.2 cm) across.
Daisies (make 2)
Rnd 1: With C, MR, 10 sc in ring, sl st to first sc. (10) Fasten off.
Rnd 2: Join B in any st. (Hdc, 3 dc, hdc) in next st, sl st in next st; repeat 4 more times. (5 petals) Fasten off.
Each daisy is about 1.75 in (4.4 cm) across.
Leaves (make 4)
With D, ch 7.
– Working from the 2nd ch from hook: sl st, sc, hdc, dc, hdc, then 3 sc in the last ch.
– Rotate the leaf and work along the free loops: hdc, dc, hdc, sc, sl st. (13 sts)
– Fasten off.
Each leaf is about 1.25 in (3.2 cm) long, with a pointed tip.
Straps (make 3)
With B, ch 4.
Row 1: Sc in 2nd ch and each ch across. Turn. (3 sc)
Next rows: Ch 1, sc in each st. Turn. (3 sc)
- Hanging strap (make 1): 70 rows, 14 in (35.6 cm)
- Connector straps (make 2): 20 rows each, 4 in (10.2 cm)
Each strap is about 0.7 in (1.8 cm) wide.
Make All Pieces
Color A (blue):
– 1 plain body panel
– 1 body panel with opening
Color B (cream):
– 2 bases
– 1 hanging strap
– 2 connector straps
– Rims and opening edging (worked later)
– 2 daisy petal rounds
Color C (yellow): 2 daisy centers
Color D (green): 4 leaves
Layout:
          ( wooden ring )
           /           \
     hanging strap (14 in / 35.6 cm)
     |                         |
 [ UPPER BASKET – daisy front-left ]
     |                         |
   connector         connector  (2.5 in / 6.4 cm gap)
     |                         |
 [ LOWER BASKET – daisy + opening ]
Joining
1. Seam each panel. Fold the panel RS out so the side edges meet at the back. With A, whipstitch the 13 row-ends together, matching row to row. Keep the tension firm but don’t pucker the seam. The two edge stitches now sit side by side and form one double bar.
2. Attach the base (Rnd 15). Place the base inside the tube with WS together. Line up its last stitch with the seam. Using B and the base’s live loop, work this round through both layers:
– Through each base stitch and the matching free loop of the panel’s foundation chain, work 1 sc.
– At the seam, work 1 sc through 1 base stitch and both seam stitches together.
(84 sc) The panel’s 85 bottom stitches become 84 positions (83 + 1 seam pair), which matches the base exactly. This round forms the cream bottom band.
Checkpoint: the basket stands 6.1 in (15.5 cm) tall before the rim is added.
Border: Rims and Opening Edging
Border gauge matches the sc gauge: 18 sc = 4 in (10.2 cm). Start every rim round at the seam, which marks the back.
Top rim (both baskets)
Join B at the seam on the top edge.
Rnd 1: Sc in each sc around, working the 2 seam stitches together as 1. (84 sc; 21 per quarter)
Rnd 2: Sc 5, sc2tog; repeat 12 times. (72 sc; 18 per quarter)
Rnd 3: Sc in each st around. (72) Sl st to first sc and fasten off.
Why the math works: Rnd 1 has 84 stitches, the same as the base, so the tube stays straight. Rnd 2 removes 1 stitch in every 7, which brings the rim down to 16 in (40.6 cm) around. Pulling the top in by that 1 in (2.5 cm) on each side gives the basket its rounded barrel shape.
Opening edging (lower basket)
Join B in the bottom-right corner of the opening. Work these rounds with RS facing.
Rnd 1: Work 1 round of sc around the opening:
– Bottom edge: 2 sc in each of the 8 ch-1 sps (16 sc)
– Left side: 2 sc in each of the 6 row-ends (12 sc)
– Top edge: 1 sc in each of the 15 free chain loops, plus 1 extra sc in the last loop (16 sc)
– Right side: 2 sc in each of the 6 row-ends (12 sc)
(16 + 12 + 16 + 12 = 56 sc)
Rnd 2: Sc around, working sc2tog at each of the 4 corners. (52 sc) Sl st to first sc and fasten off.
The corner decreases round off the rectangle into a soft oval. The inner opening ends up about 2.75 in × 2.25 in (7.0 cm × 5.7 cm).
Finishing assembly
- Daisies. Sew 2 leaves under the lower-left edge of each daisy. Sew one daisy to the front-left of each basket: about 1.5 in (3.8 cm) left of the front center on the upper basket, and just left of the opening on the lower basket.
- Hanging strap. Thread the hanging strap through the ring. Sew 0.75 in (1.9 cm) of each end inside the upper rim, at stitches 19 and 55 of Rnd 3 (the two sides).
- Connector straps. Sew one end of each connector strap 0.75 in (1.9 cm) onto the outside of the upper basket’s bottom band, at stitches 22 and 64 of Rnd 15. Sew the other end 0.75 in (1.9 cm) onto the outside of the lower basket’s rim at the matching sides. Make sure the opening faces front.
Final Blocking
- Lightly mist each basket with water until it is damp, not soaked.
- Stuff each basket firmly with a rolled towel to make the barrel shape.
- Square up the mesh with your fingers so every open space is a neat square and the bars run straight up.
- Pin the opening edging into a smooth oval over a small rolled washcloth.
- Flatten the daisies and leaves on a towel.
- Let everything dry completely before hanging.
Final Quality-Control Checklist
- Each base measures 6 in (15.2 cm) across.
- Each panel has 85 stitches in every row and 42 meshes in every mesh row.
- The bottom band and rim Rnd 1 are both 84 sc; rim Rnds 2–3 are 72 sc.
- The opening edging is 56 sc, then 52 sc.
- The seams are at the back; the daisies and opening face front.
- The connector gap measures 2.5 in (6.4 cm), and the two baskets hang level.
- All ends are woven in securely.
Troubleshooting
- Mesh squares look like rectangles: your dc is too tall. Pull up less on the first yarn-over, or go down half a hook size.
- Base ruffles: your sc is too loose. Tighten it, or redo the base with a smaller hook.
- Base cups upward: your sc is too tight. Relax your tension.
- Opening sides are uneven: check that both sections have exactly 6 rows (Rows 4–9) at the opening edge.
- Baskets hang crooked: re-sew the connector straps exactly opposite each other.
- Rim flares out: you skipped the Rnd 2 decreases. Recount to 72.
Care
Hand wash in cool water and lay flat to dry, reshaping over a towel. Avoid the dryer, because cotton mesh can shrink and distort.
Final Notes
Everything rests on one measurement chain. Your gauge of 18 sts = 4 in (10.2 cm) gives an 84-stitch base 6 in (15.2 cm) across. The 85-stitch panel seams down to 84 positions, so it matches the base 1 to 1. The 84-stitch rim decreases to 72 to shape the barrel. If the counts match at every checkpoint, the finished baskets will be 6 in × 6.7 in (15.2 cm × 17.0 cm) and will hang straight from the ring.
Happy crocheting!