

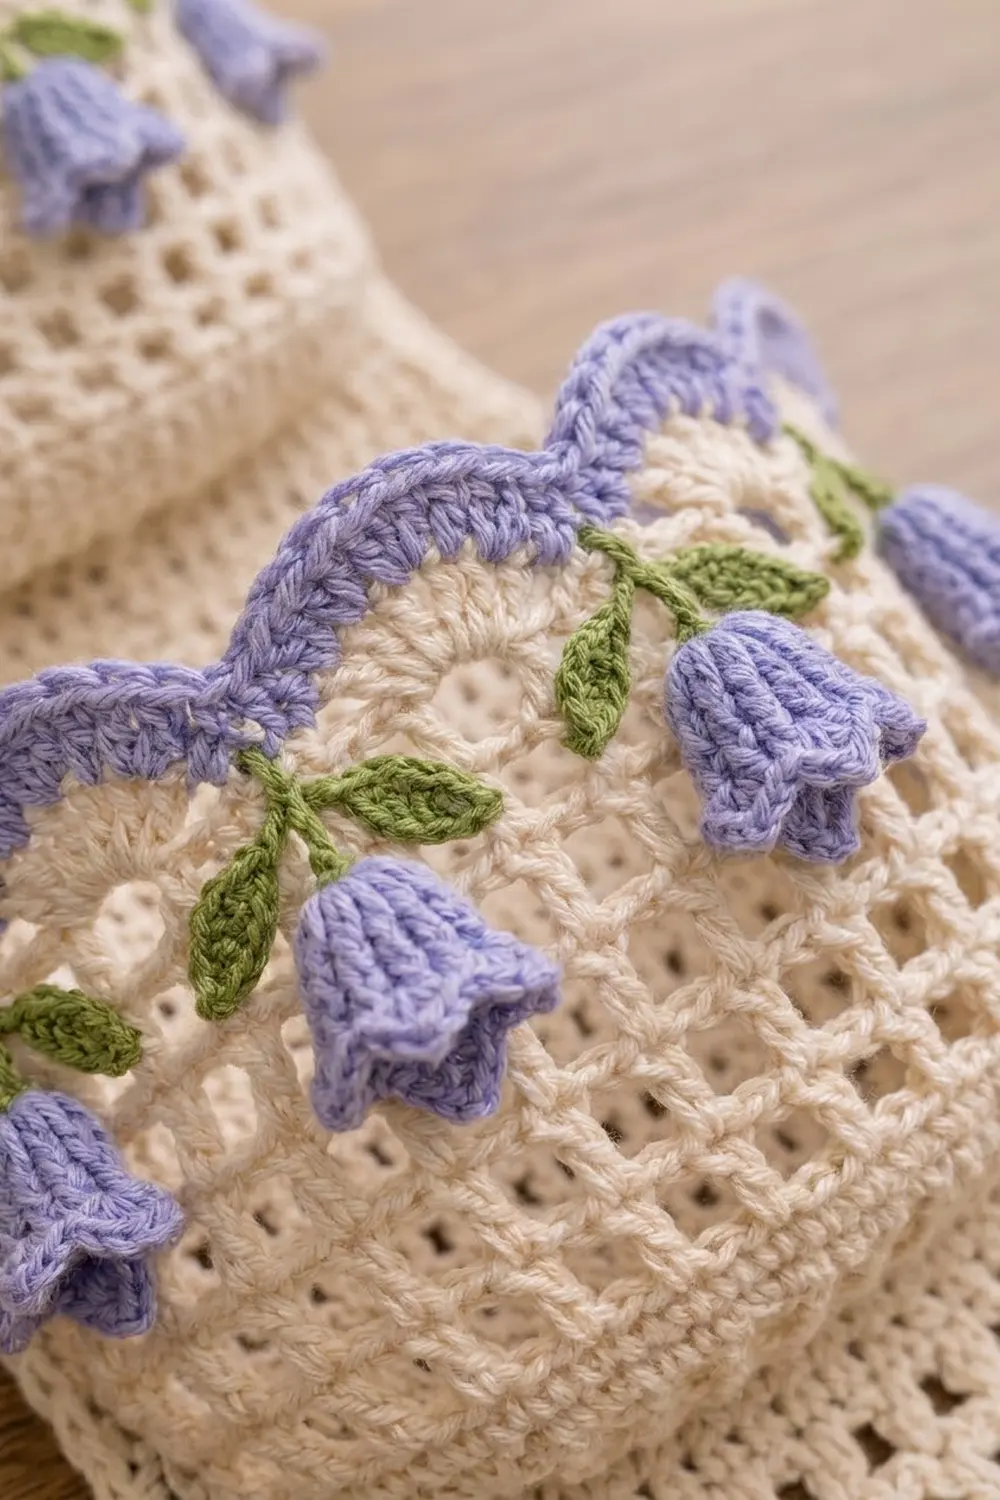
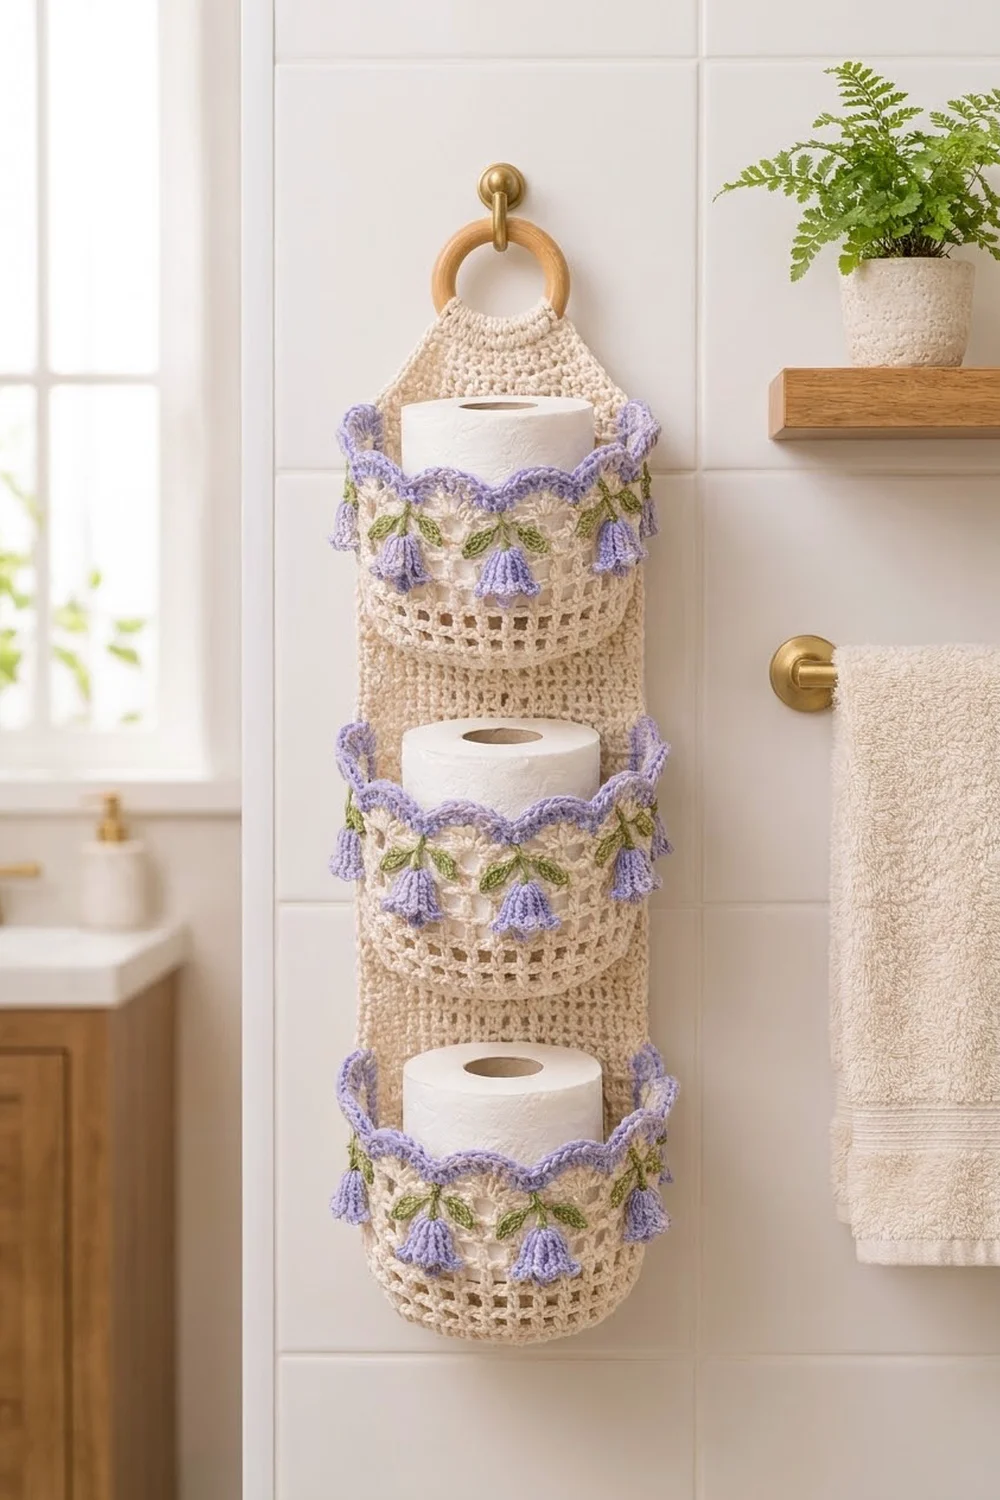
This wall-hanging toilet paper holder has three open mesh pockets stacked on a long cream backing panel. A wooden ring at the top lets it hang from any hook. Each pocket holds one standard roll and finishes with a lavender scalloped rim. Below each rim hangs a row of small lavender bellflowers, each with a pair of green leaves.
The cream, lavender, and leaf-green palette gives the holder a fresh cottage look. The open mesh lets the rolls show through, and the solid panel behind keeps everything steady against the wall.
This pattern uses US crochet terms. The finished holder is about 7 in (17.8 cm) wide and about 28 in (71.1 cm) long, measured from the bottom edge to the fold over the ring. Each pocket stands out about 3 in (7.6 cm) from the panel and is about 4 in (10.2 cm) tall.
You will crochet one backing panel in half double crochet rows. Then you make three pockets, each a half-circle base with a mesh wall, and 45 small appliqués: 15 bells and 30 leaves. Sew the pockets to the panel and add the appliqués. Next, work a two-round border around the panel, which also locks the pocket sides in place. Finally, fold the top tab over the wooden ring.
Finished Size and Construction
- Finished size: about 7 in × 28 in (17.8 cm × 71.1 cm), hanging
- Skill level: Intermediate
- Terminology: US
- Yarn weight: Worsted (CYC 4) cotton
- Hooks: 5.0 mm (H-8) for the panel and pockets; 4.0 mm (G-6) for the appliqués
- Number of pieces: 1 panel, 3 pockets, 15 bells, 30 leaves
- Layout: 3 pockets stacked in one vertical column
- Pocket size: 6 in (15.2 cm) wide at the panel, 3 in (7.6 cm) deep, about 4 in (10.2 cm) tall
- Panel size before border: 6 in × 29.3 in (15.2 cm × 74.4 cm) flat, including the taper and tab
- Border depth: 0.5 in (1.3 cm)
Materials
Use a smooth, firm worsted-weight cotton or cotton blend. Cotton holds the pocket shape, copes well with bathroom humidity, and gives crisp mesh and scallops.
- Cream (main color): 170 g, about 289 m
- Lavender: 55 g, about 94 m
- Leaf green: 30 g, about 51 m
These amounts include a safety margin of about 20%.
Tools:
- 5.0 mm (H-8) and 4.0 mm (G-6) crochet hooks
- Wooden ring, 3 in (7.6 cm) outer diameter
- Tapestry needle
- Locking stitch markers (at least 10)
- Rustproof pins and blocking mat
- Measuring tape and scissors
Abbreviations (US Terms)
- ch – chain
- sl st – slip stitch
- sc – single crochet
- hdc – half double crochet
- dc – double crochet
- hdc2tog – half double crochet 2 together
- sk – skip
- sp – space
- st(s) – stitch(es)
- BLO – back loop only
- RS – right side
Crab stitch (reverse sc): Do not turn. Work from left to right (if you are right-handed). Insert the hook into the next st to the right, yarn over, and pull up a loop. Yarn over again and pull through both loops.
Gauge and Checkpoints
Gauge with the 5.0 mm hook:
- 16 hdc × 12 rows = 4 in (10.2 cm)
- 16 sts × 8 rows in dc mesh = 4 in (10.2 cm)
- 16 sc = 4 in (10.2 cm)
Make one complete pocket before you start the panel. Its straight base edge should measure 6 in (15.2 cm), the same as the panel width. If it does, your gauge works for the whole project.
Checkpoints:
- Panel after Row 4: 6 in (15.2 cm) wide
- Panel after Row 66: 22 in (55.9 cm) long
- Panel after Row 76: about 25.3 in (64.3 cm) long
- Panel after Row 88: about 29.3 in (74.4 cm) long
- Pocket base after Row 6: 6 in (15.2 cm) straight edge, 3 in (7.6 cm) deep
- Pocket wall after Row 6: about 2.7 in (6.9 cm) tall
- Pocket wall after Row 10: about 4 in (10.2 cm) tall
Too big? Go down one hook size. Too small? Go up one hook size. Never change the stitch counts, because the border math and pocket placement depend on them.
Backing Panel
With cream and the 5.0 mm hook, ch 20.
Row 1: Hdc in 3rd ch from hook and in each ch across. (18 hdc) The beginning ch-2 never counts as a stitch on this panel.
Row 2: Ch 2, turn, 2 hdc in first st, hdc in each st to last st, 2 hdc in last st. (20 hdc)
Row 3: Repeat Row 2. (22 hdc)
Row 4: Repeat Row 2. (24 hdc)
These increases round off the bottom corners.
Rows 5–66: Ch 2, turn, hdc in each st across. (24 hdc)
Checkpoint: 6 in × 22 in (15.2 cm × 55.9 cm).
Row 67: Ch 2, turn, hdc2tog, hdc in each st to last 2 sts, hdc2tog. (22 hdc)
Rows 68–76: Repeat Row 67. Each row has 2 fewer sts than the row before: 20, 18, 16, 14, 12, 10, 8, 6, and 4 hdc. (Row 76 = 4 hdc)
Rows 77–88 (tab): Ch 2, turn, hdc in each st across. (4 hdc)
Fasten off. The tab is 1 in (2.5 cm) wide and 4 in (10.2 cm) long.
Pocket (Make 3)
Base (Half Circle)
With cream and the 5.0 mm hook. The ch-3 counts as a dc in every row.
Row 1: Magic ring, ch 3, 5 dc in ring, pull closed. (6 dc)
Row 2: Ch 3, turn, dc in same st, 2 dc in each st across. (12 dc)
Row 3: Ch 3, turn, dc in same st, dc in next st, 2 dc in next st, dc in next st; repeat from * 4 more times. (18 dc)
Row 4: Ch 3, turn, dc in same st, dc in next 2 sts, 2 dc in next st, dc in next 2 sts; repeat from * 4 more times. (24 dc)
Row 5: Ch 3, turn, dc in same st, dc in next 3 sts, 2 dc in next st, dc in next 3 sts; repeat from * 4 more times. (30 dc)
Row 6: Ch 3, turn, dc in same st, dc in next 4 sts, 2 dc in next st, dc in next 4 sts; repeat from * 4 more times. (36 dc)
Do not fasten off. The 36 stitch tops form the curved edge. The 12 row-ends and the ring form the straight edge, which should measure 6 in (15.2 cm).
Wall
Row 1 (conversion row): Ch 1, turn. Working in BLO, sc in first 17 sts, 2 sc in next st, sc in last 18 sts. (36 + 1 = 37 sc) The unworked front loops make a fold line, so the wall stands up from the base.
Row 2 (mesh): Ch 4 (counts as dc + ch 1), turn, sk next sc, dc in next sc, ch 1, sk next sc, dc in next sc; repeat from * across. (19 dc, 18 ch-1 sps)
Rows 3–6: Ch 4, turn, dc in next dc, ch 1, dc in next dc; repeat from * across. Work the last dc in the 3rd ch of the turning ch. (19 dc, 18 ch-1 sps)
Row 7 (conversion row): Ch 1, turn, sc in each dc and each ch-1 sp across. (19 + 18 = 37 sc)
Row 8: Ch 2 (does not count), turn, hdc in each st across. (37 hdc) Fasten off cream.
Row 9 (scallops): With the RS (outside) facing you, join lavender in the first hdc. Ch 1, sc in same st, sk 2 sts, 7 dc in next st, sk 2 sts, sc in next st; repeat from * 5 more times. (6 scallops: 7 sc + 42 dc = 49 sts)
Check: 1 + (6 × 6) = 37, so the scallops use every stitch of Row 8.
Row 10 (rim): Ch 1, do not turn. Loosely sl st in each st across. (49 sl st) Fasten off, leaving a 12 in (30.5 cm) tail.
The 37-stitch wall is about 9.25 in (23.5 cm) long. It curves around the base, and its two ends meet the panel’s side edges.
Bellflower Appliqués
Bell (Make 15)
With lavender and the 4.0 mm hook, work in continuous rounds.
Rnd 1: 5 sc in magic ring. (5 sc)
Rnd 2: Sc in each st around. (5 sc)
Rnd 3: 2 sc in each st around. (10 sc)
Rnd 4: Sc in each st around. (10 sc)
Rnd 5: Sc in next st, 2 sc in next st; repeat from * 4 more times. (15 sc)
Rnd 6 (petals): Sl st in next st, (hdc, dc, hdc) in next st, sl st in next st; repeat from * 4 more times. (5 petals, 25 sts)
Fasten off with a long tail. The bell is about 1 in (2.5 cm) tall, with a flared edge of 5 pointed petals.
Leaf (Make 30)
With green and the 4.0 mm hook, ch 5.
Rnd 1: Sc in 2nd ch from hook, hdc in next 2 ch, sc in last ch, ch 1 for the tip. Working along the other side of the chain: sc in same ch, hdc in next 2 ch, sc in last ch, sl st to first sc. (8 sts + ch-1 tip)
Fasten off with a tail. The leaf is about 1 in (2.5 cm) long.
Make All Pieces
| Piece | Color | Quantity |
|---|---|---|
| Backing panel | Cream | 1 |
| Pocket (base + wall) | Cream with lavender rim | 3 |
| Bell | Lavender | 15 |
| Leaf | Green | 30 |
Layout (front view):
        ( ring )
          tab          Rows 77–88
        / taper \      Rows 67–76
      | Pocket 3 |     base on top of Row 47
      |  panel   |
      | Pocket 2 |     base on top of Row 26
      |  panel   |
      | Pocket 1 |     base on top of Row 5
       \________/      Rows 1–4
Appliqués for each pocket: 5 bells and 10 leaves, placed at the 5 inner sc “valleys” of Row 9. These sit above the 7th, 13th, 19th, 25th, and 31st sts of Row 8.
Attach them before joining, while the pocket is easy to handle:
- With green, surface sl st a stem straight down from each valley through Rows 8, 7, and 6. Each stem is about 1 in (2.5 cm) long.
- Sew one leaf on each side of the top of the stem, angled up and out.
- Sew the narrow top of a bell to the bottom of the stem so its petals hang over the mesh. Tack only the sides of the bell so it stays rounded.
Joining
Method: Whipstitch with cream. The border then locks in the pocket sides.
Placement: Lay the panel RS up. Mark the tops of Rows 5, 26, and 47. These are about 1.7 in (4.3 cm), 8.7 in (22.1 cm), and 15.7 in (39.9 cm) from the bottom edge. Line up one pocket’s straight base edge along each marked row.
Stitch-to-stitch logic: Each base edge has 12 row-ends, 6 on each side of the ring. The panel row has 24 hdc, so whipstitch each row-end to 2 panel sts (12 × 2 = 24). The ring should sit between the 12th and 13th panel sts.
Sides: Lay each wall end flat on top of the panel’s side edge. Pin wall Rows 1–8 in place, but leave the lavender Rows 9–10 free so the scallops can stand up. Baste the ends loosely.
Tension: Pull each whipstitch just snug. If it’s too tight, the panel puckers. If it’s too loose, the base sags and the roll tips forward.
Size checkpoint: The panel should still lie flat at 6 in (15.2 cm) wide. Each pocket should stand out about 3 in (7.6 cm) at its center.
Border
Border gauge: 16 sc = 4 in (10.2 cm), which is 4 sc per inch. The hdc rows run 3 per inch, so work 4 sc for every 3 row-ends.
Rnd 1: With cream and the 5.0 mm hook, join with a sc at the bottom right corner and work around the panel. Where a pocket wall end lies on the side edge, insert the hook through both layers. This does not add any stitches.
- Bottom edge (18 foundation ch): 2 sc in first ch, sc in next 16 ch, 2 sc in last ch. (20 sc)
- Each long side (Rows 1–66): 4 sc for every 3 row-ends. (66 ÷ 3 × 4 = 88 sc)
- Each taper edge (Rows 67–76, 10 row-ends): 2 sc in next row-end, sc in next row-end 4 times, then 2 sc in each of the last 2 row-ends. (12 + 4 = 16 sc)
- Each tab side (Rows 77–88): 4 sc for every 3 row-ends. (12 ÷ 3 × 4 = 16 sc)
- Tab top (4 sts): 3 sc in first st, sc in next 2 sts, 3 sc in last st. (8 sc)
Sl st to the first sc. Total: 20 + 88 + 16 + 16 + 8 + 16 + 16 + 88 = 268 sc
Rnd 2: Ch 1, do not turn. Crab stitch in each st around. (268 sts) Sl st to join, fasten off, and weave in all ends.
Why the math works: The long sides are 66 rows at 3 rows per inch, which is 22 in (55.9 cm). 88 sc at 4 per inch is also 22 in, so the edge lies flat without ruffling or pulling in. Each taper row moves 0.25 in (0.6 cm) sideways and 0.33 in (0.8 cm) up. That makes a slanted edge about 4.2 in (10.7 cm) long, which 16 sc covers at 4 per inch. Each border round is about 0.25 in (0.6 cm) deep, so the two rounds add 0.5 in (1.3 cm) per side. That takes the width from 6 in (15.2 cm) to 7 in (17.8 cm).
Ring: Push the tab through the wooden ring from front to back. Fold it down 2 in (5.1 cm) and whipstitch it to the back of the panel just below the taper.
Final Blocking
- Mist the holder with water until it is damp but not dripping.
- Lay it face up and pin the panel to 7 in (17.8 cm) wide along its full length.
- Fill each pocket with a dry hand towel or a spare roll so the wall rounds out evenly.
- Pin each scallop point upward, and spread each bell’s 5 petals outward.
- Smooth the leaves so they point up and away from the stems.
- Let it dry completely, about 24 hours, before unpinning.
Final Quality-Control Checklist
- Panel is 7 in (17.8 cm) wide, and the long sides aren’t wavy
- Border Rnd 1 has 268 sts, and the crab stitch looks even
- Each pocket has 6 full scallops and 49 sts in Row 10
- Each pocket has 5 bells and 10 leaves, centered under the scallop valleys
- Pocket bases sit straight on Rows 5, 26, and 47
- Wall ends are fully caught in the border, with no gaps
- The tab is secure around the ring, and all ends are woven in
Troubleshooting
Wall flares outward: You probably worked Row 1 through both loops. Redo it in BLO.
Scallops don’t fit evenly: Recount Row 8. It must have exactly 37 sts.
Long sides ruffle: There are too many border sts. Stick to 4 sc per 3 row-ends.
Long sides pull in: The border is too tight. Go up half a hook size for the border only.
Bells look flat: Tack only their sides, and tuck a yarn scrap inside each bell while blocking.
Pocket sags with a roll inside: Tighten the base whipstitching and check that every row-end is joined.
Care
Hand wash in cool water with mild soap and gently press out the water. Reshape the pockets and dry flat, never hanging while wet.
Final Notes
The whole project rests on one measurement chain. At 16 sts per 4 in (10.2 cm), the 24-stitch panel and the half-circle bases are both 6 in (15.2 cm) wide. The 37-stitch wall divides into exactly 6 scallops. The 88-stitch border sides match 22 in (55.9 cm) of hdc rows. The two border rounds bring the hanging holder to 7 in × 28 in (17.8 cm × 71.1 cm). If you check gauge first and confirm each checkpoint, every piece will fit together without adjustment.
Happy crocheting!