

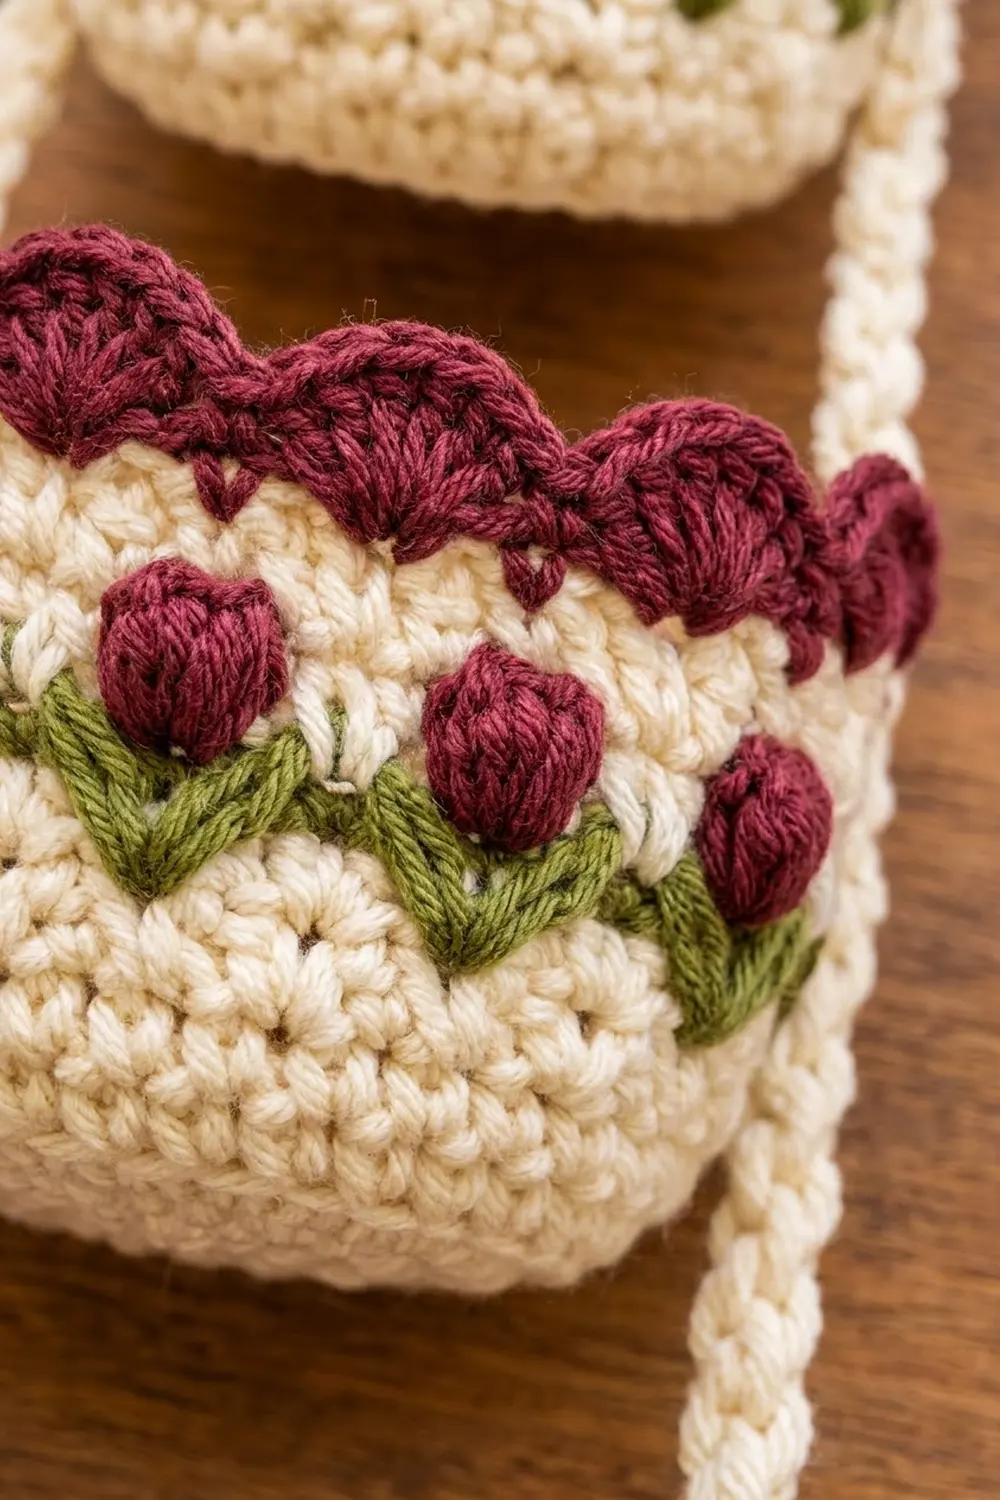
The Tulip Tier Hanging Basket is a three-level wall organizer made of three round cream baskets in graduated sizes, stacked vertically on two chunky cream cords. Each basket has a band of deep burgundy tulips on short green stems and leaves, and a burgundy scalloped rim on top. Hung from a peg, it holds a toilet roll in each tier, and it also works for washcloths, soaps, or small toys.
The palette is cream, burgundy, and olive green. The look is cottage-style: dense, firm single crochet bodies, raised bobble tulips, and soft shell scallops that sit right above each flower.
This pattern uses US crochet terms. The baskets measure 5.7 in (14.5 cm), 6.7 in (17.0 cm), and 7.6 in (19.3 cm) across, and 3 in (7.6 cm), 3.5 in (8.9 cm), and 4 in (10.2 cm) tall. The assembled organizer hangs about 23 in (58.4 cm) long and about 8 in (20.3 cm) wide.
Construction is simple. Each basket starts as a flat single crochet circle, turns upward with a back-loop round, gets a colorwork tulip band, and finishes with a two-round burgundy rim. Two slip-stitch cords are then sewn to opposite sides of all three baskets and joined at the top to form a hanging peak.
Finished Size and Construction
- Finished size (assembled): about 23 in (58.4 cm) long x 8 in (20.3 cm) wide
- Skill level: Intermediate (color changes, bobbles)
- Terminology: US
- Yarn weight: worsted (#4), cotton or cotton blend
- Hook: 4.5 mm (US 7) for baskets; 5.0 mm (US H-8) for cords
- Number of pieces: 5 (3 baskets + 2 cords)
- Layout: vertical stack, small basket on top, large on the bottom
- Piece size (base diameter): Small 5.7 in (14.5 cm), Medium 6.7 in (17.0 cm), Large 7.6 in (19.3 cm)
- Height before rim: about 2.5 in (6.4 cm), 3 in (7.6 cm), 3.5 in (8.9 cm)
- Rim (border) depth: about 0.5 in (1.3 cm)
Instructions are written as Small (Medium, Large).
Materials
Choose a firm worsted cotton or cotton blend so the baskets hold their shape. The amounts below are based on yarn with about 180 m per 100 g.
- Cream: 210 g (about 378 m)
- Burgundy: 40 g (about 72 m)
- Olive green: 20 g (about 36 m)
Tools:
- 4.5 mm (US 7) hook
- 5.0 mm (US H-8) hook
- Stitch markers (at least 4)
- Yarn needle
- Scissors
- Tape measure
- Wooden peg or hook for hanging
All quantities include a margin of about 15% for gauge swatches and differences in tension.
Abbreviations (US Terms)
- ch – chain
- sc – single crochet
- dc – double crochet
- sl st – slip stitch
- inc – 2 sc in the same stitch
- BLO – back loop only
- st(s) – stitch(es)
- rnd – round
- sk – skip
Special stitches
- Bobble: (yo, insert hook in st, yo, pull up a loop, yo, pull through 2 loops) 4 times in the same st, yo, pull through all 5 loops on hook. A bobble counts as 1 st.
- Shell: 5 dc in the same st.
- Color change: work the last yo of the stitch before the new color with the new color.
Gauge and Checkpoints
Gauge: 16 sc and 18 rnds = 4 in (10.2 cm) in sc worked in joined rounds with the 4.5 mm hook. That gives 4 sts per inch.
Make the Small basket first and use it as your test piece. Check it at each stage:
- After Base Rnd 6 (36 sts): about 2.75 in (7.0 cm) across.
- After Base Rnd 12 (72 sts): 5.7 in (14.5 cm) across, 18 in (45.7 cm) around.
- After the tulip band: the three band rounds measure about 0.75 in (1.9 cm) tall.
- Before the rim: about 2.5 in (6.4 cm) tall.
Too big? Go down to a 4.0 mm hook. Too small? Go up to a 5.0 mm hook. Tension matters most on the base: a loose base will ripple and make the basket floppy. If the base cups, you are working too tightly. If it ruffles, you are working too loosely.
Basket (make 3: Small, Medium, Large)
Work in joined rounds. Start each round with ch 1 (this does not count as a stitch), put the first sc in the same st as the join, and finish with a sl st into the first sc. Starting in the same spot every round keeps the 6-stitch repeats lined up, so each scallop sits over its tulip.
Base (cream, 4.5 mm hook)
- Rnd 1: Magic ring, ch 1, 6 sc in ring, join. (6)
- Rnd 2: Inc in each st around. (12)
- Rnd 3: (sc 1, inc) 6 times. (18)
- Rnd 4: (sc 2, inc) 6 times. (24)
- Rnd 5: (sc 3, inc) 6 times. (30)
- Rnd 6: (sc 4, inc) 6 times. (36)
- Rnd 7: (sc 5, inc) 6 times. (42)
- Rnd 8: (sc 6, inc) 6 times. (48)
- Rnd 9: (sc 7, inc) 6 times. (54)
- Rnd 10: (sc 8, inc) 6 times. (60)
- Rnd 11: (sc 9, inc) 6 times. (66)
- Rnd 12: (sc 10, inc) 6 times. (72) Small: stop here.
- Rnd 13: (sc 11, inc) 6 times. (78)
- Rnd 14: (sc 12, inc) 6 times. (84) Medium: stop here.
- Rnd 15: (sc 13, inc) 6 times. (90)
- Rnd 16: (sc 14, inc) 6 times. (96) Large: stop here.
Each round is its own complete count: 6 sts multiplied by the round number. To stop the base from turning hexagonal, you can offset the increases in alternate rounds (for example, sc half the plain sts, inc, then the rest). This does not change the counts.
Lower Wall (cream)
- Rnd W1: Ch 1, sc BLO in each st around, join. [72 (84, 96)] This round turns the edge up into a wall.
- Rnds W2–W4 (W2–W5, W2–W6): Sc in each st around. [72 (84, 96)]
The wall has no more increases from here on.
Tulip Band
Carry the color you are not using inside your stitches by laying it across the tops of the previous round and working over it. This keeps the inside neat.
- Leaf Rnd 1 (stems): With cream, sc 3 cream, sc 1 green, sc 2 cream; repeat 12 (14, 16) times. [72 (84, 96): 60 (70, 80) cream + 12 (14, 16) green]
- Leaf Rnd 2 (leaves): sc 2 cream, sc 3 green, sc 1 cream; repeat 12 (14, 16) times. [72 (84, 96): 36 (42, 48) cream + 36 (42, 48) green]
The single green stem stitch is position 4 of each repeat. In Leaf Rnd 2 it spreads out into green leaves at positions 3, 4, and 5, making a small V-shaped leaf spray under each flower. Cut green, leaving a 6 in (15.2 cm) tail, and weave it in later.
- Tulip Rnd: sc 3 cream, Bobble in burgundy, sc 2 cream; repeat 12 (14, 16) times. [72 (84, 96): 60 (70, 80) sc + 12 (14, 16) bobbles]
Each bobble sits right on top of its green leaf spray. Push the bobbles to the right side with your finger as you go.
Upper Wall (cream)
- Rnds U1–U4 (U1–U5, U1–U6): Sc in each st around. [72 (84, 96)]
In Rnd U1, work 1 sc into the top of each bobble. Don’t skip it, or you will lose stitches.
Checkpoint: height about 2.5 in (6.4 cm) [3 in (7.6 cm), 3.5 in (8.9 cm)] from table to top edge.
Make All Pieces
| Piece | Qty | Cream | Burgundy | Green |
|---|---|---|---|---|
| Small basket | 1 | 40 g | 8 g | 4 g |
| Medium basket | 1 | 52 g | 10 g | 5 g |
| Large basket | 1 | 66 g | 12 g | 6 g |
| Cord | 2 | 10 g each | – | – |
Totals: about 178 g cream, 30 g burgundy, 15 g green, which fits inside the purchase amounts.
Cord (make 2, cream, 5.0 mm hook, yarn held double)
Test first: ch 15, sl st in the back bump of each ch. The piece should measure about 5 in (12.7 cm), or 3 ch per inch.
- Row 1: Ch 72.
- Row 2: Sl st in the back bump of the 2nd ch from hook and each ch across. (71 sl sts)
Lay the cord flat: it should be 24 in (61.0 cm). Add or remove chains to match. Leave a 12 in (30.5 cm) tail at both ends.
Layout grid:
         /\         <- cords sewn together 1 in (2.5 cm) at peak
        /  \        <- 6.5 in (16.5 cm) legs
     [ SMALL  ]     <- top tier
       |    |       <- 3 in (7.6 cm) gap
    [ MEDIUM  ]     <- middle tier
       |    |       <- 3 in (7.6 cm) gap
   [  LARGE   ]     <- bottom tier
Joining
Method: Whipstitch each cord to the outside of the basket wall with a yarn needle and cream yarn.
Stitch-to-stitch logic: Each cord attaches at a scallop “valley” (an sc point of Rim Rnd 2). On every basket, those valleys fall on st 1 and the st exactly half a round away: st 37 (43, 49). Both are position 1 of a repeat, so the cords sit between tulips on opposite sides, and each basket hangs level.
- Lay the Large basket on its side. Line up the bottom end of the cord with Rnd W1 below st 1. Tack it at Rnd W1 and again at Rim Rnd 1, with 4–5 small stitches at each point.
- Measure 3 in (7.6 cm) of free cord above the Large rim. Tack the Medium basket’s Rnd W1 there, then its rim.
- Repeat with a 3 in (7.6 cm) gap for the Small basket.
- Attach the second cord in the same way at st 37 (43, 49) on each basket.
- Above the Small basket, bring the two 6.5 in (16.5 cm) legs together. Overlap the last 1 in (2.5 cm) and whipstitch them side by side to form the peak.
Tension: Make the tacking stitches snug but not tight. If you pull too hard, the wall will pucker around the cord.
Size checkpoint: Hang the piece from its peak. It should be about 23 in (58.4 cm) long, and all three baskets should hang level. Re-tack any basket that tips.
Border (Burgundy Scalloped Rim)
Work the rim on each basket before joining.
Border gauge: One scallop repeat covers 6 sts, about 1.5 in (3.8 cm) at 4 sts per inch. The rim adds about 0.5 in (1.3 cm) of height.
- Rim Rnd 1: Join burgundy. Ch 1, sc in each st around, join. [72 (84, 96): 1 per existing st + 0 added]
- Rim Rnd 2: Ch 1, sc in first st, sk 2, Shell in next st, sk 2, sc in next st; repeat around, ending the last repeat with sk 2 and joining to the first sc. [12 (14, 16) scallops]
Rim Rnd 2 count: This round works into 24 (28, 32) of the 72 (84, 96) sts and skips 48 (56, 64). It produces 12 (14, 16) sc + 60 (70, 80) dc = 72 (84, 96) sts.
Fasten off and weave in the end.
Why the math works: 72, 84, and 96 are all multiples of 6. The tulip repeat, the shell repeat, and the cord points all use the same 6-stitch grid. The shell is worked in position 4, the same position as the bobble, so every scallop peak lands directly over a tulip. The valleys sit at position 1, which is where the cords attach.
Final Blocking
- Weave in all ends on the inside of each basket.
- Fill each basket with a toilet roll wrapped in a hand towel, or a container that matches its inner diameter.
- Mist the outside with water until damp, but not soaked.
- Shape the base flat and the walls straight. Pinch each scallop into a neat fan.
- Let it dry completely, about 24 hours.
- Attach the cords after blocking.
Final Quality-Control Checklist
- Bases measure 5.7 in (14.5 cm), 6.7 in (17.0 cm), and 7.6 in (19.3 cm) and lie flat.
- Stitch counts are 72 (84, 96) in every wall round.
- 12 (14, 16) tulips, each over a green leaf spray.
- 12 (14, 16) scallops, each centered over a tulip.
- Cords sit exactly opposite each other on every basket.
- Gaps between baskets are 3 in (7.6 cm).
- The peak seam is secure, and no ends show.
Troubleshooting
- Base ruffles: Too many stitches for your tension. Go down a hook size or check your increase counts.
- Base cups upward: Tension is too tight. Go up a hook size for the base only.
- Tulips drift sideways: You started a round in the wrong stitch. Always put the first sc in the joining stitch.
- Scallops don’t line up with tulips: Count back from st 1. The shell must be in position 4.
- Carried yarn shows through: Tighten up; your stitches are too loose to hide the strand. Work snugly over it.
- Basket tilts when hung: The cords are off-center. Re-tack them at the true opposite stitch.
- Cords stretch: Use cotton yarn held double, and keep the slip stitches firm.
Care
Hand wash in cool water and lay flat to dry, reshaping each basket around a roll. Do not tumble dry.

Final Notes
The measurement chain is simple. A gauge of 4 sts per inch gives bases of 72 (84, 96) sts, which measure 5.7 in (14.5 cm), 6.7 in (17.0 cm), and 7.6 in (19.3 cm). Those numbers carry straight up the walls, through the 6-stitch tulip band, into 12 (14, 16) scallops 0.5 in (1.3 cm) deep. Cords of 24 in (61.0 cm), with 3 in (7.6 cm) gaps between tiers, give a finished hanger of about 23 in (58.4 cm). Check your gauge on the Small basket and the rest will follow.
Happy crocheting!