

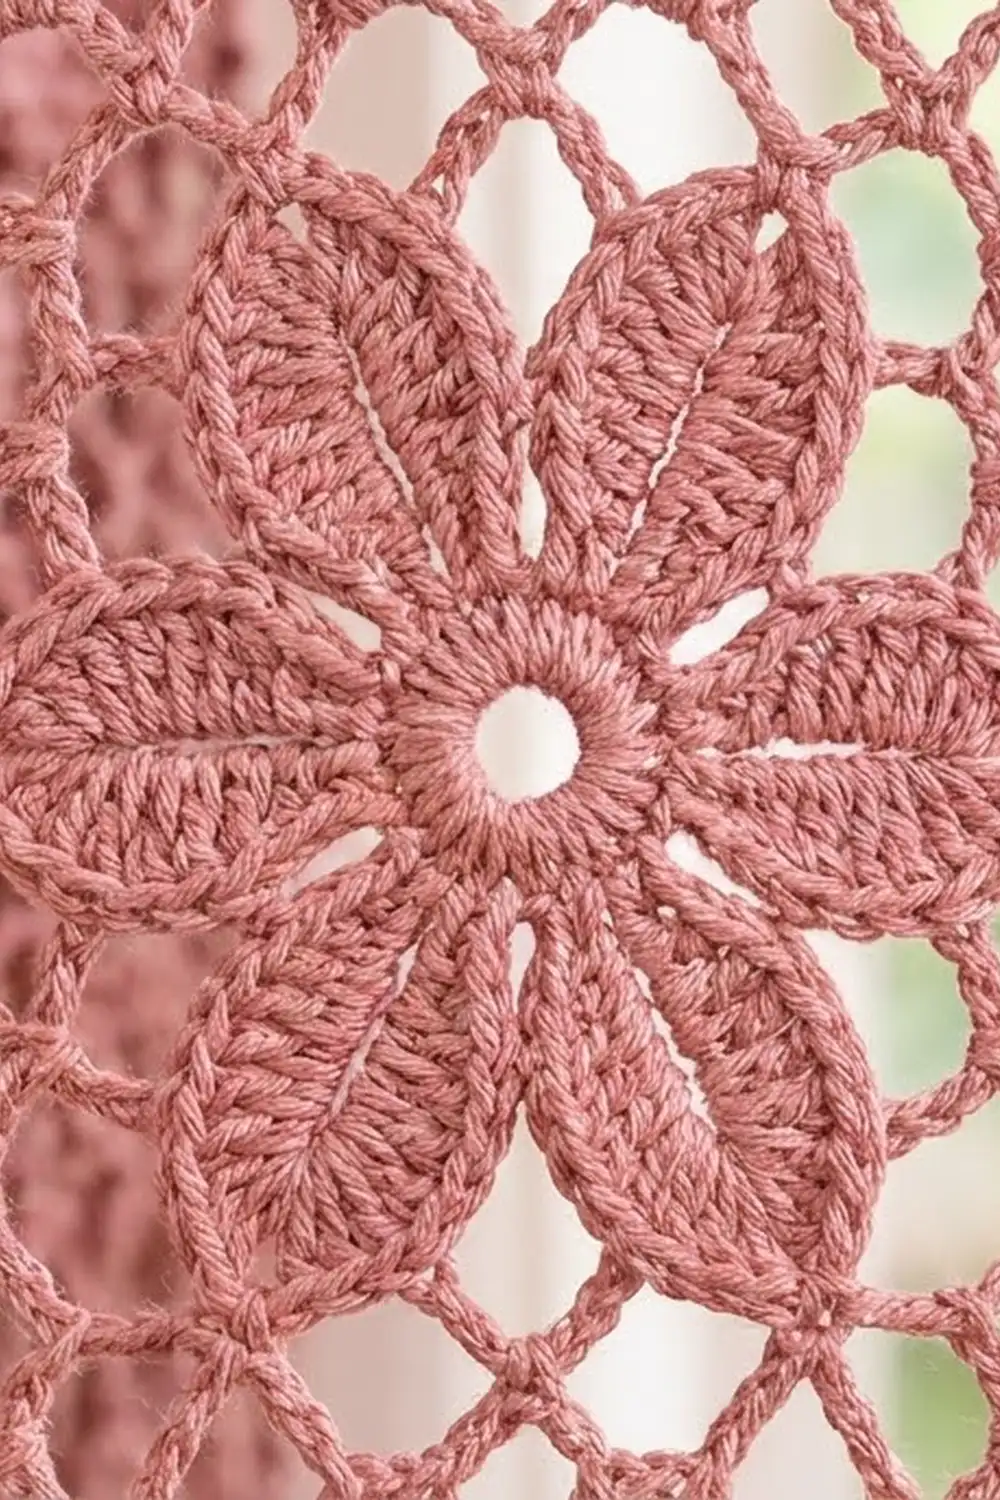
These lacy curtain panels are made from square flower motifs. Each motif has a six-petal blossom in the middle, framed by an open chain mesh. Once the squares are joined, the flowers line up in neat columns and the mesh between them forms a light, airy lattice. Daylight comes through, but the panels still soften the window.
The pair is worked in two muted colors: a warm dusty rose and a calm sage-teal. Each panel is a single color, so hanging them side by side gives a soft cottage look. The bottom hem has a scalloped edge, and folded tabs at the top slide onto a standard wooden rod.
This pattern uses US crochet terms. Each finished panel measures 22 in (55.9 cm) wide by 78 in (198.1 cm) long from the top border edge to the base of the scallops. With the 1 in (2.5 cm) scallops and the 2 in (5.1 cm) tab loops added, the total hanging length is about 81 in (205.7 cm).
Construction is simple. You make 33 motifs per panel and join them into a grid 3 squares wide by 11 squares tall. Then you add a two-round border, work scallops along the bottom edge and work the tabs along the top edge.
Finished Size and Construction
- Finished panel size: 22 x 78 in (55.9 x 198.1 cm), plus scallops and tabs
- Total hanging length: about 81 in (205.7 cm)
- Skill level: Intermediate
- Terminology: US crochet terms
- Yarn weight: Worsted (weight 4) cotton
- Hook: 5.0 mm (H-8)
- Number of pieces: 66 motifs in total, 33 per panel, making 2 panels
- Layout per panel: 3 motifs wide x 11 motifs tall
- Motif size: 7 x 7 in (17.8 x 17.8 cm), blocked
- Panel size before border: 21 x 77 in (53.3 x 195.6 cm)
- Border depth: 0.5 in (1.3 cm) on every side, plus 1 in (2.5 cm) of scallops along the bottom edge
Materials
Choose a smooth worsted-weight cotton or cotton blend. Cotton hangs well, holds the petal shapes crisply and washes easily. Avoid very fuzzy yarns, because they blur the mesh.
- Color A, dusty rose: 550 g, about 935 m
- Color B, sage-teal: 550 g, about 935 m
Each panel uses about 450 g. The quantities above include a safety margin of roughly 20% for gauge differences and swatching.
Tools
– 5.0 mm (H-8) crochet hook
– Tapestry needle
– Locking stitch markers
– Rust-proof blocking pins and foam mats
– Measuring tape
– Spray bottle
Abbreviations (US Terms)
- ch – chain
- sl st – slip stitch
- sc – single crochet
- hdc – half double crochet
- dc – double crochet
- tr – treble crochet (yarn over twice, then work the loops off two at a time)
- sp – space
- BLO – back loop only
- RS / WS – right side / wrong side
Special stitch – Petal: Work (sc, hdc, 3 dc, ch 2, 3 dc, hdc, sc) all into the same ch-5 space. The ch-2 forms the pointed tip, and the dc on either side of it form the leaf shape.
Gauge and Checkpoints
Base gauge: 14 sc = 4 in (10.2 cm) in the motif yarn and hook.
The motif itself is the real gauge, so make and block one motif before you make the rest.
Motif checkpoints:
– After Round 1: about 1.5 in (3.8 cm) across
– After Round 3 (petals): about 5 in (12.7 cm) from petal tip to opposite petal tip
– After Round 5: about 6.25 in (15.9 cm) square
– After Round 6, blocked: 7 x 7 in (17.8 x 17.8 cm)
If your motif is too big: Go down to a 4.5 mm hook. A difference of only 0.25 in (0.6 cm) per motif adds up to 2.75 in (7.0 cm) over the 11 motifs of a panel’s length.
If your motif is too small: Go up to a 5.5 mm hook.
Recheck the measurements after every 10 motifs, because tension often relaxes as you go.
Flower Motif (Make 66)
Ch 5 and join with a sl st to form a ring.
Round 1: Ch 3 (counts as dc), work 17 dc into the ring. Join with a sl st to the top of the beginning ch-3. (18 dc)
Round 2: Ch 1, sc in the same st, ch 5, skip 2 dc. Sc in the next dc, ch 5, skip 2 dc. Repeat from * 4 more times. Join with a sl st to the first sc. (6 sc, 6 ch-5 sps)
Round 3 (petals): Sl st into the first ch-5 sp. Work 1 Petal in each ch-5 sp around. Join with a sl st to the first sc. (6 petals: 60 sts and 6 ch-2 tips)
Each petal sits on its own loop, so the petals stand separate from each other with pointed tips. The center ring and its hole stay open.
Round 4: Sl st in the next hdc and the next 3 dc, then sl st into the ch-2 tip. Ch 1, sc in the same tip. Ch 4, dc in the Round 2 sc that sits between this petal and the next one, ch 4, sc in the next ch-2 tip. Repeat from * around, but omit the final sc on the last repeat. Join with a sl st to the first sc. (6 sc, 6 dc, 12 ch-4 loops)
Round 5 (squaring): Sl st in the next 2 ch to reach the center of the first ch-4 loop. Ch 4 (counts as tr), ch 5, tr in the same loop. This is the first corner.
Ch 5, sc in the next loop, ch 5, sc in the next loop, ch 5, then (tr, ch 5, tr) in the next loop. Repeat from * twice more. Finish with ch 5, sc in the next loop, ch 5, sc in the next loop, ch 5, and join with a sl st to the top of the beginning ch-4.
(8 tr, 8 sc, 16 ch-5 sps: 4 corner sps and 3 side sps on each side)
The tr pairs lift the corners, and the sc keep the sides flat. This is what turns the six-sided flower into a square.
Round 6 (edge round): Sl st into the corner ch-5 sp. Ch 1, then work (3 sc, ch 2, 3 sc) in the same sp. Sc in the next tr, 5 sc in the next ch-5 sp, sc in the next sc, 5 sc in the next ch-5 sp, sc in the next sc, 5 sc in the next ch-5 sp, sc in the next tr, then (3 sc, ch 2, 3 sc) in the corner sp. Repeat from * around, but omit the last corner on the final repeat. Join with a sl st to the first sc and fasten off.
Stitch count:
– 16 sts worked 1 per existing tr or sc
– 84 sc added in spaces (12 side sps x 5, plus 4 corner sps x 6)
– Total: 100 sc and 4 ch-2 corner sps
Per side: 3 + 1 + 5 + 1 + 5 + 1 + 5 + 1 + 3 = 25 sc between the corner ch-2 spaces. In this pattern, the corner ch-2 spaces are counted separately and are not included in the 25.
Weave in the ends, then wet-block the motif to 7 x 7 in (17.8 x 17.8 cm).
Make All Pieces
- Color A (dusty rose): 33 motifs for Panel 1
- Color B (sage-teal): 33 motifs for Panel 2
Layout per panel (3 wide x 11 tall). Each X is one motif:
Row 1:  X  X  X   (top edge)
Row 2:  X  X  X
Row 3:  X  X  X
Row 4:  X  X  X
Row 5:  X  X  X
Row 6:  X  X  X
Row 7:  X  X  X
Row 8:  X  X  X
Row 9:  X  X  X
Row 10: X  X  X
Row 11: X  X  X   (bottom edge)
Block all the motifs to the same size before joining, so that the seams line up.
Joining
Method: Slip stitch join through the back loops only.
- Hold two motifs with RS together and the edges aligned.
- Working through the BLO of both layers, sl st in the corner ch-2 sps.
- Sl st through each of the 25 matching sc pairs, which is one sc of the front motif joined to one sc of the back motif.
- Sl st in the next corner ch-2 sps.
Join in long lines. First join all the horizontal seams: work the motifs of Row 1 to Row 2 across all 3 columns in one continuous line, picking up the next pair at each corner. Repeat for every row. Then join the 2 long vertical seams the same way, each running through all 11 motifs.
Tension: Keep your slip stitches as loose as the sc edge. If a seam puckers, change to the next larger hook just for joining.
Checkpoint: The joined panel should measure 21 x 77 in (53.3 x 195.6 cm), give or take 0.5 in (1.3 cm).
Border
Border gauge: The border uses the same 14 sc = 4 in (10.2 cm) gauge as the motifs.
Round 1: Join the yarn in any panel corner ch-2 sp with the RS facing. Ch 1, work (sc, ch 2, sc) in the corner sp.
Then sc in each sc along the side. At each seam, do not work into the joined corner spaces; step straight from the last sc of one motif to the first sc of the next. Work (sc, ch 2, sc) in each of the 4 panel corners. Join with a sl st to the first sc.
Counts are measured between the corner ch-2 spaces and include the corner sc at each end:
– Top and bottom: 3 x 25 = 75 sc worked 1 per stitch, plus 2 corner sc = 77 sc
– Long sides: 11 x 25 = 275 sc worked 1 per stitch, plus 2 corner sc = 277 sc
Round 2: Ch 1. Sc in each sc, and work (sc, ch 2, sc) in each corner ch-2 sp. Join with a sl st and fasten off.
– Top and bottom: 77 worked 1 per stitch, plus 2 = 79 sc
– Long sides: 277 worked 1 per stitch, plus 2 = 279 sc
Why the math works: The 75 sc along the top edge at 3.5 sc per inch is 21.4 in (54.4 cm), which matches the 21 in (53.3 cm) width of the joined motifs. Nothing is added at the seams, so the border lies flat without ruffling. The 2 border rounds add about 0.25 in (0.6 cm) per side, which brings the panel to 22 x 78 in (55.9 x 198.1 cm).
Scalloped bottom edge (Row 3): Join the yarn with the RS facing in the first sc of the bottom edge, which is the corner sc after the ch-2. Work across the 79 bottom sts:
Sc in the first st. Skip 2 sts, 7 dc in the next st, skip 2 sts, sc in the next st. Repeat from * 12 more times.
The count is 1 + (13 x 6) = 79 sts used, giving 13 scallops, each about 1 in (2.5 cm) deep. Fasten off.
Tabs (top edge): Mark out the 79 top sts as 7 tabs of 7 sts each, with 5 skipped sts between neighboring tabs. The total is (7 x 7) + (6 x 5) = 49 + 30 = 79 sts, so the first and last tabs sit flush with the panel edges.
For each tab:
1. Join the yarn with the RS facing in the first st of the tab. Ch 1 and sc in the 7 sts. (7 sc)
2. Rows 2–16: Ch 1, turn, sc in each sc. (7 sc)
The tab should measure about 4 in (10.2 cm) long. Fold it to the WS and whipstitch the last row to the base of Border Round 1. This forms a 2 in (5.1 cm) loop, which fits a rod up to 1.25 in (3.2 cm) in diameter.
Each tab is 2 in (5.1 cm) wide, and the gaps between tabs are 1.4 in (3.6 cm).
Final Blocking
- Soak the panel in cool water for 15 minutes, then gently press out the water. Do not wring it.
- Roll it in towels to remove more of the moisture.
- Lay it flat on the foam mats. Because of its length, you may need to block it in two halves.
- Pin the panel to 22 x 78 in (55.9 x 198.1 cm), working along the long edges first.
- Pin out each petal tip and the center of each scallop.
- Make sure the seams run straight. Use a long ruler along each column.
- Let it dry completely, which usually takes 24–48 hours.
- Pin each tab flat and let it dry.
Cotton panels can drop about 1–2 in (2.5–5.1 cm) once they hang. If length matters for your window, hang the panel for 2 days before trimming the rod height.
Final Quality-Control Checklist
- 33 motifs per panel, each 7 in (17.8 cm) square
- Every motif has 25 sc per side
- All seams are flat, with no puckering
- Border Round 2 has 79 sts on the top and bottom edges and 279 sts on each long side
- 13 even scallops along the bottom edge
- 7 tabs, all the same length and sewn securely
- Panel measures 22 x 78 in (55.9 x 198.1 cm)
- All ends woven in at least 2 in (5.1 cm)
Troubleshooting
- Petals cup or curl: Your Round 2 chains are too tight. Use a larger hook just for the ch-5 loops.
- The motif stays hexagonal: Check that every corner in Round 5 has a tr pair, and that each side has 2 sc.
- Round 6 count is off: Count 5 sc in each side space and 6 sc in each corner space. Most errors happen at the corners.
- The panel slants: The motifs are not blocked to the same size. Reblock them before joining.
- The border ruffles: You probably worked into the seam corners. Rip back and skip them.
- The scallop count doesn’t fit: Recount the bottom edge. It must be exactly 79 sts.
Care
Hand wash or machine wash on a gentle cycle in cool water inside a mesh bag. Lay the panels flat to dry and reshape them while damp. Do not tumble dry, because the cotton will shrink and the lace will distort.

Final Notes
All the measurements build on each other:
1. 14 sc = 4 in (10.2 cm)
2. One motif = 25 sc per side, 7 in (17.8 cm)
3. 3 x 11 motifs = 21 x 77 in (53.3 x 195.6 cm)
4. Two border rounds give 79 and 279 sts, for 22 x 78 in (55.9 x 198.1 cm)
5. 13 scallops along the bottom edge and 7 tabs along the top edge give a total length of about 81 in (205.7 cm)
If your first motif matches its checkpoint, every later step will fit. Take your time with the blocking, and enjoy watching the light come through your blossoms.
Happy crocheting!