

The Lilac Window Valance is a light, airy curtain made of round lace motifs joined edge to edge. Each motif has an open center, a ring of puffy cluster petals, a solid double-crochet band, and an outer round of small chain loops. The circles touch at four points, so diamond-shaped openings form between them and daylight comes through.
The valance is worked in one soft lavender cotton. A solid header band runs across the top so the curtain hangs straight from clip hooks, and the bottom row of motifs gives the hem a scalloped edge with no extra edging.
This pattern uses US crochet terms. The finished valance measures 40 in (101.6 cm) wide by 22 in (55.9 cm) tall. You make 50 motifs and join each one to its neighbors during its last round (join-as-you-go). Then you work a 2 in (5.1 cm) header band straight across the top of the first motif row.
Finished Size and Construction
- Finished size: 40 in (101.6 cm) wide x 22 in (55.9 cm) tall
- Skill level: Intermediate
- Terminology: US crochet terms
- Yarn weight: DK / light worsted (3) cotton
- Hook: 4.0 mm (G-6)
- Number of pieces: 50 round motifs, joined into one panel
- Layout: 10 motifs across x 5 motifs down
- Motif size: 4 in (10.2 cm) across
- Size before border: 40 in (101.6 cm) x 20 in (50.8 cm)
- Border (header band) depth: 2 in (5.1 cm), top edge only
Materials
Yarn: Use a smooth, mercerized or combed cotton in DK weight. Cotton holds the lace open and blocks crisply. It also won’t fade or pill as quickly in window light as acrylic.
- Lavender: 400 g (approx. 880 m / 962 yd)
Quantities include roughly a 10% margin for gauge swatches and weaving in ends.
Tools:
- 4.0 mm (G-6) crochet hook
- Tapestry needle
- 4 locking stitch markers
- Measuring tape
- Blocking mats, rustproof pins and a spray bottle
- 11 curtain clip rings or hooks
- Scissors
Abbreviations (US Terms)
- ch – chain
- sl st – slip stitch
- sc – single crochet
- hdc – half double crochet
- dc – double crochet
- tr – treble crochet
- dtr – double treble crochet (yo 3 times, then work off the loops in pairs)
- sk – skip
- sp – space
- st(s) – stitch(es)
- RS – right side
Special stitches:
- Beginning cluster (beg cl): Ch 2. *Yo, insert hook in the same st, yo, pull up a loop, yo, draw through 2 loops; repeat from * once more (3 loops on hook). Yo and draw through all 3 loops.
- 3-dc cluster (cl): *Yo, insert hook in the st, yo, pull up a loop, yo, draw through 2 loops; repeat from * 2 more times (4 loops on hook). Yo and draw through all 4 loops.
- Join loop (JL): Ch 1, sl st into the center ch of the matching ch-3 loop on the neighboring motif, ch 1. This takes the place of one ch-3 and keeps the loop count the same.
Gauge and Checkpoints
Make one complete motif before you start the rest and block it lightly. It should measure 4 in (10.2 cm) across.
Checkpoints for one motif:
- After Round 1: 1.25 in (3.2 cm)
- After Round 2: 2.25 in (5.7 cm)
- After Round 3: 2.75 in (7.0 cm)
- After Round 4: 3.25 in (8.3 cm)
- After Round 5: 4 in (10.2 cm)
Header gauge: 20 dc = 4 in (10.2 cm), and 5 dc rows = 2 in (5.1 cm).
If your motif is too big: Go down 0.5 mm in hook size. Even 1/4 in (0.6 cm) extra per motif adds 2.5 in (6.4 cm) across ten motifs.
If your motif is too small: Go up 0.5 mm. Also check that your clusters aren’t pulled tight, because tight clusters make Round 2 cup.
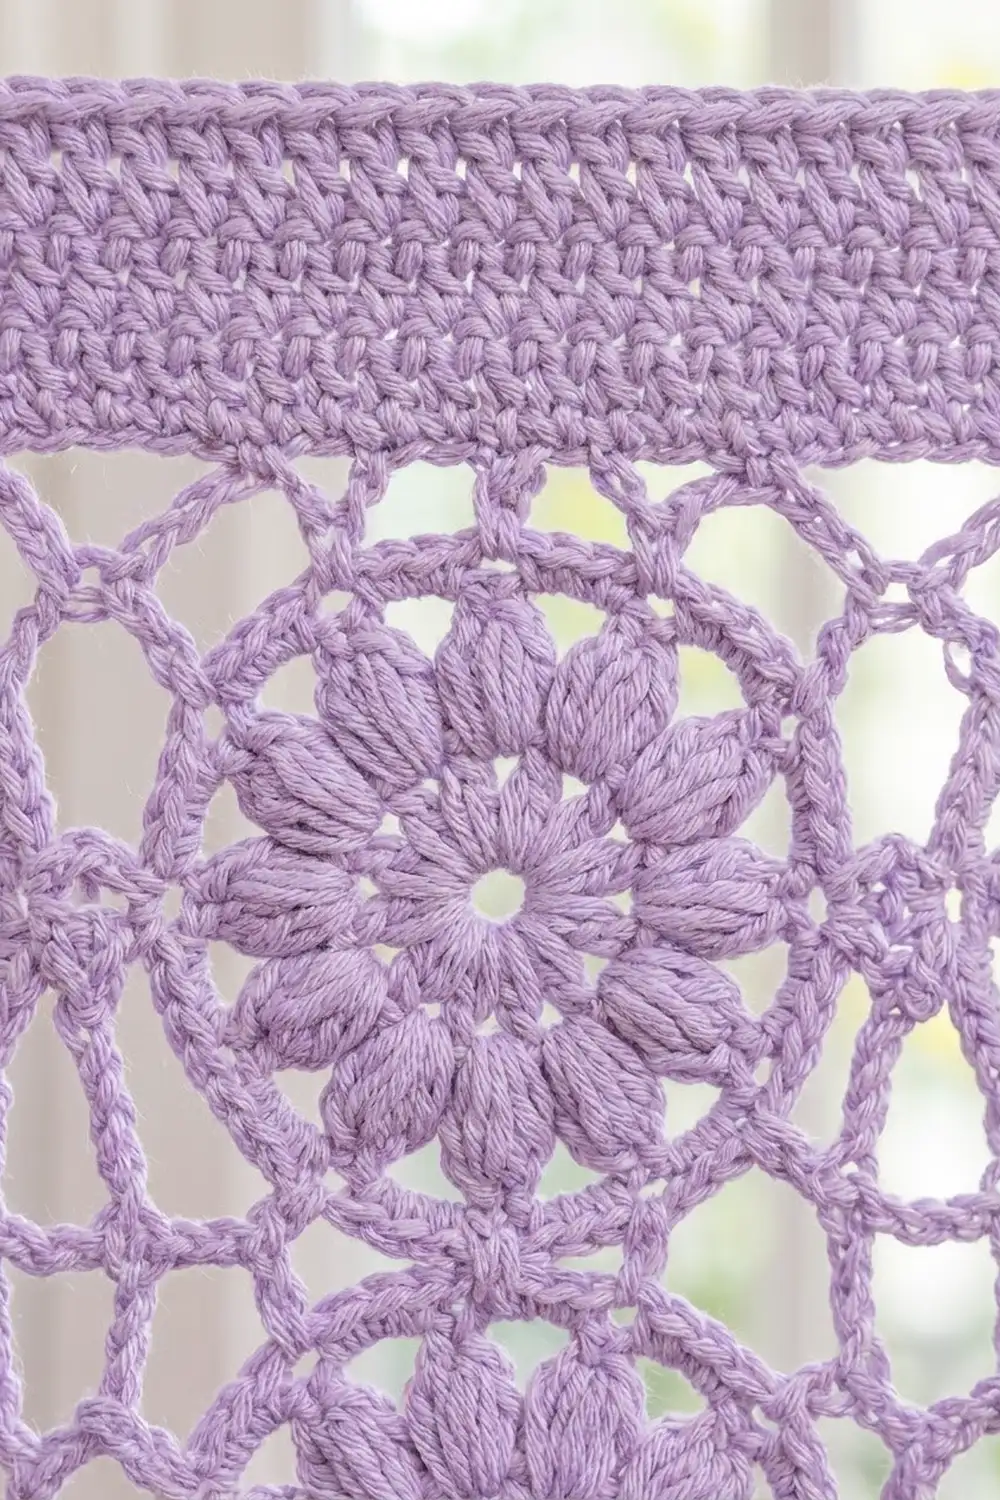
Motif (make 50)
Every motif uses the same Rounds 1–4. Round 5 is the same for every motif, except that from Motif 2 onward some loops are replaced with join loops (see Joining).
Round 1: Ch 4 and join with a sl st to form a ring. Ch 3 (counts as dc), work 15 dc into the ring, then join with a sl st to the top of the ch-3. (16 dc)
The open ring makes the center hole.
Round 2: Beg cl in the same st, ch 3, sk next st. Cl in next st, ch 3, sk next st; repeat from * 6 more times. Join with a sl st to the top of the beg cl. (8 clusters, 8 ch-3 sps)*
These are the puffy petals.
Round 3: Sl st into the first ch-3 sp. Ch 3 (counts as dc), 2 dc in the same sp, dc in the top of the next cluster. 3 dc in next ch-3 sp, dc in top of next cluster; repeat from * 6 more times. Join to the top of the ch-3. (32 dc)*
Round 4 (increase round): Ch 3 (counts as dc), dc in the same st, dc in next st. 2 dc in next st, dc in next st; repeat from * 14 more times. Join to the top of the ch-3. (48 dc = 32 sts worked + 16 increases)*
This makes the solid band around the petals.
Round 5 (loop round): Ch 1, sc in the first st, ch 3, sk next st. Sc in next st, ch 3, sk next st; repeat from * 22 more times. Join with a sl st to the first sc. Fasten off. (24 sc, 24 ch-3 loops)*
Numbering the loops: Number the loops 1–24 in the order you worked them. Hold the motif with RS facing and loops 1 and 2 at the top. Each of these four pairs straddles a compass point:
- Top: loops 1 & 2
- Side A: loops 7 & 8
- Bottom: loops 13 & 14
- Side B: loops 19 & 20
If you are right-handed, Side A is on the left and Side B is on the right. Left-handers get the mirror image, and the joining logic below works the same way.
Make All Pieces
- Lavender: 50 motifs (Motif 1 is made in full; the other 49 are joined during Round 5)
Layout (10 across x 5 down):
Row 1:  M  M  M  M  M  M  M  M  M  M   <- header band attaches here
Row 2:  M  M  M  M  M  M  M  M  M  M
Row 3:  M  M  M  M  M  M  M  M  M  M
Row 4:  M  M  M  M  M  M  M  M  M  M
Row 5:  M  M  M  M  M  M  M  M  M  M   <- scalloped hem
Joining
Method: Join-as-you-go in Round 5, at two loops per touching side.
The pairing rule:
- A Side A pair always meets a Side B pair: loop 7 meets the neighbor’s loop 20, and loop 8 meets loop 19.
- A Top pair always meets the Bottom pair of the motif above: loop 1 meets that motif’s loop 14, and loop 2 meets loop 13.
In both cases the loops that face each other are joined.
Order:
- Motif 1 is complete.
- Row 1: On each new motif, work Round 5 as written, but when you reach the two loops on the side that faces the previous motif, work JL instead of ch 3 for each of them.
- Rows 2–5: Each new motif joins at its Top pair to the motif above. Every motif except the first in its row also joins on one side to its row neighbor. That makes 2 or 4 JLs per motif.
Stitch logic: A JL has the same footprint as a ch-3 (ch 1, sl st, ch 1), so every motif still has 24 sc and 24 loops. Joining adds no stitches. The motifs touch at single points, which leaves the open diamond windows between every four circles.
Tension: Keep the sl st in each JL relaxed. If it’s tight, the joins pucker and the circles turn oval. Pull the ch 1 on each side of the sl st to the same height as a normal chain.
Size checkpoint: Row 1 should measure 40 in (101.6 cm) across, unblocked and laid flat (10 x 4 in / 10.2 cm). The full motif panel should measure 40 in (101.6 cm) x 20 in (50.8 cm).
Border (Header Band)
The only border on this valance is a header band across the top. The sides and hem stay as the motifs’ own loop edge, and the bottom row’s loops form the scallops.
Border gauge: 20 dc = 4 in (10.2 cm)
Row 1 (leveling row, RS): Join the yarn in loop 21 of the top-right motif. You’ll work across the top quadrant of each motif, from loop 21 through loops 22, 23, 24, 1, 2, 3, 4, 5 and 6. The stitches get taller toward the dips so the row comes out level.
*Ch 5 (counts as dtr) in loop 21 on the first motif only, or dtr in loop 21 on later motifs. Then work:
- ch 1, tr in loop 22, ch 1
- dc in loop 23, ch 1
- hdc in loop 24, ch 1
- sc in loop 1, ch 1
- sc in loop 2, ch 1
- hdc in loop 3, ch 1
- dc in loop 4, ch 1
- tr in loop 5, ch 1
- dtr in loop 6
That is 19 sts for each motif (10 sts + 9 ch-1). If this is not the last motif, ch 1 (connector) and repeat from * on the next motif.
Count: (10 motifs x 19) + 9 connectors = 199 sts
Row 2: Ch 3 (counts as dc), turn. Dc in each st and ch across. (199 dc)
Row 3 (mesh row): Ch 4 (counts as dc + ch 1), turn. Sk next st, dc in next st. Ch 1, sk next st, dc in next st; repeat from * across. (100 dc + 99 ch-1 sps = 199 sts)*
Row 4: Ch 3 (counts as dc), turn. Dc in each ch-1 sp and each dc across. (199 dc)
Row 5: Ch 3 (counts as dc), turn. Dc in each st across. (199 dc)
Row 6: Ch 1, turn. Sc in each st across. (199 sc) Fasten off.
Why the math works: Each motif repeat takes 19 sts plus a 1-st connector, so it’s 20 sts wide. At 20 dc to 4 in (10.2 cm), that’s one motif width. The header measures 39.8 in (101.1 cm) and blocks out to match the 40 in (101.6 cm) panel. Because the count is odd, the mesh row starts and ends with a dc, so both ends match. The header adds 2 in (5.1 cm), which brings the total height to 22 in (55.9 cm).
Hook points: Mark st 1, every connector stitch (sts 20, 40, 60 and so on up to 180), and st 199. That gives 11 points about 4 in (10.2 cm) apart. Clip the hooks through Rows 5–6 at these points.
Final Blocking
- Weave in all ends along the dc band of each motif, not through the loops.
- Soak the valance in cool water for 10 minutes. Press the water out gently; don’t wring it.
- Roll it in a towel to remove excess water.
- Lay it flat on mats, RS up.
- Pin the header’s top edge in a straight line 40 in (101.6 cm) long.
- Pin the side edges straight down, 22 in (55.9 cm) from the top edge.
- Pin one pin through the center loop of each bottom scallop so the scallops hang evenly.
- Use your fingers to open each diamond window and round out each circle.
- Let it dry completely, then remove the pins.
Final Quality-Control Checklist
- [ ] All 50 motifs measure 4 in (10.2 cm)
- [ ] Every motif has 24 loops, and no joins were skipped
- [ ] Motifs touch only at their Top/Bottom and Side A/Side B pairs
- [ ] Header Rows 1–6 each count 199 sts
- [ ] Panel is 40 in (101.6 cm) x 22 in (55.9 cm)
- [ ] The scallops along the hem are even
- [ ] All ends are secure and hidden
- [ ] 11 hook points are evenly spaced
Troubleshooting
The motif cups like a bowl: Your clusters are too tight, or you dropped stitches in Round 4. Recount for 48 dc.
The motif ruffles: Your hook is too large, or you added extra stitches in Round 4. Go down a hook size.
Joins land in the wrong place: Check your loop numbering. Side A must meet Side B, and the Top pair must meet the Bottom pair above it.
The header ripples: Your Row 1 tension is loose. Rework with firmer chains, or go down 0.5 mm for the header only.
The header pulls the motifs in: Your Row 1 stitches are too short. Check that you used dtr in loops 21 and 6.
The scallops are uneven: Re-block, pinning through the center bottom loop of each motif.
Care
Hand wash cool with a mild detergent, then reshape and dry flat. Re-block lightly after washing so the circles and the header stay crisp.
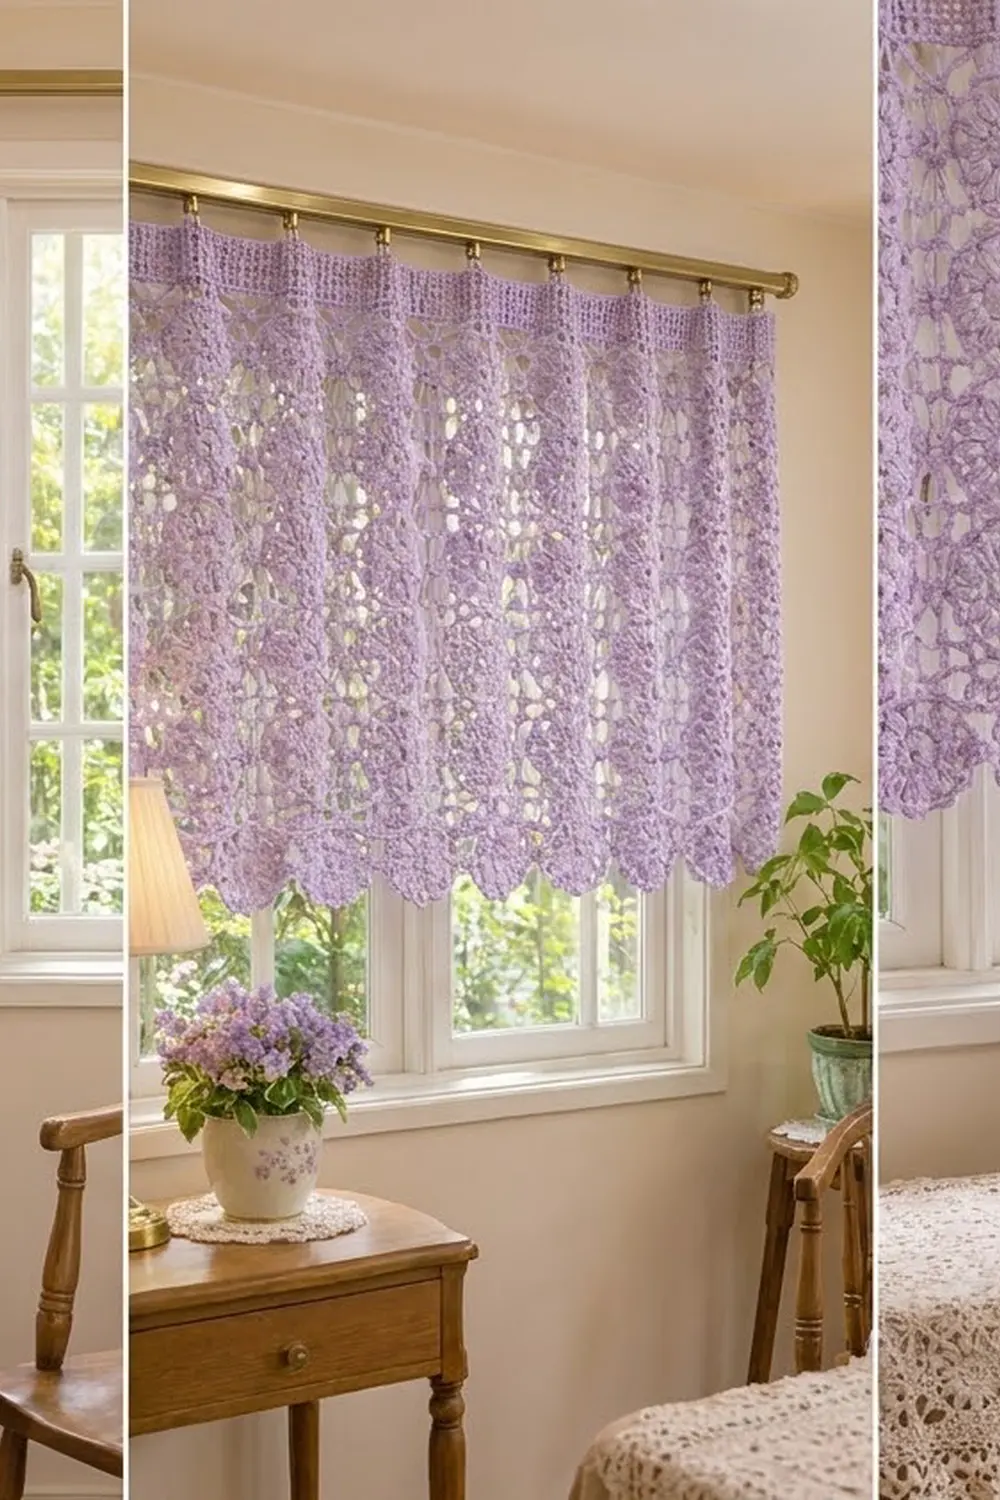
Final Notes
The measurements build on each other. Each motif measures 4 in (10.2 cm). Ten motifs across give 40 in (101.6 cm), and five rows down give 20 in (50.8 cm). The 199-stitch header adds 2 in (5.1 cm), for a finished valance of 40 in (101.6 cm) x 22 in (55.9 cm).
If your first motif matches gauge, the rest of the measurements should come out right. Check it carefully before moving on.
Happy crocheting!