

The Bluebell Crown organizer is a set of three scalloped baskets stacked on crochet straps. It hangs from a single wooden ring. Each basket is just the right size for a standard toilet paper roll, a stack of washcloths, or small bathroom items.
The whole piece uses one calm, dusty denim blue cotton. The look comes from texture rather than color. Each basket has a firm round base, a row of open posts, and two layers of pointed fan scallops that overlap like petals. The natural wooden ring adds a soft, warm accent.
This pattern uses US crochet terms. Each basket measures 6 in (15.2 cm) across and 3¾ in (9.5 cm) tall. The assembled organizer hangs about 19¼ in (48.9 cm) from the top of the ring to the bottom of the lowest basket.
Here is the construction in short. You work a flat double crochet circle, then turn the wall up through the back loops. Next come open treble posts and a scalloped rim. Finally, an outer petal skirt is worked into the leftover front loops of the base edge. You make three baskets and three straps, then sew everything to the ring.
Finished Size and Construction
- Finished size (assembled): about 19¼ in (48.9 cm) long × 6 in (15.2 cm) wide
- Skill level: Intermediate
- Terminology: US crochet terms
- Yarn weight: Worsted (#4) cotton
- Hook: 5.0 mm (H-8)
- Number of pieces: 7 (3 baskets, 3 straps, 1 wooden ring)
- Layout: 3 baskets stacked vertically, 3 in (7.6 cm) apart
- Piece size: each basket is 6 in (15.2 cm) across × 3¾ in (9.5 cm) tall; each strap is 16 in (40.6 cm) × ¾ in (1.9 cm)
- Size before border: wall height 2¼ in (5.7 cm) above the base
- Border depth: scalloped rim adds 1½ in (3.8 cm)
Materials
Yarn: Use a smooth, firm worsted-weight cotton or cotton blend. Cotton keeps its shape, stands up well in the scallops, and handles bathroom humidity.
- Dusty denim blue: 250 g / about 385 m
Tools:
- 5.0 mm (H-8) crochet hook
- 1 wooden ring, 2½ in (6.4 cm) across
- Tapestry needle
- Stitch markers
- Ruler or tape measure
- Rust-proof pins for blocking
The quantities include a margin of about 15% for swatching and seaming.
Abbreviations (US Terms)
- ch – chain
- sl st – slip stitch
- sc – single crochet
- dc – double crochet
- tr – treble crochet
- st(s) – stitch(es)
- sk – skip
- sp – space
- BLO – back loop only
- FLO – front loop only
- rep – repeat
Special stitch – Fan Shell: 9 tr in the same stitch.
Gauge and Checkpoints
- Double crochet gauge: 15 dc and 8 rows = 4 in (10.2 cm)
- Single crochet gauge: 16 sc and 16 rows = 4 in (10.2 cm)
Make one complete basket before you start the others. Check it at each stage:
- After base Round 2: 2 in (5.1 cm) across
- After base Round 4: 4 in (10.2 cm) across
- After base Round 6: 6 in (15.2 cm) across, lying flat
- After wall Round 11: wall is 2¼ in (5.7 cm) tall, and the outside of the wall measures about 19 in (48.3 cm) around
- After Round 13: total height is 3¾ in (9.5 cm)
If your piece is too big, go down a hook size, to 4.5 mm (US 7). If it is too small, go up a hook size, to 5.5 mm (I-9). If the base ruffles, you are working too loosely. If it cups, you are working too tightly. Fix the base before you start the wall.
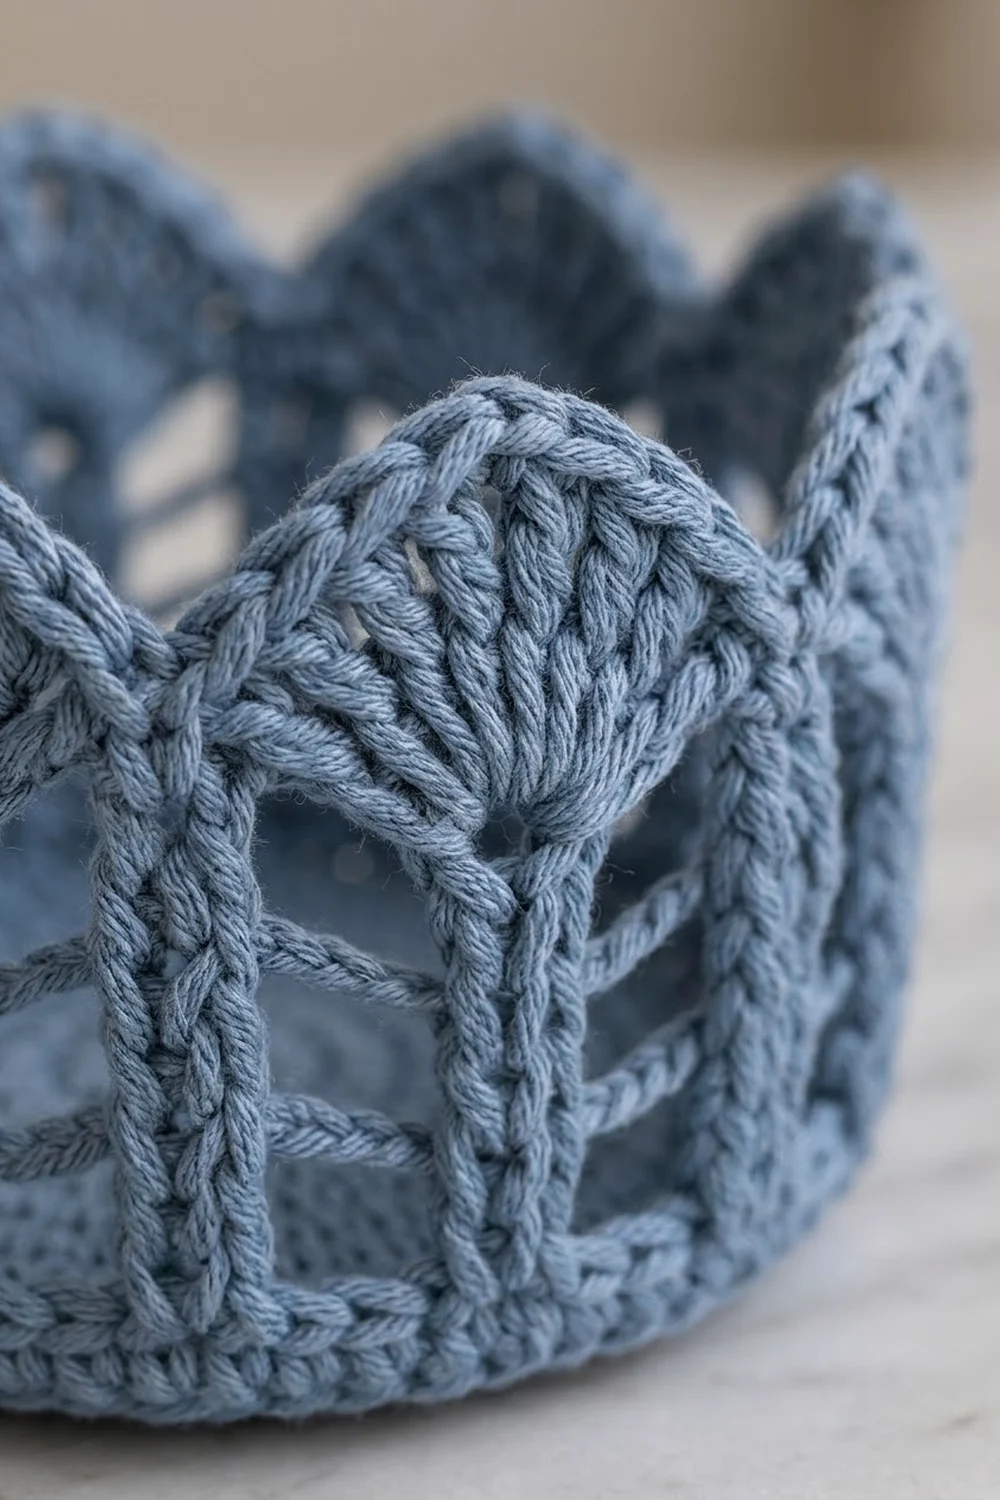
Basket Base
Round 1: Make a magic ring. Ch 3 (counts as dc), then work 11 dc in the ring. Join with a sl st to the top of the ch-3. (12 dc)
Round 2: Ch 3, dc in the same st, then 2 dc in each st around. Join. (24 dc)
Round 3: Ch 3, dc in the same st, dc in the next st, 2 dc in the next st, dc in the next st; rep from * around. Join. (36 dc)*
Round 4: Ch 3, dc in the same st, dc in the next 2 sts, 2 dc in the next st, dc in the next 2 sts; rep from * around. Join. (48 dc)*
Round 5: Ch 3, dc in the same st, dc in the next 3 sts, 2 dc in the next st, dc in the next 3 sts; rep from * around. Join. (60 dc)*
Round 6: Ch 3, dc in the same st, dc in the next 4 sts, 2 dc in the next st, dc in the next 4 sts; rep from * around. Join. (72 dc)*
Checkpoint: the base is 6 in (15.2 cm) across and lies flat.
Basket Wall
Round 7 (turning round): Ch 1. Working in BLO, sc in each st around. Join. (72 sc)
This round folds the wall upward and leaves the front loops of Round 6 free for the skirt.
Round 8: Ch 1, sc in each st around through both loops. Join. (72 sc)
Round 9 (posts): Ch 5 (counts as tr + ch 1), sk the next st, tr in the next st, ch 1, sk the next st; rep from * around. Join to the 4th ch of the beginning ch-5. (36 tr, 36 ch-1 sps)*
Round 10: Ch 5 (counts as tr + ch 1), sk the ch-1 sp, tr in the next tr, ch 1, sk the ch-1 sp; rep from * around. Join to the 4th ch. (36 tr, 36 ch-1 sps)*
The posts now stack into the open vertical columns.
Round 11: Ch 1, sc in each tr and in each ch-1 sp around. Join. (72 sc)
Checkpoint: the wall is 2¼ in (5.7 cm) tall from the base edge. This is the size before the border.
Scalloped Rim (Border)
Border gauge: each scallop takes up a 6-stitch repeat of Round 11, which is about 1½ in (3.8 cm) of the rim. Each scallop rises 1½ in (3.8 cm).
Round 12: Ch 1, sc in the first st, *sk 2 sts, Fan Shell in the next st, sk 2 sts, sc in the next st; rep from * 10 more times. Then sk 2 sts, Fan Shell in the next st, and sk the last 2 sts. Join to the first sc.
- Per scallop: 9 tr + 1 sc = 10 sts
- Total: 12 scallops × 10 = 120 sts
Round 13 (pointed edging): Ch 1. *Sc in the sc, sc in the next 4 tr, (sc, ch 2, sc) in the center (5th) tr, sc in the next 4 tr; rep from * around. Join.
- Per scallop: 10 sts worked one-to-one + 1 extra sc = 11 sc, plus 1 ch-2 point
- Total: (120 sc worked into existing sts) + (12 extra sc) = 132 sc and 12 ch-2 sps
Why the math works: Round 11 has 72 sts, and 72 ÷ 6 = 12 exact repeats, so no stitch is left over. The 9 tr fan sits on a 6-stitch base, so the rim flares just enough to make a crown shape. The one extra sc and the ch-2 at each center tr turn the rounded fan into a point.
Fasten off and weave in the ends.
Outer Petal Skirt
Turn the basket upside down. The free front loops of Round 6 show as a ridge around the base edge.
Skirt Round 1: Join the yarn in any free front loop of Round 6. Ch 1, then sc in each free front loop around. Join. (72 sc)
Skirt Round 2: Turn the basket right side up. Ch 3 (counts as dc), dc in each st around. Join. (72 dc)
This round makes a cuff that stands against the wall.
Skirt Round 3: Sl st in the next 3 sts. Ch 1, sc in the same st, *sk 2 sts, Fan Shell in the next st, sk 2 sts, sc in the next st; rep from * around, ending with sk 2 sts and join to the first sc.
- Total: 12 shells × 10 = 120 sts
The 3 slip stitches shift this round by half a repeat, so each skirt petal sits centered between two rim scallops.
Skirt Round 4: Work the same as Round 13. (132 sc and 12 ch-2 sps)
Checkpoint: the skirt reaches about 2¼ in (5.7 cm) up the wall, level with Round 11.
Fasten off and weave in the ends.
Straps (Make 3)
Ch 65.
Row 1: Sc in the 2nd ch from the hook and in each ch across. (64 sc)
Rows 2–3: Ch 1, turn, sc in each st across. (64 sc)
Fasten off, leaving a 20 in (50.8 cm) tail for sewing.
Checkpoint: each strap is 16 in (40.6 cm) × ¾ in (1.9 cm). At 4 sc per inch, every 4 stitches equal 1 in (2.5 cm).
Make All Pieces
- Baskets: 3, all in dusty denim blue
- Straps: 3, all in dusty denim blue
- Wooden ring: 1
Layout:
        ( RING )
         /    \      Strap 1 (hanger)
        /      \
   [ BASKET 1 ]     top
     |      |        Straps 2 + 3, 3 in (7.6 cm) gap
   [ BASKET 2 ]     middle
     |      |        3 in (7.6 cm) gap
   [ BASKET 3 ]     bottom
      \____/         strap ends meet under the base
Joining
Method: Whipstitch with the yarn tail, going through both loops of the strap’s edge stitches and into the basket wall.
Placement: On each basket, mark two opposite points on Round 8. Use st 1 and st 37, which are exactly 36 sts apart. These are the two side lines.
Strap 1 (hanger), counted along its 64 sts:
- 9 sts sewn to the top basket wall
- 20 sts hanging free (5 in / 12.7 cm)
- 6 sts wrapped around the ring (1½ in / 3.8 cm)
- 20 sts hanging free
- 9 sts sewn to the top basket wall
Total: 9 + 20 + 6 + 20 + 9 = 64 ✓
Fold the strap over the ring and sew the two layers together just below it. Sew each 9-stitch end straight down one side line, from Round 11 to the base edge. Tuck each end behind the skirt petal.
Straps 2 and 3 (sides), counted along their 64 sts:
- 9 sts over the top basket
- 12 sts for the gap (3 in / 7.6 cm)
- 9 sts over the middle basket
- 12 sts for the gap
- 9 sts over the bottom basket
- 13 sts under the base (3¼ in / 8.3 cm)
Total: 9 + 12 + 9 + 12 + 9 + 13 = 64 ✓
Lay each side strap over the end of the hanger leg and sew through all the layers. The 9-stitch sections match the 2¼ in (5.7 cm) wall height exactly. Under the bottom basket, the two strap ends meet at the center of the base. Sew them there.
Tension: Sew firmly but don’t pucker the strap. Before you sew each gap, measure it with a ruler so all gaps are the same.
Size checkpoint: Hang the organizer. From the top of the ring to the bottom of the lowest base should be about 19¼ in (48.9 cm). From the bottom base up to the top basket’s Round 11 should be 12¾ in (32.4 cm).
Final Blocking
- Lightly mist each basket with water.
- Stuff each basket firmly with a towel or a toilet paper roll so the wall stands straight.
- Pull each rim point up and pin it, so all 12 points sit at the same height.
- Press the skirt petals gently against the wall and pin them.
- Lay the straps flat and pin them straight, at 16 in (40.6 cm) for any strap you haven’t sewn yet.
- Let everything dry completely, then remove the pins.
Final Quality-Control Checklist
- Each base is 6 in (15.2 cm) across and lies flat
- Each wall is 2¼ in (5.7 cm) tall before the rim
- Each basket has 12 rim points and 12 skirt petals, offset from each other
- Each basket is 3¾ in (9.5 cm) tall overall
- All three straps are 64 sts long
- Both gaps are 3 in (7.6 cm)
- The organizer hangs level, with no tilt
- All ends are woven in securely
Troubleshooting
- Base cups upward: your tension is too tight. Go up a hook size or loosen your dc.
- Base ruffles: your tension is too loose, or you added extra increases. Recount each round to 12, 24, 36, 48, 60, and 72.
- Rim has 11 or 13 scallops: Round 11 is not exactly 72 sc. Rip back and recount.
- Points look round: you skipped the ch-2 or worked it in the wrong tr. Make sure it goes in the 5th tr of each shell.
- Skirt petals sit right under the rim points: you left out the 3 offset slip stitches in Skirt Round 3.
- Organizer hangs crooked: your gaps don’t match. Unpick the stitching and measure again.
Care
Hand wash in cool water, press out the water in a towel, and dry the baskets flat with something inside them to hold their shape. Don’t wring them or tumble dry them.

Final Notes
The measurement chain is simple. A 72-stitch base that is 6 in (15.2 cm) across gives a wall 2¼ in (5.7 cm) tall. A rim of 12 scallops adds 1½ in (3.8 cm), for a basket 3¾ in (9.5 cm) tall. Three straps of 64 stitches link the three baskets with 3 in (7.6 cm) gaps. If every checkpoint matches, the organizer will hang straight at about 19¼ in (48.9 cm).
Happy crocheting!