

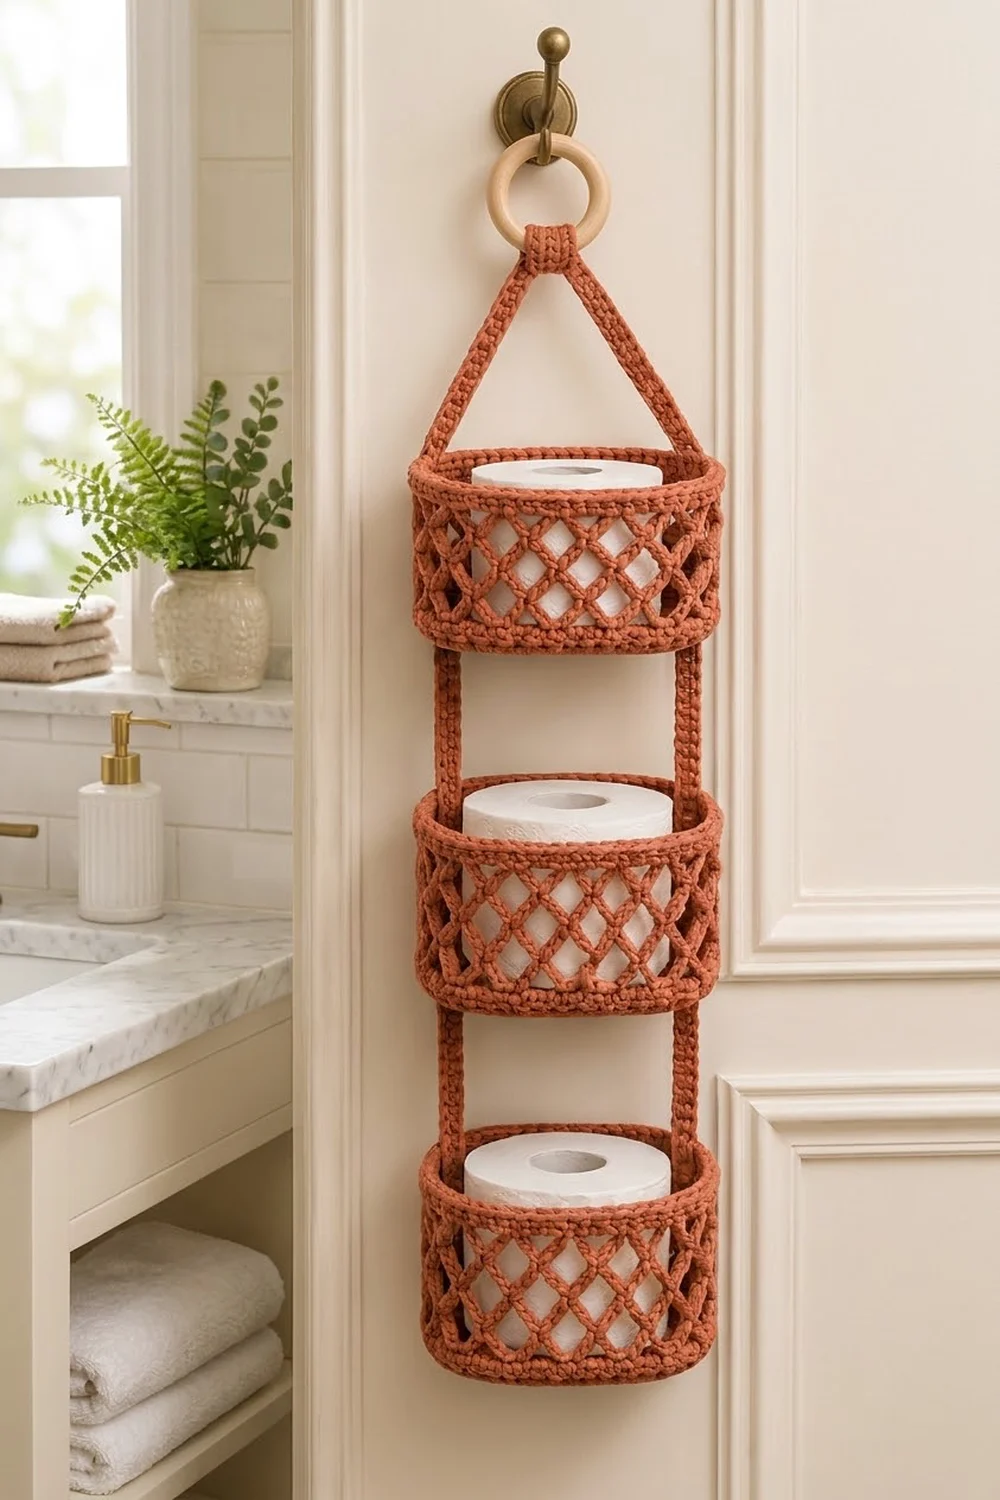
This hanging organizer stacks three oval baskets in a column, with an open diamond lattice on every wall. It holds spare toilet rolls, hand towels, soaps or craft supplies, and it hangs from a single hook, so it uses wall space you were not using anyway.
The sample uses one warm terracotta cotton cord, which goes well with cream walls, natural wood and brass. The look is clean and a little boho. The solid oval bases and rims give the baskets their structure, and the lattice keeps them light.
All terms are US crochet terms. Each basket measures about 8.25 in (21.0 cm) long × 5.25 in (13.3 cm) wide × 4.75 in (12.1 cm) tall. The assembled organizer is about 26.5 in (67.3 cm) from the top of the ring to the bottom of the lowest basket.
Each basket is worked in one piece from the bottom up: an oval single-crochet base, a back-loop turning round, a short solid band, six rounds of chain-loop lattice, then a three-round solid rim. Three straps worked in rows are sewn on afterward, and one of them is looped through a wooden ring.
Finished Size and Construction
- Finished size: about 26.5 in (67.3 cm) tall overall; each basket is 8.25 × 5.25 × 4.75 in (21.0 × 13.3 × 12.1 cm)
- Skill level: Easy to Intermediate
- Terminology: US
- Yarn weight: Bulky (#5) cotton cord, about 5 mm thick
- Hook: 6.0 mm (US J-10)
- Number of pieces: 6 crocheted (3 baskets, 3 straps) plus 1 wooden ring
- Layout: 1 column × 3 tiers
- Piece size: each basket base is 8.25 × 5.25 in (21.0 × 13.3 cm)
- Size before rim: wall height 3.75 in (9.5 cm)
- Rim (border) depth: 1 in (2.5 cm), 3 rounds
Materials
Choose a firm, smooth bulky cotton or cotton-blend cord. Soft, loosely plied yarns let the baskets sag. The cord should hold its shape when you squeeze a swatch.
- Terracotta: 300 g, about 150 m (164 yd)
- Each basket uses about 70 g (35 m)
- Each side strap uses about 15 g (7.5 m)
- The hanger strap uses about 12 g (6 m)
The quantities include a margin of about 15% for gauge differences and the swatch.
Tools:
– 6.0 mm (US J-10) crochet hook
– Wooden ring, 3 in (7.6 cm) diameter
– 4 locking stitch markers
– Large-eye tapestry needle
– Scissors
– Tape measure
– Pins or clips
Abbreviations (US Terms)
- ch – chain
- sc – single crochet
- sl st – slip stitch
- sk – skip
- st(s) – stitch(es)
- ch-sp – chain space
- BLO – back loop only
- inc – 2 sc in the same stitch
- Rnd(s) – round(s)
Special stitch – lattice loop: ch 5, then sc into the centre of the next ch-5 loop. Repeated around, these loops stack into the diamond mesh.
Gauge and Checkpoints
Gauge: 11 sc × 12 rnds = 4 in (10.2 cm) in sc worked in joined rounds.
Make one full basket before starting the others. It is your real gauge test.
- After Rnd 8: the base measures 8.25 × 5.25 in (21.0 × 13.3 cm) and lies flat.
- After Rnd 10: the solid wall band is about 0.75 in (1.9 cm) tall.
- After Rnd 16: the wall is 3.75 in (9.5 cm) tall.
- After Rnd 19: the wall is 4.75 in (12.1 cm) tall.
If the base is too big, or ripples, go down to a 5.5 mm hook. If it is too small, or cups up before Rnd 9, go up to a 6.5 mm hook. Change hooks before you start the walls. Lattice loops that sag usually mean loose chains, so tighten the chains rather than changing the stitch count.
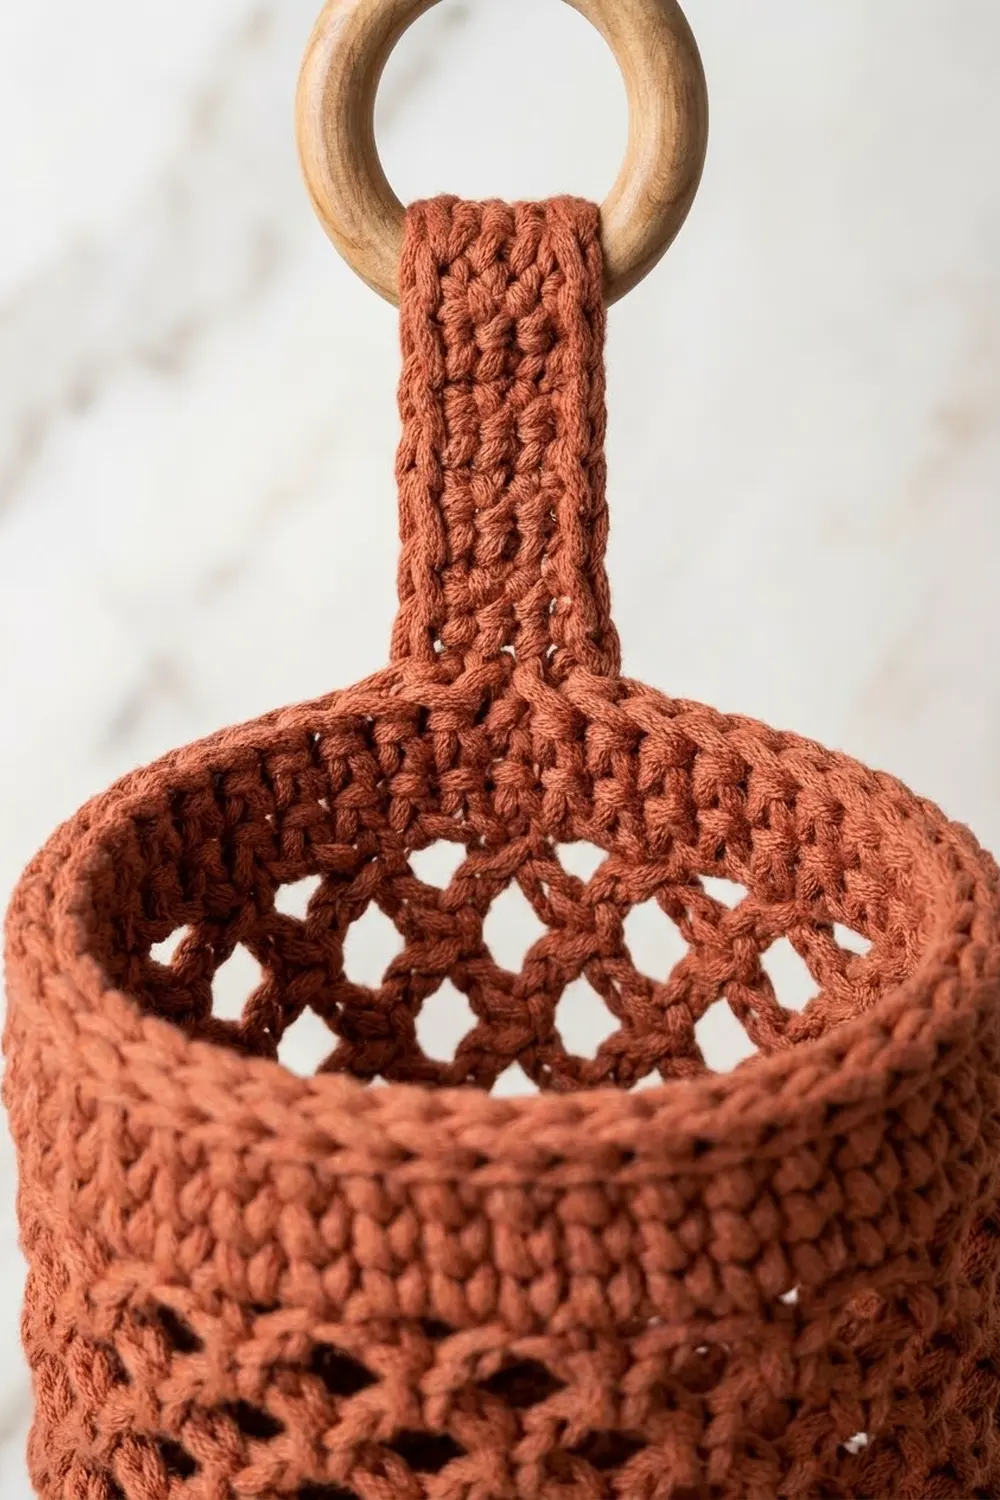
Basket (Make 3)
Join each round with a sl st to the first sc. Then ch 1 (this ch does not count as a st) and work the first st into the same st as the join.
Oval Base
Ch 11.
Rnd 1: 3 sc in 2nd ch from hook (end A), sc in next 8 ch, 3 sc in last ch (end B). Working along the opposite side of the foundation chain, sc in next 8 ch. Join. (22 sts: 3 per end, 8 per straight side)
Rnd 2: Inc in each of next 3 sts, sc in next 8; repeat from * once more. Join. (28 sts: 6 per end)
Rnd 3: (Sc in next st, inc) 3 times, sc in next 8; repeat from * once. Join. (34 sts: 9 per end)
Rnd 4: (Sc in next 2, inc) 3 times, sc in next 8; repeat from * once. Join. (40 sts: 12 per end)
Rnd 5: (Sc in next 3, inc) 3 times, sc in next 8; repeat from * once. Join. (46 sts: 15 per end)
Rnd 6: (Sc in next 4, inc) 3 times, sc in next 8; repeat from * once. Join. (52 sts: 18 per end)
Rnd 7: (Sc in next 5, inc) 3 times, sc in next 8; repeat from * once. Join. (58 sts: 21 per end)
Rnd 8: (Sc in next 6, inc) 3 times, sc in next 8; repeat from * once. Join. (64 sts: 24 per curved end, 8 per straight side)
The two straight sides stay at 8 sts the whole way. All the growth goes into the curved ends, 3 increases per end per round, which keeps the oval flat.
Checkpoint: 8.25 × 5.25 in (21.0 × 13.3 cm).
Walls
Rnd 9: Sc in BLO of each st around. Join. (64 sts) The unused front loops make a sharp ridge that turns the base up into the wall.
Rnd 10: Sc in each st around. Join. (64 sts)
Rnd 11 (lattice set-up): Sc in first st, ch 5, sk 3 sts, sc in next st. Repeat from * around, ending with ch 5, sk 3 sts, and join to the first sc. (16 sc, 16 ch-5 loops) Each repeat uses 4 sts, so 64 ÷ 4 = 16 loops.
Rnd 12: Sl st in each of the next 3 ch to reach the centre of the first loop. Ch 1, sc in the same loop, ch 5, sc in next ch-5 loop. Repeat from * around, ending with ch 5, and join to the first sc. (16 ch-5 loops)
Rnds 13–16: Repeat Rnd 12. (16 ch-5 loops each round)
Each sc sits in the middle of the loop below, so the loops offset into diamonds. Six lattice rounds add 3 in (7.6 cm), about 0.5 in (1.3 cm) per round.
Checkpoint: wall height 3.75 in (9.5 cm).
Border: Solid Rim
The rim is worked on each basket right after Rnd 16, without fastening off.
Border gauge: the same as the base, 11 sc per 4 in (10.2 cm), worked in joined rounds.
Rnd 17 (conversion round): Sl st to the centre of the first loop is not needed here. Ch 1, then work 4 sc into each ch-5 loop around, working nothing into the sc between loops. Join. (0 sts worked into existing sc + 4 sc × 16 loops = 64 sts)
The count per side matches the base:
– Each straight side: 2 loops × 4 = 8 sc
– Each curved end: 6 loops × 4 = 24 sc
– Total: 8 + 24 + 8 + 24 = 64 sc
Rnd 18: Sc in each st around. Join. (64 sts)
Rnd 19: Sc in each st around. Join. (64 sts) Fasten off and weave in the ends.
Why the math works: the base ended at 64 sts, and Rnd 11 turned every 4 sts into one loop. Putting 4 sc back into each loop restores exactly 64 sts. The rim’s circumference therefore matches the base, and the walls stand straight instead of flaring or pulling in.
Checkpoint: wall height 4.75 in (12.1 cm). The rim is 1 in (2.5 cm) deep.
On Rnd 19, place a marker in the 12th st of each curved end (the centre of its 24 sts). These markers show where the straps go.
Straps
All straps are 3 sc wide, which makes them 1 in (2.5 cm) wide. Each row is 1 row tall, at 12 rows = 4 in (10.2 cm).
Side Straps (Make 2)
Ch 4.
Row 1: Sc in 2nd ch from hook and in each ch across. Turn. (3 sts)
Rows 2–60: Ch 1, sc in each st across. Turn. (3 sts)
Fasten off and leave a 24 in (61.0 cm) tail for sewing. Each side strap is 20 in (50.8 cm) long.
Hanger Strap (Make 1)
Work as for the side straps, but stop after Row 48. Fasten off and leave a 16 in (40.6 cm) tail. The hanger strap is 16 in (40.6 cm) long.
Make All Pieces
- Baskets: 3, terracotta
- Side straps: 2, terracotta
- Hanger strap: 1, terracotta
- Wooden ring: 1
Layout (front view):
        ( O )        <- wooden ring
         / \         <- hanger strap
   |[ Basket 1 ]|
   |            |    <- side straps, 2.5 in gap
   |[ Basket 2 ]|
   |            |    <- 2.5 in gap
   |[ Basket 3 ]|
Joining
Method: whipstitch with the cord tail on a tapestry needle, working on the outside of each basket.
Side straps:
1. Lay the three baskets in a column with the marked curved ends lined up.
2. Centre one side strap on the marked stitch of each curved end, with the strap’s long edges running straight down.
3. Place the top of the strap level with the top of Basket 1’s Rnd 19.
4. Leave a 2.5 in (6.4 cm) gap, place Basket 2, leave another 2.5 in (6.4 cm) gap, and place Basket 3.
5. The last 0.75 in (1.9 cm) of the strap folds under Basket 3’s base and is sewn flat.
Check the length: 3 × 4.75 in + 2 × 2.5 in = 19.25 in (48.9 cm), and 19.25 in + 0.75 in = 20 in (50.8 cm), which is exactly one strap.
Stitch-to-stitch logic: on each basket, sew both long edges of the strap to the wall:
– Through each of the 3 rim rounds
– Through the sc at every lattice crossing it covers
– Through Rnds 9–10
Each basket section covers about 14 strap rows (4.75 in ÷ 0.333 in). Make one whipstitch per strap row on each edge, catching the nearest basket stitch or loop each time. Do not sew the strap sections in the gaps.
Hanger strap:
1. Fold the hanger strap in half over the wooden ring.
2. Bind the two layers together just below the ring with 6–8 tight wraps of cord. Secure the wraps with the needle. This wrapped section takes up about 2 in (5.1 cm).
3. Spread the two legs into a triangle.
4. Overlap the last 1 in (2.5 cm) of each leg onto the top of a side strap on Basket 1. Sew through all layers.
Each leg runs about 6 in (15.2 cm) diagonally. 2 in + 2 × 6 in + 2 × 1 in = 16 in (40.6 cm), the full strap.
Tension: pull each whipstitch snug but not tight. The strap should lie flat and the wall should not pucker.
Size checkpoint: hang the organizer. The triangle should rise about 4.25 in (10.8 cm) above Basket 1. The total height should be about 26.5 in (67.3 cm).
Final Blocking
- Mist each basket lightly with water.
- Stuff it firmly with a towel or a toilet roll wrapped in plastic, so the oval stays 8.25 × 5.25 in (21.0 × 13.3 cm).
- Pinch the Rnd 9 ridge into a crisp edge.
- Lay the straps flat, pin them to 1 in (2.5 cm) wide, and leave them to dry.
- Let everything dry completely, about 24 hours, before hanging it.
Final Quality-Control Checklist
- Each base has 64 sts and lies flat.
- Every basket has 16 lattice loops in each round, Rnds 11–16.
- Each rim has 64 sts: 8 per straight side and 24 per curved end.
- All three baskets are 4.75 in (12.1 cm) tall.
- The side straps are 20 in (50.8 cm) and the hanger strap is 16 in (40.6 cm).
- The gaps between baskets are an even 2.5 in (6.4 cm).
- The ring binding is tight and secure.
- All ends are woven in and hidden.
Troubleshooting
- Base ruffles: your stitches are too loose for the increases. Go down a hook size.
- Base cups up: your tension is too tight. Go up a hook size.
- Wrong number of lattice loops: check that the base has 64 sts before Rnd 11, and that you skip exactly 3 sts each time.
- Walls flare at the rim: you put more than 4 sc in a loop on Rnd 17. Recount.
- Baskets tilt: a strap is off-centre. Re-sew it on the marked stitch.
- Hanger stretches: use a firmer cord, or work the hanger strap with a hook one size smaller.
Care
Hand wash in cool water, reshape the baskets, and dry them flat. Do not tumble dry.
Final Notes
The measurements build on each other. At a gauge of 11 sc × 12 rnds = 4 in (10.2 cm), Rnd 8 gives a 64-st base of 8.25 × 5.25 in (21.0 × 13.3 cm). Sixteen loops of 4 sts carry that count through the lattice and back to 64 rim sts. The walls reach 4.75 in (12.1 cm). Three baskets plus two 2.5 in (6.4 cm) gaps plus the tuck make one 20 in (50.8 cm) strap, and the hanger triangle and ring bring the total to about 26.5 in (67.3 cm). If you check each stage, the organizer will hang straight.
Happy crocheting!