
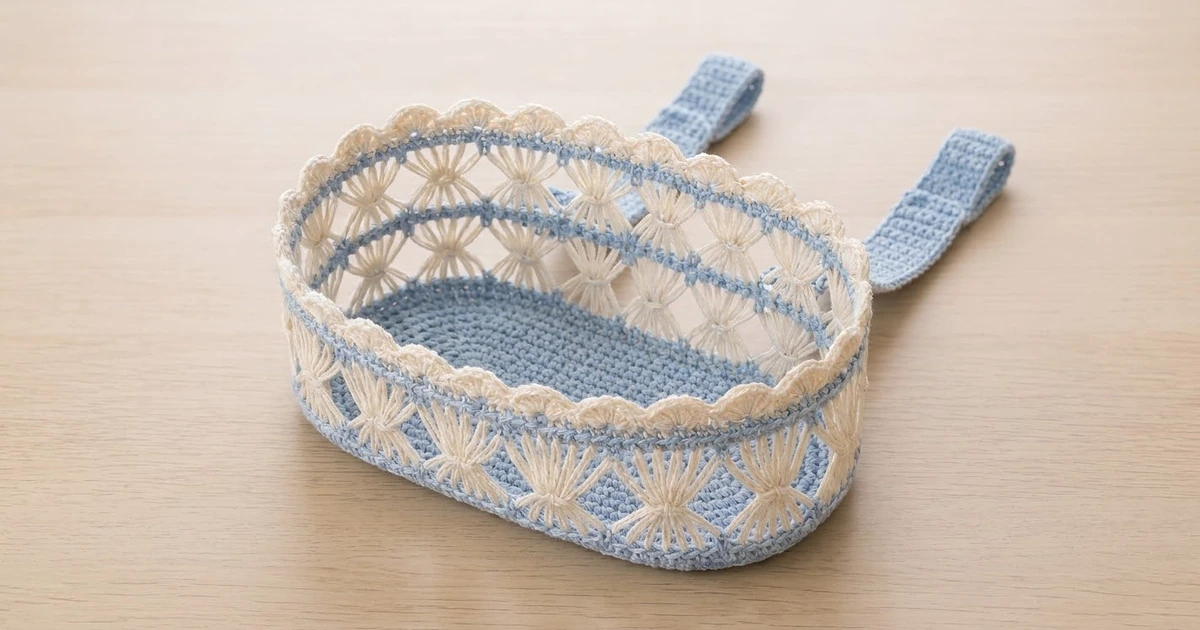
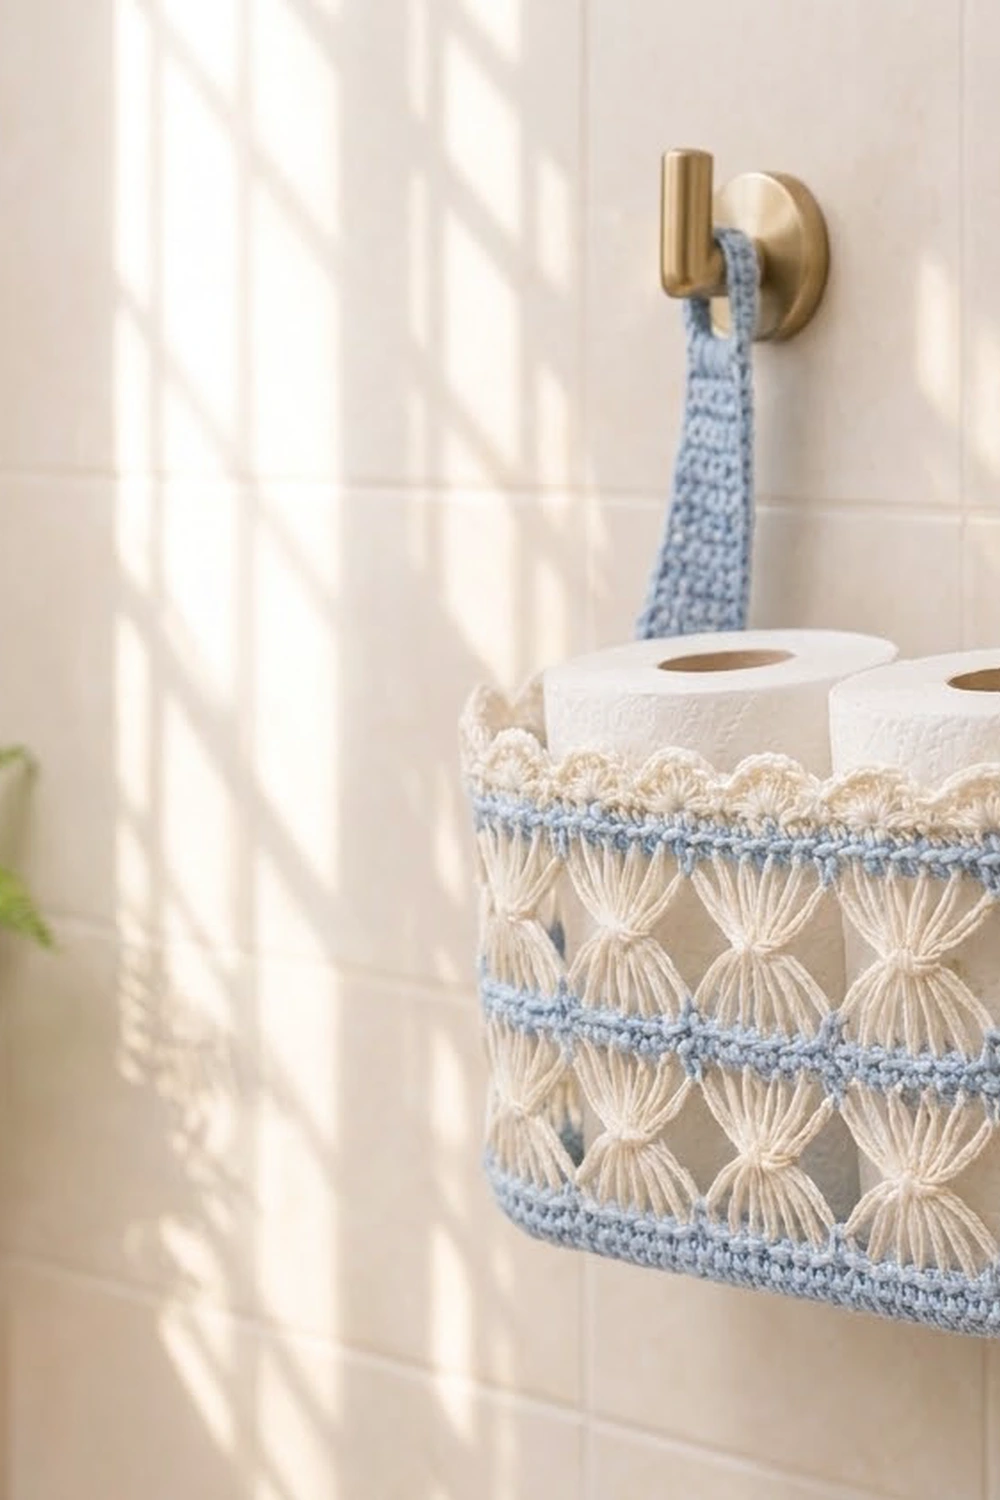
This hanging basket holds two standard toilet paper rolls side by side. It hangs from two wall hooks by a pair of straps. The walls are made of soft blue single crochet bands and two rings of cream hairpin lace. Each lace band is pinched at the center into a row of bow-tie fans, and the rim has a row of cream scallops.
The colors are light powder blue and warm cream. The look is fresh and a little vintage, so it suits a bathroom with white tile and brass fittings. Cotton yarn keeps the basket firm and easy to wash.
The pattern uses US crochet terms. The finished basket is about 9.25 in (23.5 cm) long, 4 in (10.2 cm) wide and 5.75 in (14.6 cm) tall at the scalloped rim. Each strap rises about 5 in (12.7 cm) above the rim and ends in a hanging loop.
Construction is simple. You crochet an oval base in joined rounds, turn the wall up with a back-loop round, and work blue rounds upward. You make two hairpin lace strips separately, join each into a ring, and crochet them into the wall as you go. A two-round border and two sewn-on straps finish the basket.
Finished Size and Construction
- Finished size: 9.25 in (23.5 cm) long x 4 in (10.2 cm) wide x 5.75 in (14.6 cm) tall
- Skill level: Intermediate (you need basic hairpin lace)
- Terminology: US crochet terms
- Yarn weight: Worsted (#4) cotton
- Hook: 4.0 mm (G-6)
- Number of pieces: One finished basket. The body is made in one piece, with 2 hairpin strips worked in and 2 straps sewn on.
- Layout: Oval base; walls of 10 blue rounds and 2 hairpin bands; straps on the back long side
- Base size: 9.25 in x 4 in (23.5 cm x 10.2 cm), 96 sts around
- Height before border: 5.25 in (13.3 cm)
- Border depth: 0.5 in (1.3 cm), 2 rounds
Materials
Use a smooth worsted-weight cotton or cotton blend with about 1.5 m per gram (for example, 100 m per 65 g). Cotton holds the basket’s shape, and the hairpin loops stay crisp.
- Color A, powder blue: 65 g / 100 m (base, blue wall rounds, straps)
- Color B, cream: 50 g / 75 m (hairpin strips, fan ties, border)
These quantities include a margin of about 25%.
Tools:
- 4.0 mm (G-6) crochet hook
- Adjustable hairpin lace loom, set to 1.5 in (3.8 cm) wide
- 12 locking stitch markers
- Tapestry needle
- Scissors and a tape measure
- 2 wall hooks for hanging
Abbreviations (US Terms)
- ch – chain
- sc – single crochet
- hdc – half double crochet
- dc – double crochet
- sl st – slip stitch
- st(s) – stitch(es)
- BLO – back loop only
- inc – 2 sc in the same st
- rnd(s) – round(s)
Special technique – Join-Loop sc (jl-sc): Insert the hook through the next hairpin loop from front to back, keeping the loop untwisted. Then insert it into the next st of the previous round. Yarn over and complete a sc through both. This attaches one loop to one st.
Gauge and Checkpoints
Gauge: 16 sc and 18 rows = 4 in (10.2 cm) in sc with Color A. That is 4 sts and 4.5 rows per inch.
Make the base first and use it as your gauge test. Every later count depends on it.
- After Rnd 1: about 5.75 in (14.6 cm) long.
- After Rnd 5: about 7.25 in (18.4 cm) long and 2 in (5.1 cm) wide.
- After Rnd 9: 9.25 in x 4 in (23.5 cm x 10.2 cm). The base should lie flat, with no cupping or ruffling.
- After Rnd 19: the wall is about 5.25 in (13.3 cm) tall, measured from the ridge of Rnd 10.
If the base comes out too big, change to a 3.75 mm (F-5) hook. If it comes out too small, use a 4.5 mm (7) hook. Do not change the stitch counts. The hairpin strips need exactly 96 loops per side to match the wall.
Oval Base
With Color A, ch 24.
Rnd 1: 3 sc in 2nd ch from hook (end A), sc in next 21 ch, 3 sc in last ch (end B). Rotate and work along the opposite side of the foundation ch: sc in next 21 ch. Join with sl st to first sc. (48 sts)
From here on, each round has two ends and two straight sides. The straight sides stay at 21 sts, and each end gains 3 sts per round.
Rnd 2: Ch 1. [2 sc in each of next 3 sts, sc in next 21 sts] twice. Join. (54 sts)
Rnd 3: Ch 1. [(sc in next st, inc) 3 times, sc in next 21 sts] twice. Join. (60 sts)
Rnd 4: Ch 1. [(sc in next 2 sts, inc) 3 times, sc in next 21 sts] twice. Join. (66 sts)
Rnd 5: Ch 1. [(sc in next 3 sts, inc) 3 times, sc in next 21 sts] twice. Join. (72 sts)
Rnd 6: Ch 1. [(sc in next 4 sts, inc) 3 times, sc in next 21 sts] twice. Join. (78 sts)
Rnd 7: Ch 1. [(sc in next 5 sts, inc) 3 times, sc in next 21 sts] twice. Join. (84 sts)
Rnd 8: Ch 1. [(sc in next 6 sts, inc) 3 times, sc in next 21 sts] twice. Join. (90 sts)
Rnd 9: Ch 1. [(sc in next 7 sts, inc) 3 times, sc in next 21 sts] twice. Join. (96 sts)
Check: each end now has 27 sts and each straight side has 21 sts. 27 + 21 + 27 + 21 = 96. Do not fasten off.
Hairpin Lace Strips (Make 2)
With Color B, set the loom to 1.5 in (3.8 cm). Work a standard hairpin strip with a single sc spine down the center:
- Wrap the yarn around the right prong.
- Turn the loom so the yarn wraps around the other prong.
- Work 1 sc into the front strand of the loop on the hook side.
- Repeat these steps.
Keep the spine exactly centered between the prongs.
Make 96 loops on each side of each strip. On one side, place a marker after every 8th loop to divide the strip into 12 groups. Slide loops off the loom as needed, keeping them in order and untwisted.
When the strip is finished, fasten off and leave a 12 in (30.5 cm) tail. Use the tail to sew the last spine st to the first spine st, so the strip becomes a ring. Make sure the ring is not twisted.
Bow-tie ties: Cut 12 pieces of Color B, each 12 in (30.5 cm) long.
- At the center of one 8-loop group, pinch the spine so that group’s section of spine bunches up.
- Wrap one piece of yarn tightly around the pinch 4 times.
- Knot it on the inside of the ring, weave in the ends, and trim.
- Repeat for all 12 groups.
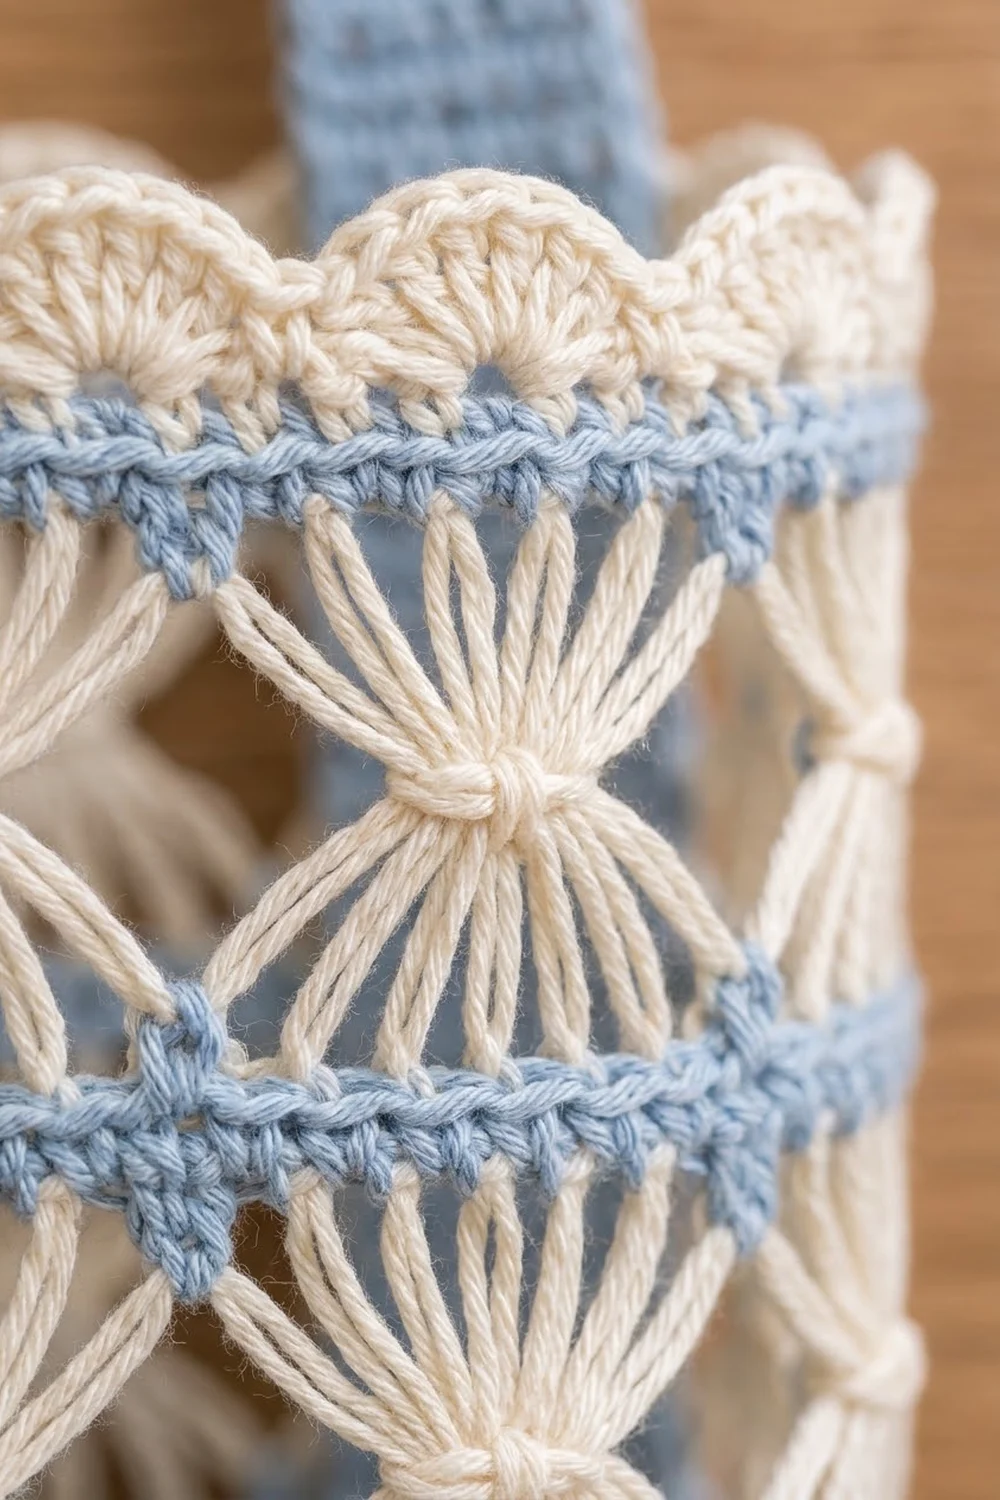
The loops now fan out from each tie toward both edges. The fans of neighboring groups touch at the edges, and an open diamond forms between each pair of ties. Check that each ring has 12 bow-ties.
Walls
Continue with Color A from the base.
Rnd 10 (turning ridge): Ch 1, sc in BLO of each st around. Join. (96 sts)
This round turns the wall upward and leaves a neat ridge around the bottom edge.
Rnds 11–12: Ch 1, sc in each st around. Join. (96 sts each)
Rnd 13 (join first strip): Hold one hairpin ring so its lower loops line up with Rnd 12, and place the first tie at the start of the round. Ch 1, jl-sc in each st around, using one lower loop per st. Join. (96 sts; 96 loops attached)
Rnd 14: Ch 1, work 1 sc in each upper loop of the same strip, keeping each loop untwisted. Join. (96 sts)
Line up the ties on the two edges vertically. The 8 loops of a group should sit directly above the 8 sts they cover below. The single blue sc where two fans meet forms the small blue point between fans.
Rnd 15: Ch 1, sc in each st around. Join. (96 sts)
Rnd 16 (join second strip): Ch 1, attach the second hairpin ring with jl-sc as in Rnd 13, lining its ties up with the ties of the first ring. Join. (96 sts; 96 loops attached)
Rnd 17: Ch 1, work 1 sc in each upper loop of the second strip. Join. (96 sts)
Rnds 18–19: Ch 1, sc in each st around. Join. (96 sts each) Fasten off Color A.
Checkpoint: The wall should be 5.25 in (13.3 cm) tall above the ridge of Rnd 10. That is 10 blue rows (about 2.25 in or 5.7 cm) plus two hairpin bands of 1.5 in (3.8 cm) each. The fans should spread evenly and the diamonds should stay open.
Straps (Make 2)
With Color A, ch 6.
Row 1: Sc in 2nd ch from hook and in each ch across. Turn. (5 sts)
Rows 2–36: Ch 1, sc in each st across. Turn. (5 sts each)
Fasten off and leave a 20 in (50.8 cm) tail. Each strap is 1.25 in (3.2 cm) wide and 8 in (20.3 cm) long.
Make the hanging loop: Fold the top 1.5 in (3.8 cm) of the strap to the back. Whipstitch the end row to the strap to make a closed loop.
Border
With Color B, work the border into Rnd 19. Begin at the first st of end A, where your round joins are.
Border gauge: Each scallop uses 4 sts of Rnd 19, so there is 1 scallop per inch (2.5 cm). The 24 in (61.0 cm) rim holds 24 scallops.
Border Rnd 1: Join Color B with sl st. Ch 1, sc in each st around. Join. (96 sc worked 1-per-stitch + 0 added = 96 sts)
Each half of the basket is one end plus one long side, so it has 27 + 21 = 48 sts.
Border Rnd 2: Ch 1. [Sc in next st, hdc in next st, 3 dc in next st, hdc in next st] 24 times. Join with sl st to first sc. (96 sts worked 1-per-stitch + 48 extra dc = 144 sts)
Each half gets 12 scallops: 48 sts worked 1-per-stitch + 24 extra dc = 72 sts.
Why the math works: The repeat is 4 sts wide. 96 divides evenly by 4, which gives 24 scallops. Each half has 48 sts, which also divides by 4, so each half gets exactly 12 scallops with no partial repeat. The 2 extra dc in each scallop make it curve upward without making the rim ruffle. Fasten off and weave in the ends.
Attach the straps: Choose one long side as the back. Count the 21 straight sts of that side in Rnd 19. Center one strap over sts 1–5 and the other over sts 17–21. That puts them 4 in (10.2 cm) apart, center to center. Place each strap inside the basket so it overlaps 1 in (2.5 cm) down the wall. Whipstitch all 4 edges of the overlap through the blue rounds only. The border stays in front of the straps.
Final Blocking
- Wet the basket in cool water and squeeze gently. Do not wring it.
- Roll it in a towel to remove extra water.
- Fill it with two toilet paper rolls wrapped in plastic bags, or with a folded towel shaped like the inside of the basket.
- Shape the base so it sits flat and both ends curve evenly.
- Spread each bow-tie fan so the loops are even and the diamonds are open.
- Pin each scallop on the rim so it curves outward slightly.
- Lay the straps straight and flat.
- Let the basket dry completely, about 24 hours.
Final Quality-Control Checklist
- The base measures 9.25 in x 4 in (23.5 cm x 10.2 cm) and has 96 sts.
- Every wall round, and Border Rnd 1, has 96 sts.
- Each hairpin ring has 96 loops per side and 12 bow-ties.
- The bow-ties on both bands line up vertically.
- No hairpin loops are twisted or skipped.
- The wall is 5.25 in (13.3 cm) tall before the border.
- Border Rnd 2 has 144 sts and 24 scallops, 12 per half.
- Each strap is 5 sts wide and 36 rows long, and it is securely sewn inside.
- All ends are woven in on the inside.
Troubleshooting
The base cups. Your tension is tight. Go up one hook size for the base.
The base ruffles. Your tension is loose. Go down one hook size.
There are too many or too few loops. Count the 8-loop groups using the markers. Add or unravel loops before you join the strip into a ring.
The fans lean sideways. The two edges are out of line. Undo the round worked into the upper loops and line the groups up again.
The loops look messy. Some loops twisted while you worked. Undo back to the twisted loop and rework it flat.
The rim waves. Border Rnd 2 is too loose. Rework it with a smaller hook.
The basket is too short for your rolls. Add one more plain round of Color A before the border. Each round adds about 0.25 in (0.6 cm), and the count stays at 96.
The basket tilts on the wall. The straps differ in length or spacing. Move one strap until both loops sit at the same height.
Care
Hand wash in cool water with mild soap, reshape, and lay flat to dry. Do not tumble dry, because it can tangle the hairpin loops.
Final Notes
Here is the measurement chain. A gauge of 4 sts per inch gives a 96-st base that measures 9.25 in x 4 in (23.5 cm x 10.2 cm). Those 96 sts carry up every wall round. Each hairpin ring has 96 loops per side, attached one loop per stitch. The 24 in (61.0 cm) rim holds 24 one-inch scallops. If the base measures right, the rest of the basket follows.
Happy crocheting!