
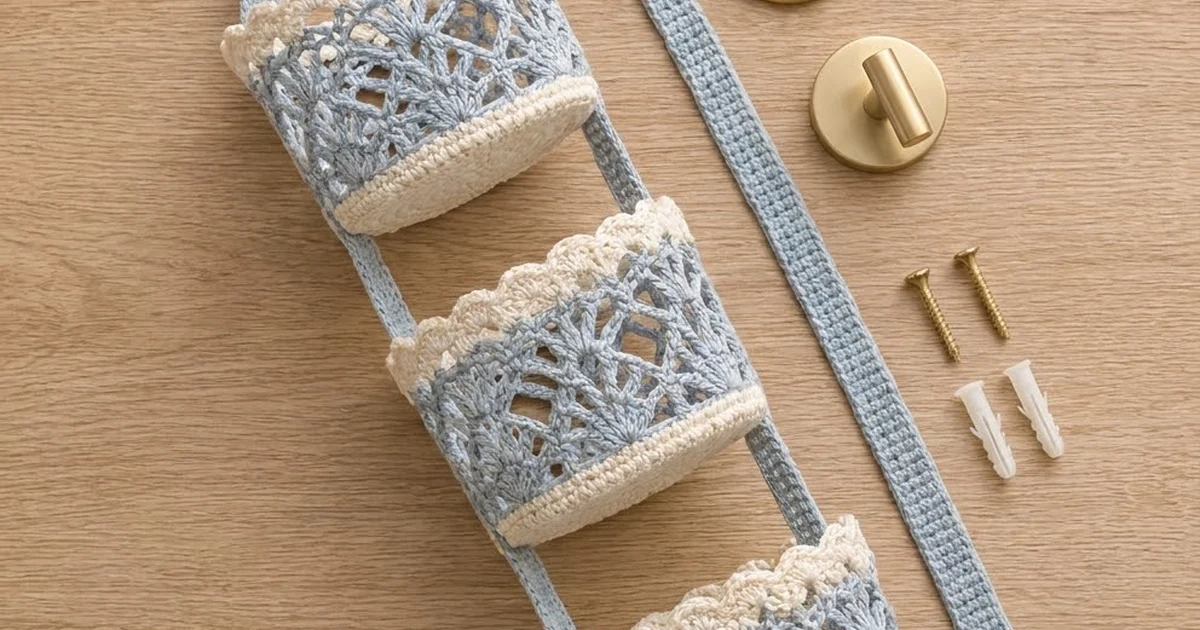
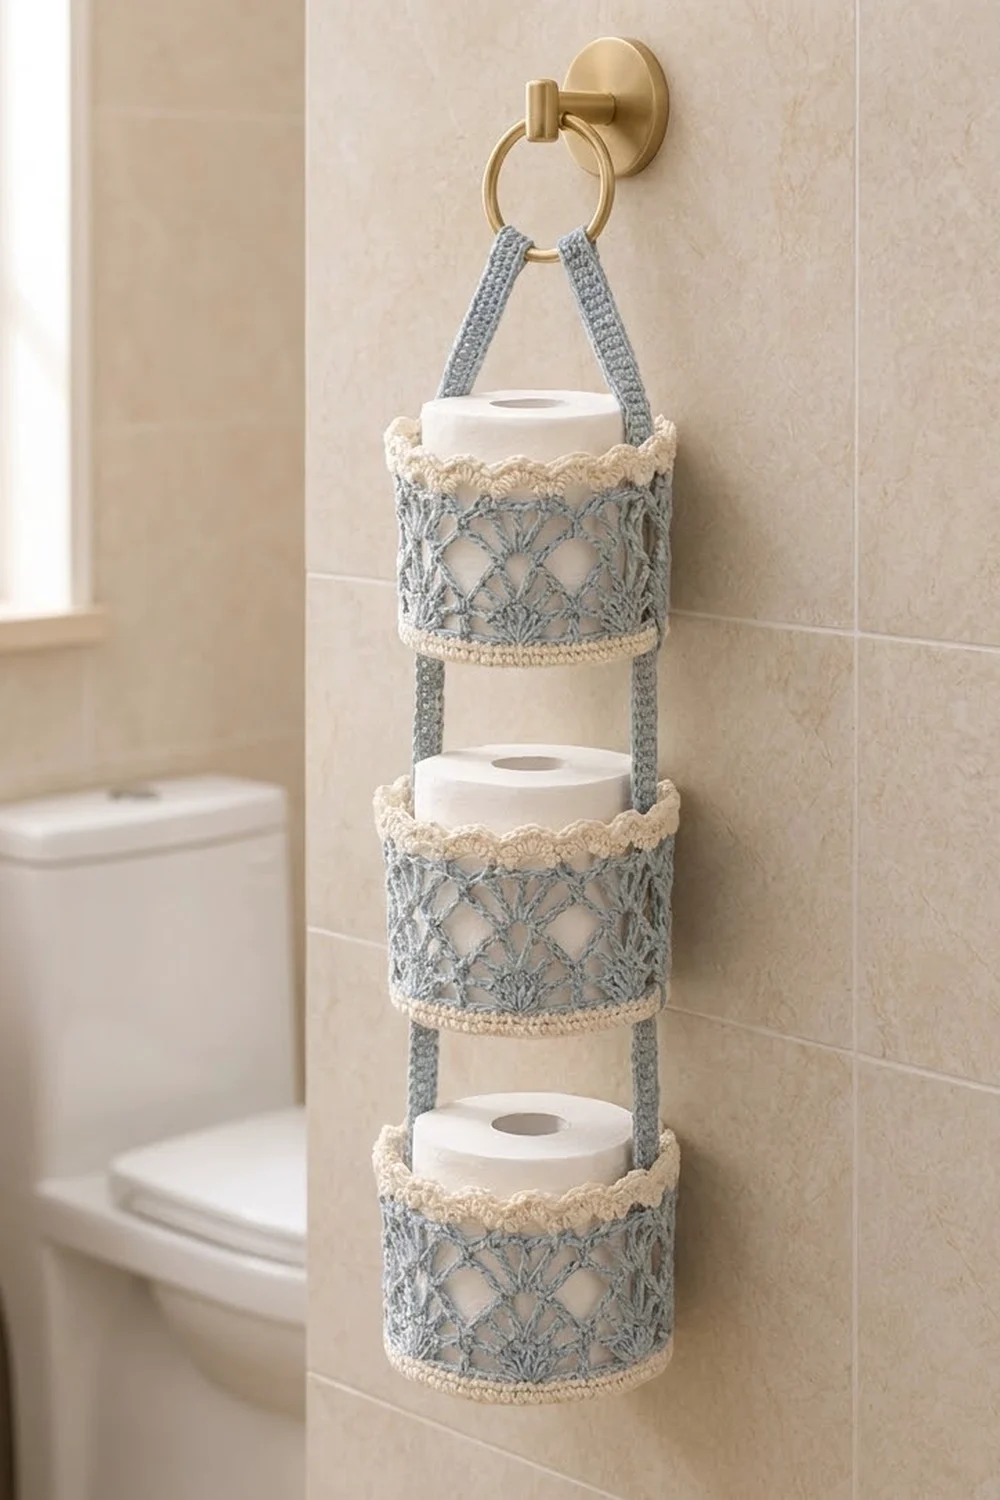
This hanging holder stores three rolls of toilet paper in three lace baskets, one above the other. Each basket has a light-blue fan-lace wall, a cream bottom band and a cream scalloped rim. Two blue straps hold the baskets together and hang from a brass ring.
The color scheme is calm and coastal: dusty blue lace with cream trim. The open fans let the white rolls show through, so the holder looks light even when it is full.
The pattern uses US crochet terms. Each basket measures 5.75 in (14.6 cm) across and 4.5 in (11.4 cm) tall, and fits a standard roll that is about 4.5 in (11.4 cm) wide. The holder hangs 24.5 in (62.2 cm) from the top of the ring to the bottom of the lowest basket.
How it’s built: for each basket, you crochet a flat base disc and a flat lace panel. You seam the panel into a tube by overlapping its edges, join it to the base with a round of single crochet, and then work the scalloped border around the top. Next you make two straps, sew them to the baskets, and fold their ends over the ring.
Finished Size and Construction
- Basket size: 5.75 in (14.6 cm) across × 4.5 in (11.4 cm) tall
- Overall length: 24.5 in (62.2 cm), including a 2 in (5.1 cm) ring
- Skill level: Intermediate
- Terminology: US
- Yarn weight: Worsted (#4) cotton
- Hook: 4.5 mm (US 7)
- Number of pieces: 8 (3 bases, 3 wall panels, 2 straps)
- Layout: 3 baskets stacked vertically, 2 in (5.1 cm) apart
- Wall panel before seaming: 18.25 in (46.4 cm) wide × 3.7 in (9.4 cm) tall
- Basket before border: 5.75 in (14.6 cm) across × 3.7 in (9.4 cm) tall
- Border depth: 0.75 in (1.9 cm)
Materials
Use a smooth, firm worsted-weight cotton. Cotton holds the basket shape better than acrylic, and it copes with bathroom humidity. Avoid splitty or very soft yarn, because the fans lose their definition.
- Color A, light blue: 65 g (about 110 m)
- Color B, cream: 70 g (about 120 m)
These quantities include a margin of about 25%.
Tools and hardware:
– 4.5 mm (US 7) crochet hook
– Yarn needle
– 4 stitch markers
– Brass or metal ring, 2 in (5.1 cm) across
– Wall hook with screws and wall anchors
– Scissors and a measuring tape
Abbreviations (US Terms)
- ch – chain
- sc – single crochet
- dc – double crochet
- sl st – slip stitch
- sk – skip
- st(s) – stitch(es)
- sp – space
- rep – repeat
- RS / WS – right side / wrong side
Special stitches
– Fan: (dc, ch 1) 4 times in the same st, then dc in that same st again. This makes 5 dc.
– Half fan: (dc, ch 1, dc, ch 1, dc) in the same st. This makes 3 dc.
– Scallop: 5 dc in the same st.
Gauge and Checkpoints
Single crochet gauge: 16 sc and 18 rows = 4 in (10.2 cm)
Lace gauge: one 12-st fan repeat = 3 in (7.6 cm) wide, and Rows 4–9 = 3 in (7.6 cm) tall
Make one complete basket before you start the others, and measure it at each of these stages:
- Base after Rnd 6: about 2.9 in (7.4 cm) across
- Base after Rnd 9: about 4.3 in (10.9 cm) across
- Base after Rnd 12: 5.75 in (14.6 cm) across
- Panel after Row 3: 18.25 in (46.4 cm) wide × 0.7 in (1.8 cm) tall
- Panel after Row 9: 18.25 in (46.4 cm) wide × 3.7 in (9.4 cm) tall
- Seamed tube: 18 in (45.7 cm) around, which matches the base’s circumference
If your pieces come out too big, go down half a hook size. If they come out too small, go up half a hook size. Keep the stitch counts the same. Fit matters more than exact size, so the finished basket should hold a roll with about 0.5 in (1.3 cm) of room around it.
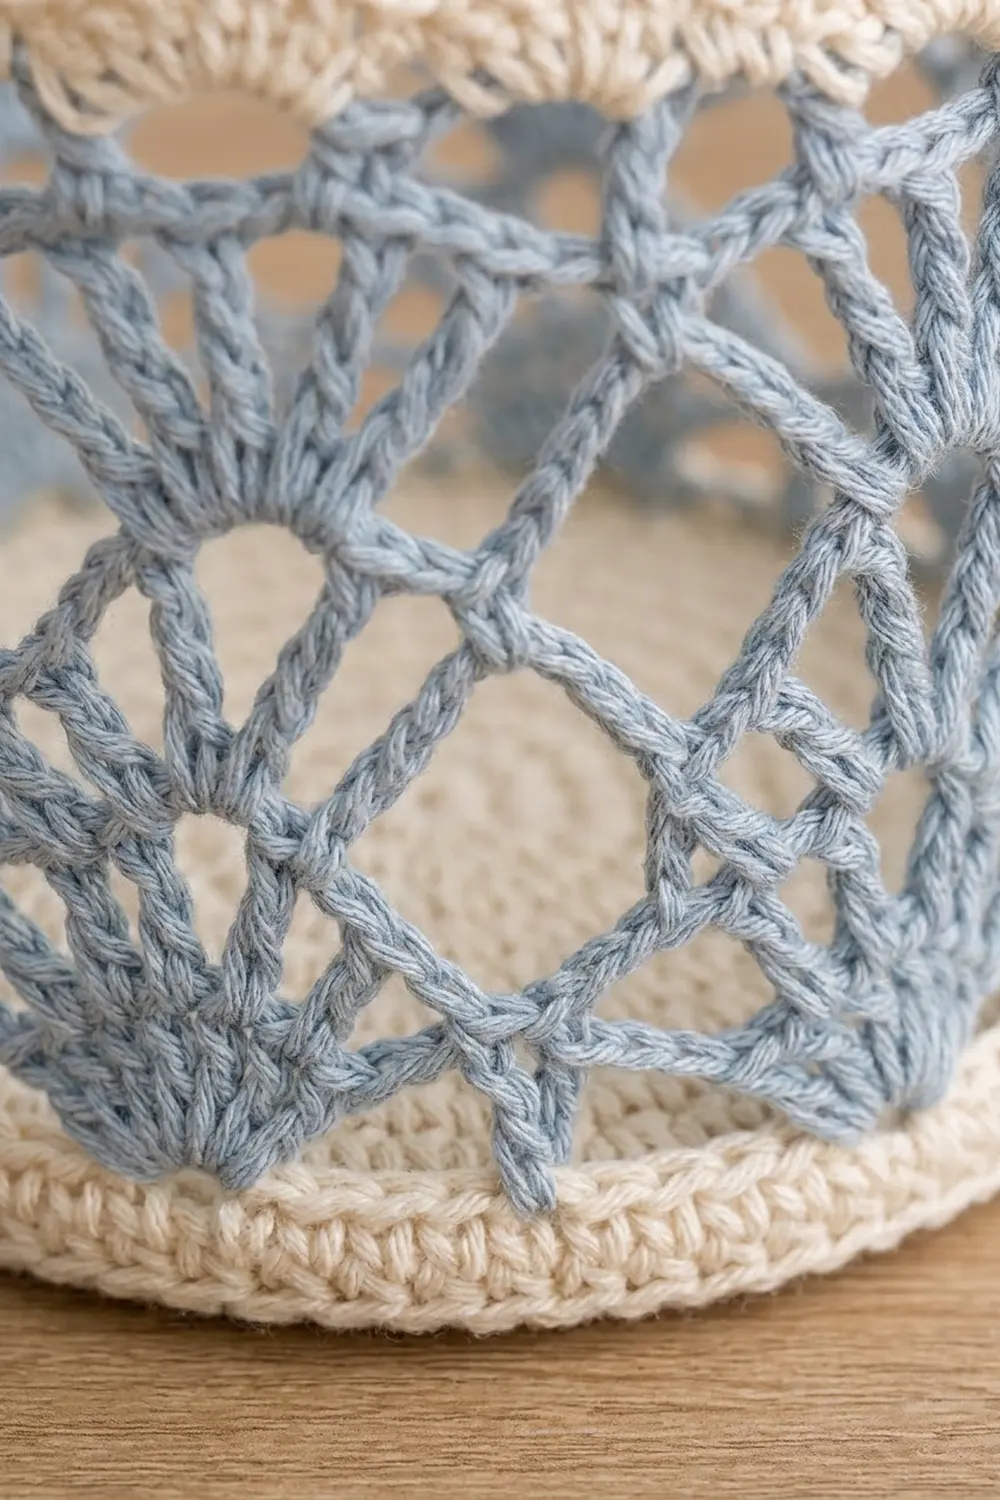
Base (Make 3)
Use Color B. Work in joined rounds: at the end of each round, join with a sl st to the first sc, then ch 1 to start the next round. The ch 1 never counts as a stitch.
Rnd 1: Make a magic ring. Work 6 sc into the ring. (6 sts)
Rnd 2: 2 sc in each st around. (12)
Rnd 3: sc in next st, 2 sc in next st; rep around. (18)
Rnd 4: sc in next 2 sts, 2 sc in next st; rep around. (24)
Rnd 5: sc in next 3 sts, 2 sc in next st; rep around. (30)
Rnd 6: sc in next 4 sts, 2 sc in next st; rep around. (36) This is Checkpoint 1.
Rnd 7: sc in next 5 sts, 2 sc in next st; rep around. (42)
Rnd 8: sc in next 6 sts, 2 sc in next st; rep around. (48)
Rnd 9: sc in next 7 sts, 2 sc in next st; rep around. (54) This is Checkpoint 2.
Rnd 10: sc in next 8 sts, 2 sc in next st; rep around. (60)
Rnd 11: sc in next 9 sts, 2 sc in next st; rep around. (66)
Rnd 12: sc in next 10 sts, 2 sc in next st; rep around. (72)
On every other round, shift the starting point of the increases by a couple of stitches so the disc stays round instead of turning into a hexagon. Fasten off and weave in the ends.
Wall Panel (Make 3)
You work the panel flat, in rows. Its final width is 73 sts. When you seam it, the first and last stitch columns overlap and become a single column, which leaves 72 sts around the tube.
Cream bottom band (Color B)
Foundation: Ch 74.
Row 1 (RS): Sc in the 2nd ch from the hook and in each ch across. (73 sc)
Rows 2–3: Ch 1, turn, sc in each st across. (73 sc)
On the last yarn-over of Row 3, change to Color A. This is Checkpoint 4.
Fan lace (Color A)
Row 4 (fan row): Ch 1, turn. Sc in the first st, then ch 2, sk 5 sts, fan in next st, ch 2, sk 5 sts, sc in next st; rep from * 5 more times. (6 fans, 7 sc)
Row 5 (mesh row): Ch 5 (counts as dc and ch 2), turn. Dc in next dc or sc, ch 2; rep across, skipping all ch-sps and ending with dc in the last sc without a ch 2 after it. (37 dc including the turning ch, 36 ch-2 sps)
Row 6 (offset fan row): Ch 4 (counts as dc and ch 1), turn. Work (dc, ch 1, dc) in the first dc to complete a half fan. Then ch 2, sk 2 dc, sc in next dc, ch 2, sk 2 dc, fan in next dc; rep from * 4 more times. Finish with ch 2, sk 2 dc, sc in next dc, ch 2, sk 2 dc, and a half fan in the 3rd ch of the turning ch. (2 half fans, 5 fans, 6 sc)
In this row the fans sit above the Row 4 sc, and the sc sit above the centers of the Row 4 fans. This offset creates the diamond pattern.
Row 7 (mesh row): Ch 5, turn. Dc in next dc or sc, ch 2; rep across, ending with dc in the 3rd ch of the turning ch. (37 dc, 36 ch-2 sps)
Row 8 (fan row): Ch 1, turn. Sc in the first dc, then ch 2, sk 2 dc, fan in next dc, ch 2, sk 2 dc, sc in next dc; rep from * 5 more times. The last sc goes into the 3rd ch of the turning ch. (6 fans, 7 sc) These fans line up with the fans in Row 4.
Row 9 (mesh row): Work it the same as Row 5. (37 dc, 36 ch-2 sps)
Fasten off. The panel should now measure 18.25 in (46.4 cm) × 3.7 in (9.4 cm). This is Checkpoint 5.
Make All Pieces
| Piece | Qty | Color |
|---|---|---|
| Base | 3 | B |
| Wall panel | 3 | A and B |
| Strap | 2 | A |
Straps (make 2, Color A):
Foundation: Ch 97.
Row 1: Sc in the 2nd ch from the hook and in each ch across. (96 sc)
Row 2: Ch 1, turn. Sc in the first 2 sts, ch 2, sk 2 sts, sc in the next 88 sts, ch 2, sk 2 sts, sc in the last 2 sts. (92 sc and 2 ch-2 eyelets, covering 96 sts)
Row 3: Ch 1, turn. Sc in each sc and 2 sc in each ch-2 sp. (96 sc)
Rnd 4 (edging): Ch 1. Work around the whole strap:
– 96 sc along the Row 3 edge
– 5 sc across the short end (2 sc in the end of Row 3, 1 sc in the end of Row 2, 2 sc in the end of Row 1)
– 96 sc along the foundation chain
– 5 sc across the other short end in the same way
Join with a sl st. (202 sc) The extra stitches in the short ends round them off. The finished strap is 24 in (61.0 cm) × 1 in (2.5 cm).
Layout (seen from the front):
        ( O )        <- 2 in ring
        |   |        <- 5 in strap drop
     [ Basket 1 ]
        |   |        <- 2 in gap
     [ Basket 2 ]
        |   |        <- 2 in gap
     [ Basket 3 ]
Joining
1. Seam each tube. Fold the panel with RS out. Lay the last stitch column of every row directly on top of the first, so the two edge columns become one: 73 − 1 = 72 sts around. Whipstitch through both layers. Use Color B on the cream rows and Color A on the lace rows.
At Row 6, the two half fans now sit on top of each other and form one complete fan (3 + 3 − 1 shared column = 5 dc). The tube should measure 18 in (45.7 cm) around.
2. Join the base. Put the base inside the bottom of the tube, with the WS of both pieces facing each other. Join Color B at the seam. Ch 1, then sc around, working each stitch through one foundation loop of the wall and the matching st of Base Rnd 12. Treat the overlapped seam loops as one loop. Join with a sl st. (72 sc)
The counts match one to one, 72 sts on each piece, so you add no stitches and the wall stays straight instead of flaring or puckering. Keep your tension even: if this round is too tight, the base cups upward. The joining round leaves a neat cream ridge around the bottom.
Size checkpoint: the basket should be 5.75 in (14.6 cm) across and 3.7 in (9.4 cm) tall before you add the border.
3. Attach the straps after you have bordered and blocked the baskets. See Final Blocking, below.
Border (Top Rim, Color B)
Border gauge: 4 sc = 1 in (2.5 cm). Join Color B at the seam on Row 9.
Rnd 1 (conversion round): Ch 1. Sc in each dc, treating the overlapped pair at the seam as one dc, and sc in each ch-2 sp. That gives (36 sc in dc) + (36 sc in sps) = 72 sc. Join.
Rnd 2: Ch 1, sc in each st around. (72 sc) Join.
Rnd 3 (scallops): Ch 1. Sc in next st, sk 2 sts, scallop in next st, sk 2 sts; rep from * 11 more times. Join with a sl st to the first sc. (12 scallops, 12 sc)
Why the math works: the tube has 36 mesh dc and 36 ch-2 spaces, so the conversion round gives exactly 72 sts, the same as the base. Each scallop repeat uses 6 sts, and 72 ÷ 6 = 12, so the last scallop ends right at the seam. The rim is a single closed edge with no corners, so you never add corner stitches. The border adds 0.75 in (1.9 cm), which brings the basket to 4.5 in (11.4 cm) tall, including the base ridge.
Final Blocking
- Lightly dampen each basket with a spray bottle.
- Slide a container that is about 5.5 in (14.0 cm) wide inside, such as a can wrapped in a towel.
- Pull the wall straight up and open each fan with your fingers.
- Shape each scallop so it points upward and is evenly spaced.
- Pat the base flat.
- Pin the straps flat to 24 in (61.0 cm) × 1 in (2.5 cm).
- Let everything dry completely before assembling.
Attach the straps. Number the strap stitches from the bottom end. The 96 sts break down like this:
- Basket 3: 18 sts (4.5 in / 11.4 cm)
- Gap: 8 sts (2 in / 5.1 cm)
- Basket 2: 18 sts
- Gap: 8 sts
- Basket 1: 18 sts
- Drop to the ring: 20 sts (5 in / 12.7 cm)
- Fold over the ring: 6 sts (1.5 in / 3.8 cm)
18 + 8 + 18 + 8 + 18 + 20 + 6 = 96.
Place the straps on opposite sides of each basket, 36 rim sts apart, with one strap covering the side seam. Sew each strap to the cream bottom ridge and to Border Rnds 1–2 of every basket.
At the top, fold the last 1.5 in (3.8 cm) of each strap over the ring and sew it down, stitching around the eyelet through both layers. At the bottom, the eyelet sits on the lowest basket’s base ridge; sew around it there.
Final Quality-Control Checklist
- Each base has 72 sts and measures 5.75 in (14.6 cm) across.
- Each panel has 73 sts and measures 18.25 in (46.4 cm) wide.
- At the seam, the two half fans form one full fan.
- Each base joining round has 72 sc.
- Each border has 12 scallops.
- The three baskets match in height to within 0.25 in (0.6 cm).
- The straps are 36 sts apart on every basket, and the gaps between baskets are even.
- The ring is sewn in securely and all ends are woven in.
Troubleshooting
- The base ruffles: your stitches are too loose. Go down a hook size for the base only.
- The base cups upward: check that you work 6 increases in every round.
- The fan rows don’t line up: count again so you skip exactly 2 dc on each side of every fan.
- The tube is bigger than the base: overlap the seam by exactly one column, not zero columns.
- The scallops crowd together at the seam: recount Rnd 1. It must have 72 sts.
- The basket tilts when hanging: make sure the straps are exactly opposite each other and the gaps are even.
Care
Hand wash in cool water, press out the excess water in a towel, and reshape the baskets over a container to dry. Hang the holder away from direct shower spray so it lasts longer.
Final Notes
Here is the full measurement chain:
- A 72-st base is 5.75 in (14.6 cm) across.
- A 73-st panel is 18.25 in (46.4 cm) wide. Overlapped at the seam, it becomes an 18 in (45.7 cm) tube with 72 sts.
- The 72-sc joining round attaches the tube to the base one stitch to one stitch.
- The conversion round brings the top back to 72 sts, which gives 12 even scallops.
- With the border, each basket is 4.5 in (11.4 cm) tall.
- Three baskets and two 24 in (61.0 cm) straps make a holder that hangs 24.5 in (62.2 cm) long.
If you check the first basket at each stage, the rest of the project comes together easily. Happy crocheting!