

This butterfly wall pocket is a lacy pink-and-cream organizer that hangs from a hook and holds small things like scrunchies, claw clips, and combs. A dusty pink lace butterfly forms the back. Cream lace wings sit on top of it, and two cream lace pockets with pink rims sit over the lower wings.
Each wing lobe is a round lace motif: a puffed eight-petal flower in the center, then rings of chain mesh. The pink back gets a small scalloped edge, so a thin pink outline shows around the cream overlay wings. The body is worked in back-loop single crochet, which gives it raised horizontal ridges. Two curled antennae and a pink cord hanging loop finish the top.
The pattern uses US crochet terms. The finished organizer is about 12 in (30.5 cm) wide and 9.5 in (24.1 cm) tall, not counting the antennae and hanging loop.
Construction is modular. You make four pink lobes and a pink body, join them, and add the scalloped border. Then you make four cream overlay lobes and two cream pocket fronts. Each pocket gets a pink gusset and a pink rope rim. Everything is sewn together in layers.
Finished Size and Construction
- Finished size: 12 in (30.5 cm) wide x 9.5 in (24.1 cm) tall
- Skill level: Intermediate
- Terminology: US crochet terms
- Yarn weight: DK / light worsted (3) cotton
- Hook: 3.5 mm (E-4)
- Number of pieces: 14 (4 pink lobes, 1 pink body, 4 cream overlay lobes, 2 cream pocket fronts, 2 antennae, 1 hanging cord). The gussets and rims are worked directly onto the pockets.
- Layout: butterfly back on the bottom layer, cream overlay wings in the middle, two pockets on top over the lower wings
- Piece sizes: large (upper) lobe 5 in (12.7 cm) across; small (lower) lobe and pocket front 4 in (10.2 cm) across; body 1.2 in (3.0 cm) x 7.25 in (18.4 cm)
- Size before border: about 11 in (27.9 cm) x 8.5 in (21.6 cm)
- Border depth: 0.5 in (1.3 cm) of scallops on the pink back
Materials
Use a smooth mercerized or combed cotton in DK weight. Cotton holds the lace open, keeps its shape when the pockets are full, and stands up to a steamy bathroom. Avoid fuzzy yarn because it hides the mesh.
- Dusty pink: 70 g, about 154 m (back panel, border, gussets, rims, antennae, cord)
- Cream: 50 g, about 110 m (overlay wings and pocket fronts)
These amounts include a margin of roughly 20 percent for swatching and joining.
Tools:
– 3.5 mm (E-4) crochet hook
– Tapestry needle
– Stitch markers (at least 6)
– Rust-proof pins and a blocking mat
– Spray bottle
– Ruler or tape measure
Abbreviations (US Terms)
- ch – chain
- sl st – slip stitch
- sc – single crochet
- hdc – half double crochet
- dc – double crochet
- sc2tog – single crochet 2 together
- BLO – back loop only
- rsc – reverse single crochet (crab stitch)
- sp – space
- st(s) – stitch(es)
Petal: (sc, hdc, 3 dc, hdc, sc) all in the same ch-5 space. One petal has 7 sts, and its center st is the 2nd of the 3 dc.
Reverse single crochet (rsc): Do not turn. Working from left to right (right-handers), insert the hook into the next st to the right, pull up a loop, yarn over, and pull through both loops. This gives a twisted, rope-like edge.
Gauge and Checkpoints
Base gauge: 20 sc and 22 rows = 4 in (10.2 cm) in sc.
Motif gauge: Rounds 1–3 (the flower) = 2.5 in (6.4 cm) across.
Make one large lobe in pink before anything else, and measure it at each checkpoint:
- After Round 3: 2.5 in (6.4 cm)
- After Round 6 (ch-6 mesh): 4.5 in (11.4 cm)
- After Round 7: 5 in (12.7 cm)
For the small lobe, check 3.5 in (8.9 cm) after Round 5 and 4 in (10.2 cm) after Round 6.
Too big? Go down to a 3.25 mm hook, or tighten the chains in the mesh rounds. Loose chains are the most common cause. Too small? Go up to a 3.75 mm hook. Flat, even rounds matter more than a tiny size difference. If the edge ripples, the chains are too long. If it cups, they are too short.
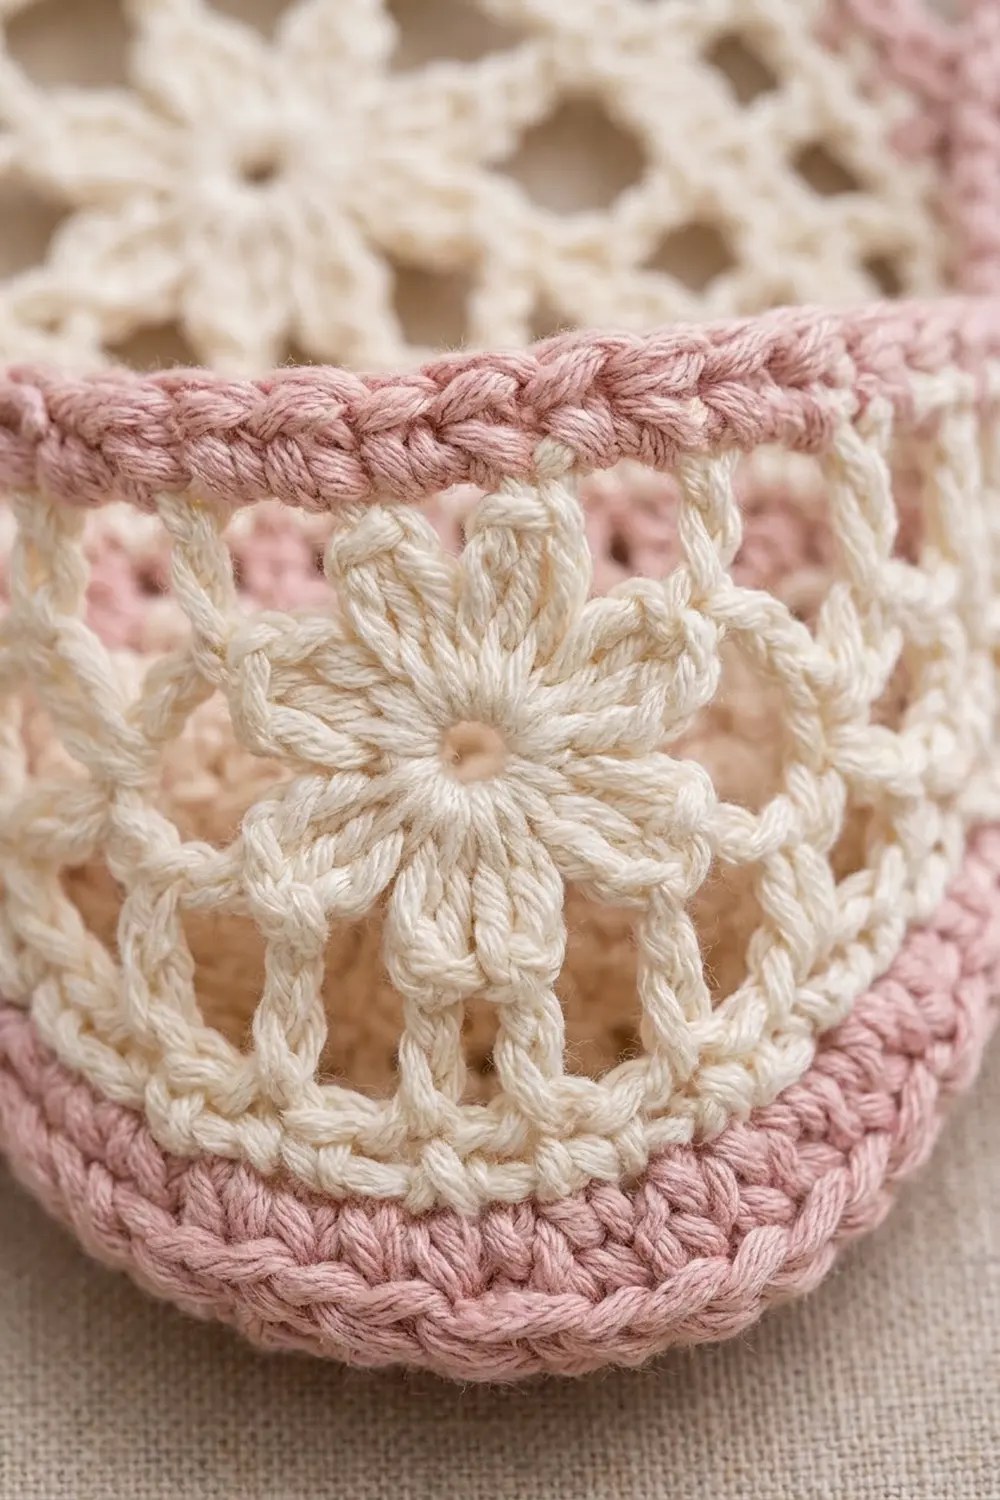
Large Lobe (Upper Wing)
Make 2 in pink and 2 in cream.
Round 1: Make a magic ring, ch 3 (counts as dc), work 15 dc in ring, sl st to top of ch-3. (16 dc)
Round 2: Ch 1, sc in same st, ch 5, skip next st, sc in next st, ch 5, skip next st; repeat from * 6 more times, sl st to first sc. (8 sc, 8 ch-5 sps)
Round 3: Sl st into first ch-5 sp, ch 1, work 1 petal in each ch-5 sp around, sl st to first sc. (8 petals, 56 sts)
Round 4: Sl st in next hdc, next dc, and next dc so you are in the center dc of the petal. Ch 1, sc in same st, ch 7, sc in center dc of next petal; repeat from * 6 more times, ch 7, sl st to first sc. (8 sc, 8 ch-7 sps)
Round 5: Sl st into first ch-7 sp, ch 1, (sc, ch 5, sc) in ch-7 sp, ch 5; repeat from * in each ch-7 sp around, sl st to first sc. (16 ch-5 sps)
Round 6: Sl st in next 3 ch, ch 1, sc in same sp, ch 6, sc in next ch-5 sp; repeat from * 14 more times, ch 6, sl st to first sc. (16 ch-6 sps)
Round 7: Sl st into first ch-6 sp, ch 1, work 7 sc in each ch-6 sp around, sl st to first sc. (16 x 7 = 112 sc)
Fasten off and leave a 12 in (30.5 cm) tail on the cream lobes for sewing.
Small Lobe (Lower Wing) and Pocket Front
Make 2 in pink (back), 2 in cream (overlay), and 2 in cream (pocket fronts).
Rounds 1–5: Work as for the large lobe. (16 ch-5 sps)
Round 6: Sl st into first ch-5 sp, ch 1, work 6 sc in each ch-5 sp around, sl st to first sc. (16 x 6 = 96 sc)
Fasten off. The piece should measure 4 in (10.2 cm) across.
Body
Make 1 in pink. The body is worked in rows from the tail up to the head. Working in BLO gives the horizontal ridges.
Row 1: Ch 3, sc in 2nd ch from hook and next ch, turn. (2 sc)
Row 2: Ch 1, 2 sc BLO in each st, turn. (4 sc)
Row 3: Ch 1, 2 sc BLO in first st, sc BLO in next 2 sts, 2 sc BLO in last st, turn. (6 sc)
Rows 4–34: Ch 1, sc BLO in each st, turn. (6 sc per row)
Row 35: Ch 1, 2 sc BLO in first st, sc BLO in next 4 sts, 2 sc BLO in last st, turn. (8 sc)
Rows 36–38: Ch 1, sc BLO in each st, turn. (8 sc)
Row 39: Ch 1, sc2tog, sc in next 4 sts, sc2tog, turn. (6 sc)
Row 40: Ch 1, sc2tog 3 times. (3 sc)
Fasten off. The body measures 1.2 in (3.0 cm) wide and 7.25 in (18.4 cm) long, which is 40 rows at 5.5 rows per inch.
Antennae and Hanging Cord
Antenna (make 2, pink): Make a magic ring, work 6 sc in ring, and pull it tight to form a knob. Ch 10 and fasten off, leaving a 6 in (15.2 cm) tail. Each antenna is about 2 in (5.1 cm) long. Bend the knob end outward.
Hanging cord (make 1, pink): Ch 46, sl st in 2nd ch from hook and in each ch across. (45 sl st, about 9 in / 22.9 cm) Fasten off.
Make All Pieces
Before you assemble anything, check that you have every piece:
- Pink: 2 large lobes (112 sc each), 2 small lobes (96 sc each), 1 body, 2 antennae, 1 cord
- Cream: 2 large lobes, 2 small overlay lobes, 2 pocket fronts
Layout (seen from the front):
[Large L] [Body] [Large R]
[Small L] [Body] [Small R]
The upper lobes tilt up and outward. The lower lobes tilt down and outward.
Joining the Back Panel
Use pink yarn and whip-stitch through the back loops, one stitch to one stitch or one stitch to one row-end. Keep the tension snug but not tight. The seams should lie flat without puckering.
- Upper lobes to body: Place a marker on 14 consecutive sc of Round 7 on each large lobe. Sew these 14 sts to the row-ends of body Rows 21–34 (14 row-ends), one per row-end.
- Lower lobes to body: Mark 10 consecutive sc of Round 6 on each small lobe. Sew them to the row-ends of Rows 9–18 (10 row-ends).
- Upper lobe to lower lobe: Starting next to the body seam, sew 14 sts of the large lobe to the next 14 sts of the small lobe, stitch to stitch. Body Rows 19–20 stay free where the lobes meet.
Free stitches left for the border:
– Large lobe: 112 − 14 − 14 = 84 sts
– Small lobe: 96 − 10 − 14 = 72 sts
Size checkpoint: The joined back should be about 11 in (27.9 cm) wide and 8.5 in (21.6 cm) tall. If it is much wider, the body seams have stretched. Resew them more firmly.
Border (Pink Back Only)
Border gauge: One scallop uses 6 sts of edge and adds 0.5 in (1.3 cm) of depth.
Work the border separately on each of the 4 free arcs.
Scallop Row (large lobe): With RS facing, join pink in the first free st next to the body seam. Sc in next st, skip 2 sts, 5 dc in next st, skip 2 sts; repeat from * 13 more times, then sl st into the first joined st of the lobe-to-lobe seam. (14 scallops, 84 sts used)
Scallop Row (small lobe): Join pink in the first free st next to the lobe-to-lobe seam. Work the same repeat 11 more times, for 12 times total, then sl st into the first st of the body seam. (12 scallops, 72 sts used)
Why the math works: Each repeat uses exactly 6 edge sts (1 sc + 2 skipped + 1 dc group + 2 skipped). 84 ÷ 6 = 14 and 72 ÷ 6 = 12, so every arc ends on a full scallop with no leftover sts. All 4 arcs come to 14 + 14 + 12 + 12 = 52 scallops.
Weave in ends. Sew the antennae to body Row 40 and the two ends of the cord to the back of Rows 37–38, making a 4.5 in (11.4 cm) loop.
Overlay Wings
Sew each cream large lobe to a cream small lobe along 14 sts, the same way as on the back. This leaves 84 and 72 free sts.
Lay each overlay on its pink wing. Whip-stitch the overlay’s free edge to the pink back’s last round, one stitch to one stitch (84 to 84, 72 to 72), working into the pink sts just inside the scallops. The pink scallops stay visible as a 0.5 in (1.3 cm) frame. Tack the inner edges of the overlay to the body seam.
Pockets
Work the following on each cream pocket front (96 sc). Mark the 64 sts that form the lower two-thirds of the circle and the 32 sts that form the top arc.
Gusset (pink):
Row 1: Join pink in the first marked lower st, ch 1, sc in each of the 64 sts, turn. (64 sc)
Row 2: Ch 1, sc in each st, turn. (64 sc)
Row 3: Ch 1, sc in next 2 sts, sc2tog; repeat from * 15 more times, turn. (16 repeats x 3 = 48 sc)
Row 4: Ch 1, sc in each st. (48 sc) Fasten off. The gusset is about 0.75 in (1.9 cm) deep.
Rim (pink):
Row 1: With RS facing, join pink at the gusset edge. Sc in 4 gusset row-ends, sc in each of the 32 top-arc sts, sc in 4 gusset row-ends. (4 + 32 + 4 = 40 sc)
Row 2: Ch 1, do not turn, rsc in each st across. (40 rsc)
Fasten off and leave a 16 in (40.6 cm) tail.
Attach: Pin the pocket over the small overlay lobe, with the pocket’s inner side touching the body. Sew gusset Row 4 (48 sts) to the lowest 48 sts of the small lobe, stitch to stitch, going through both the cream and the pink layers. The front arc (64 sts) is longer than the seam (48 sts), so the pocket cups forward and opens.
Final Blocking
- Spray the whole organizer until it is evenly damp, not dripping.
- Lay it face up on the blocking mat.
- Pin the body straight to 7.25 in (18.4 cm).
- Pin the wingspan to 12 in (30.5 cm) and the height to 9.5 in (24.1 cm).
- Pin out every scallop point on the pink border.
- Open the mesh on the overlay wings with your fingertips so the flowers sit centered.
- Stuff each pocket with a rolled-up cloth so the cup shape holds.
- Let it dry completely, at least 24 hours, before you hang it.
Final Quality-Control Checklist
- Large lobes are 5 in (12.7 cm) and small lobes 4 in (10.2 cm)
- Body ridges run horizontally and the body is 1.2 in (3.0 cm) wide
- 14 scallops on each upper wing and 12 on each lower wing
- Pink frame is even, about 0.5 in (1.3 cm), all around
- Pockets cup forward, with 0.75 in (1.9 cm) gussets
- Rope rims are 40 sts and lie flat
- Cord is secure and the loop measures 4.5 in (11.4 cm)
- All ends are woven in on the back
Troubleshooting
Lobe ruffles: The mesh chains are too long. Redo Round 6 with tighter chains.
Lobe cups: The chains are too short, or the sc in Round 7 are tight. Go up a hook size for the last round.
Scallops don’t come out even: Recount the free sts. They should be 84 and 72, and the seams should use exactly 14, 14, and 10 sts.
Pocket is flat: Check that Row 3 of the gusset decreases to 48 sts.
Pocket sags when full: Add a second line of stitching through the gusset seam.
Overlay buckles: Sew one stitch to one stitch. Don’t skip or double up.
Care
Hand wash in cool water with mild soap, roll it in a towel, and dry it flat, re-pinning the scallops if needed. Don’t put it in the dryer.

Final Notes
The whole design follows one measurement chain. A 2.5 in (6.4 cm) flower grows into a 5 in (12.7 cm) or 4 in (10.2 cm) lobe. The lobes join to a 7.25 in (18.4 cm) body for a back of about 11 in (27.9 cm) x 8.5 in (21.6 cm). A 0.5 in (1.3 cm) scallop border brings that to 12 in (30.5 cm) x 9.5 in (24.1 cm). If each checkpoint matches, the overlays and pockets will fit stitch for stitch.
Happy crocheting!