

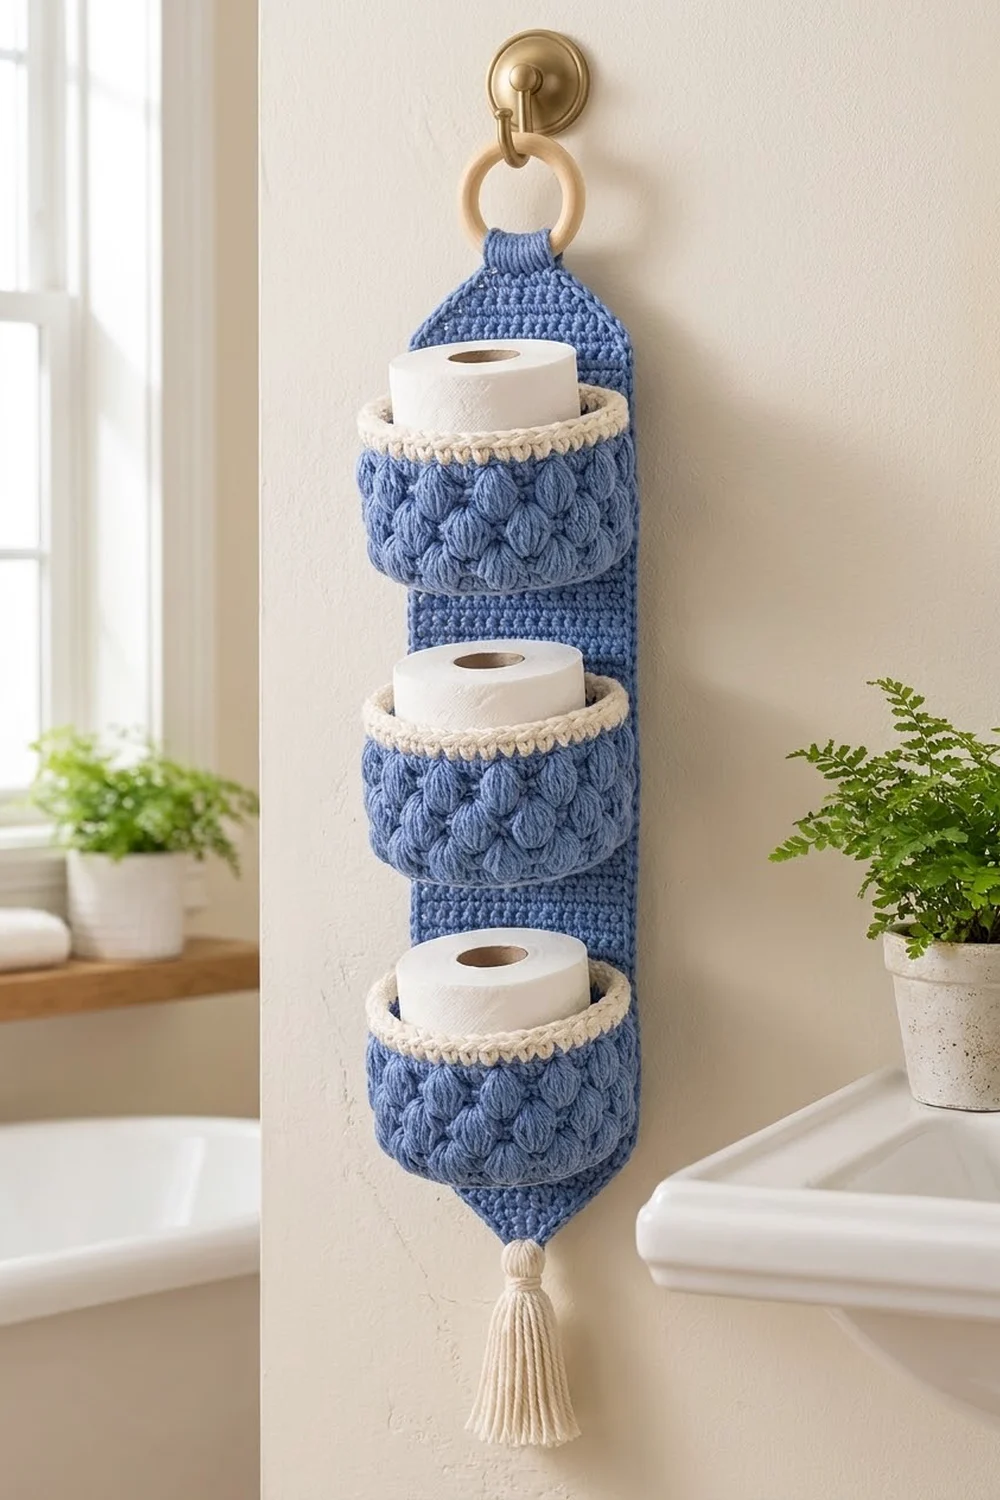
This hanging holder stores three spare toilet rolls in a narrow strip of wall space. Three oval baskets with puff-stitch walls are sewn in a column onto a long single-crochet back panel. A wooden ring at the top hangs the holder from a door hook or towel hook, and a cream tassel finishes the point at the bottom.
The colors are cornflower blue and cream. The blue makes the puffs stand out, and the cream rims and tassel tie in with white towels and porcelain. Cotton yarn keeps the stitches crisp and the baskets firm enough to hold their oval shape around a roll.
This pattern uses US crochet terms. The finished panel measures 6.75 in (17.1 cm) wide by 24.5 in (62.2 cm) long before you fold the tab. Each basket is 7.75 in (19.7 cm) long, 5 in (12.7 cm) deep, and 3.25 in (8.3 cm) tall. A standard roll stands upright inside each basket, and its top shows above the rim so it’s easy to grab.
Construction is simple. Work each basket in the round, starting from an oval base, then add the puff walls and a cream rim. Work the panel flat in rows from the bottom point to the top tab. Then sew on the baskets, add a single border round to the panel, attach the ring, and hang the tassel.
Finished Size and Construction
- Finished size: panel 6.75 × 24.5 in (17.1 × 62.2 cm); hangs 23 in (58.4 cm) from the ring, plus a 4 in (10.2 cm) tassel
- Skill level: Intermediate
- Terminology: US
- Yarn weight: Worsted (#4) cotton
- Hook: 4.5 mm (US 7)
- Number of pieces: 4 crocheted pieces (3 baskets and 1 panel), plus a tassel and a ring
- Layout: 1 column of 3 baskets on the panel
- Basket size: 7.75 × 5 in (19.7 × 12.7 cm) base, 3.25 in (8.3 cm) tall
- Panel size before border: 6.25 × 24 in (15.9 × 61.0 cm)
- Border depth: 0.25 in (0.6 cm) on each edge
Materials
Choose a smooth, worsted-weight cotton or cotton blend. Puffs show up best in a plied yarn that doesn’t split. Acrylic will work, but the baskets will be softer and may sag under a full roll.
- Blue (Color A): 230 g / 391 m
- Cream (Color B): 50 g / 85 m
These amounts include a margin of about 15% for your gauge swatch and small tension differences. Puff stitches use a lot of yarn, so don’t cut the margin.
Tools:
– 4.5 mm (US 7) crochet hook
– One 3 in (7.6 cm) wooden ring
– Locking stitch markers
– Tapestry needle
– Scissors
– A 4.5 in (11.4 cm) piece of card for the tassel
– Rust-proof pins and a blocking mat
Abbreviations (US Terms)
- ch – chain
- sc – single crochet
- sc2tog – single crochet 2 together
- sl st – slip stitch
- BLO – back loop only
- rev sc – reverse single crochet (crab stitch)
- st(s) – stitch(es)
- sp – space
- rep – repeat
Puff stitch (puff): Yarn over, insert hook in the indicated st, yarn over, and pull up a loop to about 0.5 in (1.3 cm). Rep from * to * 3 more times (9 loops on hook). Yarn over and draw through all 9 loops.
Reverse sc: Working from left to right, insert the hook in the next st to the right, pull up a loop, yarn over, and draw through both loops.
Gauge and Checkpoints
Gauge: 16 sc × 16 rows = 4 in (10.2 cm) in rows of sc. One sc measures 0.25 in (0.6 cm) wide and tall. This square gauge is what makes the seams and border work out stitch for stitch.
Make a single basket before starting the panel. That one basket tells you whether your gauge holds up in the round and through the puff stitches. Test-fit a toilet roll in it before you make the other two.
Checkpoints:
– Base, Rnd 5: 50 sts; about 5.25 × 2.5 in (13.3 × 6.4 cm)
– Base, Rnd 10: 80 sts; 7.75 × 5 in (19.7 × 12.7 cm), lying flat
– Wall, Rnd 18: wall 2.75 in (7.0 cm) tall
– Finished basket: 3.25 in (8.3 cm) tall
– Panel, Row 12: 6.25 in (15.9 cm) wide, 3 in (7.6 cm) tall
– Panel, Row 76: 19 in (48.3 cm) long
– Panel, Row 96: 24 in (61.0 cm) long
Base too big or ruffled? Go down 0.5 mm in hook size. Too small or cupping? Go up 0.5 mm. The base must stay at least 5 in (12.7 cm) deep or a standard roll won’t fit.
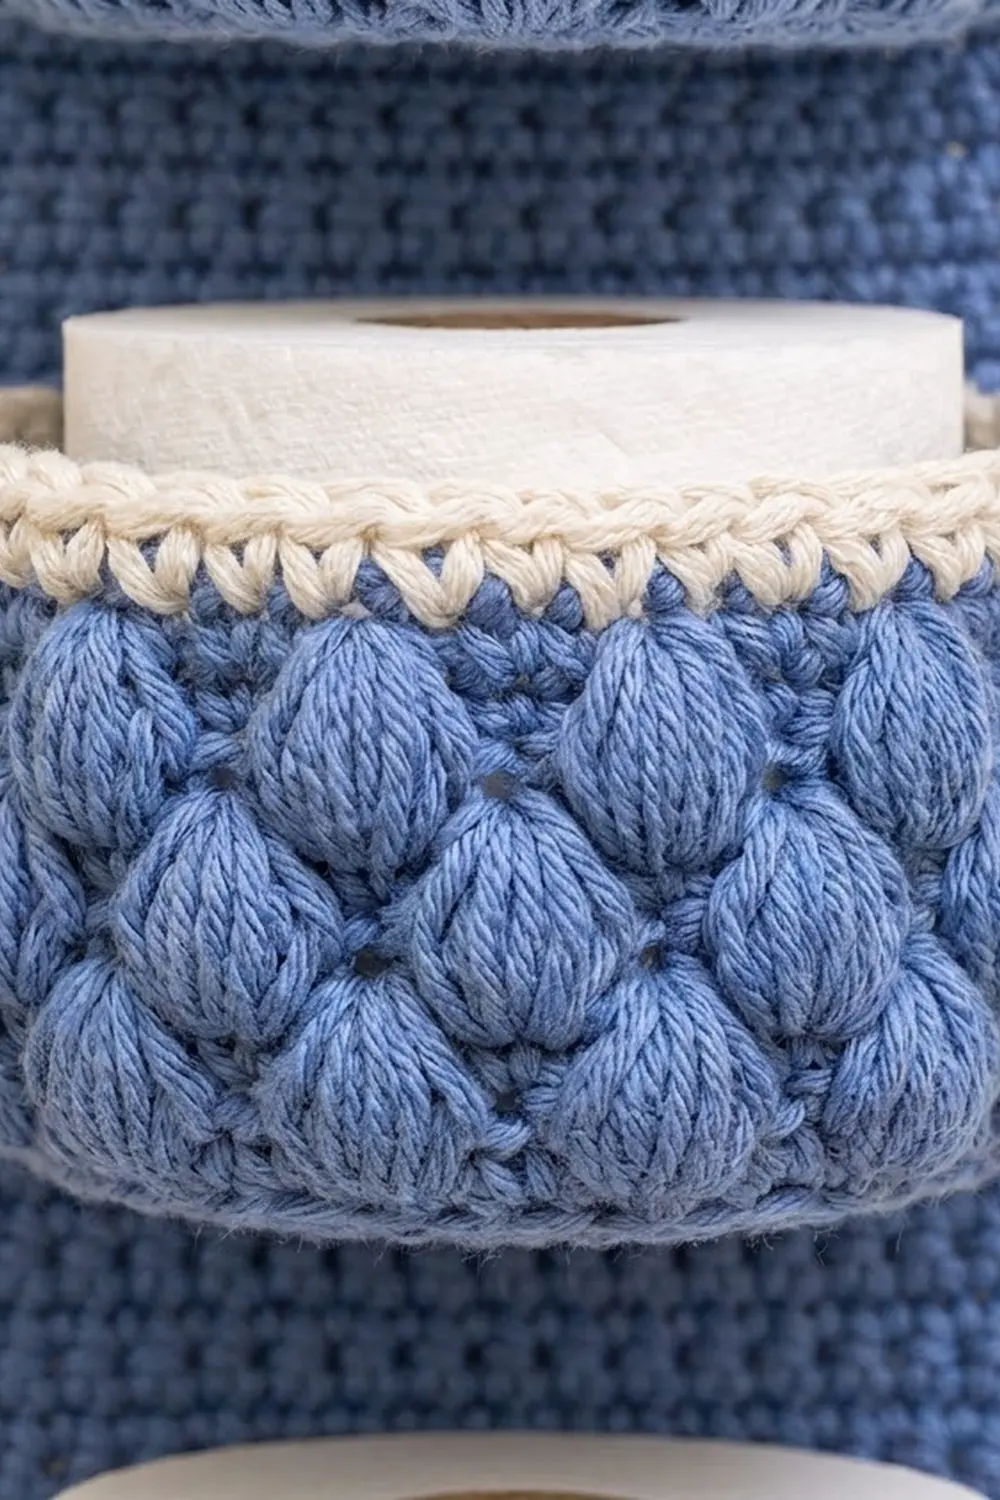
Basket (Make 3)
Oval Base
With Color A, ch 13.
Rnd 1: Sc in 2nd ch from hook and in next 10 ch, 3 sc in last ch. Working along the other side of the chain, sc in next 10 ch, 2 sc in the first ch. Join with sl st to the first sc. (26 sts)
From now on, ch 1 at the start of every round and join with a sl st to the first st. The ch 1 does not count as a st.
Rnd 2: Sc in next 10 sts, 2 sc in each of next 3 sts, sc in next 10 sts, 2 sc in each of next 3 sts. (32 sts)
Rnd 3: Sc in next 10 sts, sc in next st, 2 sc in next st 3 times, sc in next 10 sts, sc in next st, 2 sc in next st 3 times. (38 sts)
Rnds 4–10: Keep the 10 straight sc on each side and add 3 increases evenly around each curved end, so the increases fall on top of the previous round’s increases. Each round adds 6 sts.
- Rnd 4: 44 sts
- Rnd 5: 50 sts
- Rnd 6: 56 sts
- Rnd 7: 62 sts
- Rnd 8: 68 sts
- Rnd 9: 74 sts
- Rnd 10: 80 sts
Check the base against the Rnd 10 checkpoint.
Puff Walls
Rnd 11: Sc in BLO of each st around. (80 sts) This round turns the work upward and leaves a ridge of front loops on the outside.
Rnd 12: Sc in each st around. (80 sts)
Rnd 13: Puff in next st, ch 1, skip next st; rep around. Join with sl st to the top of the first puff. (40 puffs + 40 ch-1 sps = 80 sts)
Rnd 14: Sc in each puff and each ch-1 sp around. (80 sts)
Rnd 15: Sl st in next st. Puff in next st, ch 1, skip next st; rep around. (40 puffs + 40 ch-1 sps = 80 sts) This round’s puffs sit between the puffs of Rnd 13, which gives the staggered look.
Rnd 16: Rep Rnd 14. (80 sts)
Rnd 17: Rep Rnd 13. (80 sts)
Rnd 18: Rep Rnd 14. (80 sts) Fasten off Color A.
Cream Rim
Rnd 19: Join Color B in any st. Sc in each st around. (80 sts)
Rnd 20: Ch 1. Rev sc in each st around. (80 sts) Fasten off, leaving a 6 in (15.2 cm) tail, and weave it in.
The reverse sc rolls into the beaded cream edge. Each wall has 3 rows of staggered puffs.
Back Panel (Make 1)
Work the panel flat in rows, starting at the bottom point. Ch 1 and turn at the start of each row; the ch 1 does not count as a st.
With Color A, ch 2.
Row 1: 3 sc in 2nd ch from hook. (3 sts)
Row 2: 2 sc in first st, sc in next st, 2 sc in last st. (5 sts)
Rows 3–12: 2 sc in first st, sc across to the last st, 2 sc in last st. Each row adds 2 sts. Row 3 has 7 sts, and Row 12 has 25 sts.
Rows 13–76: Sc in each st across. (25 sts) That gives 64 rows, or 16 in (40.6 cm), of straight panel.
Rows 77–84: Sc2tog, sc across to the last 2 sts, sc2tog. Each row decreases by 2 sts. Row 77 has 23 sts, and Row 84 has 9 sts.
Rows 85–96: Sc in each st across. (9 sts) This 12-row tab is 3 in (7.6 cm) long. Do not fasten off; go straight into the border, or put the live loop on a marker until after joining.
Make All Pieces
- Baskets: 3 baskets, each with Color A for Rnds 1–18 and Color B for Rnds 19–20
- Panel: 1, Color A
- Tassel: 1, Color B
Layout (front view, top to bottom):
      [ ring ]
      [  tab  ]
   [ panel taper ]
[ Basket 3: rows 55–66 ]
[ Basket 2: rows 35–46 ]
[ Basket 1: rows 15–26 ]
     [ point ]
     [ tassel ]
Joining
Mark the attachment rows on the front of the panel: Rows 15 and 26, 35 and 46, and 55 and 66.
Find the back of each basket. Flatten the base and locate the middle st of one long straight side on Rnd 11. Mark that st, then count 12 sts to each side of it. Those 25 sts form the basket back.
Stitch-to-stitch logic. Both pieces have a gauge of 4 sts per inch, so 25 basket sts match the 25 panel sts exactly, one to one.
Lower seam. Use Color A and a tapestry needle. Whipstitch the 25 front-loop ridge sts below Rnd 11 to the 25 sts of the lower marked row. The basket ends overhang the panel by 0.75 in (1.9 cm) on each side.
Upper seam. Rnds 11–19 measure 2.75 in (7.0 cm), which matches 11 panel rows. Flatten the basket back against the panel. Whipstitch the same 25 back sts of Rnd 19, just below the rev sc, to the 25 sts of the upper marked row.
Tension. Pull each stitch snug but not tight. Your seams should lie flat without puckering the panel. Pin the seam before you sew it, and work from the center out to each side.
Size checkpoint. The gap between one basket’s rim and the next basket’s base should be 2.25 in (5.7 cm), or 9 rows. The panel should still measure 6.25 in (15.9 cm) wide.
Border
Border gauge: The border is one round of sc, 0.25 in (0.6 cm) deep. Along straight edges, work 1 sc per row-end. Along diagonal edges, work 3 sc per 2 row-ends.
The border goes around the outer edges of the panel only, so it does not touch the baskets.
Border Round: Ch 1 and turn so you are working along the top of Row 96.
- Top of tab: 3 sc in first st, sc in next 7 sts, 3 sc in last st. (13 sts)
- First long side, working downward:
- Tab row-ends, Rows 95–85: 1 sc each (11 sts)
- Taper row-ends, Rows 84–77: 1 sc in next row-end, 2 sc in next row-end 4 times (12 sts)
- Straight row-ends, Rows 76–13: 1 sc each (64 sts)
- Point row-ends, Rows 12–1: 1 sc in next row-end, 2 sc in next row-end 6 times (18 sts)
- Side total: 105 sts
- Point: 3 sc in the base of the foundation ch. (3 sts)
- Second long side, working upward: mirror the first side: 18 + 64 + 12 + 11 = 105 sts.
Join with a sl st to the first sc. Total: 13 + 105 + 3 + 105 = 226 sts. Fasten off.
Why the math works: With a square gauge, one sc covers one row-end exactly, so the straight edges stay flat. A diagonal row-end is about 0.35 in (0.9 cm) long, so 1.5 sc per row-end matches it. The 3-sc corners turn each point without cupping.
Finished panel: 6.75 × 24.5 in (17.1 × 62.2 cm).
Ring and Tassel
Ring: Pass the tab through the ring from front to back and fold it down 1.5 in (3.8 cm). Whipstitch the tab top to the back of the panel at Row 90. The holder now hangs 23 in (58.4 cm) from the bottom of the ring.
Tassel:
1. Wrap Color B 20 times around the 4.5 in (11.4 cm) card.
2. Tie the strands together at the top with a 12 in (30.5 cm) strand, then cut the loops at the bottom.
3. Wrap the neck tightly 0.75 in (1.9 cm) below the top.
4. Trim the tassel to 4 in (10.2 cm).
5. Sew it to the border point using the tie ends.
Final Blocking
- Lightly mist the panel only. Avoid soaking the puff walls.
- Pin the panel flat to 6.75 × 24.5 in (17.1 × 62.2 cm), with the point and taper symmetrical.
- Stuff each basket with a toilet roll or a folded towel to set its oval shape.
- Steam the cream rims lightly from 1 in (2.5 cm) above. Do not press the puffs.
- Leave everything to dry completely before you remove the pins.
- Trim and steam the tassel ends so they hang straight.
Final Quality-Control Checklist
- Each base measures 7.75 × 5 in (19.7 × 12.7 cm).
- Each basket has 80 sts in every wall round and 3 staggered puff rows.
- Each basket stands 3.25 in (8.3 cm) tall.
- The panel is 25 sts wide in the straight section and 9 sts wide at the tab.
- The border count is 226 sts.
- All three baskets are sewn on 25 sts to 25 sts, top and bottom.
- The gaps between baskets are 2.25 in (5.7 cm).
- All tails are woven in on the back.
- The holder hangs straight from the ring.
Troubleshooting
- Base cups: Your increases are drifting. Realign them over the previous round’s increases, or go up a hook size.
- Base ruffles: Go down a hook size, or check that each round adds only 6 sts.
- Puffs lean in a spiral: Always join with a sl st into the top of the first puff, not the ch-1.
- Puffs look flat: Pull up longer loops, about 0.5 in (1.3 cm).
- Panel twists: Count 25 sts every 10 rows.
- Baskets tilt forward: Tighten the upper seam, and check that it sits exactly 11 rows above the lower seam.
- Border waves on the diagonals: Work fewer 2-sc row-ends.
- Border pulls on the diagonals: Work more 2-sc row-ends.
- Holder hangs crooked: Re-sew the tab so it is centered on the ring.
Care
Hand wash in cool water and lay flat to dry, reshaping each basket around a roll. Remove the wooden ring before washing.
Final Notes
The measurement chain is short. A gauge of 16 sc = 4 in (10.2 cm) gives a 5 in (12.7 cm) deep base with 80 sts. The basket wall is 3.25 in (8.3 cm) tall. The 25-st panel is 6.25 in (15.9 cm) wide and grows to 6.75 in (17.1 cm) after the border. Each 25-st seam matches 25 panel sts. With three baskets on 11-row bands and 9-row gaps, the holder hangs 23 in (58.4 cm) from the ring.
Happy crocheting!