

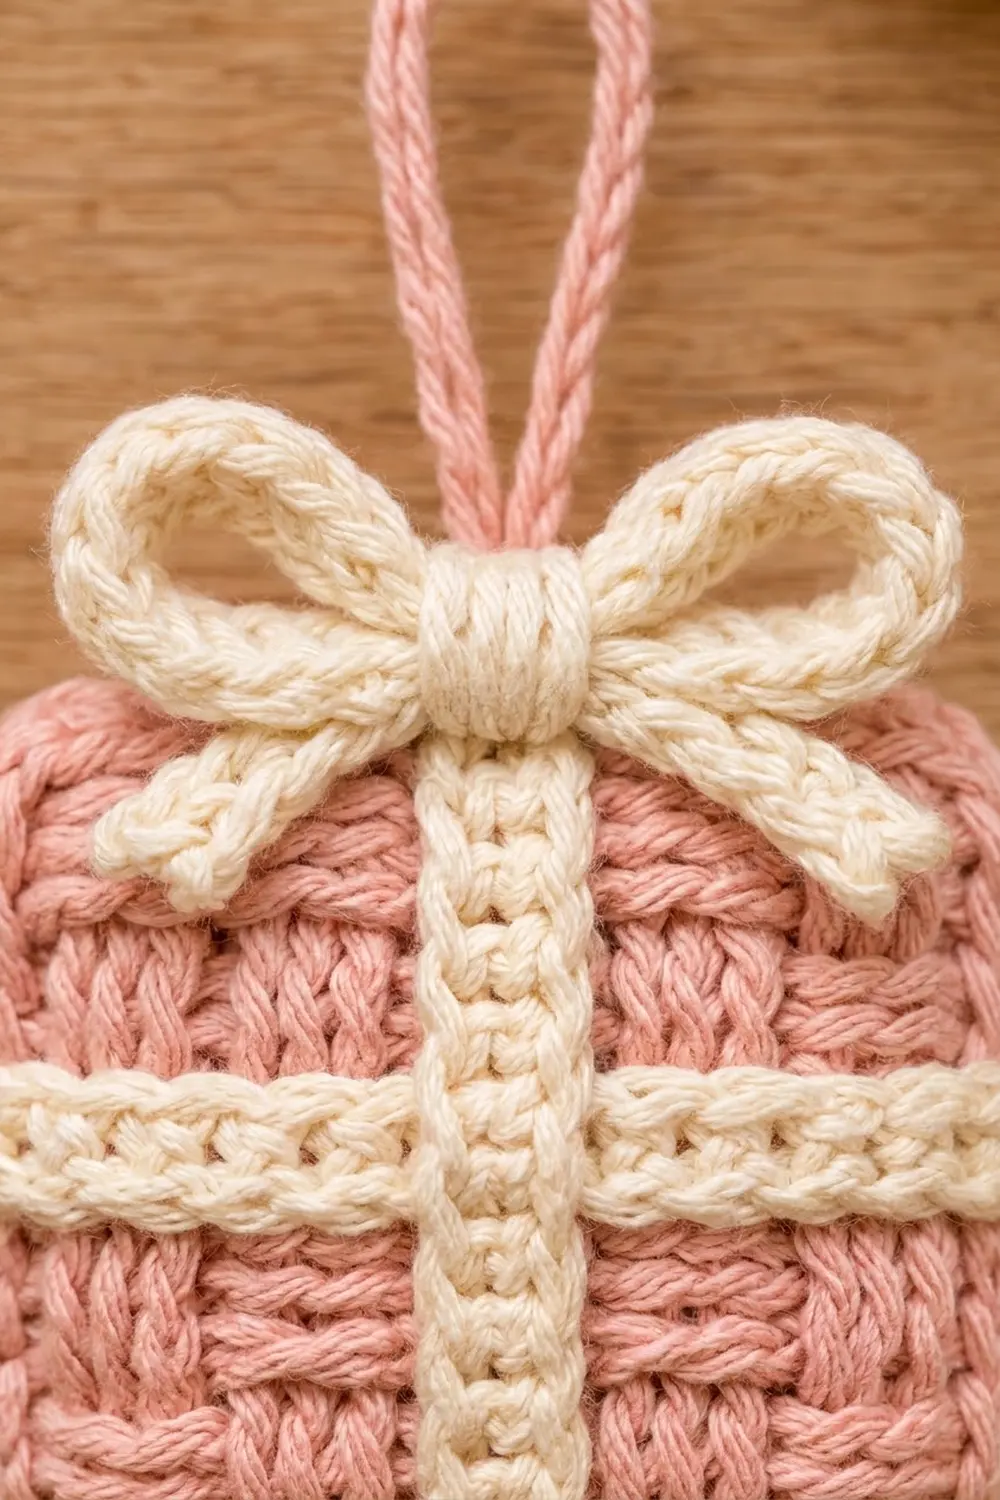
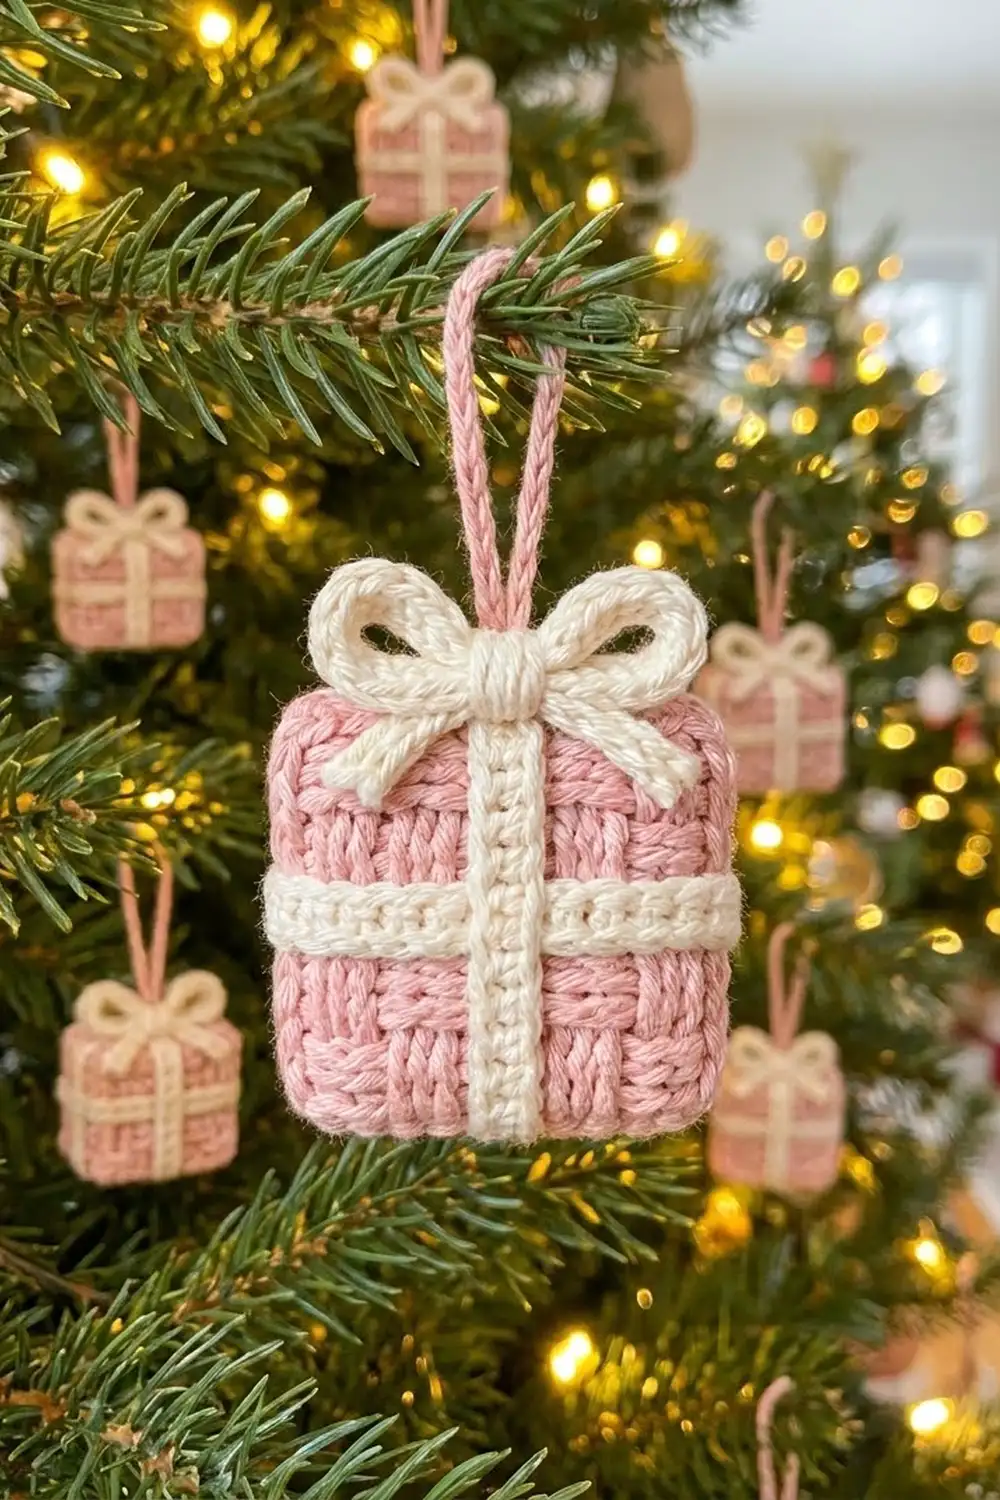
This little gift box ornament looks like a wrapped present shrunk down to tree size. Raised basketweave texture in blush pink covers the box, a cream ribbon crosses the front, and a plump two-loop bow sits on top. A pink chain loop is ready for hanging.
The colors are soft and a little vintage: dusty pink for the box and creamy off-white for the ribbon and bow. The style is cozy and textured but still neat. It works well on a pastel tree, as a gift tag, or tied to a wrapped package.
The pattern uses US crochet terms. The finished box measures 2.75 in x 2.75 in (7.0 cm x 7.0 cm) across the front and about 0.75 in (1.9 cm) deep. With the bow and hanging loop it is about 5 in (12.7 cm) tall.
Construction is simple. First you crochet a basketweave panel and edge it, then you work plain walls up from that edging to make an open box. A second panel becomes the lid. You sew the ribbon strips onto the lid, then join the lid to the walls with a single crochet border round and stuff the box lightly as you close it. The bow and hanging loop are sewn on last.
Finished Size and Construction
- Finished size (front face): 2.75 in x 2.75 in (7.0 cm x 7.0 cm)
- Depth: about 0.75 in (1.9 cm)
- Total height with bow and loop: about 5 in (12.7 cm)
- Skill level: Intermediate (post stitches, working in rounds around a panel)
- Terminology: US
- Yarn weight: DK (#3), cotton or cotton blend
- Hook: 3.5 mm (E-4)
- Number of pieces: 1 finished ornament (box base, lid, 2 ribbon strips, bow and hanging loop, all assembled into one item)
- Layout: a single box; no grid
- Basketweave panel before edging: 2.25 in (5.7 cm) square
- Panel after edging (size before border): 2.5 in (6.4 cm) square
- Border depth: about 0.125 in (0.3 cm) on each side, which brings the front to 2.75 in (7.0 cm)
Materials
Use a smooth, mercerized or soft-spun DK cotton so the basketweave and ribbon stitches stay crisp. Acrylic DK also works, but the box will be a little puffier.
- Color A, blush pink: 10 g / 23 m (25 yd), for the base, walls, lid and hanging loop
- Color B, cream: 4 g / 9 m (10 yd), for the ribbon strips and bow
These amounts include a margin of about 20% for gauge swatching and weaving in ends.
Tools
- 3.5 mm (E-4) crochet hook
- Tapestry needle
- About 3 g of polyester fiberfill
- Stitch markers (2)
- Scissors
- Pins and a small blocking mat or folded towel
Abbreviations (US Terms)
- ch – chain
- sl st – slip stitch
- sc – single crochet
- dc – double crochet
- BLO – back loop only
- st(s) – stitch(es)
- rep – repeat
- RS / WS – right side / wrong side
Special stitches
- FPdc (front post double crochet): Yarn over, insert the hook from front to back to front around the post of the stitch below, yarn over and pull up a loop, then [yarn over, pull through 2 loops] twice. The post stands out on the side facing you.
- BPdc (back post double crochet): Yarn over, insert the hook from back to front to back around the post of the stitch below, then finish like a dc. The post sinks away from the side facing you.
Gauge and Checkpoints
Make the base panel first and treat it as your gauge swatch.
- Panel gauge: 12 sts and 7 rows = 2.25 in x 2.25 in (5.7 cm x 5.7 cm) in basketweave pattern
- Checkpoint 1, after Row 7: the panel measures 2.25 in (5.7 cm) square.
- Checkpoint 2, after the edging round: the panel measures 2.5 in (6.4 cm) square.
- Checkpoint 3, after the walls: the walls stand about 0.75 in (1.9 cm) tall.
- Checkpoint 4, after the border: the front face measures 2.75 in (7.0 cm) square.
If your panel is too big, go down 0.5 mm in hook size. If it is too small, go up 0.5 mm. If the width is right but the panel is taller than it is wide, pull up each post stitch a little less and keep the turning ch-2 snug.
Base Panel (Back of the Box)
Make this with Color A.
Row 1 (WS): Ch 14. Dc in the 3rd ch from the hook and in each ch across. The skipped ch-2 does not count as a stitch. (12 dc)
Row 2 (RS): Ch 2 (does not count as a stitch here or in any later row), turn. *FPdc in each of the next 3 sts, BPdc in each of the next 3 sts; rep from * once more. (12 sts)
Row 3 (WS): Ch 2, turn. *FPdc in each of the next 3 sts, BPdc in each of the next 3 sts; rep from * once more. (12 sts)
Row 3 uses the same wording as Row 2 because you are now working from the back. A FPdc worked on the WS sinks on the RS, so each block keeps the same raised or sunken look across two rows.
Rows 4–5: Ch 2, turn. *BPdc in each of the next 3 sts, FPdc in each of the next 3 sts; rep from * once more. (12 sts per row)
Rows 6–7: Ch 2, turn. *FPdc in each of the next 3 sts, BPdc in each of the next 3 sts; rep from * once more. (12 sts per row)
You now have 4 blocks across and 3 bands of blocks up, set out like a checkerboard. Do not fasten off.
Checkpoint 1: 2.25 in (5.7 cm) square.
Edging Round
This round squares off the panel. Each corner is the middle stitch of a 3-sc group. Every side has 12 non-corner stitches, which makes 14 stitches per side when you count the 2 corner stitches.
Rnd 8 (RS): Ch 1, turn so the RS faces you.
- Top edge: 3 sc in the first st (the 2nd of these is the corner), sc in each of the next 10 sts, 3 sc in the last st (the 2nd of these is the corner).
- Left side (row ends): 2 sc in the end of Row 7, 2 sc in Row 6, 1 sc in Row 5, 2 sc in Row 4, 1 sc in Row 3, 2 sc in Row 2, 2 sc in Row 1. That is 12 non-corner sc.
- Bottom edge (foundation ch): 3 sc in the first ch (the 2nd is the corner), sc in each of the next 10 ch, 3 sc in the last ch (the 2nd is the corner).
- Right side (row ends): 2 sc in Row 1, 2 sc in Row 2, 1 sc in Row 3, 2 sc in Row 4, 1 sc in Row 5, 2 sc in Row 6, 2 sc in Row 7.
Sl st to the first sc. Count: 4 corner sts + (4 sides x 12 non-corner sts) = 52 sts, which is 14 per side including the corners.
Checkpoint 2: 2.5 in (6.4 cm) square.
Box Walls
Keep the RS of the base facing you, since it is the outside of the box. Work in continuous rounds and move a stitch marker up as you go.
Rnd 9: Ch 1, sc in the BLO of each st around. (52 sts) The unused front loops form a crisp ridge, and the fabric starts to bend upward.
Rnds 10–12: Sc in each st around. (52 sts per round)
There are no increases, so the walls rise straight. Mark the four corner stitches (the old corner stitches stacked up) if that helps. Fasten off and weave in the ends.
Checkpoint 3: The walls are about 0.75 in (1.9 cm) tall, and the box is open like a small tray.
Lid (Front of the Box)
Using Color A, repeat Rows 1–7 and Rnd 8 exactly as for the base. (52 sts, 14 per side including corners)
Do not fasten off. Pull up a long loop and remove the hook. You will use this working yarn for the border.
Ribbon Strips
Make these with Color B.
Vertical strip: Ch 16. Sc in the 2nd ch from the hook and in each ch across. (15 sc) Fasten off and leave a 10 in (25.4 cm) tail.
Horizontal strip: Make it exactly the same way. (15 sc)
Each strip is about 2.75 in (7.0 cm) long, which matches the finished front face.
Attaching: Place the lid RS up. Pin the vertical strip down the center, between stitches 6 and 7 of the 12-st panel. Pin the horizontal strip across the face so its center sits about 1.25 in (3.2 cm) above the bottom edge, which puts it just below the middle. Lay it over the vertical strip. Whipstitch along both long edges of each strip with the cream tail. Stop about 0.125 in (0.3 cm) from the lid edge so the border round can sit cleanly over the ends.
Bow
Make this with Color B.
Bow strip: Ch 31. Sc in the 2nd ch from the hook and in each ch across. (30 sc) Fasten off.
Center knot: Ch 7. Sc in the 2nd ch from the hook and in each ch across. (6 sc) Fasten off and leave an 8 in (20.3 cm) tail.
Shaping: Fold both ends of the bow strip to the middle so they overlap by 2 sts. This makes two loops of about 14 sts each. Pinch the center, wrap the center knot around it tightly, and sew its ends together at the back. The bow measures about 2 in (5.1 cm) wide.
Hanging Loop
Make this with Color A.
Ch 26. Sl st in the 2nd ch from the hook and in each ch across. (25 sl sts) Fasten off and leave a 6 in (15.2 cm) tail. The cord is about 3 in (7.6 cm) long. Folded in half, it makes a loop about 1.5 in (3.8 cm) tall.
Border (Joining Round)
Border gauge: 14 sc per side including corners = 2.75 in (7.0 cm). That works out to about 5.1 sts per inch (2.0 sts per cm) on the finished edge.
Put the lid on top of the open box with the RS of the lid facing up and the ribbon side out. Line up the lid’s 4 corner stitches with the 4 corner stitches of Rnd 12. Pin the corners.
Put the lid’s live loop back on the hook. Working through both the lid’s edging stitch and the matching Rnd 12 wall stitch:
Border Rnd: Ch 1. Sc through both layers in each st around. That is 14 sts per side including both corners, and 52 sts in all. After you have worked 3 sides, stuff the box lightly with fiberfill until it is just plump. Pack it more firmly into the corners and keep the center soft. Finish the 4th side. Sl st to the first sc and fasten off.
Why the math works: The lid edging has 52 sts and the walls have 52 sts, so the two match stitch for stitch. Each side has 14 sts, made up of 2 shared corners and 12 non-corner stitches. That gives 4 + (4 x 12) = 52, and no stitch is counted twice. Because the round adds no new stitches, the edges stay flat and do not ruffle. The sc ridge adds about 0.125 in (0.3 cm) on each side, so the 2.5 in (6.4 cm) face grows to 2.75 in (7.0 cm).
Checkpoint 4: The front face is 2.75 in (7.0 cm) square.
Final Assembly
- Fold the hanging loop in half. Sew both ends to the top border at the center, between the 7th and 8th of the 14 top-side stitches.
- Sew the bow over the loop ends at the top center. Center it over the top of the vertical ribbon so it covers the attachment point.
- Weave in all ends and hide them inside the stuffing.
Final Blocking
- Lightly mist the ornament with water. Do not soak it, because that would flatten the stuffing.
- Shape the box into a square with your fingers and push out the four corners.
- Pin it face up on the mat, checking that it measures 2.75 in (7.0 cm) on each side.
- Fluff the bow loops and pin them open in a symmetrical shape.
- Pull the hanging loop straight up and pin it to about 1.5 in (3.8 cm).
- Let it dry completely, which usually takes a few hours.
Final Quality-Control Checklist
- The basketweave blocks alternate cleanly, 4 across and 3 up, on both faces.
- Every panel round had 52 sts, with 14 per side including corners.
- The walls are straight and about 0.75 in (1.9 cm) tall.
- The front measures 2.75 in (7.0 cm) square.
- The vertical ribbon is centered and the horizontal ribbon sits just below the middle.
- The bow is centered, firm at the knot and even on both sides.
- The hanging loop is secure and about 1.5 in (3.8 cm) tall.
- No ends or stuffing show.
Troubleshooting
- The blocks blur together: Check which post stitch you used on the WS rows. Rows 2–3 and 6–7 both start with FPdc, and Rows 4–5 both start with BPdc.
- The panel is taller than it is wide: Use a smaller turning ch, or pull the post stitch loops up less.
- The edging ruffles: You have too many sts on the row-end sides. Count exactly 12 non-corner sts per side.
- The walls flare out: You worked an increase by accident. Recount to 52.
- The lid does not line up: Match the corners first, then count 12 sts between them.
- The box bulges: Remove some stuffing. The faces should stay nearly flat.
- The bow flops: Wrap the center knot tighter and add a stitch through all layers.
Care
Spot clean with cool water and mild soap, then reshape and lay flat to dry. Store the ornament flat so the bow does not get crushed.
Final Notes
The measurements build in a chain. The 12-st basketweave panel measures 2.25 in (5.7 cm). The 52-st edging brings it to 2.5 in (6.4 cm). Straight 52-st walls give the box 0.75 in (1.9 cm) of depth. The 52-st joining border finishes the front at 2.75 in (7.0 cm). If you check your gauge at each step, the lid, walls, ribbons and bow will all fit together.
Happy crocheting!