

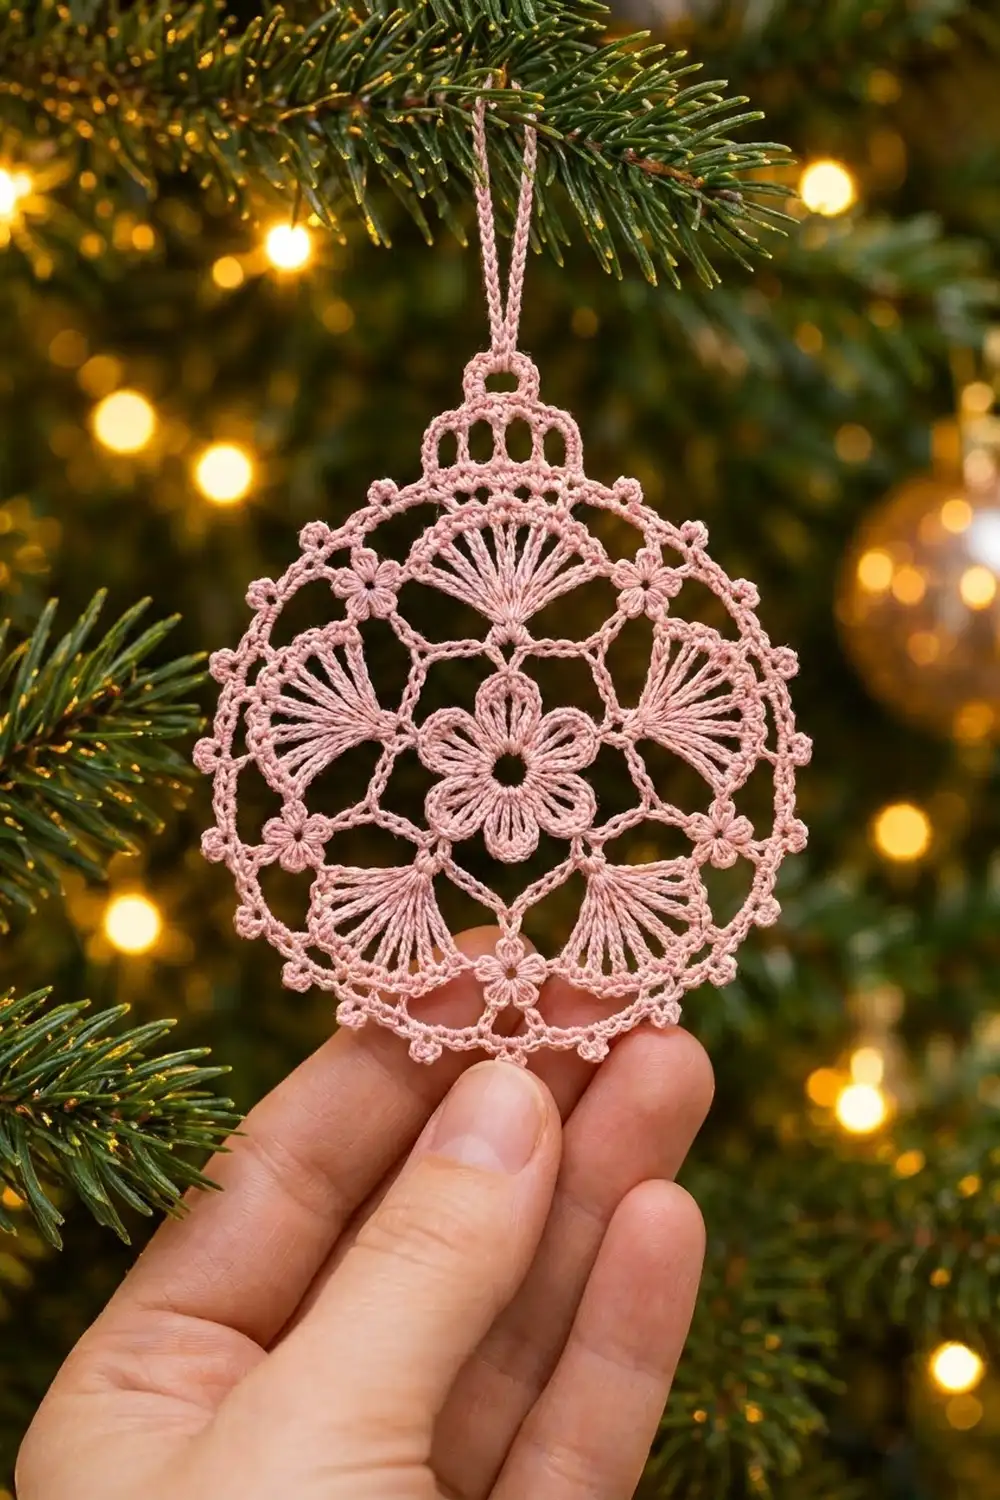
The Blush Bloom Lace Bauble is a flat lace Christmas ornament worked in fine cotton thread. It is a round lace medallion shaped like a classic bauble. A six-petal flower sits in the center, six fans of tall stitches spread out around it, small three-picot flowers mark the mesh junctions, and a picot rim finishes the edge. A small openwork cap and a hanging loop sit on top.
The sample is worked in a single soft blush pink, which gives it a vintage, heirloom feel. It looks delicate on a green tree with warm lights. Once starched, it is sturdy enough to hang year after year.
This pattern uses US crochet terms. The finished bauble measures 3.5 in (8.9 cm) across. With the cap and loop, it stands about 5 in (12.7 cm) tall.
Construction is simple. You crochet one piece in joined rounds from the center out: first the flower, then the mesh, then the fans, then the rim. You work the cap in short rows into the top of the rim and chain the hanging loop last. There is no sewing and no joining.
Finished Size and Construction
- Finished size: 3.5 in (8.9 cm) diameter; about 5 in (12.7 cm) tall including cap and loop
- Skill level: Intermediate (thread work, tall stitches, picots)
- Terminology: US crochet terms
- Yarn weight: Size 10 crochet cotton thread (Lace, weight 0)
- Hook: 1.5 mm (US steel 7)
- Number of pieces: 1
- Layout: One round motif with a cap at the top
- Piece size: 3.5 in (8.9 cm) diameter
- Size before border: 3 in (7.6 cm) diameter after Round 8
- Border depth: about 0.25 in (0.6 cm) on each side (Rounds 9–10)
Materials
Use a mercerized size 10 cotton thread. It keeps the stitches crisp and takes starch well. Avoid fuzzy or very soft threads, because they blur the fans and picots.
- Blush pink, size 10 cotton thread: about 6 g / 34 m (37 yd) per ornament
These amounts include a margin of about 20 percent for the test rounds and weaving in. One 50 g ball makes about eight ornaments.
Tools
- 1.5 mm (US steel 7) crochet hook
- Fine tapestry needle or beading needle
- Small sharp scissors
- 2 locking stitch markers
- Fabric stiffener or spray starch
- Foam blocking board, rustproof pins and a plastic sheet
Abbreviations (US Terms)
- ch – chain
- sl st – slip stitch
- sc – single crochet
- hdc – half double crochet
- dc – double crochet
- tr – treble crochet
- sc2tog – single crochet 2 together
- sk – skip
- sp(s) – space(s)
- st(s) – stitch(es)
- RS – right side
Special stitch – picot cluster (pc): Ch 3, sl st in 3rd ch from hook (1 picot made); repeat from * to * 2 more times, then sl st into the top of the last sc made. This makes a tiny three-picot flower. The second picot is the “center picot.” A pc never counts as a stitch.
Gauge and Checkpoints
Gauge: about 12 sc = 1 in (2.5 cm) in size 10 thread.
With thread, it is easier to check gauge on the ornament itself than on a separate swatch. Work Rounds 1–3 as your test, then keep measuring at each checkpoint:
- After Round 3 (flower): 1.25 in (3.2 cm) across, petal tip to petal tip
- After Round 5 (inner mesh): 1.75 in (4.4 cm)
- After Round 7 (fans): 2.75 in (7.0 cm)
- After Round 8: 3 in (7.6 cm)
- After Round 9: 3.25 in (8.3 cm)
- After Round 10: 3.5 in (8.9 cm)
Pat each round flat before you measure. Lace thread curls easily, so measure gently and don’t stretch it.
If the flower is too big, go down to a 1.25 mm (US steel 9) hook. If it is too small, go up to a 1.75 mm (US steel 6) hook. Being off by only 0.125 in (0.3 cm) at Round 3 can grow to almost 0.5 in (1.3 cm) by Round 10, so fix it early.
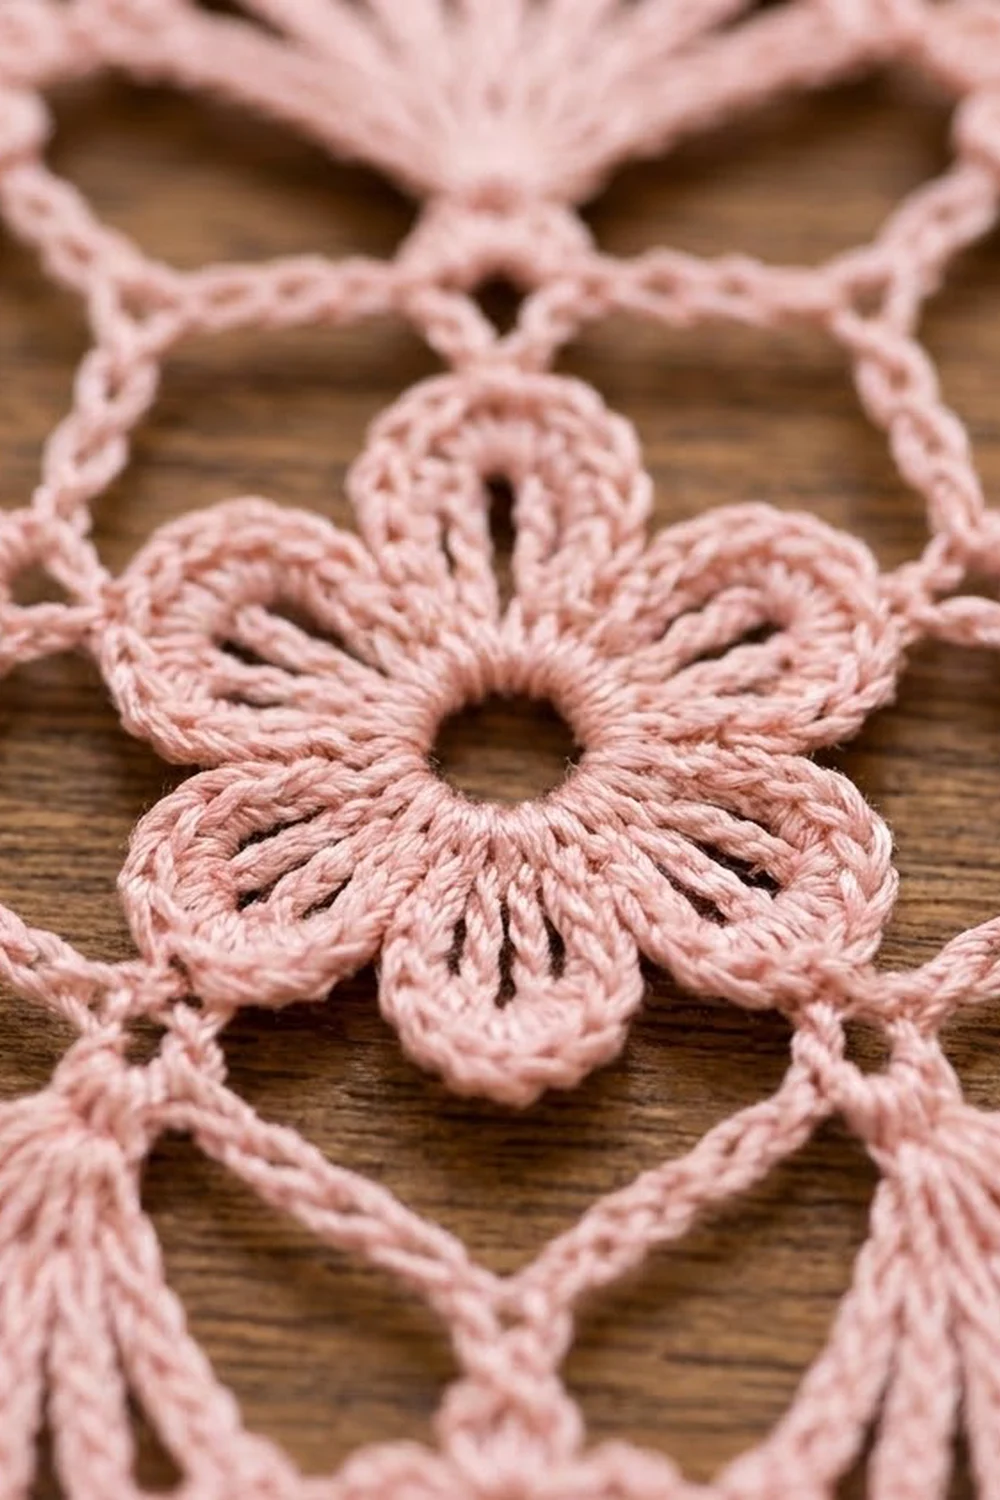
Center Flower (Rounds 1–4)
Round 1: Ch 8, sl st in first ch to form a ring. Ch 1, work 18 sc in the ring, sl st in first sc to join. (18 sc)
The ring is larger than usual, which leaves the open center hole.
Round 2: Ch 1, sc in first sc, ch 3, sk 2 sc, sc in next sc, ch 3, sk 2 sc; repeat from * 4 more times, sl st in first sc to join. (6 sc, 6 ch-3 sps)
Round 3: In each ch-3 sp around, work (sc, hdc, 3 dc, hdc, sc). Sl st in first sc to join. (6 petals; 42 sts)
Each petal has 7 sts and a rounded tip.
Round 4: Working behind the petals, sl st around the post of the first Round 2 sc. Ch 1, sc around the same post, ch 5, sc around the post of the next Round 2 sc; repeat from * 4 more times, ch 5, sl st in first sc to join. (6 sc, 6 ch-5 loops)
The ch-5 loops sit behind the flower and help it lie flat.
Inner Mesh (Round 5)
Round 5: Sl st in first ch-5 loop. Ch 1, (sc, ch 5, sc) in same loop, ch 5, (sc, ch 5, sc) in next loop, ch 5; repeat from * 4 more times, sl st in first sc to join. (12 sc, 12 ch-5 sps)
There are now two kinds of spaces. The ch-5 inside each (sc, ch 5, sc) group sits over a petal; call these A spaces. The ch-5 between the groups is a B space. There are 6 of each.
Checkpoint: 1.75 in (4.4 cm) across.
Fan Bases (Round 6)
Round 6: Sl st in the first A space. Ch 3 (counts as dc), 2 dc in same sp, ch 3, sc in next B sp, ch 3, 3 dc in next A sp, ch 3, sc in next B sp, ch 3; repeat from * 4 more times, sl st in top of beginning ch-3 to join. (18 dc, 6 sc, 12 ch-3 sps)
Each 3-dc group is the narrow base of a fan.
Fans and Picot Flowers (Round 7)
Round 7: Ch 4 (counts as tr), tr in same st, 3 tr in next dc, 2 tr in next dc (first fan made), ch 4, (sc, pc) in next sc, ch 4, 2 tr in next dc, 3 tr in next dc, 2 tr in next dc, ch 4, (sc, pc) in next sc, ch 4; repeat from * 4 more times, sl st in top of beginning ch-4 to join. (42 tr in 6 fans of 7 tr; 6 sc; 6 pc; 12 ch-4 sps)
The tall stitches open out like a fan. The pc between each pair of fans makes a tiny flower at the mesh junction.
Checkpoint: 2.75 in (7.0 cm) across.
Outer Mesh (Round 8)
Round 8: Ch 1, sc in each of first 7 tr, ch 5, sk ch-4 sp, sc in center picot of next pc, ch 5, sk ch-4 sp, sc in each of next 7 tr, ch 5, sk ch-4 sp, sc in center picot of next pc, ch 5, sk ch-4 sp; repeat from * 4 more times, sl st in first sc to join. (48 sc, 12 ch-5 sps)
Each repeat now has 7 sc across a fan, 1 sc at a picot flower, and 2 ch-5 sps.
Checkpoint: 3 in (7.6 cm) across. This is the size before the border.
Border (Rounds 9–10)
The border is one solid round of sc followed by a picot edge. It uses the main gauge of about 12 sc per in (2.5 cm), and each round adds about 0.125 in (0.3 cm) to each side.
Because the piece is round, it has 6 equal sections instead of sides. Each section runs from the start of one fan to the start of the next.
Round 9: Ch 1, sc in each of next 7 sc, 6 sc in next ch-5 sp, sc in next sc, 6 sc in next ch-5 sp; repeat from * 5 more times, sl st in first sc to join. (120 sc)
Per section: 7 + 6 + 1 + 6 = 20 sc. Six sections × 20 sc = 120 sc.
Checkpoint: 3.25 in (8.3 cm) across. The circumference is about 10.2 in (25.9 cm). At 12 sc per in, that edge holds about 122 sc, so 120 sc lie flat without ruffling or cupping.
Round 10: Ch 1, sc in each of next 5 sc, pc; repeat from * 23 more times, sl st in first sc to join. (120 sc, 24 pc)
Per section: 20 sc ÷ 5 = 4 pc. Six sections × 4 pc = 24 pc.
Why the math works: 120 divides evenly into 6 sections and into the 5-stitch picot repeat. Every fan gets the same picot spacing, and the last pc lands on the very last sc of the round.
Checkpoint: 3.5 in (8.9 cm) across, from picot tip to picot tip.
Fasten off and weave in the tail.
Cap and Hanging Loop
Lay the piece RS up with one fan pointing straight up. Find the 11 Round 10 sc centered over that fan, which is the center sc plus 5 on each side. Put a marker in the first and last of these 11 sc. Don’t count the pc in this area; fold them toward the back as you work.
Row 1: With RS facing, join thread in first marked sc. Ch 1, sc in same st and in next 10 sc. Turn. (11 sc)
Row 2: Ch 4 (counts as dc + ch 1), sk next sc, dc in next sc, ch 1, sk next sc, dc in next sc; repeat from * 3 more times. Turn. (6 dc, 5 ch-1 sps)
This row makes the open, barred band of the cap.
Row 3: Ch 1, sc in first dc, sc in next ch-1 sp, sc in next dc; repeat from * 4 more times. Work the last sc in the 3rd ch of the turning ch. Turn. (11 sc)
Row 4: Ch 1, sc2tog, sc in next 7 sc, sc2tog. Turn. (9 sts)
Row 5: Ch 1, sc2tog, sc in next 5 sc, sc2tog. Turn. (7 sts)
The cap is about 0.9 in (2.3 cm) wide at the base, about 0.6 in (1.5 cm) wide at the top, and 0.5 in (1.3 cm) tall.
Loop: Ch 1, sl st in next 3 sts. In the 4th (center) st, work sl st, ch 30, sl st in same st. Turn. Work 1 sc in each ch around the loop (30 sc), then sl st in the center st. Sl st in the last 3 sts. Fasten off.
The sc round makes the loop firm. It stands about 1 in (2.5 cm) above the cap.
Weave in all ends along the solid rim or inside the cap. Don’t weave through the fans, where the tails would show.
Final Blocking
Starching is what makes this lace hold its shape.
- Soak the ornament in cool water, then press out the water in a towel.
- Dip it in fabric stiffener or diluted liquid starch. Squeeze out the extra so no film is left in the open spaces.
- Cover the blocking board with plastic. Lay the ornament on it, RS up.
- Mark a 3.5 in (8.9 cm) circle on the board as a guide.
- Pin the 24 picot clusters to the circle. Pin in opposite pairs: top and bottom first, then left and right, then fill in the rest.
- Pin the tip of each of the 6 fans so they open out evenly.
- Shape the 6 petals and the 6 small picot flowers with your fingertips.
- Pin the cap straight and pin the loop flat in a narrow oval.
- Let it dry completely, at least 12 hours. Remove the pins gently.
Final Quality-Control Checklist
- The bauble measures 3.5 in (8.9 cm) across.
- The total height with cap and loop is about 5 in (12.7 cm).
- The center hole is open and round.
- There are 6 even petals and 6 fans of 7 tr each.
- There are 6 small picot flowers between the fans.
- Round 9 has 120 sc, and Round 10 has 24 picot clusters.
- The cap is centered over the top fan.
- The piece lies flat with no cupping or ruffling.
- All tails are hidden and trimmed.
Troubleshooting
The piece cups (bowls up). Your chains are too short or too tight. Chain more loosely, or go up one hook size for Rounds 4–8 only.
The edge ruffles. Round 9 has more than 120 sc, or your sc are tight. Recount, and make sure each ch-5 sp gets exactly 6 sc.
The fans lean to one side. Check that you worked 2, 3 and 2 tr into the three dc of each fan base. Pin the fan tips straight when blocking.
The picots are uneven. Pull each ch-3 snug before the sl st, and always sl st into the 3rd ch from the hook.
The cap is off-center. Count 5 sc on each side of the center sc above the top fan before you place the markers.
The loop twists. Work the sc round on the loop evenly, then pin it flat during blocking.
Care
Hand wash in cool water, starch again if needed, and dry flat. Store flat in tissue paper between seasons so the fans keep their shape.
Final Notes
The whole ornament depends on a short chain of measurements. The flower measures 1.25 in (3.2 cm) after Round 3. The mesh reaches 1.75 in (4.4 cm) after Round 5, the fans 2.75 in (7.0 cm) after Round 7, and the outer mesh 3 in (7.6 cm) after Round 8. The border then brings the piece to 3.25 in (8.3 cm) and finally to 3.5 in (8.9 cm). If you check each step, the cap and loop will finish the bauble at about 5 in (12.7 cm) tall.
Make one in blush pink, then try ivory, gold or soft red to fill your tree.
Happy crocheting!