

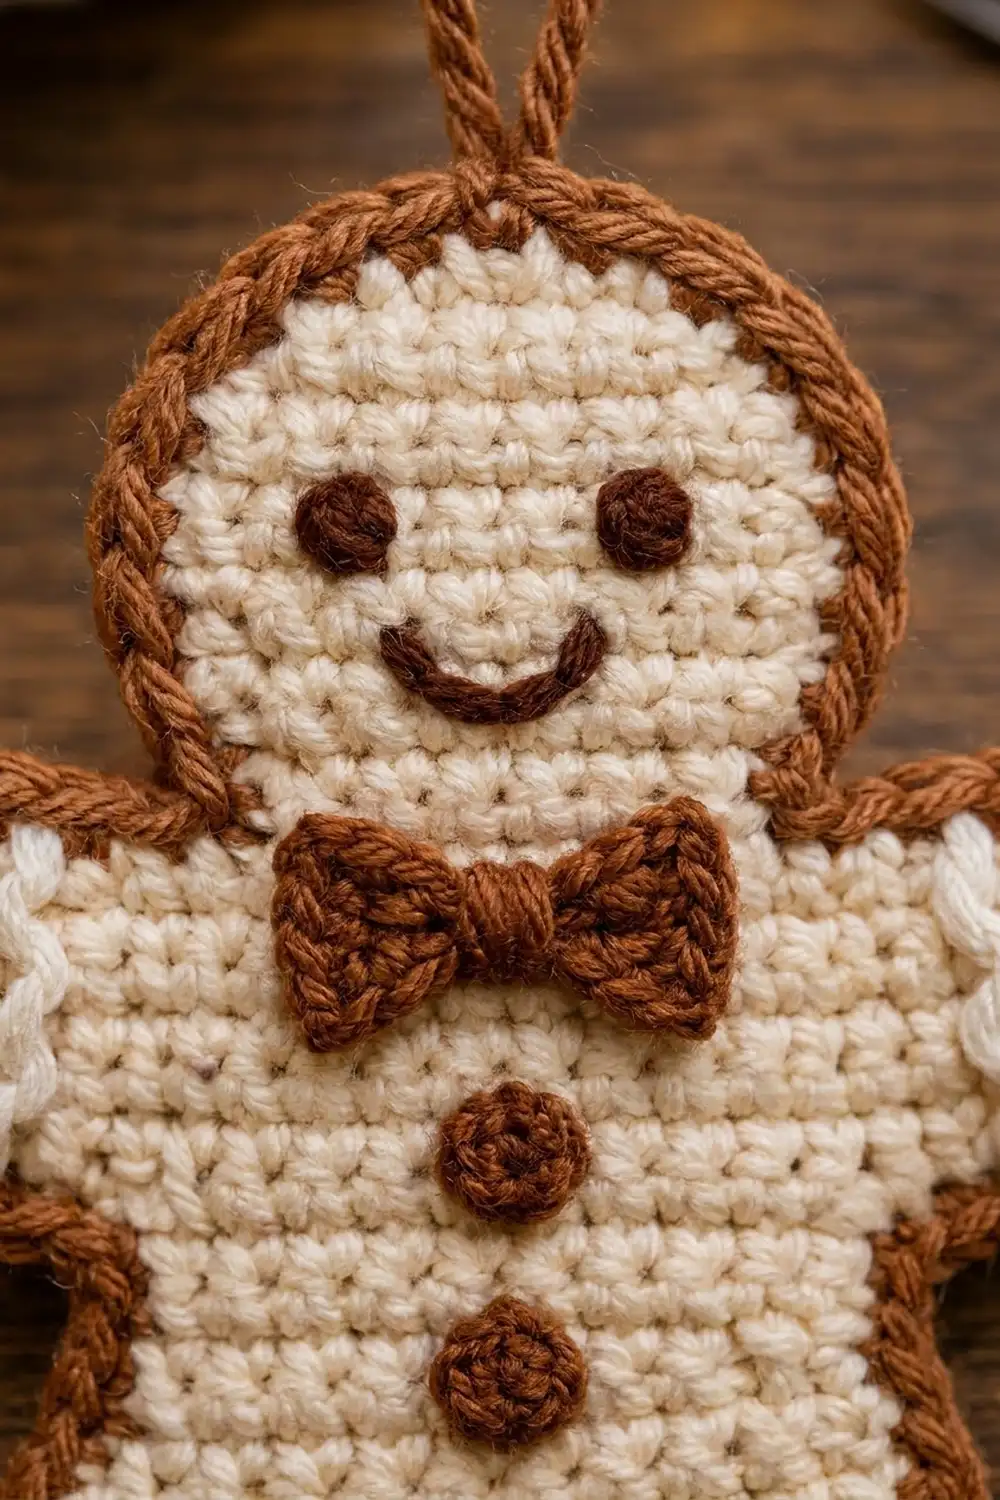
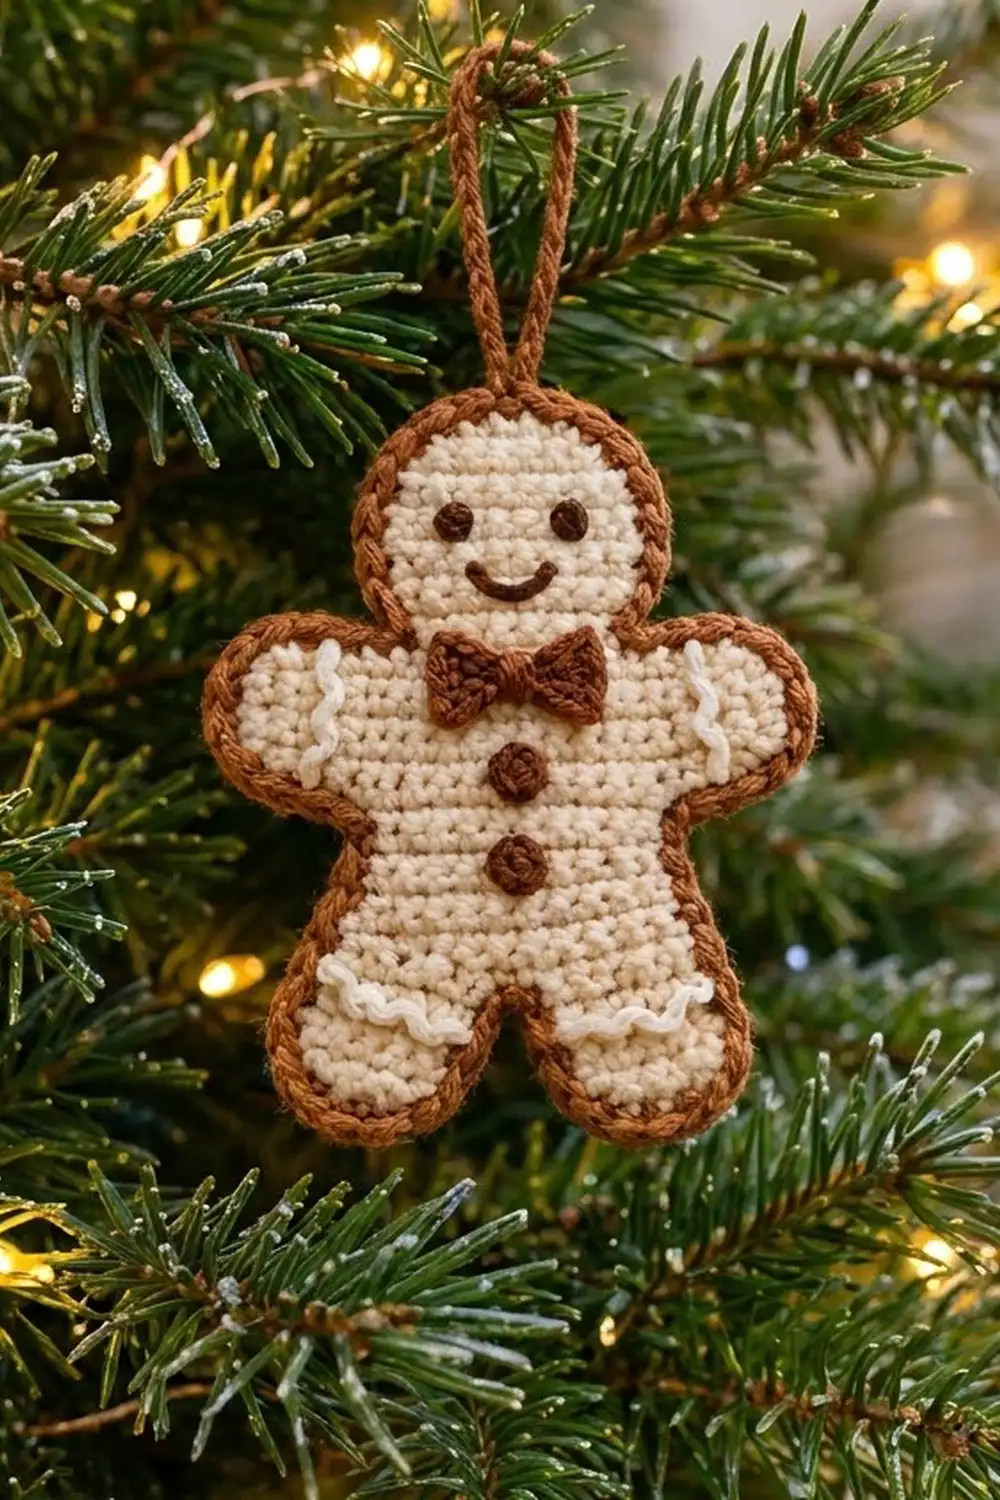
This little gingerbread man looks fresh off a holiday baking tray. He has a soft cream body and a rope-like brown edge that looks like a baked crust. A tiny bow tie, two round buttons, a stitched smile and white “icing” squiggles on his arms and legs finish him off.
The colors are simple: cream for the cookie, warm caramel brown for the crust, face, bow and buttons, and bright white for the icing. The style is flat and graphic, so he hangs neatly on a branch and also works as a gift tag.
This pattern uses US crochet terms. The finished ornament measures 5 in (12.7 cm) wide across the arms and 5.3 in (13.5 cm) tall. The hanging loop adds another 1.5 in (3.8 cm).
You work the two legs separately in rows of single crochet and then join them into one body. Next you add the arms with chains and foundation stitches and shape the neck and head. A brown two-round border goes all the way around. The bow tie and buttons are tiny appliqués sewn on top, and the face and icing are embroidered.
Finished Size and Construction
- Finished size: 5 in (12.7 cm) wide x 5.3 in (13.5 cm) tall, plus a 1.5 in (3.8 cm) loop
- Skill level: Easy to intermediate
- Terminology: US crochet terms
- Yarn weight: DK (light worsted, #3) cotton
- Hook: 3.25 mm (US D/3)
- Number of pieces: 1 flat body, plus 1 small bow tie and 2 small buttons sewn on
- Layout: A single ornament in one layer with no stuffing
- Piece size before border: 4.5 in (11.4 cm) wide x 4.8 in (12.2 cm) tall
- Border depth: About 0.25 in (0.6 cm) on every side
Materials
Choose a smooth DK-weight cotton, either mercerized or soft. Cotton shows each stitch clearly and holds the flat shape after blocking. Avoid fuzzy or brushed yarns, because they hide the texture and the icing lines.
- Cream (body): 10 g, about 23 m
- Caramel brown (border, loop, bow, buttons, face): 6 g, about 14 m
- White (icing): 2 g, about 5 m
These quantities include a margin of about 20% for swatching and embroidery tails.
Tools:
- 3.25 mm (US D/3) crochet hook
- Blunt tapestry needle
- Small scissors
- 2 stitch markers
- Ruler or tape measure
- Blocking mat and rust-proof pins
- Spray bottle with water
Abbreviations (US Terms)
- ch: chain
- sc: single crochet
- sc2tog: single crochet 2 together (decrease)
- sl st: slip stitch
- st(s): stitch(es)
- fsc: foundation single crochet
- rev sc: reverse single crochet (crab stitch)
- RS: right side
Foundation single crochet (fsc): Insert the hook into the “chain” at the base of the stitch you just made. For the first fsc, use the base of the last sc of the row. Yarn over, pull up a loop, yarn over and pull through 1 loop (this makes the new “chain”). Then yarn over and pull through both loops. Each fsc adds a stitch to the end of a row without a separate chain.
Reverse single crochet (rev sc): Work from left to right if you are right-handed. Insert the hook into the next stitch to the right, yarn over, pull up a loop, yarn over and pull through both loops. This creates the twisted, rope-like edge.
Gauge and Checkpoints
Gauge: 22 sc and 24 rows = 4 in (10.2 cm) in rows of sc with a 3.25 mm hook. That works out to 5.5 sts and 6 rows per 1 in (2.5 cm).
Make one ornament as a test piece before buying yarn for a set. Measure at each checkpoint with the piece lying flat and relaxed:
- After Row 6 (each leg): 1.45 in (3.7 cm) wide x 1 in (2.5 cm) tall
- After Row 12 (body): 3.1 in (7.9 cm) wide x 2 in (5.1 cm) tall
- After Row 17 (arms): 4.5 in (11.4 cm) wide x 2.8 in (7.1 cm) tall
- After Row 29 (head): 4.8 in (12.2 cm) tall overall, with the head 2.7 in (6.9 cm) wide
If your piece is too big: Go down to a 3.0 mm hook. If it is too small: Go up to a 3.5 mm (US E/4) hook. Fix gauge early, because an error of 0.2 in (0.5 cm) at Row 12 gets bigger with every row.
Pattern
Use cream for the whole body. Every row starts with ch 1 and turn, and the ch 1 never counts as a stitch.
Leg 1
Row 1: Ch 9, sc in 2nd ch from hook and in each ch across. (8 sc)
Rows 2–6: Ch 1, turn, sc in each st across. (8 sc)
Fasten off and set the leg aside. It should measure 1.45 in (3.7 cm) x 1 in (2.5 cm).
Leg 2
Rows 1–6: Work as for Leg 1, but do not fasten off.
Body
Row 7 (joining row): Ch 1, turn, and sc in each of the 8 sts of Leg 2. Ch 1. Place Leg 1 next to Leg 2 with Row 6 at the top and the same side facing, then sc in each of its 8 sts. (16 sc + 1 ch = 17 sts)
Row 8: Ch 1, turn, sc in next 8 sc, sc in the ch-1, sc in last 8 sc. (17 sc)
Rows 9–12: Ch 1, turn, sc in each st across. (17 sc)
Checkpoint: 3.1 in (7.9 cm) wide x 2 in (5.1 cm) tall.
Arms
Row 13: Ch 5, turn, sc in 2nd ch from hook and in next 3 ch (4 sc). Sc in each of the 17 body sts, then work 4 fsc off the end of the row. (4 + 17 + 4 = 25 sts)
Rows 14–16: Ch 1, turn, sc in each st across. (25 sc)
Row 17: Ch 1, turn, sc2tog, sc in next 21 sts, sc2tog. (23 sts)
These decreases round off the top of each hand. Checkpoint: 4.5 in (11.4 cm) wide x 2.8 in (7.1 cm) tall.
Shoulders and Neck
Row 18: Ch 1, turn, sl st in first 3 sts, sc in next 17 sts, and leave the last 3 sts unworked. (17 sc; the sl sts do not count)
Row 19: Ch 1, turn, sc2tog, sc in next 13 sts, sc2tog. (15 sts)
Row 20: Ch 1, turn, sc2tog, sc in next 11 sts, sc2tog. (13 sts)
Head
Row 21: Ch 1, turn, 2 sc in first st, sc in next 11 sts, 2 sc in last st. (15 sts)
Rows 22–26: Ch 1, turn, sc in each st across. (15 sc)
Row 27: Ch 1, turn, sc2tog, sc in next 11 sts, sc2tog. (13 sts)
Row 28: Ch 1, turn, sc2tog, sc in next 9 sts, sc2tog. (11 sts)
Row 29: Ch 1, turn, sc2tog, sc in next 7 sts, sc2tog. (9 sts)
Fasten off and weave in the cream ends. Checkpoint: 4.8 in (12.2 cm) tall, with the head 2.7 in (6.9 cm) wide.
Border
Border gauge: Work 1 sc in each stitch along the top and bottom edges and 1 sc in each row-end along the sides. The fabric has 5.5 sts and 6 rows per inch, and those rates are close enough for the edge to lie flat.
With the RS facing, join caramel brown with a sl st in the first st of Row 29.
Round 1: Ch 1. Work the sections below in order:
- Head top: 2 sc in first st, sc in next 7 sts, 2 sc in last st. (11 sc)
- Head side: 1 sc in each row-end of Rows 28 down to 18. (11 sc)
- Arm top: 1 sc in each of the 3 sl sts of Row 18. (3 sc)
- Hand: 2 sc in the Row 17 row-end, 1 sc in each row-end of Rows 16–14, and 2 sc in the Row 13 row-end. (7 sc)
- Arm underside: 1 sc in the base of each of the 4 arm sts. (4 sc)
- Body side: 1 sc in each row-end of Rows 12 down to 7. (6 sc)
- Leg outer side: 1 sc in each row-end of Rows 6 down to 1. (6 sc)
- Foot: 3 sc in the first foundation ch, sc in next 6 ch, 3 sc in the last ch. (12 sc)
- Leg inner side: 1 sc in each row-end of Rows 1–6. (6 sc)
- Crotch: 1 sc in the ch-1 of Row 7. (1 sc)
Now work the second half in mirror order: leg inner side, foot, leg outer side, body side, arm underside, hand, arm top and head side. Join with a sl st to the first sc.
Round 1 count: Each half has 11 + 3 + 7 + 4 + 6 + 6 + 12 + 6 = 55 sc. Two halves make 110 sc. Add the 11 head-top sc and the 1 crotch sc for a total of 122 sc.
Round 2: Ch 1, rev sc in each st around. (122 rev sc) Join with a sl st to the first rev sc and fasten off.
Why the math works: Extra stitches go only at the outer corners: 2 at the head top, 2 at each hand and 4 at each foot. The inside corners at the neck, armpits and crotch get no extras, so they stay crisp. Round 2 is worked one stitch into each stitch, so it adds texture without changing the count. Together the two rounds add 0.25 in (0.6 cm) per side. The width grows from 4.5 in (11.4 cm) to 5 in (12.7 cm), and the height from 4.8 in (12.2 cm) to 5.3 in (13.5 cm).
Hanging Loop
Join brown with a sl st in the center (6th) sc of the head top. Ch 20, then sl st in the same st. Fasten off and tie the tails firmly at the back. The loop stands about 1.5 in (3.8 cm) tall.
Appliqués and Embroidery
Bow Tie (brown)
Row 1: Ch 6, sc in 2nd ch from hook and in each ch across. (5 sc)
Rows 2–4: Ch 1, turn, sc in each st across. (5 sc)
Fasten off, leaving a 10 in (25.4 cm) tail. Wrap the tail tightly around the center 5 times to pinch the piece into a bow shape, then secure it. The bow is about 0.9 in (2.3 cm) wide.
Buttons (make 2, brown)
Round 1: Make a magic ring, work 6 sc into the ring, pull it closed and sl st to the first sc. (6 sc)
Leave an 8 in (20.3 cm) tail. Each button is about 0.3 in (0.8 cm) across.
Placement
- Bow tie: Center it over Rows 18–19, just below the neck.
- Buttons: Place them on the 9th (center) st of the body, one on Row 14 and one on Row 10.
- Eyes: Work brown French knots (wrap 3 times) on Row 25, in st 5 and st 11.
- Smile: Backstitch a brown curve on Row 23 from st 6 to st 10, lifting the ends by half a row.
Sew the appliqués on through their edge stitches so the stitching hides underneath.
White Icing
Backstitch with a single strand of white:
- Hands: A vertical zigzag with 3 small peaks from Row 13 to Row 17, inside the border
- Legs: A horizontal wave with 3 small peaks across Row 3, from st 2 to st 7
Keep the icing stitches relaxed so they don’t pucker the cream fabric.
Final Blocking
- Weave in all remaining tails through stitches of the same color.
- Lay the ornament RS up on a blocking mat.
- Mist it until damp, not soaked.
- Pin it to 5 in (12.7 cm) x 5.3 in (13.5 cm), with the arms level and the legs angled slightly outward.
- Add pins at the neck and armpits to keep the inside corners sharp.
- Ease the rev sc edge so it rolls outward evenly.
- Let it dry completely (6–8 hours) before unpinning.
Final Quality-Control Checklist
- The body measures 4.5 in (11.4 cm) x 4.8 in (12.2 cm) before the border
- Border Round 1 has 122 sc, and Round 2 has 122 rev sc
- Both hands match, and both feet match
- The eyes are level, and the smile is centered under them
- The bow tie sits straight over the neck
- The buttons line up on the center stitch
- The icing lines mirror each other from left to right
- The loop is centered and tied firmly
- The finished piece lies flat at 5 in (12.7 cm) x 5.3 in (13.5 cm)
Troubleshooting
The border ruffles: You probably worked extra sc into the row-ends. Use exactly 1 sc per row-end.
The border cups inward: Your border tension is tighter than the body. Go up one hook size for the border only.
The head looks square: Check that Rows 27–29 use sc2tog rather than skipped stitches, then pin the head round when blocking.
The rev sc edge looks flat: Make sure you are working in the reverse direction and twisting the hook slightly as you pull up each loop.
The embroidery puckers: Embroider on a flat surface and leave each stitch slightly loose.
Care
Hand wash in cool water with mild soap, press the water out in a towel and dry flat. Store the ornament flat and out of sunlight so the cream stays bright.
Final Notes
Here is the measurement chain from start to finish. Each leg is 1.45 in (3.7 cm) wide, and the joined body is 3.1 in (7.9 cm) wide. The arms bring the width to 4.5 in (11.4 cm), and the head finishes the body at 4.8 in (12.2 cm) tall. The 122-stitch border adds 0.25 in (0.6 cm) per side, giving a finished ornament of 5 in (12.7 cm) x 5.3 in (13.5 cm). If each checkpoint matches, your gingerbread man will hang flat and even on the tree.
Happy crocheting!