

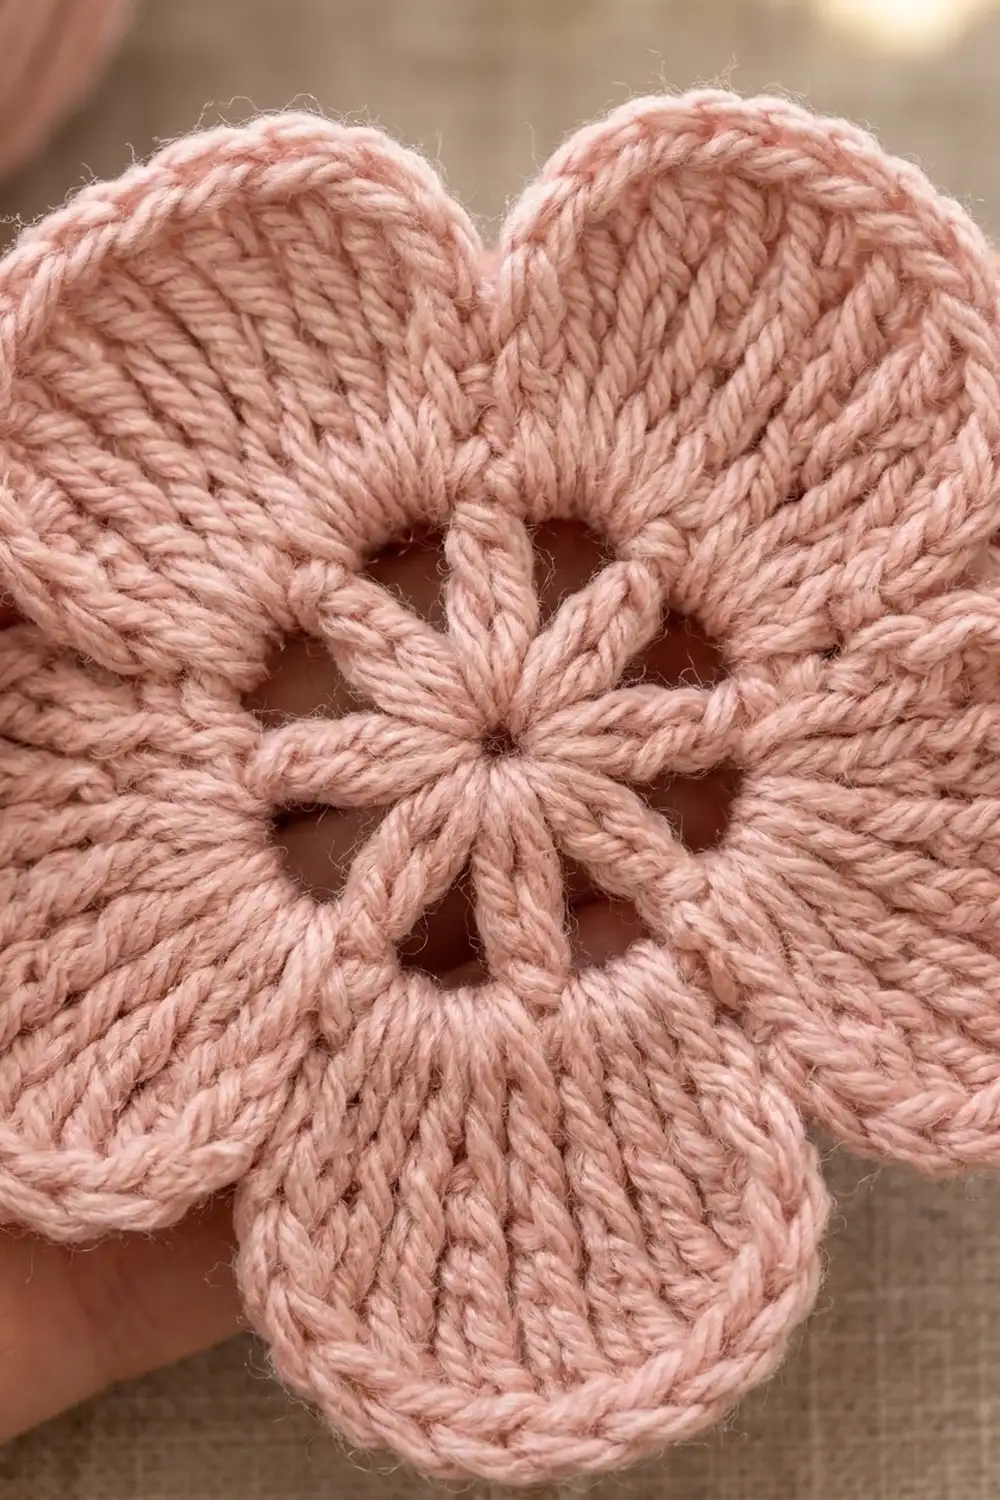
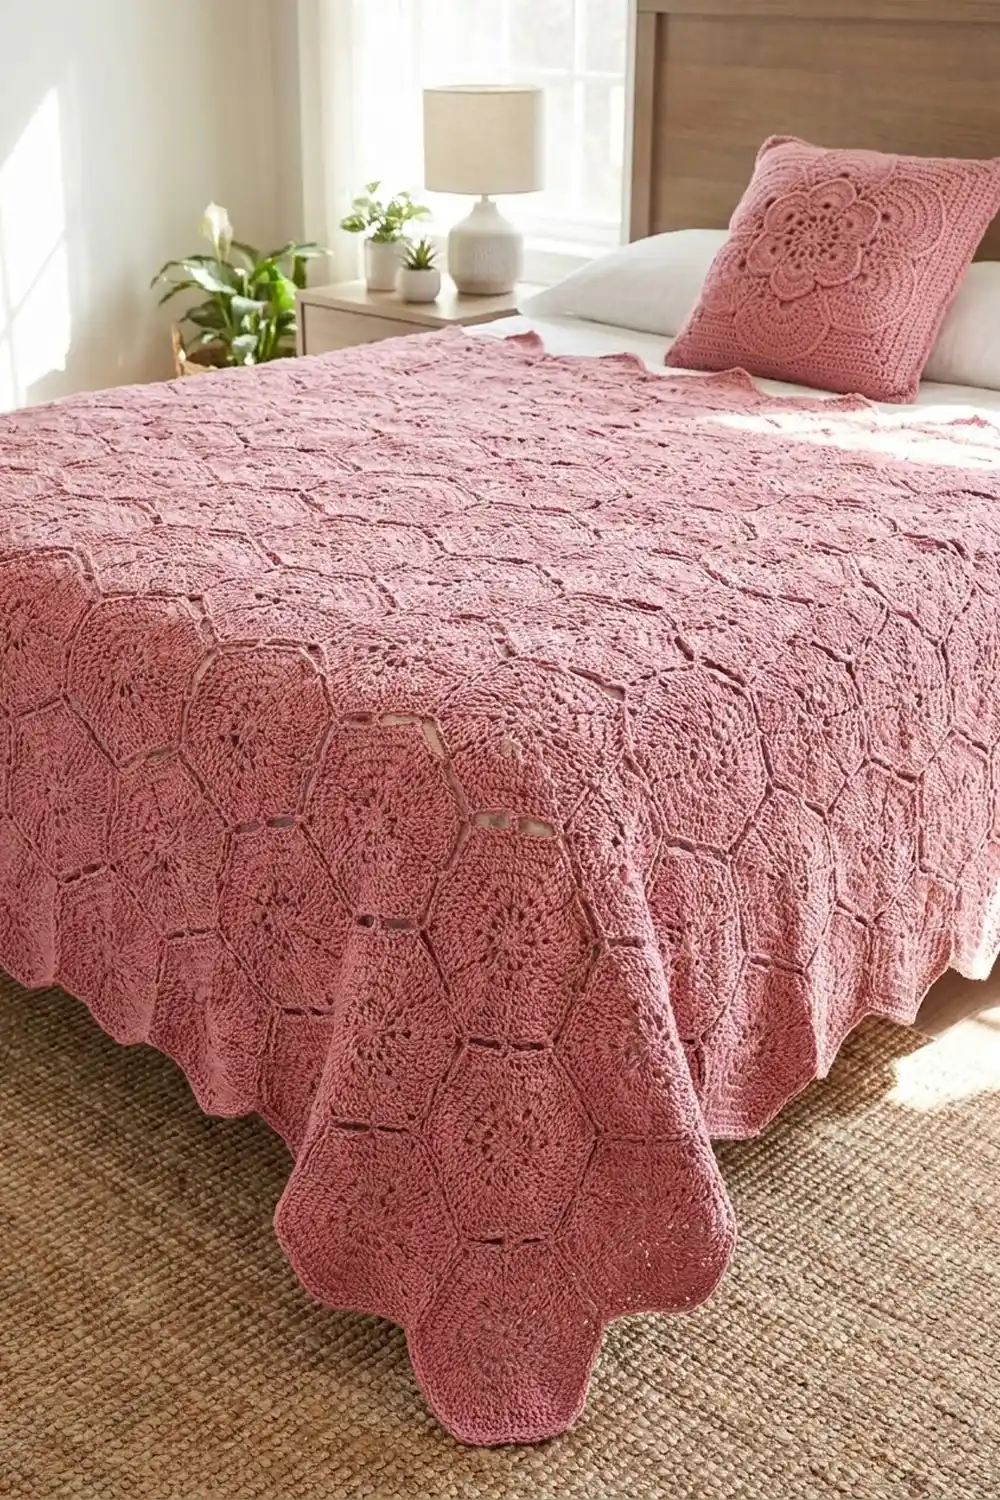
The Blush Blossom Bedspread is a soft, open, romantic coverlet built from one simple idea: a six-petal flower repeated across the whole bed. Each flower has a small lacy center with six windows, solid fan-shaped petals, and a crisp single crochet rim that outlines every curve.
The whole piece is worked in one color, a warm dusty rose pink. Because there are no color changes, the texture does the work. The petals read as smooth, rounded shapes, and the small gaps between joined flowers keep the bedspread light and airy.
This pattern uses US crochet terms. The finished bedspread measures about 85 in x 89.8 in (215.9 cm x 228.1 cm) after the border. It covers the top of a full or queen bed with some drape. Each flower measures 6 in (15.2 cm) from one petal tip to the opposite tip.
You crochet each flower in five rounds. The first flower is finished on its own. Every flower after that is joined as you go during its last round, linked at the petal tips in an offset honeycomb layout. Two border rounds then follow the scalloped outer edge.
Finished Size and Construction
- Finished size: about 85 in x 89.8 in (215.9 cm x 228.1 cm)
- Skill level: Intermediate
- Terminology: US crochet terms
- Yarn weight: Worsted (#4), cotton or cotton blend
- Hook: 5 mm (H-8)
- Number of pieces: 230 flower motifs, joined as you go
- Layout: 17 offset rows, alternating 14 flowers and 13 flowers
- Piece size: 6 in (15.2 cm) tip to tip, about 5.6 in (14.2 cm) flat to flat
- Size before border: 84 in x 88.8 in (213.4 cm x 225.6 cm)
- Border depth: about 0.5 in (1.3 cm), 2 rounds
Materials
Choose a smooth worsted cotton or cotton blend with good stitch definition. Cotton keeps the petals crisp and the windows open. A soft acrylic also works, but the flowers will be a little fluffier and may grow slightly larger.
- Dusty rose pink: 1,800 g / about 3,420 m (3,740 yd), based on 100 g / 190 m (208 yd) skeins
One flower uses about 12 m (13.1 yd), or roughly 6.3 g, including tails. The border uses about 220 m (241 yd). The total above includes a margin of about 10% for gauge differences and swatching.
Tools:
- 5 mm (H-8) crochet hook
- Tapestry needle
- Scissors
- Stitch markers
- Measuring tape
- Blocking mats, rust-proof pins, and a spray bottle
Abbreviations (US Terms)
- ch – chain
- sl st – slip stitch
- sc – single crochet
- dc – double crochet
- sp – space
- st(s) – stitch(es)
- rev sc – reverse single crochet (crab stitch)
Special stitch – tip join: At a petal tip, work this instead of ch 2: ch 1, sl st in the ch-2 tip sp of the matching petal on the finished neighbor, ch 1. This links the two tips without adding bulk.
Reverse single crochet: Working from left to right (if you crochet right-handed), insert the hook in the next st to the right, pull up a loop, yarn over, and pull through both loops.
Gauge and Checkpoints
Make one complete flower before anything else and block it lightly. Your test flower must measure 6 in (15.2 cm) from one petal tip to the opposite tip.
Base gauge: 16 sc = 4 in (10.2 cm) with a 5 mm hook.
Check these diameters as you go:
- After Round 1: 1.75 in (4.4 cm)
- After Round 2: 3 in (7.6 cm)
- After Round 3: 4.25 in (10.8 cm)
- After Round 4: 5.5 in (14.0 cm)
- After Round 5: 6 in (15.2 cm) tip to tip
If your flower is larger than 6 in (15.2 cm), go down a hook size. If it is smaller, go up a hook size. Being off by only 1/4 in (0.6 cm) per flower adds up to 3.5 in (8.9 cm) across 14 flowers, so match gauge now.
Flower Motif
Work in joined rounds with the right side facing. Do not turn.
Round 1: Make a magic ring. Ch 3 (counts as dc), 11 dc in ring. Join with sl st to top of beginning ch-3. Pull the ring closed. (12 dc)
Round 2: Ch 3 (counts as dc), dc in next st, ch 3; dc in each of next 2 sts, ch 3; repeat from * 4 more times. Join with sl st to top of beginning ch-3. (12 dc in 6 pairs, 6 ch-3 sps)*
The six ch-3 spaces become the six windows of the center, and the dc pairs form the spokes between them.
Round 3: Sl st in first ch-3 sp. Ch 3 (counts as dc), 6 dc in same sp; sc in the gap between the 2 dc of the next pair; 7 dc in next ch-3 sp, sc in the gap between the 2 dc of the next pair; repeat from * 4 more times. Join with sl st to top of beginning ch-3. (42 dc + 6 sc = 48 sts)*
Each 7-dc fan is the base of one petal. The sc sits between petals and anchors the valley.
Round 4: Ch 3 (counts as dc), dc in same st, 2 dc in each of next 6 dc, sc in next sc; 2 dc in each of next 7 dc, sc in next sc; repeat from * 4 more times. Join with sl st to top of beginning ch-3. (84 dc + 6 sc = 90 sts; 14 dc per petal)*
The petals are now full, rounded fans.
Round 5 (rim): Ch 1, sc in same st and in next 3 dc, 2 sc in each of next 3 dc, ch 2 (tip), 2 sc in each of next 3 dc, sc in next 4 dc, sl st in next sc; sc in next 4 dc, 2 sc in each of next 3 dc, ch 2, 2 sc in each of next 3 dc, sc in next 4 dc, sl st in next sc; repeat from * 4 more times. Join with sl st to first sc. Fasten off. (120 sc + 6 ch-2 tips + 6 sl sts; 20 sc per petal)*
Each petal now has 10 sc on each side of its tip. These 10-sc halves are used in the border count.
Petal names: Lay the flower right side up with one tip pointing left. Round 5 starts on that petal and travels counterclockwise. In order, the petals are: Petal 1 = W (left), Petal 2 = SW, Petal 3 = SE, Petal 4 = E (right), Petal 5 = NE, Petal 6 = NW.
Make All Pieces
You need 230 flowers, all in dusty rose pink:
- Odd rows (1, 3, 5 … 17): 9 rows x 14 flowers = 126 flowers
- Even rows (2, 4, 6 … 16): 8 rows x 13 flowers = 104 flowers
Only the first flower is completed separately. All the others are joined during Round 5.
Layout grid (O = flower; even rows are shifted half a flower to the right):
Row 17: O O O O O O O O O O O O O O   (14)
Row 16:  O O O O O O O O O O O O O    (13)
Row 15: O O O O O O O O O O O O O O   (14)
  ...   pattern continues ...
Row 3:  O O O O O O O O O O O O O O   (14)
Row 2:   O O O O O O O O O O O O O    (13)
Row 1:  O O O O O O O O O O O O O O   (14)
Joining
Join as you go. Build from Row 1 upward and work each row from left to right.
Row 1: Make Flower 1 complete. For each next flower in the row, work Rounds 1–4. Then on Round 5, replace the ch 2 at Petal 1 (W) with a tip join to Petal 4 (E) of the flower on its left.
Even rows: The first flower sits between the first two flowers of the row below. On Round 5, join its Petal 2 (SW) to Petal 5 (NE) of the lower-left flower, and its Petal 3 (SE) to Petal 6 (NW) of the lower-right flower. Every flower after the first also joins Petal 1 (W) to Petal 4 (E) of its left neighbor.
Odd rows (3 and up): The first flower joins only its Petal 3 (SE) to Petal 6 (NW) of the first flower in the row below. Middle flowers join Petal 1 (W), Petal 2 (SW), and Petal 3 (SE). The last flower joins Petal 1 (W) and Petal 2 (SW) only.
Stitch-to-stitch logic: Joins happen only at the ch-2 tips. No stitches are added or removed, so every flower keeps exactly 20 sc per petal. Each flower touches at most 6 neighbors, one per petal, which leaves small triangular gaps where three flowers meet.
Tension: Make the ch 1 on each side of the join the same height as a normal chain. Tight joins pull the tips together and make the gaps pucker. Loose joins let the flowers drift apart.
Size checkpoint: Rows are spaced 5.2 in (13.2 cm) center to center.
- After Row 1: 84 in (213.4 cm) wide, 5.6 in (14.2 cm) tall
- After Row 2: 10.8 in (27.4 cm) tall
- After Row 5: 26.4 in (67.1 cm) tall
- After Row 17: 88.8 in (225.6 cm) tall
Weave in tails as you finish each flower. Leave a 6 in (15.2 cm) tail and weave it through the rim, not across the windows.
Border
The border follows the scalloped edge, so the flower shapes stay visible. The border gauge is the same as the motif gauge: one border sc goes into each rim sc.
Border rules:
- Sc in each free rim sc.
- Work 3 sc in each free ch-2 tip.
- Skip the rim sl st in each valley between two petals of the same flower.
- At a joined tip on the outer edge, sc in the last sc of one flower, then sc directly in the first free sc of the next flower. Do not work into the join.
Count per flower type:
- Free petal = 20 sc + 3 tip sc = 23 sts
- Half petal (one side of a joined tip) = 10 sts
- Corner flower (Row 1 or 17, first or last): 10 + 23 + 23 + 23 + 23 + 10 = 112 sts
- Bottom or top edge flower (Rows 1 and 17, flowers 2–13): 10 + 23 + 23 + 10 = 66 sts
- Odd-row side flower (Rows 3–15, first or last): 10 + 23 + 23 + 23 + 10 = 89 sts
- Even-row side flower (Rows 2–16, first or last): 10 + 23 + 10 = 43 sts
Round 1: With the right side facing, join yarn at the tip of Petal 1 on the bottom-left corner flower. Sc around, following the rules above. Join with sl st to first sc.
- Bottom edge: 12 flowers x 66 = 792 sts
- Top edge: 12 flowers x 66 = 792 sts
- Left side: (7 x 89) + (8 x 43) = 623 + 344 = 967 sts
- Right side: 967 sts
- Corners: 4 x 112 = 448 sts
- Total: 792 + 792 + 967 + 967 + 448 = 3,966 sts
Round 2: Ch 1, rev sc in each st around. Join with sl st to first st. Fasten off. (3,966 sts)
Why the math works: Each rim sc gets exactly one border stitch, so the edge length doesn’t change and the edge stays flat. The 3 sc at each free tip turn the curve without cupping, and skipping the valley sl st lets each scallop dip naturally. Round 2 puts one stitch into each stitch, so it adds a corded edge without adding length. Together the 2 rounds add about 0.5 in (1.3 cm) on each side. That takes the piece from 84 in x 88.8 in (213.4 cm x 225.6 cm) to 85 in x 89.8 in (215.9 cm x 228.1 cm).
Final Blocking
- Weave in any remaining tails, including the border tail.
- Lay the bedspread on a clean floor or on several blocking mats. Work in sections if you are short on space.
- Mist one section evenly until the yarn is damp but not soaking.
- Open each center window with your fingertips and smooth each petal into a round fan.
- Pin the outer petal tips first. Check that each bottom-edge flower measures 6 in (15.2 cm) tip to tip.
- Measure the width at several points. Aim for 85 in (215.9 cm) everywhere.
- Let each section dry completely before you unpin it and move to the next.
Final Quality-Control Checklist
- All 230 flowers are present: 9 rows of 14 and 8 rows of 13.
- Every flower measures 6 in (15.2 cm) tip to tip.
- Every flower has 6 open windows and 6 petals of 20 sc.
- All joins sit exactly at the petal tips, with no joins skipped.
- Border Round 1 has 3,966 sts, and Round 2 matches.
- The finished size is about 85 in x 89.8 in (215.9 cm x 228.1 cm).
- All tails are woven in securely, and none show in the windows.
Troubleshooting
Center windows close up: The ch-3 in Round 2 is too tight. Chain more loosely, or work the chains on a larger hook.
Petals ruffle: The Round 4 dc are too loose. Use a hook 0.5 mm smaller for Round 4 only.
Petals cup: Round 5 is too tight. Loosen your tension, or use a hook 0.5 mm larger for the rim.
Flowers twist out of line: A petal was joined to the wrong neighbor. Make sure Petal 1 points left before you start Round 5.
Border ripples: You added extra stitches at the joins. Recount one flower against the counts above.
Border pulls in: You skipped tip increases. Make sure each free tip has 3 sc.
Care
Hand wash, or machine wash on a gentle cold cycle in a laundry bag. Dry flat and reshape the petals while damp. Don’t hang it wet, because the weight will stretch the joins.
Final Notes
The measurement chain is simple. One flower measures 6 in (15.2 cm). Fourteen flowers make 84 in (213.4 cm) across. Seventeen rows spaced 5.2 in (13.2 cm) apart make 88.8 in (225.6 cm) long. Two border rounds of 3,966 sts add 0.5 in (1.3 cm) per side, for a finished size of 85 in x 89.8 in (215.9 cm x 228.1 cm). Get the first flower right, and the rest follows.
Happy crocheting!